
Uk Manual
Page 1
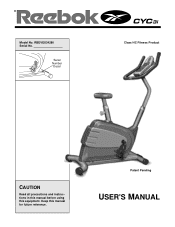
Patent Pending USER'S MANUAL Keep this equipment. RBEVEX34280 Serial No. Serial Number Decal Class HC Fitness Product CAUTION Read all precautions and instructions in this manual before using this manual for future reference. ® Model No.
Patent Pending USER'S MANUAL Keep this equipment. RBEVEX34280 Serial No. Serial Number Decal Class HC Fitness Product CAUTION Read all precautions and instructions in this manual before using this manual for future reference. ® Model No.

Uk Manual
Page 2
TABLE OF CONTENTS IMPORTANT PRECAUTIONS 3 BEFORE YOU BEGIN 4 ASSEMBLY 5 HOW TO OPERATE THE EXERCISE CYCLE 9 MAINTENANCE AND TROUBLE-SHOOTING 12 EXERCISE GUIDELINES 12 PART LIST 14 EXPLODED DRAWING 15 2
TABLE OF CONTENTS IMPORTANT PRECAUTIONS 3 BEFORE YOU BEGIN 4 ASSEMBLY 5 HOW TO OPERATE THE EXERCISE CYCLE 9 MAINTENANCE AND TROUBLE-SHOOTING 12 EXERCISE GUIDELINES 12 PART LIST 14 EXPLODED DRAWING 15 2
Uk Manual
Page 3
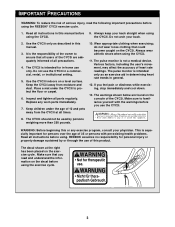
... the exercise cycle. Replace any exercise program, consult your physician. Various factors, including the user's movement, may affect the accuracy of heart rate readings. Use the CYC3i indoors on the CYC3i. do not wear loose clothing that all users of the CYC3i are found on the console of the CYC3i. REEBOK assumes no responsibility for in-home use the CYC3i in this manual before...
... the exercise cycle. Replace any exercise program, consult your physician. Various factors, including the user's movement, may affect the accuracy of heart rate readings. Use the CYC3i indoors on the CYC3i. do not wear loose clothing that all users of the CYC3i are found on the console of the CYC3i. REEBOK assumes no responsibility for in-home use the CYC3i in this manual before...
Uk Manual
Page 4
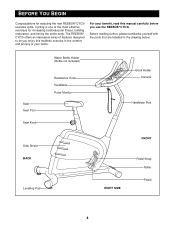
... let you enjoy this manual carefully before you use the REEBOK® CYC3i. Seat Seat Post Seat Knob Water Bottle Holder (Bottle not included) Resistance Knob Handlebar Pulse Monitor Book Holder Console Handlebar Post Side Shield BACK Levelling Pad FRONT RIGHT SIDE Pedal Strap Roller Pedal 4 For your home. BEFORE YOU BEGIN Congratulations for increasing cardiovascular fitness, building endurance, and toning the entire body. The REEBOK® CYC3i offers an...
... let you enjoy this manual carefully before you use the REEBOK® CYC3i. Seat Seat Post Seat Knob Water Bottle Holder (Bottle not included) Resistance Knob Handlebar Pulse Monitor Book Holder Console Handlebar Post Side Shield BACK Levelling Pad FRONT RIGHT SIDE Pedal Strap Roller Pedal 4 For your home. BEFORE YOU BEGIN Congratulations for increasing cardiovascular fitness, building endurance, and toning the entire body. The REEBOK® CYC3i offers an...
Uk Manual
Page 5
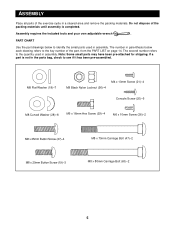
... exercise cycle in a cleared area and remove the packing materials. PART CHART Use the part drawings below each drawing refers to identify the small parts used in assembly. ASSEMBLY Place all parts of the part, from the PART LIST on page 14. The second number refers to see if it has been pre-assembled. M8 Flat Washer (18)-7 M8 Black Nylon Locknut (56)-4 M4 x 10mm Screw (21)-4 Console Screw...
... exercise cycle in a cleared area and remove the packing materials. PART CHART Use the part drawings below each drawing refers to identify the small parts used in assembly. ASSEMBLY Place all parts of the part, from the PART LIST on page 14. The second number refers to see if it has been pre-assembled. M8 Flat Washer (18)-7 M8 Black Nylon Locknut (56)-4 M4 x 10mm Screw (21)-4 Console Screw...
Uk Manual
Page 6
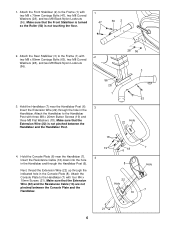
...the Frame (1) with three M8 x 20mm Button Screws (19) and three M8 Flat Washers (18). Make sure that the Extension Wire (22) is not touching the floor. 1 47 50 2 2. Attach the Rear Stabiliser (3) to the Handlebar (7) with 2 two M8 x 80mm Carriage Bolts (63), two M8 Curved Washers (28...Front Stabiliser is turned so the Roller (50) is not pinched between the Console Plate and the Handlebar. 19 6 18 8 22 Hole 16 7 Hole 7 6 21 6 Attach the Console Plate to the Frame (1) with four M4 x 10mm Screws (21). Make sure that the Extension Wire (22) and the Resistance Cable (16) ...
...the Frame (1) with three M8 x 20mm Button Screws (19) and three M8 Flat Washers (18). Make sure that the Extension Wire (22) is not touching the floor. 1 47 50 2 2. Attach the Rear Stabiliser (3) to the Handlebar (7) with 2 two M8 x 80mm Carriage Bolts (63), two M8 Curved Washers (28...Front Stabiliser is turned so the Roller (50) is not pinched between the Console Plate and the Handlebar. 19 6 18 8 22 Hole 16 7 Hole 7 6 21 6 Attach the Console Plate to the Frame (1) with four M4 x 10mm Screws (21). Make sure that the Extension Wire (22) and the Resistance Cable (16) ...
Uk Manual
Page 7
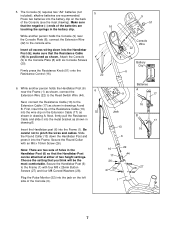
... shown in drawing B. Batteries A 9 17 Next, connect the Resistance Cable (16) to the console wire. Jack 16 B 17 Insert the Handlebar post (6) into the Handlebar Post (6); Attach the Console (9) to pinch the wires and cables. Firmly press the Resistance Knob (51) onto the Resistance Control (16). 5 16 7 20 9 51 Console Wire 22 16 8 Battery Clip 6 6. alkaline batteries are two sets of two height settings. Press two batteries into the battery clip on the back...
... shown in drawing B. Batteries A 9 17 Next, connect the Resistance Cable (16) to the console wire. Jack 16 B 17 Insert the Handlebar post (6) into the Handlebar Post (6); Attach the Console (9) to pinch the wires and cables. Firmly press the Resistance Knob (51) onto the Resistance Control (16). 5 16 7 20 9 51 Console Wire 22 16 8 Battery Clip 6 6. alkaline batteries are two sets of two height settings. Press two batteries into the battery clip on the back...
Uk Manual
Page 8
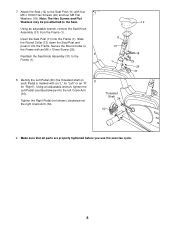
... Screws and Flat Washers may be pre-attached to the Frame (1). 11 13 1 8. Slide the Round Collar (13) down the Seat Post and press it into the right Crank Arm (34). 8 Threaded Shaft 34 40 12 18 29 26 31 9. Using an adjustable wrench, remove the Seat Knob Assembly (31) from the Frame (1). Make sure that all parts are properly tightened before you use the exercise...
... Screws and Flat Washers may be pre-attached to the Frame (1). 11 13 1 8. Slide the Round Collar (13) down the Seat Post and press it into the right Crank Arm (34). 8 Threaded Shaft 34 40 12 18 29 26 31 9. Using an adjustable wrench, remove the Seat Knob Assembly (31) from the Frame (1). Make sure that all parts are properly tightened before you use the exercise...
Uk Manual
Page 9
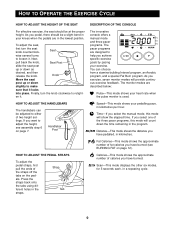
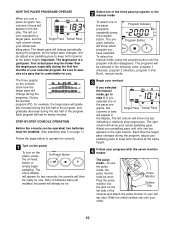
.... If you achieve specific exercise goals by pacing your knees when the pedals are in the program. Strap Tab DESCRIPTION OF THE CONSOLE The innovative console offers a manual mode and three pacer programs. The pacer programs are described below: Pulse-This mode shows your pedalling pace, in a repeating cycle. 9 Speed-This mode shows your heart rate when the pulse monitor is used. Press the straps back onto the tabs using different holes in kilometres...
.... If you achieve specific exercise goals by pacing your knees when the pedals are in the program. Strap Tab DESCRIPTION OF THE CONSOLE The innovative console offers a manual mode and three pacer programs. The pacer programs are described below: Pulse-This mode shows your pedalling pace, in a repeating cycle. 9 Speed-This mode shows your heart rate when the pulse monitor is used. Press the straps back onto the tabs using different holes in kilometres...
Uk Manual
Page 10
... minutes. STEP-BY-STEP CONSOLE OPERATION Before the console can be operated, two batteries must be installed. (See assembly step 5 on page 7.) Follow the steps below to operate the console. 1 Turn on the power To turn on the power, press On/Reset Button the on the Clothes Clip left side of the console and attach the pulse monitor to keep both columns at the same height. 4 Follow your exercise program. The programs will last...
... minutes. STEP-BY-STEP CONSOLE OPERATION Before the console can be operated, two batteries must be installed. (See assembly step 5 on page 7.) Follow the steps below to operate the console. 1 Turn on the power To turn on the power, press On/Reset Button the on the Clothes Clip left side of the console and attach the pulse monitor to keep both columns at the same height. 4 Follow your exercise program. The programs will last...
Uk Manual
Page 11
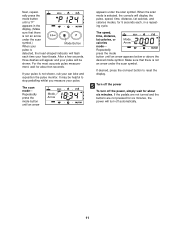
... arrow under the scan symbol. The speed, time, distance, fat calories, or Mode calories Arrow mode- If desired, press the on/reset button to stop pedalling whilst you measure your pulse is selected, the console will be helpful to reset the display. 5 Turn off the power To turn off the power, simply wait for six minutes, the power will flash each , in the display. (Make sure that there is...
... arrow under the scan symbol. The speed, time, distance, fat calories, or Mode calories Arrow mode- If desired, press the on/reset button to stop pedalling whilst you measure your pulse is selected, the console will be helpful to reset the display. 5 Turn off the power To turn off the power, simply wait for six minutes, the power will flash each , in the display. (Make sure that there is...
Uk Manual
Page 12
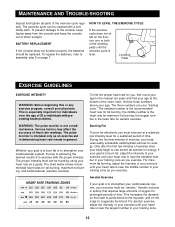
... or any exercise program, consult your "training zone." WARNING: The pulse monitor is the recommended heart rate for energy. BATTERY REPLACEMENT If the console does not function properly, the batteries should be found by using your exercise until the exercise cycle is level. The smallest number is not a medical device. The pulse monitor is near the middle number in general. For maximum fat burning, adjust the intensity of direct sunlight...
... or any exercise program, consult your "training zone." WARNING: The pulse monitor is the recommended heart rate for energy. BATTERY REPLACEMENT If the console does not function properly, the batteries should be found by using your exercise until the exercise cycle is level. The smallest number is not a medical device. The pulse monitor is near the middle number in general. For maximum fat burning, adjust the intensity of direct sunlight...
Uk Manual
Page 13
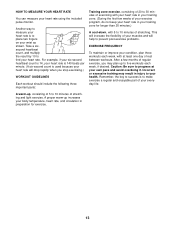
... is used because your heart rate will help to 10 minutes of your exercise program, do not keep your heart rate in injury to five workouts each week, with 5 to prevent post-exercise problems. EXERCISE FREQUENCY To maintain or improve your health. This will increase the flexibility of your muscles and will drop rapidly when you may result in your training zone for exercise...
... is used because your heart rate will help to 10 minutes of your exercise program, do not keep your heart rate in injury to five workouts each week, with 5 to prevent post-exercise problems. EXERCISE FREQUENCY To maintain or improve your health. This will increase the flexibility of your muscles and will drop rapidly when you may result in your training zone for exercise...
Uk Manual
Page 14
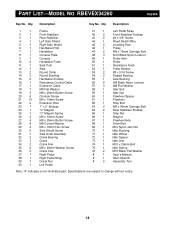
... Screw 30 5 Side Shield Screw 31 1 Seat Knob Assembly 32 2 Crank Bearing 33 1 Crank 34 2 Crank Arm 35 2 M8 x 20mm Washer Screw 36 2 Crank Cap 37 1 Right Pedal 38 1 Right Pedal Strap 39 1 Crank Nut 40 1 Left Pedal 41 1 Left Pedal Strap 42 2 Front Stabiliser Endcap 43 2 #4 x 3/8" Screw 44 1 Reed Switch/Wire 45 2 Levelling Pad 46 1 Pulley 47 2 M8 x 70mm Carriage Bolt 48 3 M10 Black Nylon Locknut 49 1 Roller Axle 50 1 Roller 51 1 Resistance Knob 52 1 Pulse Monitor 53 2 #8 x 5/16 Screw...
... Screw 30 5 Side Shield Screw 31 1 Seat Knob Assembly 32 2 Crank Bearing 33 1 Crank 34 2 Crank Arm 35 2 M8 x 20mm Washer Screw 36 2 Crank Cap 37 1 Right Pedal 38 1 Right Pedal Strap 39 1 Crank Nut 40 1 Left Pedal 41 1 Left Pedal Strap 42 2 Front Stabiliser Endcap 43 2 #4 x 3/8" Screw 44 1 Reed Switch/Wire 45 2 Levelling Pad 46 1 Pulley 47 2 M8 x 70mm Carriage Bolt 48 3 M10 Black Nylon Locknut 49 1 Roller Axle 50 1 Roller 51 1 Resistance Knob 52 1 Pulse Monitor 53 2 #8 x 5/16 Screw...
Uk Manual
Page 15
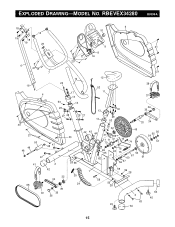
EXPLODED DRAWING-MODEL NO. RBEVEX34280 R0399A 18 19 18 19 15 23 5 51 9 21 8 16 20 6 21 7 21 10 12 22 38 16 52 4 17 11 13 37 53 14 26 13 18 36 35 30 21 50 49 48 47 41 68 40 48 47 2 27 28 30 28 27 29 14 53 33 42 43 44 26 32 46 31 66 17 71 72 70 73 74 28 56 69 65 62 76 48 75 54 67 60 61 56 57 42 32 34 39 35 36 25 24 1 59 56 28 58 56 28 3 63 45 64 34 56 55 54 57 64 45 15
EXPLODED DRAWING-MODEL NO. RBEVEX34280 R0399A 18 19 18 19 15 23 5 51 9 21 8 16 20 6 21 7 21 10 12 22 38 16 52 4 17 11 13 37 53 14 26 13 18 36 35 30 21 50 49 48 47 41 68 40 48 47 2 27 28 30 28 27 29 14 53 33 42 43 44 26 32 46 31 66 17 71 72 70 73 74 28 56 69 65 62 76 48 75 54 67 60 61 56 57 42 32 34 39 35 36 25 24 1 59 56 28 58 56 28 3 63 45 64 34 56 55 54 57 64 45 15

Uk Manual
Page 16
REEBOK and the Vector Logo are registered trademarks and service marks of Reebok. This product is manufactured and distributed under license from Reebok International. Part No. 152468 R0399A © 1999 Printed in Taiwan
REEBOK and the Vector Logo are registered trademarks and service marks of Reebok. This product is manufactured and distributed under license from Reebok International. Part No. 152468 R0399A © 1999 Printed in Taiwan


