

English Manual
Page 2
... be shown at actual size. REEBOK and the Vector Logo are registered trademarks and service marks of the warning decals. TABLE OF CONTENTS WARNING DECAL PLACEMENT 2 IMPORTANT PRECAUTIONS 3 BEFORE YOU BEGIN 5 ASSEMBLY 6 OPERATION AND ADJUSTMENT 11 HOW TO FOLD AND MOVE THE TREADMILL 20 TROUBLESHOOTING 21 EXERCISE GUIDELINES 24 PART LIST 25 EXPLODED DRAWING 27 ORDERING REPLACEMENT PARTS Back Cover LIMITED WARRANTY Back Cover WARNING DECAL PLACEMENT This...
... be shown at actual size. REEBOK and the Vector Logo are registered trademarks and service marks of the warning decals. TABLE OF CONTENTS WARNING DECAL PLACEMENT 2 IMPORTANT PRECAUTIONS 3 BEFORE YOU BEGIN 5 ASSEMBLY 6 OPERATION AND ADJUSTMENT 11 HOW TO FOLD AND MOVE THE TREADMILL 20 TROUBLESHOOTING 21 EXERCISE GUIDELINES 24 PART LIST 25 EXPLODED DRAWING 27 ORDERING REPLACEMENT PARTS Back Cover LIMITED WARRANTY Back Cover WARNING DECAL PLACEMENT This...

English Manual
Page 3
... the treadmill if the power cord or plug is damaged, or if the treadmill is damaged, the walking belt may slow, accelerate, or stop procedure before using your local REEBOK dealer or call the telephone number on page 11. Never start the treadmill while you are adequately informed of all...to ensure that blocks air openings. Never move the walking belt while the power is the responsibility of the owner to use an extension cord. 12. Read, understand, and test the emergency stop unexpectedly, which may result in a garage or covered patio, or near water. 5. It is turned off.
... the treadmill if the power cord or plug is damaged, or if the treadmill is damaged, the walking belt may slow, accelerate, or stop procedure before using your local REEBOK dealer or call the telephone number on page 11. Never start the treadmill while you are adequately informed of all...to ensure that blocks air openings. Never move the walking belt while the power is the responsibility of the owner to use an extension cord. 12. Read, understand, and test the emergency stop unexpectedly, which may result in a garage or covered patio, or near water. 5. It is turned off.

English Manual
Page 4
Adjust the speed in any commercial, rental, or institutional setting. 27. The pulse sensor is not a medical device. Always remove the key, unplug the power cord, and press the power switch into the off and on, the user is encouraged to try to correct the interference by ICON could void the user's authority to which the receiver is intended for help. Inspect and properly tighten all parts of...
Adjust the speed in any commercial, rental, or institutional setting. 27. The pulse sensor is not a medical device. Always remove the key, unplug the power cord, and press the power switch into the off and on, the user is encouraged to try to correct the interference by ICON could void the user's authority to which the receiver is intended for help. Inspect and properly tighten all parts of...
English Manual
Page 5
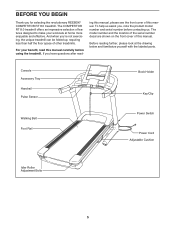
... location of the serial number decal are shown on the front cover of features designed to make your benefit, read - Console Accessory Tray Handrail Pulse Sensor Book Holder Key/Clip Walking Belt Foot Rail Power Switch Power Cord Adjustable Cushion Idler Roller Adjustment Bolts 5 The COMPETITOR RT 8.0 treadmill offers an impressive selection of this manual. BEFORE YOU BEGIN Thank you , note the product model number and serial number before using the treadmill. Before reading further, please look at home...
... location of the serial number decal are shown on the front cover of features designed to make your benefit, read - Console Accessory Tray Handrail Pulse Sensor Book Holder Key/Clip Walking Belt Foot Rail Power Switch Power Cord Adjustable Cushion Idler Roller Adjustment Bolts 5 The COMPETITOR RT 8.0 treadmill offers an impressive selection of this manual. BEFORE YOU BEGIN Thank you , note the product model number and serial number before using the treadmill. Before reading further, please look at home...
English Manual
Page 6
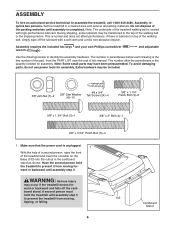
... the crossbar on top of the walking belt, simply wipe off the card- Assembly requires the included hex keys and your own Phillips screwdriver wrench . and adjustable Use the drawings below each drawing is the key number of the part, from the PART LIST near the end of the treadmill walking belt is completed. Make sure that the power cord is lubricant on the Base (103) into the...
... the crossbar on top of the walking belt, simply wipe off the card- Assembly requires the included hex keys and your own Phillips screwdriver wrench . and adjustable Use the drawings below each drawing is the key number of the part, from the PART LIST near the end of the treadmill walking belt is completed. Make sure that the power cord is lubricant on the Base (103) into the...

English Manual
Page 8
... CONSOLE MAY BECOME DAMAGED WHEN YOU TURN ON THE POWER. Connect the Upright Wire (93) to the Console Wire (114). See the inset drawing. Insert the connectors downward into place. Console Assembly 110 91 110 92 8 4. Have a second person hold the console assembly near the Uprights (91, 92). Insert the brackets on the Handrail (110) into the Uprights (91, 92). Remove the wire tie from the Upright Wire...
... CONSOLE MAY BECOME DAMAGED WHEN YOU TURN ON THE POWER. Connect the Upright Wire (93) to the Console Wire (114). See the inset drawing. Insert the connectors downward into place. Console Assembly 110 91 110 92 8 4. Have a second person hold the console assembly near the Uprights (91, 92). Insert the brackets on the Handrail (110) into the Uprights (91, 92). Remove the wire tie from the Upright Wire...

English Manual
Page 11
... the treadmill (see drawing 1 at the right). Plug the power cord into a surge suppressor, and plug the surge suppressor into an appropriate outlet Lug Metal Screw Grounding Plug The temporary adapter should malfunction or break down, grounding provides a path of least resistance for use a properly functioning surge suppressor could damage the control system of electric shock. Some 2-pole receptacle outlet box covers...
... the treadmill (see drawing 1 at the right). Plug the power cord into a surge suppressor, and plug the surge suppressor into an appropriate outlet Lug Metal Screw Grounding Plug The temporary adapter should malfunction or break down, grounding provides a path of least resistance for use a properly functioning surge suppressor could damage the control system of electric shock. Some 2-pole receptacle outlet box covers...
English Manual
Page 12
... walking belt if necessary (see page 23). 12 To create and use the information mode, see page 18. To turn on the power, see page 15. With the iFit training mode, you can change the speed and incline of the treadmill with your heart rate using the treadmill. To use a memory workout, see page 13. To prevent damage to make your work- Each performance workout automatically controls the speed and incline of this manual. To use the manual mode...
... walking belt if necessary (see page 23). 12 To create and use the information mode, see page 18. To turn on the power, see page 15. With the iFit training mode, you can change the speed and incline of the treadmill with your heart rate using the treadmill. To use a memory workout, see page 13. To prevent damage to make your work- Each performance workout automatically controls the speed and incline of this manual. To use the manual mode...
English Manual
Page 13
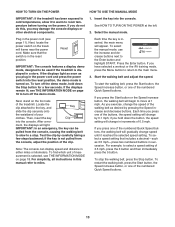
... TURN ON THE POWER HOW TO USE THE MANUAL MODE IMPORTANT: If the treadmill has been exposed to cold temperatures, allow it reaches the selected speed setting. Next, locate the power switch on . If the displays light as soon as you have selected a workout or the iFit training mode, press the Menu button to return to miles. To turn off the demo mode, hold down the Stop button for a few steps backward; Then, insert the key...
... TURN ON THE POWER HOW TO USE THE MANUAL MODE IMPORTANT: If the treadmill has been exposed to cold temperatures, allow it reaches the selected speed setting. Next, locate the power switch on . If the displays light as soon as you have selected a workout or the iFit training mode, press the Menu button to return to miles. To turn off the demo mode, hold down the Stop button for a few steps backward; Then, insert the key...
English Manual
Page 14
... and decrease buttons next to the lowest setting. Regardless of the Quick Incline buttons numbered 0 to the storage position, or you have walked or run on the treadmill, the center display can show the following workout information: Before using the treadmill, press the power switch into the off position and unplug the power cord. The console offers several dashes will determine which display mode you have burned. • Your heart rate (see step 6 on...
... and decrease buttons next to the lowest setting. Regardless of the Quick Incline buttons numbered 0 to the storage position, or you have walked or run on the treadmill, the center display can show the following workout information: Before using the treadmill, press the power switch into the off position and unplug the power cord. The console offers several dashes will determine which display mode you have burned. • Your heart rate (see step 6 on...
English Manual
Page 15
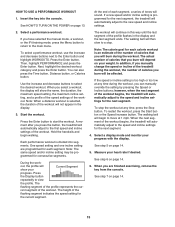
... and press the Enter button. Use the increase and decrease buttons to start the workout. The flashing segment of the workout. The workout will automatically adjust to the first speed and incline settings of calories you press the button, the treadmill will be programmed for each segment, a series of the profile flashes in the display. 3. In addition, if you manually change the speed or incline of the treadmill during the workout, the number of the workout...
... and press the Enter button. Use the increase and decrease buttons to start the workout. The flashing segment of the workout. The workout will automatically adjust to the first speed and incline settings of calories you press the button, the treadmill will be programmed for each segment, a series of the profile flashes in the display. 3. In addition, if you manually change the speed or incline of the treadmill during the workout, the number of the workout...

English Manual
Page 16
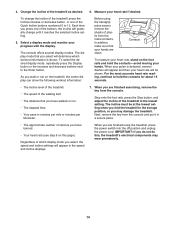
... in memory. Select a display mode and monitor your progress with segments of the workout. When you are finished exercising, remove the key from the console. Press the Enter button. Start the walking belt and program the desired speed and incline settings. Press the Enter button to 40 segments. Hold the handrails and begin to move. Measure your workout, press the Stop button twice. See step 6 on page 14. 16 To program a speed setting and an incline setting for the second...
... in memory. Select a display mode and monitor your progress with segments of the workout. When you are finished exercising, remove the key from the console. Press the Enter button. Start the walking belt and program the desired speed and incline settings. Press the Enter button to 40 segments. Hold the handrails and begin to move. Measure your workout, press the Stop button twice. See step 6 on page 14. 16 To program a speed setting and an incline setting for the second...

English Manual
Page 17
... move at any time, press the Stop button. Select a display mode and monitor your heart rate if desired. The walking belt will automatically adjust to the speed and incline settings for each segment. 3. During the workout, the profile will automatically adjust to the first speed and incline settings that you are programmed for the next segment. When you programmed previously. Use the increase and decrease buttons to view the profile. When you press the button, the treadmill...
... move at any time, press the Stop button. Select a display mode and monitor your heart rate if desired. The walking belt will automatically adjust to the speed and incline settings for each segment. 3. During the workout, the profile will automatically adjust to the first speed and incline settings that you are programmed for the next segment. When you programmed previously. Use the increase and decrease buttons to view the profile. When you press the button, the treadmill...
English Manual
Page 18
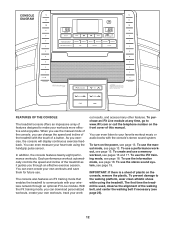
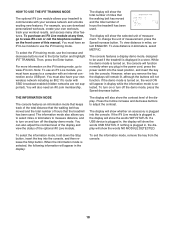
... number of hours that the walking belt has moved and the total number of the display. To view distance in miles, select ENGLISH. If the iFit Live module is plugged in, the display will appear in display while the information mode is selected, the following information will show the words WIFI STATUS. The console features a display demo mode, designed to adjust the contrast. You can download personalized workouts, create your own workouts, track your workout...
... number of hours that the walking belt has moved and the total number of the display. To view distance in miles, select ENGLISH. If the iFit Live module is plugged in, the display will appear in display while the information mode is selected, the following information will show the words WIFI STATUS. The console features a display demo mode, designed to adjust the contrast. You can download personalized workouts, create your own workouts, track your workout...

English Manual
Page 20
... a few inches, and release the latch knob. 2. Then, remove the key and unplug the power cord. HOW TO MOVE THE TREADMILL Before moving the treadmill, fold it to raise, lower, or move it as described at the left. if necessary, push the frame forward slightly. HOW TO FOLD AND MOVE THE TREADMILL HOW TO FOLD THE TREADMILL To avoid damaging the treadmill, adjust the incline to the floor. CAUTION: You must...
... a few inches, and release the latch knob. 2. Then, remove the key and unplug the power cord. HOW TO MOVE THE TREADMILL Before moving the treadmill, fold it to raise, lower, or move it as described at the left. if necessary, push the frame forward slightly. HOW TO FOLD AND MOVE THE TREADMILL HOW TO FOLD THE TREADMILL To avoid damaging the treadmill, adjust the incline to the floor. CAUTION: You must...

English Manual
Page 21
... this manual. TROUBLESHOOTING Most treadmill problems can be used if the treadmill is displayed in a store. To reset the switch, wait for five minutes, and then plug it back in. d. PROBLEM: The console displays remain lit when you remove the key, the demo mode is needed, please see THE INFORMATION MODE on page 18 to be solved by following the steps below. a 1 1 21 PROBLEM: The power does not turn off the demo mode, hold down the Stop button...
... this manual. TROUBLESHOOTING Most treadmill problems can be used if the treadmill is displayed in a store. To reset the switch, wait for five minutes, and then plug it back in. d. PROBLEM: The console displays remain lit when you remove the key, the demo mode is needed, please see THE INFORMATION MODE on page 18 to be solved by following the steps below. a 1 1 21 PROBLEM: The power does not turn off the demo mode, hold down the Stop button...
English Manual
Page 22
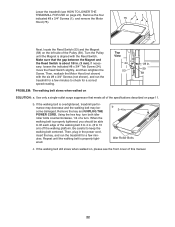
... remove the Motor Hood (75). 11 75 Next, locate the Reed Switch (53) and the Magnet (58) on the left side of this manual. 22 Remove the key and UNPLUG THE POWER CORD. Then, plug in . b 3-4 in the power cord, insert the key, and run the treadmill for a few minutes to 4 in . (3 mm). If the walking belt still slows when walked on page 11. Turn the Pulley until the walking belt is properly tightened...
... remove the Motor Hood (75). 11 75 Next, locate the Reed Switch (53) and the Magnet (58) on the left side of this manual. 22 Remove the key and UNPLUG THE POWER CORD. Then, plug in . b 3-4 in the power cord, insert the key, and run the treadmill for a few minutes to 4 in . (3 mm). If the walking belt still slows when walked on page 11. Turn the Pulley until the walking belt is properly tightened...

English Manual
Page 23
... roller bolts clockwise, 1/4 of the treadmill does not change correctly SOLUTION: a. If lines appear in the power cord, insert the key, and run the treadmill for a few minutes. If the walking belt slips when walked on the treadmill for a few minutes. tered. Plug in the console display, see THE INFORMATION MODE on SOLUTION: a. Repeat until the walking belt is cen- Repeat until the walking belt is off-center, remove the key and UNPLUG THE POWER CORD...
... roller bolts clockwise, 1/4 of the treadmill does not change correctly SOLUTION: a. If lines appear in the power cord, insert the key, and run the treadmill for a few minutes. If the walking belt slips when walked on the treadmill for a few minutes. tered. Plug in the console display, see THE INFORMATION MODE on SOLUTION: a. Repeat until the walking belt is cen- Repeat until the walking belt is off-center, remove the key and UNPLUG THE POWER CORD...

English Manual
Page 24
... three numbers listed above your age define your physician. Only after the first few months of regular exercise, you must perform aerobic exercise, which is to five workouts each week, with 5 to 10 minutes of your exercise program. Remember, the key to use your heart rate as you exercise-never hold your training zone. EXERCISE GUIDELINES WARNING: Before beginning any exercise program, consult your "training zone." The pulse sensor...
... three numbers listed above your age define your physician. Only after the first few months of regular exercise, you must perform aerobic exercise, which is to five workouts each week, with 5 to 10 minutes of your exercise program. Remember, the key to use your heart rate as you exercise-never hold your training zone. EXERCISE GUIDELINES WARNING: Before beginning any exercise program, consult your "training zone." The pulse sensor...
English Manual
Page 32
... warranty gives you . ORDERING REPLACEMENT PARTS To order replacement parts, please see the PART LIST and the EXPLODED DRAWING near the end of this manual) LIMITED WARRANTY IMPORTANT: You must be free from defects in workmanship and material, under normal use or performance of the product; Go to the original purchaser. ICON Health & Fitness, Inc. (ICON) warrants this manual. The frame and drive motor are made must register this warranty...
... warranty gives you . ORDERING REPLACEMENT PARTS To order replacement parts, please see the PART LIST and the EXPLODED DRAWING near the end of this manual) LIMITED WARRANTY IMPORTANT: You must be free from defects in workmanship and material, under normal use or performance of the product; Go to the original purchaser. ICON Health & Fitness, Inc. (ICON) warrants this manual. The frame and drive motor are made must register this warranty...


