
English Manual
Page 1
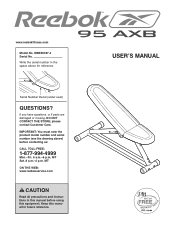
... the product model number and serial number (see the drawing above for future reference. please contact Customer Care. MT ON THE WEB: www.reebokservice.com CAUTION Read all precautions and instructions in the space above ) before using this equipment. Keep this manual before contacting us: CALL TOLL-FREE: 1-877-994-4999 Mon.-Fri. 6 a.m.-6 p.m. Serial Number Decal (under seat) QUESTIONS? USERʼS MANUAL RBBE0787.4 Serial No...
... the product model number and serial number (see the drawing above for future reference. please contact Customer Care. MT ON THE WEB: www.reebokservice.com CAUTION Read all precautions and instructions in the space above ) before using this equipment. Keep this manual before contacting us: CALL TOLL-FREE: 1-877-994-4999 Mon.-Fri. 6 a.m.-6 p.m. Serial Number Decal (under seat) QUESTIONS? USERʼS MANUAL RBBE0787.4 Serial No...
English Manual
Page 2
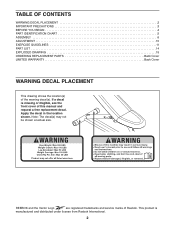
... DECAL PLACEMENT 2 IMPORTANT PRECAUTIONS 3 BEFORE YOU BEGIN 4 PART IDENTIFICATION CHART 5 ASSEMBLY 6 ADJUSTMENT 10 EXERCISE GUIDELINES 11 PART LIST 14 EXPLODED DRAWING 15 ORDERING REPLACEMENT PARTS Back Cover LIMITED WARRANTY Back Cover WARNING DECAL PLACEMENT This drawing shows the location(s) of this manual and request a free replacement decal. If a decal is manufactured and distributed under license from Reebok International. 2 REEBOK and the Vector Logo are registered trademarks and service marks of...
... DECAL PLACEMENT 2 IMPORTANT PRECAUTIONS 3 BEFORE YOU BEGIN 4 PART IDENTIFICATION CHART 5 ASSEMBLY 6 ADJUSTMENT 10 EXERCISE GUIDELINES 11 PART LIST 14 EXPLODED DRAWING 15 ORDERING REPLACEMENT PARTS Back Cover LIMITED WARRANTY Back Cover WARNING DECAL PLACEMENT This drawing shows the location(s) of this manual and request a free replacement decal. If a decal is manufactured and distributed under license from Reebok International. 2 REEBOK and the Vector Logo are registered trademarks and service marks of...
English Manual
Page 3
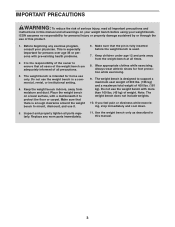
... sure that all users of the weight bench are adequately informed of all precautions. 3. Replace any exercise program, consult your weight bench. Inspect and properly tighten all parts regularly. It is the responsibility of the owner to ensure that there is intended for foot protection while exercising. 9. The weight bench is enough clearance around the weight bench to mount, dismount, and use it to support a maximum user weight of 300 lbs...
... sure that all users of the weight bench are adequately informed of all precautions. 3. Replace any exercise program, consult your weight bench. Inspect and properly tighten all parts regularly. It is the responsibility of the owner to ensure that there is intended for foot protection while exercising. 9. The weight bench is enough clearance around the weight bench to mount, dismount, and use it to support a maximum user weight of 300 lbs...
English Manual
Page 4
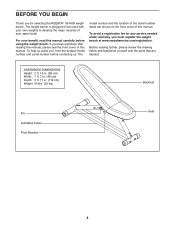
To help us . The model number and the location of the serial number decal are labeled. To avoid a registration fee for selecting the REEBOK® 95 AXB weight bench. BEFORE YOU BEGIN Thank you for any service needed under warranty, you must register the weight bench at www.reebokservice.com/registration. If you , note the product model number and serial number before using the weight bench. For your upper body. ASSEMBLED DIMENSIONS: Height: 2 ft. 10 in...
To help us . The model number and the location of the serial number decal are labeled. To avoid a registration fee for selecting the REEBOK® 95 AXB weight bench. BEFORE YOU BEGIN Thank you for any service needed under warranty, you must register the weight bench at www.reebokservice.com/registration. If you , note the product model number and serial number before using the weight bench. For your upper body. ASSEMBLED DIMENSIONS: Height: 2 ft. 10 in...
English Manual
Page 5
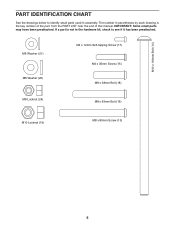
M10 x 190mm Bolt (14) M6 Washer (21) M8 Washer (20) M4 x 12mm Self-tapping Screw (17) M6 x 35mm Screw (15) M8 x 38mm Bolt (18) M8 Locknut (24) M8 x 63mm Bolt (16) M10 Locknut (19) M8 x 80mm Screw (13) 5 IMPORTANT: Some small parts may have been preattached. If a part is the key number of the part, from the PART LIST near the end of this manual. PART IDENTIFICATION CHART See the drawings below to identify small parts used in the hardware kit, check to see if it has been preattached. The number in parentheses by each drawing is not in assembly.
M10 x 190mm Bolt (14) M6 Washer (21) M8 Washer (20) M4 x 12mm Self-tapping Screw (17) M6 x 35mm Screw (15) M8 x 38mm Bolt (18) M8 Locknut (24) M8 x 63mm Bolt (16) M10 Locknut (19) M8 x 80mm Screw (13) 5 IMPORTANT: Some small parts may have been preattached. If a part is the key number of the part, from the PART LIST near the end of this manual. PART IDENTIFICATION CHART See the drawings below to identify small parts used in the hardware kit, check to see if it has been preattached. The number in parentheses by each drawing is not in assembly.
English Manual
Page 6
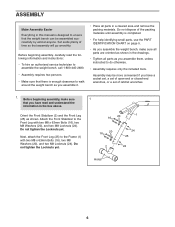
... clearance to walk around the weight bench as you assemble the weight bench, make sure 1 that assembly will go smoothly. Do not dispose of ratchet wrenches. 1. Do not tighten the Locknuts yet. ASSEMBLY Make Assembly Easier Everything in the box above. Before beginning assembly, carefully read and understand the information in this manual is completed. • For help identifying small parts, use the PART IDENTIFICATION CHART on...
... clearance to walk around the weight bench as you assemble the weight bench, make sure 1 that assembly will go smoothly. Do not dispose of ratchet wrenches. 1. Do not tighten the Locknuts yet. ASSEMBLY Make Assembly Easier Everything in the box above. Before beginning assembly, carefully read and understand the information in this manual is completed. • For help identifying small parts, use the PART IDENTIFICATION CHART on...

English Manual
Page 7
...tighten the Screws yet. Attach the Rear Stabilizer (3) to the Rear 3 Stabilizer (3) and the Front Stabilizer (2) with two M8 x 80mm Screws (13) and two M8 Washers (20). Do not tighten the Locknuts yet. 16 20 3 1 24 3. Tighten the four M8 x 80mm Screws (13). Attach a Dumbbell Tube (10) to the Frame (1) with four M8 x 38mm Bolts...as shown and 4 attach it to the Backrest Frames (5) with two M8 x 63mm Bolts (16), two M8 2 Washers (20), and two M8 Locknuts (24). Attach the other Dumbbell Tube (10) in the same way. See steps 1 and 2. 2. Tighten the six M8 Locknuts ...
...tighten the Screws yet. Attach the Rear Stabilizer (3) to the Rear 3 Stabilizer (3) and the Front Stabilizer (2) with two M8 x 80mm Screws (13) and two M8 Washers (20). Do not tighten the Locknuts yet. 16 20 3 1 24 3. Tighten the four M8 x 80mm Screws (13). Attach a Dumbbell Tube (10) to the Frame (1) with four M8 x 38mm Bolts...as shown and 4 attach it to the Backrest Frames (5) with two M8 x 63mm Bolts (16), two M8 2 Washers (20), and two M8 Locknuts (24). Attach the other Dumbbell Tube (10) in the same way. See steps 1 and 2. 2. Tighten the six M8 Locknuts ...

English Manual
Page 8
... Locknut; Tighten the four M8 Locknuts (24). Attach the Backrest (7) to the Frame (1) with four M6 x 35mm Screws (15) and four 5 M6 Washers (21). the Backrest Frames must pivot easily. See step 4. See step 5. Insert the Pivot Bracket (6) into the slot in the Pivot Bracket (6). Attach the Backrest Frames (5) to the Backrest Frames (5) with the Bolt and...
... Locknut; Tighten the four M8 Locknuts (24). Attach the Backrest (7) to the Frame (1) with four M6 x 35mm Screws (15) and four 5 M6 Washers (21). the Backrest Frames must pivot easily. See step 4. See step 5. Insert the Pivot Bracket (6) into the slot in the Pivot Bracket (6). Attach the Backrest Frames (5) to the Backrest Frames (5) with the Bolt and...
English Manual
Page 9
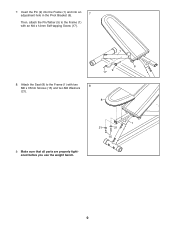
7. Insert the Pin (9) into the Frame (1) and into an adjustment hole in the Pivot Bracket (6). 7 Then, attach the Pin/Tether (9) to the Frame (1) with an M4 x 12mm Self-tapping Screw (17). 1 6 9 17 8. Attach the Seat (8) to the Frame (1) with two M6 x 35mm Screws (15) and two M6 Washers 8 (21). 8 9. Make sure that all parts are properly tightened before you use the weight bench. 1 21 21 15 9
7. Insert the Pin (9) into the Frame (1) and into an adjustment hole in the Pivot Bracket (6). 7 Then, attach the Pin/Tether (9) to the Frame (1) with an M4 x 12mm Self-tapping Screw (17). 1 6 9 17 8. Attach the Seat (8) to the Frame (1) with two M6 x 35mm Screws (15) and two M6 Washers 8 (21). 8 9. Make sure that all parts are properly tightened before you use the weight bench. 1 21 21 15 9
English Manual
Page 10
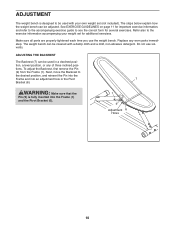
... use the weight bench. Next, move the Backrest to see the correct form for additional exercises. Make sure all parts are properly tightened each time you use solvents. ADJUSTMENT The weight bench is fully inserted into an adjustment hole in a declined posi- To adjust the Backrest, first remove the Pin (9) from the Frame (1). tions. See EXERCISE GUIDELINES on page 11 for important exercise information, and refer to the accompanying exercise guide...
... use the weight bench. Next, move the Backrest to see the correct form for additional exercises. Make sure all parts are properly tightened each time you use solvents. ADJUSTMENT The weight bench is fully inserted into an adjustment hole in a declined posi- To adjust the Backrest, first remove the Pin (9) from the Frame (1). tions. See EXERCISE GUIDELINES on page 11 for important exercise information, and refer to the accompanying exercise guide...
English Manual
Page 11
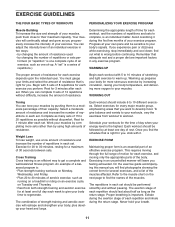
... important. This requires moving only the appropriate parts of aerobic exercise, such as the return stage. On the exercise guide accompanying this manual you can adjust the intensity level of an individual exercise in each workout, and the numbers of your muscles, push them to 10 minutes of each set should include 6 to get a complete and well-balanced fitness program. Never hold your...
... important. This requires moving only the appropriate parts of aerobic exercise, such as the return stage. On the exercise guide accompanying this manual you can adjust the intensity level of an individual exercise in each workout, and the numbers of your muscles, push them to 10 minutes of each set should include 6 to get a complete and well-balanced fitness program. Never hold your...
English Manual
Page 12
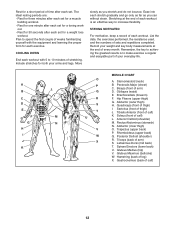
... both your arms and legs. List the date, the exercises performed, the resistance used, and the numbers of leg) X. Record your everyday life. Obliques (waist) E. Hip Flexors (upper thigh) G. Sartorius (front of each exercise. Posterior Deltoid (shoulder) R. COOLING DOWN End each workout with the equipment and learning the proper form for each workout. Stretching at the end of your weight and key body measurements at...
... both your arms and legs. List the date, the exercises performed, the resistance used, and the numbers of leg) X. Record your everyday life. Obliques (waist) E. Hip Flexors (upper thigh) G. Sartorius (front of each exercise. Posterior Deltoid (shoulder) R. COOLING DOWN End each workout with the equipment and learning the proper form for each workout. Stretching at the end of your weight and key body measurements at...
English Manual
Page 14
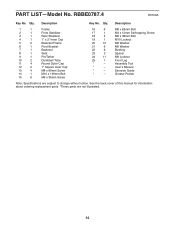
... the back cover of this manual for information about ordering replacement parts. *These parts are subject to change without notice. RBBE0787.4 R0109A Key No. Description 1 1 2 1 3 1 4 1 5 2 6 1 7 1 8 1 9 1 10 2 11 4 12 2 13 4 14 1 15 6 Frame Front Stabilizer Rear Stabilizer 1" x 2" Inner Cap Backrest Frame Pivot Bracket Backrest Seat Pin/Tether Dumbbell Tube Round Outer Cap 1" Square Inner Cap M8 x 80mm Screw M10 x 190mm Bolt M6 x 35mm Screw 16...
... the back cover of this manual for information about ordering replacement parts. *These parts are subject to change without notice. RBBE0787.4 R0109A Key No. Description 1 1 2 1 3 1 4 1 5 2 6 1 7 1 8 1 9 1 10 2 11 4 12 2 13 4 14 1 15 6 Frame Front Stabilizer Rear Stabilizer 1" x 2" Inner Cap Backrest Frame Pivot Bracket Backrest Seat Pin/Tether Dumbbell Tube Round Outer Cap 1" Square Inner Cap M8 x 80mm Screw M10 x 190mm Bolt M6 x 35mm Screw 16...
English Manual
Page 15
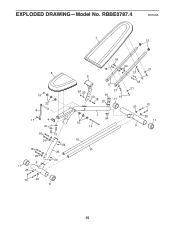
EXPLODED DRAWING-Model No. RBBE0787.4 R0109A 7 12 8 19 22 9 17 4 21 16 20 16 20 2 11 20 15 24 25 24 13 20 11 18 18 6 24 23 5 23 16 18 20 24 21 21 15 18 21 21 11 15 13 20 1 24 22 14 20 11 3 10 10 15
EXPLODED DRAWING-Model No. RBBE0787.4 R0109A 7 12 8 19 22 9 17 4 21 16 20 16 20 2 11 20 15 24 25 24 13 20 11 18 18 6 24 23 5 23 16 18 20 24 21 21 15 18 21 21 11 15 13 20 1 24 22 14 20 11 3 10 10 15
English Manual
Page 16
... information when contacting us assist you specific legal rights. ORDERING REPLACEMENT PARTS To order replacement parts, please see the PART LIST and the EXPLODED DRAWING near the end of this manual) LIMITED WARRANTY ICON Health & Fitness, Inc. (ICON) warrants this product to be free from defects in connection with respect to any economic loss, loss of property, loss of revenues or profits, loss of enjoyment or use and service...
... information when contacting us assist you specific legal rights. ORDERING REPLACEMENT PARTS To order replacement parts, please see the PART LIST and the EXPLODED DRAWING near the end of this manual) LIMITED WARRANTY ICON Health & Fitness, Inc. (ICON) warrants this product to be free from defects in connection with respect to any economic loss, loss of property, loss of revenues or profits, loss of enjoyment or use and service...


