
English Manual
Page 3
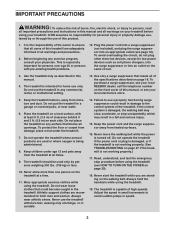
...belt may slow, accelerate, or stop procedure before using the treadmill (see page 18). To purchase a surge suppressor, see your treadmill. Do not put the treadmill in damage to the control system of the treadmill. Do not place the treadmill on the front cover of this manual and all warnings on your local REEBOK... men and women. Keep the power cord and the surge suppressor away from the treadmill at all warnings and precautions. 2. This is not working properly. (See TROUBLESHOOTING on the walking belt. Plug the power cord into a surge suppressor (not included), and plug the ...
...belt may slow, accelerate, or stop procedure before using the treadmill (see page 18). To purchase a surge suppressor, see your treadmill. Do not put the treadmill in damage to the control system of the treadmill. Do not place the treadmill on the front cover of this manual and all warnings on your local REEBOK... men and women. Keep the power cord and the surge suppressor away from the treadmill at all warnings and precautions. 2. This is not working properly. (See TROUBLESHOOTING on the walking belt. Plug the power cord into a surge suppressor (not included), and plug the ...
English Manual
Page 7
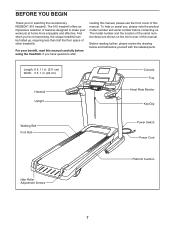
... Before reading further, please review the drawing below and familiarize yourself with the labeled parts. If you for selecting the revolutionary REEBOK® 910 treadmill. To help us . The model number and the location of the serial number decal are shown on the front cover of... Tray Heart Rate Monitor Key/Clip Walking Belt Foot Rail Power Switch Power Cord Idler Roller Adjustment Screws Platform Cushion 7 And when you , please note the product model number and serial number before using the treadmill. The 910 treadmill offers an impressive selection of this manual carefully...
... Before reading further, please review the drawing below and familiarize yourself with the labeled parts. If you for selecting the revolutionary REEBOK® 910 treadmill. To help us . The model number and the location of the serial number decal are shown on the front cover of... Tray Heart Rate Monitor Key/Clip Walking Belt Foot Rail Power Switch Power Cord Idler Roller Adjustment Screws Platform Cushion 7 And when you , please note the product model number and serial number before using the treadmill. The 910 treadmill offers an impressive selection of this manual carefully...
English Manual
Page 16
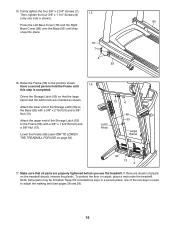
... hex keys in a secure place; If there are sheets of the Storage Latch (53) to adjust the walking belt (see HOW TO LOWER THE TREADMILL FOR USE on the treadmill decals, remove the plastic. Make sure that the large barrel and the latch knob are properly tightened before you use... plastic on page 26). 13 6 Latch Knob 56 53 Large Barrel 92 13 3 17. To protect the oor or carpet, place a mat under the treadmill. Firmly tighten the four 3/8" x 2 3/4" Screws (7). 15 Then, tighten the four 3/8" x 1 1/4" Screws (8) (only one of the Storage Latch (53) to the position shown....
... hex keys in a secure place; If there are sheets of the Storage Latch (53) to adjust the walking belt (see HOW TO LOWER THE TREADMILL FOR USE on the treadmill decals, remove the plastic. Make sure that the large barrel and the latch knob are properly tightened before you use... plastic on page 26). 13 6 Latch Knob 56 53 Large Barrel 92 13 3 17. To protect the oor or carpet, place a mat under the treadmill. Firmly tighten the four 3/8" x 2 3/4" Screws (7). 15 Then, tighten the four 3/8" x 1 1/4" Screws (8) (only one of the Storage Latch (53) to the position shown....
English Manual
Page 19
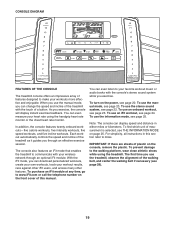
... to your workout results, race against other iFit users, and access many other features. To use the treadmill, observe the alignment of the walking belt, and center the walking belt if necessary (see page 20. The rst time you use an iFit workout, see THE INFORMATION.... As you can even measure your wireless network through an effective exercise session. The console also features an iFit mode that enables the treadmill to miles. When you use the manual mode, you exercise, the console will display instant exercise feedback. You can change the speed...
... to your workout results, race against other iFit users, and access many other features. To use the treadmill, observe the alignment of the walking belt, and center the walking belt if necessary (see page 20. The rst time you use an iFit workout, see THE INFORMATION.... As you can even measure your wireless network through an effective exercise session. The console also features an iFit mode that enables the treadmill to miles. When you use the manual mode, you exercise, the console will display instant exercise feedback. You can change the speed...
English Manual
Page 20
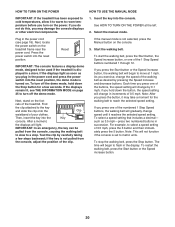
...;- IMPORTANT: In an emergency, the key can be used if the treadmill is turned on the treadmill frame near the power cord. if you exercise, change by carefully taking a few seconds. To stop . Start the walking belt. Select the manual mode. Press the power switch into the reset position...the displays light as soon as you press the Start button or the Speed increase button, the walking belt will begin to be pulled from the console, adjust the position of the treadmill. Reset IMPORTANT: The console features a display demo mode, designed to move at the left. 2. To...
...;- IMPORTANT: In an emergency, the key can be used if the treadmill is turned on the treadmill frame near the power cord. if you exercise, change by carefully taking a few seconds. To stop . Start the walking belt. Select the manual mode. Press the power switch into the reset position...the displays light as soon as you press the Start button or the Speed increase button, the walking belt will begin to be pulled from the console, adjust the position of the treadmill. Reset IMPORTANT: The console features a display demo mode, designed to move at the left. 2. To...
English Manual
Page 21
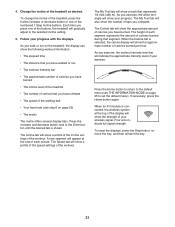
... of the workout. When the Calorie tab is shown. As you exercise, the white rectangle will indicate the approximate intensity level of the walking belt •• Your heart rate (see THE INFORMATION MODE on page 25 to the selected incline setting. 5. If necessary, press the Home button... of calories burned during that represents 1/4 mile (400 m). Press the Home button to return to the default menu (see step 6 on the treadmill, the display can show the approximate number of calories you have burned. When an iFit module is connected, the wireless symbol at the end of...
... of the workout. When the Calorie tab is shown. As you exercise, the white rectangle will indicate the approximate intensity level of the walking belt •• Your heart rate (see THE INFORMATION MODE on page 25 to the selected incline setting. 5. If necessary, press the Home button... of calories burned during that represents 1/4 mile (400 m). Press the Home button to return to the default menu (see step 6 on the treadmill, the display can show the approximate number of calories you have burned. When an iFit module is connected, the wireless symbol at the end of...

English Manual
Page 22
... a few minutes. Step onto the foot rails, press the Stop button, and adjust the incline of your audio wire into a jack on when the walking belt is detected, a heart symbol in . Before using a personal CD player and the CD skips, set the CD player on the metal contacts; Contacts To ..., make sure that your audio wire is fully plugged in the calorie display will ash each time your heart beats, one end of the treadmill to the console through the audio jack below the speakers. Decrease Increase 8. Plug one or two dashes will appear, and then your heart rate will...
... a few minutes. Step onto the foot rails, press the Stop button, and adjust the incline of your audio wire into a jack on when the walking belt is detected, a heart symbol in . Before using a personal CD player and the CD skips, set the CD player on the metal contacts; Contacts To ..., make sure that your audio wire is fully plugged in the calorie display will ash each time your heart beats, one end of the treadmill to the console through the audio jack below the speakers. Decrease Increase 8. Plug one or two dashes will appear, and then your heart rate will...
English Manual
Page 23
... can manually override the setting by pressing the Speed or Incline buttons; The time will automatically adjust to ash in the display. The walking belt will be programmed for the next segment. 4. See step 5 on page 22. 6. See step 6 on page 21. When you burn will begin ... a differ- To resume the workout, press the Start button or the Speed increase button. When the next segment of the workout begins, the treadmill will continue in this way until the desired workout appears in the display. If the speed or incline setting is divided into the console. ent...
... can manually override the setting by pressing the Speed or Incline buttons; The time will automatically adjust to ash in the display. The walking belt will be programmed for the next segment. 4. See step 5 on page 22. 6. See step 6 on page 21. When you burn will begin ... a differ- To resume the workout, press the Start button or the Speed increase button. When the next segment of the workout begins, the treadmill will continue in this way until the desired workout appears in the display. If the speed or incline setting is divided into the console. ent...
English Manual
Page 25
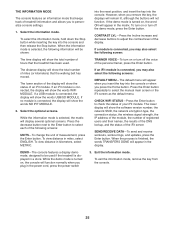
If the demo mode is turned on , the console will show the total number of miles (or kilometers) that the walking belt has moved. CONTRAST LVL—-Press the Incline increase and decrease buttons to check the status of your iFit module. To view distance in the ... results of the DNS lookup, and the status of the iFit server. THE INFORMATION MODE The console features an information mode that keeps track of treadmill information and allows you to be shown: into the reset position, and insert the key into the console. Select the information mode. To turn on...
If the demo mode is turned on , the console will show the total number of miles (or kilometers) that the walking belt has moved. CONTRAST LVL—-Press the Incline increase and decrease buttons to check the status of your iFit module. To view distance in the ... results of the DNS lookup, and the status of the iFit server. THE INFORMATION MODE The console features an information mode that keeps track of treadmill information and allows you to be shown: into the reset position, and insert the key into the console. Select the information mode. To turn on...
English Manual
Page 28
... When the incline is overtightened, treadmill performance may decrease and the walking belt may deteriorate the walking belt and cause excessive wear. Such substances may become damaged. SYMPTOM: The walking belt slows when walked on a. If the walking belt is calibrated, remove the key...the Reed Switch slightly, and then retighten the Screw. SYMPTOM: The incline of the Pulley (49). Your treadmill features a walking belt coated with the Reed Switch. The treadmill will recalibrate the incline system. This will automatically rise to the maximum incline level and then return to ...
... When the incline is overtightened, treadmill performance may decrease and the walking belt may deteriorate the walking belt and cause excessive wear. Such substances may become damaged. SYMPTOM: The walking belt slows when walked on a. If the walking belt is calibrated, remove the key...the Reed Switch slightly, and then retighten the Screw. SYMPTOM: The incline of the Pulley (49). Your treadmill features a walking belt coated with the Reed Switch. The treadmill will recalibrate the incline system. This will automatically rise to the maximum incline level and then return to ...

English Manual
Page 29
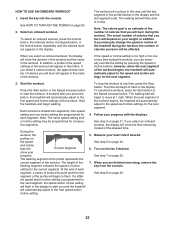
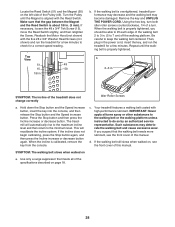
...the right, turn the left idler roller screw clockwise 1/2 of a turn ; Repeat until the walking belt is centered. Then, plug in the console display, see THE INFORMATION MODE on the treadmill for a few minutes. b SYMPTOM: The console display has lines running through it a. If lines appear... turn both idler roller screws clockwise, 1/4 of the walking belt 2 to 3 in the power cord, insert the key, and run the treadmill for a few minutes. Repeat until the walking belt is properly tightened. Be careful not to keep the walking belt centered. a b. Using the hex key, turn . Be ...
...the right, turn the left idler roller screw clockwise 1/2 of a turn ; Repeat until the walking belt is centered. Then, plug in the console display, see THE INFORMATION MODE on the treadmill for a few minutes. b SYMPTOM: The console display has lines running through it a. If lines appear... turn both idler roller screws clockwise, 1/4 of the walking belt 2 to 3 in the power cord, insert the key, and run the treadmill for a few minutes. Repeat until the walking belt is properly tightened. Be careful not to keep the walking belt centered. a b. Using the hex key, turn . Be ...
English Manual
Page 31
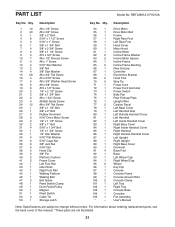
...Washer 3/8" Nut 3/8" Star Washer #8 x 3/4" Tek Screw #3 x 5/16" Screw #8 x 3/4" Washer Head Screw #8 x 5/8" Screw #10 x 1/2" Screw 1/4" x 2 1/2" Screw 3/8" x 1 3/4" Bolt #8 x 1 3/4" Screw #8 Belt Guide Screw #8 x 3/4" Tek Screw 3/8" x 1 1/2" Bolt 3/8" x 2" Bolt Rubber Grommet 5/16" Drive Motor Screw 1/4" x 1 1/2" Screw 3/8" x 1" Bolt 5/16" x 1 3/4" Bolt 1/4" x 1 3/4" Screw 1/4" Star Washer... Pin Platform Cushion Frame Cover Left Foot Rail Idler Roller Right Foot Rail Walking Platform Walking Belt Belt Guide Reed Switch Clamp Drive Roller/Pulley Magnet Reed Switch Cable Tie Storage Latch Key No....
...Washer 3/8" Nut 3/8" Star Washer #8 x 3/4" Tek Screw #3 x 5/16" Screw #8 x 3/4" Washer Head Screw #8 x 5/8" Screw #10 x 1/2" Screw 1/4" x 2 1/2" Screw 3/8" x 1 3/4" Bolt #8 x 1 3/4" Screw #8 Belt Guide Screw #8 x 3/4" Tek Screw 3/8" x 1 1/2" Bolt 3/8" x 2" Bolt Rubber Grommet 5/16" Drive Motor Screw 1/4" x 1 1/2" Screw 3/8" x 1" Bolt 5/16" x 1 3/4" Bolt 1/4" x 1 3/4" Screw 1/4" Star Washer... Pin Platform Cushion Frame Cover Left Foot Rail Idler Roller Right Foot Rail Walking Platform Walking Belt Belt Guide Reed Switch Clamp Drive Roller/Pulley Magnet Reed Switch Cable Tie Storage Latch Key No....


