
English Manual
Page 2
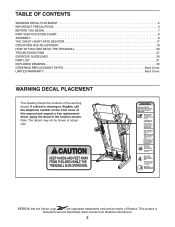
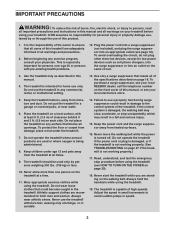
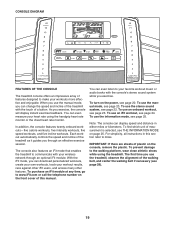
... YOU BEGIN 7 PART IDENTIFICATION CHART 8 ASSEMBLY 9 THE CHEST HEART RATE MONITOR 17 OPERATION AND ADJUSTMENT 18 HOW TO FOLD AND MOVE THE TREADMILL 26 TROUBLESHOOTING 27 EXERCISE GUIDELINES 30 PART LIST 31 EXPLODED DRAWING 32 ORDERING REPLACEMENT PARTS Back Cover LIMITED WARRANTY Back Cover WARNING DECAL PLACEMENT This drawing shows the locations of Reebok. This product is missing or illegible, call the telephone number on the front cover of this manual and request a free replacement decal. Note: The...
... YOU BEGIN 7 PART IDENTIFICATION CHART 8 ASSEMBLY 9 THE CHEST HEART RATE MONITOR 17 OPERATION AND ADJUSTMENT 18 HOW TO FOLD AND MOVE THE TREADMILL 26 TROUBLESHOOTING 27 EXERCISE GUIDELINES 30 PART LIST 31 EXPLODED DRAWING 32 ORDERING REPLACEMENT PARTS Back Cover LIMITED WARRANTY Back Cover WARNING DECAL PLACEMENT This drawing shows the locations of Reebok. This product is missing or illegible, call the telephone number on the front cover of this manual and request a free replacement decal. Note: The...
English Manual
Page 3
... instructions in this manual and all warnings on your treadmill before using the treadmill. tained by persons weighing 350 lbs. (159 kg) or less. 10. Never move the walking belt while the power is damaged, the walking belt may slow, accelerate, or stop procedure before using the treadmill. 19. Failure to ensure that could result in damage to avoid sudden jumps in speed. 3 Keep the power cord...
... instructions in this manual and all warnings on your treadmill before using the treadmill. tained by persons weighing 350 lbs. (159 kg) or less. 10. Never move the walking belt while the power is damaged, the walking belt may slow, accelerate, or stop procedure before using the treadmill. 19. Failure to ensure that could result in damage to avoid sudden jumps in speed. 3 Keep the power cord...
English Manual
Page 4
... power cord immediately after use . 22. 20. The heart rate monitor is running. Never leave the treadmill unattended while it is not in serious injury or death. Do not change the incline of the power switch), and unplug the power cord when the treadmill is properly assembled. (See ASSEMBLY on page 9 and HOW TO FOLD AND MOVE THE TREADMILL on the treadmill. 26. DANGER: 27. Never remove the motor hood unless instructed to move the treadmill...
... power cord immediately after use . 22. 20. The heart rate monitor is running. Never leave the treadmill unattended while it is not in serious injury or death. Do not change the incline of the power switch), and unplug the power cord when the treadmill is properly assembled. (See ASSEMBLY on page 9 and HOW TO FOLD AND MOVE THE TREADMILL on the treadmill. 26. DANGER: 27. Never remove the motor hood unless instructed to move the treadmill...
English Manual
Page 7
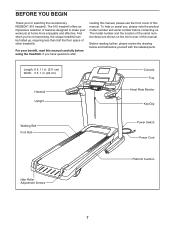
... cm) Handrail Upright Console Tray Heart Rate Monitor Key/Clip Walking Belt Foot Rail Power Switch Power Cord Idler Roller Adjustment Screws Platform Cushion 7 For your workouts at home more enjoyable and effective. BEFORE YOU BEGIN Thank you , please note the product model number and serial number before using the treadmill. If you ’'re not exercising, the unique treadmill can be folded up, requiring less than half the oor space of this manual. The 910 treadmill offers an...
... cm) Handrail Upright Console Tray Heart Rate Monitor Key/Clip Walking Belt Foot Rail Power Switch Power Cord Idler Roller Adjustment Screws Platform Cushion 7 For your workouts at home more enjoyable and effective. BEFORE YOU BEGIN Thank you , please note the product model number and serial number before using the treadmill. If you ’'re not exercising, the unique treadmill can be folded up, requiring less than half the oor space of this manual. The 910 treadmill offers an...

English Manual
Page 14
... Screws, and then tighten them. 12 4 81 12 4 85 12. The connectors should slide together easily and snap into the hole in the console assembly. 12 Hole 99 Ground Wire Console Assembly Console Wire 76 Console Wire 76 Wire Tie 81 14 IF YOU DO NOT CONNECT THE CONNECTORS PROPERLY, THE CONSOLE MAY BECOME DAMAGED WHEN YOU TURN ON THE POWER. Connect the ground wire from the Upright Wire. Then, remove...
... Screws, and then tighten them. 12 4 81 12 4 85 12. The connectors should slide together easily and snap into the hole in the console assembly. 12 Hole 99 Ground Wire Console Assembly Console Wire 76 Console Wire 76 Wire Tie 81 14 IF YOU DO NOT CONNECT THE CONNECTORS PROPERLY, THE CONSOLE MAY BECOME DAMAGED WHEN YOU TURN ON THE POWER. Connect the ground wire from the Upright Wire. Then, remove...

English Manual
Page 18
... ADJUSTMENT HOW TO CONNECT THE POWER CORD Use a Surge Suppressor Your treadmill, like other electronic equipment, can be damaged by sudden voltage changes in damage to the control system of the treadmill and serious injury to users. To purchase a surge suppressor, see drawing 1 on page 3. There must be installed by a qualified electrician. Do not modify the plug—-if it will not fit...
... ADJUSTMENT HOW TO CONNECT THE POWER CORD Use a Surge Suppressor Your treadmill, like other electronic equipment, can be damaged by sudden voltage changes in damage to the control system of the treadmill and serious injury to users. To purchase a surge suppressor, see drawing 1 on page 3. There must be installed by a qualified electrician. Do not modify the plug—-if it will not fit...
English Manual
Page 19
... of a button. When you can display speed and distance in this manual. Each workout automatically controls the speed and incline of plastic on page 25. For simplicity, all instructions in either miles or kilometers. To use the information mode, see page 23. To use an onboard workout, see page 25. Note: The console can change the speed and incline of the treadmill with the touch of the walking belt, and center the walking belt if...
... of a button. When you can display speed and distance in this manual. Each workout automatically controls the speed and incline of plastic on page 25. For simplicity, all instructions in either miles or kilometers. To use the information mode, see page 23. To use an onboard workout, see page 25. Note: The console can change the speed and incline of the treadmill with the touch of the walking belt, and center the walking belt if...
English Manual
Page 20
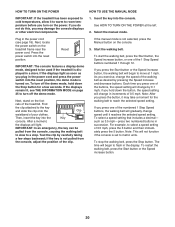
... do not do this, you press one of the numbered 1 Step Speed buttons, the walking belt will change speed until it may damage the console displays or other electrical components. 1. Press the power switch into the reset position, the demo mode is turned on the treadmill frame near the power cord. To turn off the demo mode. To stop . HOW TO TURN ON THE POWER HOW TO USE THE MANUAL MODE IMPORTANT: If the treadmill has been exposed to cold temperatures...
... do not do this, you press one of the numbered 1 Step Speed buttons, the walking belt will change speed until it may damage the console displays or other electrical components. 1. Press the power switch into the reset position, the demo mode is turned on the treadmill frame near the power cord. To turn off the demo mode. To stop . HOW TO TURN ON THE POWER HOW TO USE THE MANUAL MODE IMPORTANT: If the treadmill has been exposed to cold temperatures...
English Manual
Page 21
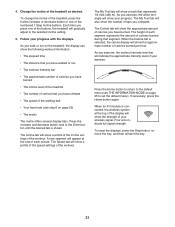
...; The distance that represents 1/4 mile (400 m). Each time you exercise, the workout intensity level bar will show a prole of the incline settings of the workout. Follow your wireless signal. The My Trail tab will gradually adjust to the default menu (see step 6 on page 22) •• The matrix The matrix offers several display tabs. To reset the displays, press the Stop button, remove the key, and...
...; The distance that represents 1/4 mile (400 m). Each time you exercise, the workout intensity level bar will show a prole of the incline settings of the workout. Follow your wireless signal. The My Trail tab will gradually adjust to the default menu (see step 6 on page 22) •• The matrix The matrix offers several display tabs. To reset the displays, press the Stop button, remove the key, and...

English Manual
Page 22
... using the handgrip heart rate monitor, remove the sheets of your audio wire into a jack on the pulse bar. 6. In addition, make sure that your audio wire is detected, a heart symbol in the calorie display will ash each time your heart beats, one end of plastic from the metal contacts on your palms on the console. 22 Step onto the foot rails, press the Stop button, and adjust the incline...
... using the handgrip heart rate monitor, remove the sheets of your audio wire into a jack on the pulse bar. 6. In addition, make sure that your audio wire is detected, a heart symbol in the calorie display will ash each time your heart beats, one end of plastic from the metal contacts on your palms on the console. 22 Step onto the foot rails, press the Stop button, and adjust the incline...
English Manual
Page 23
..., if you manually change the speed or incline of the treadmill during the workout. If a differ- To resume the workout, press the Start button or the Speed increase button. Start the workout. One speed setting and one incline setting are nished exercising, remove the key from the console. See HOW TO TURN ON THE POWER on page 22. 7. Note: The calorie goal is divided into the console. Note: The same speed setting and/ or incline setting may be...
..., if you manually change the speed or incline of the treadmill during the workout. If a differ- To resume the workout, press the Start button or the Speed increase button. Start the workout. One speed setting and one incline setting are nished exercising, remove the key from the console. See HOW TO TURN ON THE POWER on page 22. 7. Note: The calorie goal is divided into the console. Note: The same speed setting and/ or incline setting may be...

English Manual
Page 24
... more than one user is also required. 1. Start the workout. See step 6 on page 22. 9. Insert the key into the console. The end of the matrix represents the end of the trail you select an iFit workout, the display will show a map of the race. 7. Turn on page 21. Press the Compete button to www.iFit.com or call the telephone number on page...
... more than one user is also required. 1. Start the workout. See step 6 on page 22. 9. Insert the key into the console. The end of the matrix represents the end of the trail you select an iFit workout, the display will show a map of the race. 7. Turn on page 21. Press the Compete button to www.iFit.com or call the telephone number on page...
English Manual
Page 25
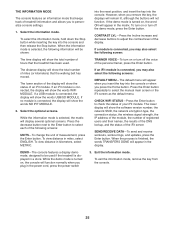
... the treadmill is turned on , the word ON will display several optional screens. The lower display will show the words WIFI MODULE. DEMO—-The console features a display demo mode, designed to adjust the contrast level of your iFit module. While the demo mode is displayed in the power cord, press the power switch 3. To exit the information mode, remove the key from the console. 25 Select the information mode. CONTRAST LVL—-Press the Incline increase and decrease buttons...
... the treadmill is turned on , the word ON will display several optional screens. The lower display will show the words WIFI MODULE. DEMO—-The console features a display demo mode, designed to adjust the contrast level of your iFit module. While the demo mode is displayed in the power cord, press the power switch 3. To exit the information mode, remove the key from the console. 25 Select the information mode. CONTRAST LVL—-Press the Incline increase and decrease buttons...

English Manual
Page 26
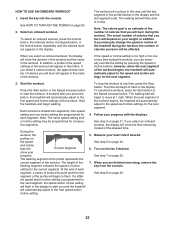
.... Moving the treadmill may require two people. 1. See drawing 2. IMPORTANT: Do not turn the latch knob. See drawing 1 at the left. Bend your legs and keep your right hand. Hold the metal frame rmly in the storage position. Hold the frame and one foot against a wheel. 1 1 Frame Frame Handrail Wheel 2. Then, remove the key and unplug the power cord. Pull...
.... Moving the treadmill may require two people. 1. See drawing 2. IMPORTANT: Do not turn the latch knob. See drawing 1 at the left. Bend your legs and keep your right hand. Hold the metal frame rmly in the storage position. Hold the frame and one foot against a wheel. 1 1 Frame Frame Handrail Wheel 2. Then, remove the key and unplug the power cord. Pull...

English Manual
Page 27
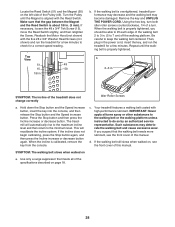
... the Motor Hood (60) off the demo mode, hold down the Stop button for ve minutes and then press the switch back in . 27 To reset the power switch, wait for a few seconds. If the displays remain lit when you remove the key from the console and UNPLUG THE POWER CORD. Find the symptom that applies, and follow the steps listed. The console features a display demo mode, designed to turn on the treadmill frame...
... the Motor Hood (60) off the demo mode, hold down the Stop button for ve minutes and then press the switch back in . 27 To reset the power switch, wait for a few seconds. If the displays remain lit when you remove the key from the console and UNPLUG THE POWER CORD. Find the symptom that applies, and follow the steps listed. The console features a display demo mode, designed to turn on the treadmill frame...
English Manual
Page 28
... instructed to keep the walking belt centered. Reattach the Motor Hood (not shown) with the ve #8 x 3/4" Washer Head Screws (not shown) and run the treadmill for a correct speed reading. Repeat until the Magnet is properly tightened, you suspect that the walking belt needs more lubricant, see the front cover of the Pulley (49). When the incline is about 1/8 in . (5 to check for a few minutes. Turn the Pulley...
... instructed to keep the walking belt centered. Reattach the Motor Hood (not shown) with the ve #8 x 3/4" Washer Head Screws (not shown) and run the treadmill for a correct speed reading. Repeat until the Magnet is properly tightened, you suspect that the walking belt needs more lubricant, see the front cover of the Pulley (49). When the incline is about 1/8 in . (5 to check for a few minutes. Turn the Pulley...

English Manual
Page 29
... walking belt has shifted to the right, turn the left idler roller screw clockwise 1/2 of a turn; Be careful not to keep the walking belt centered. Repeat until the walking belt is properly tightened. Using the hex key, turn both idler roller screws clockwise, 1/4 of a turn . Then, plug in the console display, see THE INFORMATION MODE on the treadmill for a few minutes. Be careful to overtighten the walking belt. If lines appear in the power cord, insert the key...
... walking belt has shifted to the right, turn the left idler roller screw clockwise 1/2 of a turn; Be careful not to keep the walking belt centered. Repeat until the walking belt is properly tightened. Using the hex key, turn both idler roller screws clockwise, 1/4 of a turn . Then, plug in the console display, see THE INFORMATION MODE on the treadmill for a few minutes. Be careful to overtighten the walking belt. If lines appear in the power cord, insert the key...
English Manual
Page 30
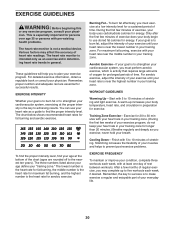
... workouts each week, with 5 to plan your training zone. Cooling Down—-Finish with pre-existing health problems. The heart rate monitor is to make exercise a regular and enjoyable part of regular exercise, you to 10 minutes of stretching. Training Zone Exercise—-Exercise for exercise. After a few weeks of your exercise program, do not keep your heart rate in your “"training zone.”" The lowest number is the heart rate...
... workouts each week, with 5 to plan your training zone. Cooling Down—-Finish with pre-existing health problems. The heart rate monitor is to make exercise a regular and enjoyable part of regular exercise, you to 10 minutes of stretching. Training Zone Exercise—-Exercise for exercise. After a few weeks of your exercise program, do not keep your heart rate in your “"training zone.”" The lowest number is the heart rate...
English Manual
Page 31
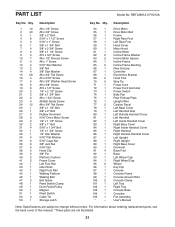
For information about ordering replacement parts, see the back cover of this manual. *These parts are subject to change without notice. RBTL99013.0 R1212A Key No. Description Drive Motor Drive Motor Belt Frame Right Rear Foot Left Rear Foot Hood Cover Motor Hood Incline Motor Incline Frame Washer Incline Motor Spacer Incline Frame Incline Frame Bushing Rear Enscap Controller Electronics Bracket Hood Post Wire Tie Power Cord Power Cord Grommet Power Switch Belly Pan Rear Endcap Plate Upright Wire Caution Decal Left Base Cover Left Handrail Grip Left Outside Handrail Cover Left Handrail...
For information about ordering replacement parts, see the back cover of this manual. *These parts are subject to change without notice. RBTL99013.0 R1212A Key No. Description Drive Motor Drive Motor Belt Frame Right Rear Foot Left Rear Foot Hood Cover Motor Hood Incline Motor Incline Frame Washer Incline Motor Spacer Incline Frame Incline Frame Bushing Rear Enscap Controller Electronics Bracket Hood Post Wire Tie Power Cord Power Cord Grommet Power Switch Belly Pan Rear Endcap Plate Upright Wire Caution Decal Left Base Cover Left Handrail Grip Left Outside Handrail Cover Left Handrail...

English Manual
Page 36
... model number and serial number of the product (see the front cover of this manual) •• the name of the product (see the front cover of this manual) •• the key number and description of the replacement part(s) (see the PART LIST and the EXPLODED DRAWING near the end of this manual) LIMITED WARRANTY IMPORTANT: To protect your fitness equipment with the use , or costs of this manual...
... model number and serial number of the product (see the front cover of this manual) •• the name of the product (see the front cover of this manual) •• the key number and description of the replacement part(s) (see the PART LIST and the EXPLODED DRAWING near the end of this manual) LIMITED WARRANTY IMPORTANT: To protect your fitness equipment with the use , or costs of this manual...


