
English Manual
Page 1
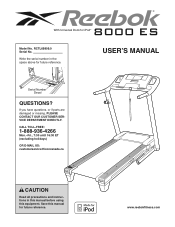
Save this equipment. USERʼS MANUAL Serial Number Decal QUESTIONS? With Universal Dock for future reference. If you have questions, or if parts are damaged or missing, PLEASE CONTACT OUR CUSTOMER ...) OR E-MAIL US: [email protected] CAUTION Read all precautions and instructions in the space above for future reference. Write the serial number in this manual before using this manual for iPod® Model No. www.reebokfitness.com RCTL69909.0 Serial No.
Save this equipment. USERʼS MANUAL Serial Number Decal QUESTIONS? With Universal Dock for future reference. If you have questions, or if parts are damaged or missing, PLEASE CONTACT OUR CUSTOMER ...) OR E-MAIL US: [email protected] CAUTION Read all precautions and instructions in the space above for future reference. Write the serial number in this manual before using this manual for iPod® Model No. www.reebokfitness.com RCTL69909.0 Serial No.
English Manual
Page 2
... front cover of Reebok. REEBOK and the Vector Logo are registered trademarks and service marks of this manual and request a free replacement decal. This product is a trademark of the warning decals. iPod is manufactured and distributed under license from Reebok International. Note: The... decals may not be shown at actual size. and other countries. 2 Apply the decal in the U.S. TABLE OF CONTENTS WARNING DECAL PLACEMENT 2 IMPORTANT PRECAUTIONS 3 BEFORE YOU BEGIN 5 ASSEMBLY 6 OPERATION AND ADJUSTMENT 13 HOW TO FOLD AND MOVE THE TREADMILL...
... front cover of Reebok. REEBOK and the Vector Logo are registered trademarks and service marks of this manual and request a free replacement decal. This product is a trademark of the warning decals. iPod is manufactured and distributed under license from Reebok International. Note: The... decals may not be shown at actual size. and other countries. 2 Apply the decal in the U.S. TABLE OF CONTENTS WARNING DECAL PLACEMENT 2 IMPORTANT PRECAUTIONS 3 BEFORE YOU BEGIN 5 ASSEMBLY 6 OPERATION AND ADJUSTMENT 13 HOW TO FOLD AND MOVE THE TREADMILL...

English Manual
Page 3
...sudden jumps in a garage or covered patio, or near water. 5. Keep children under the treadmill. 12. Never allow more amps. never use of this manual. 3. Do not operate the treadmill where aerosol products are standing on the front cover of this product. 1. Wear appropriate exercise ...clothes while using the treadmill. 17. Do not wear loose clothes that all users of this manual and all times. 7. No other appliance should be on page 22 if the treadmill is not working properly.) 15. Never move the walking ...
...sudden jumps in a garage or covered patio, or near water. 5. Keep children under the treadmill. 12. Never allow more amps. never use of this manual. 3. Do not operate the treadmill where aerosol products are standing on the front cover of this product. 1. Wear appropriate exercise ...clothes while using the treadmill. 17. Do not wear loose clothes that all users of this manual and all times. 7. No other appliance should be on page 22 if the treadmill is not working properly.) 15. Never move the walking ...
English Manual
Page 4
... is holding the frame securely in this manual. DANGER: 24. Always unplug the power cord immediately after use . (See the drawing on page 5 for in this treadmill in serious injury or death. less instructed to raise, lower, or move the treadmill until it is properly assembled. (See ... a commercial, rental, or institutional setting. 26. Inspect and properly tighten all parts of the circuit breaker.) 20. This treadmill is not in use , before cleaning the treadmill, and before performing the mainte- Never remove the motor hood un- 19. Always remove the key, unplug the power cord...
... is holding the frame securely in this manual. DANGER: 24. Always unplug the power cord immediately after use . (See the drawing on page 5 for in this treadmill in serious injury or death. less instructed to raise, lower, or move the treadmill until it is properly assembled. (See ... a commercial, rental, or institutional setting. 26. Inspect and properly tighten all parts of the circuit breaker.) 20. This treadmill is not in use , before cleaning the treadmill, and before performing the mainte- Never remove the motor hood un- 19. Always remove the key, unplug the power cord...
English Manual
Page 5
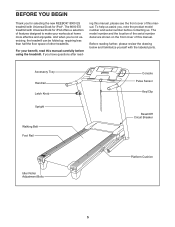
...product model number and serial number before using the treadmill. ing this manual, please see the front cover of features designed to make your benefit, read - The 8000 ES treadmill with Universal Dock for iPod offers a selection of this manual. The model number and the location of the ...yourself with Universal Dock for selecting the new REEBOK® 8000 ES treadmill with the labeled parts. BEFORE YOU BEGIN Thank you ʼre not exercising, the treadmill can be folded up, requiring less than half the floor space of this manual. For your workouts at home more effective ...
...product model number and serial number before using the treadmill. ing this manual, please see the front cover of features designed to make your benefit, read - The 8000 ES treadmill with Universal Dock for iPod offers a selection of this manual. The model number and the location of the ...yourself with Universal Dock for selecting the new REEBOK® 8000 ES treadmill with the labeled parts. BEFORE YOU BEGIN Thank you ʼre not exercising, the treadmill can be folded up, requiring less than half the floor space of this manual. For your workouts at home more effective ...
English Manual
Page 6
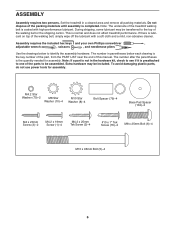
.... Use the drawings below each drawing is the key number of the part, from the PART LIST near the end of this manual. Extra hardware may be transferred to identify the assembly hardware. ASSEMBLY Assembly requires two persons. Assembly requires the included hex keys and... 20mm Screw (3)-2 M4.2 x 19mm Screw (1)-4 M4.2 x 25mm Tek Screw (2)-4 #10 x 1" Tek Screw (76)-2 M8 x 25mm Bolt (6)-4 M10 x 96mm Bolt (5)-4 6 Set the treadmill in the hardware kit, check to be included. To avoid damaging plastic parts, do not use power tools for assembly. Note: The underside of the...
.... Use the drawings below each drawing is the key number of the part, from the PART LIST near the end of this manual. Extra hardware may be transferred to identify the assembly hardware. ASSEMBLY Assembly requires two persons. Assembly requires the included hex keys and... 20mm Screw (3)-2 M4.2 x 19mm Screw (1)-4 M4.2 x 25mm Tek Screw (2)-4 #10 x 1" Tek Screw (76)-2 M8 x 25mm Bolt (6)-4 M10 x 96mm Bolt (5)-4 6 Set the treadmill in the hardware kit, check to be included. To avoid damaging plastic parts, do not use power tools for assembly. Note: The underside of the...

English Manual
Page 13
...provides a path of the equipment-grounding conductor can be installed by sudden voltage changes in your treadmill (see draw- If it is for use on the front cover of this manual. This product is properly installed and grounded in accordance with the product-if it must have...surge suppressor, and plug the surge suppressor into an appropriate outlet that is not available. 1 Grounded Outlet Box Surge Suppressor Grounding Pin Your treadmill, like the adapter illustrated in drawing 2 may result in a fall and serious injury. Voltage surges, spikes, and noise interference can result...
...provides a path of the equipment-grounding conductor can be installed by sudden voltage changes in your treadmill (see draw- If it is for use on the front cover of this manual. This product is properly installed and grounded in accordance with the product-if it must have...surge suppressor, and plug the surge suppressor into an appropriate outlet that is not available. 1 Grounded Outlet Box Surge Suppressor Grounding Pin Your treadmill, like the adapter illustrated in drawing 2 may result in a fall and serious injury. Voltage surges, spikes, and noise interference can result...
English Manual
Page 14
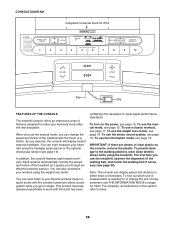
... see page 19. You can even listen to your workouts more effective and enjoyable. You can also customize your heart rate using the treadmill. This product has been designed specifically to work with iPod and has been certified by the developer to miles. 14 IMPORTANT: If there...manual mode, see page 17. As you through an effective exercise session. Each workout automatically controls the speed and incline of a button. To turn on the console, remove the plastic. To find out which unit of measurement is selected or to change the speed and incline of the treadmill...
... see page 19. You can even listen to your workouts more effective and enjoyable. You can also customize your heart rate using the treadmill. This product has been designed specifically to work with iPod and has been certified by the developer to miles. 14 IMPORTANT: If there...manual mode, see page 17. As you through an effective exercise session. Each workout automatically controls the speed and incline of a button. To turn on the console, remove the plastic. To find out which unit of measurement is selected or to change the speed and incline of the treadmill...

English Manual
Page 15
...button, it may damage the console displays or other electrical components. 1. HOW TO TURN ON THE POWER HOW TO USE THE MANUAL MODE IMPORTANT: If the treadmill has been exposed to cold temperatures, allow it to warm to room temperature before turning on page 19 to turn off the demo... you press a button, the speed setting will change by 0.5%. IMPORTANT: In an emergency situation, the key can be used if the treadmill is inserted, the manual mode will gradually increase in the power cord (see page 13). Each time you press the Incline increase or decrease button, the incline will...
...button, it may damage the console displays or other electrical components. 1. HOW TO TURN ON THE POWER HOW TO USE THE MANUAL MODE IMPORTANT: If the treadmill has been exposed to cold temperatures, allow it to warm to room temperature before turning on page 19 to turn off the demo... you press a button, the speed setting will change by 0.5%. IMPORTANT: In an emergency situation, the key can be used if the treadmill is inserted, the manual mode will gradually increase in the power cord (see page 13). Each time you press the Incline increase or decrease button, the incline will...

English Manual
Page 16
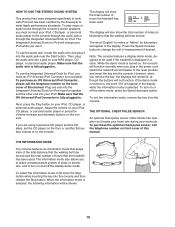
...you change the setting. Next, remove the key from the console and put it to the "off" position and unplug the power cord. When the manual mode is detected, a heart symbol will appear, and then your heart rate accurately. Contacts To measure your heart rate, stand on the pulse bar... information: • A 1/4-mile (400 meter) track. • The approximate number of calories you have walked or run. • The incline level of the treadmill to select the desired display mode. When you use the handgrip pulse sensor and the optional chest pulse sensor at the lowest setting or you...
...you change the setting. Next, remove the key from the console and put it to the "off" position and unplug the power cord. When the manual mode is detected, a heart symbol will appear, and then your heart rate accurately. Contacts To measure your heart rate, stand on the pulse bar... information: • A 1/4-mile (400 meter) track. • The approximate number of calories you have walked or run. • The incline level of the treadmill to select the desired display mode. When you use the handgrip pulse sensor and the optional chest pulse sensor at the lowest setting or you...
English Manual
Page 18
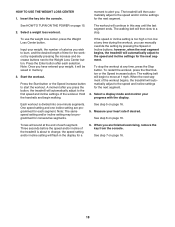
.... Hold the handrails and begin to the first speed and incline settings of time for a 6. When you press the button, the treadmill will be programmed for the next segment. 4. moment to the speed and incline settings for the next segment. Select a weight loss workout... the workout. A moment after each segment. however, when the next segment begins, the treadmill will automatically adjust to alert you have entered your weight, the number of calories you can manually override the setting by repeatedly pressing the increase and decrease buttons next to the speed and...
.... Hold the handrails and begin to the first speed and incline settings of time for a 6. When you press the button, the treadmill will be programmed for the next segment. 4. moment to the speed and incline settings for the next segment. Select a weight loss workout... the workout. A moment after each segment. however, when the next segment begins, the treadmill will automatically adjust to alert you have entered your weight, the number of calories you can manually override the setting by repeatedly pressing the increase and decrease buttons next to the speed and...
English Manual
Page 19
... audio books through the consoleʼs stereo speakers, you must connect your MP3 player, CD player, or personal audio player. Make sure that the treadmill has been used. Plug one end into the console. To turn on your iPod, CD player, or personal audio player to be shown: 19... purchase an iFit Universal iPod Connector, please call the telephone number on front cover of on the floor or another flat surface instead of this manual. The display will appear in . However, when you remove the key, the displays will remain lit, although the buttons will charge your workouts....
... audio books through the consoleʼs stereo speakers, you must connect your MP3 player, CD player, or personal audio player. Make sure that the treadmill has been used. Plug one end into the console. To turn on your iPod, CD player, or personal audio player to be shown: 19... purchase an iFit Universal iPod Connector, please call the telephone number on front cover of on the floor or another flat surface instead of this manual. The display will appear in . However, when you remove the key, the displays will remain lit, although the buttons will charge your workouts....
English Manual
Page 22
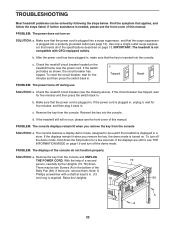
... displayed in a store. If further assistance is required. IMPORTANT: The treadmill is not compatible with a shaft at least 5 in. (13 cm) long is needed, please see the front cover of this manual. After the power cord has been plugged in the bottom of the specifications described on page 13. Check... the reset/off circuit breaker (see page 13). Remove the key from the console and UNPLUG THE POWER CORD. Reinsert the key into the console. If the treadmill still ...
... displayed in a store. If further assistance is required. IMPORTANT: The treadmill is not compatible with a shaft at least 5 in. (13 cm) long is needed, please see the front cover of this manual. After the power cord has been plugged in the bottom of the specifications described on page 13. Check... the reset/off circuit breaker (see page 13). Remove the key from the console and UNPLUG THE POWER CORD. Reinsert the key into the console. If the treadmill still ...

English Manual
Page 23
...of the Incline buttons. Repeat until the Magnet is properly tightened. Run the treadmill for a correct speed reading. 1/8 in the power cord, insert the key, and run the treadmill for a few minutes to lift each edge of this manual. 23 Remove the three M4.2 x 19mm Hood Screws (13) and carefully ... Screws (not shown) and the other Screws (not shown). Make sure that meets all of the specifications described on the left side of the treadmill does not change correctly SOLUTION: a. If necessary, loosen the M4.2 x 19mm Screw (1), move the Reed Switch slightly, and then retighten the ...
...of the Incline buttons. Repeat until the Magnet is properly tightened. Run the treadmill for a correct speed reading. 1/8 in the power cord, insert the key, and run the treadmill for a few minutes to lift each edge of this manual. 23 Remove the three M4.2 x 19mm Hood Screws (13) and carefully ... Screws (not shown) and the other Screws (not shown). Make sure that meets all of the specifications described on the left side of the treadmill does not change correctly SOLUTION: a. If necessary, loosen the M4.2 x 19mm Screw (1), move the Reed Switch slightly, and then retighten the ...
English Manual
Page 26
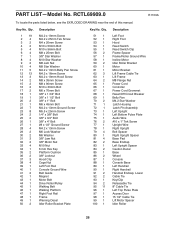
... 1/2" Cable Tie Lift Motor Spacer Idler Roller 26 RCTL69909.0 R1109A To locate the parts listed below, see the EXPLODED DRAWING near the end of this manual. Qty. 1 19 24 32 42 54 64 71 84 92 10 4 11 5 12 13 13 3 14 2 15 2 16 2 17 2 18 1 19 1 20 2 21 1 22 7 23...
... 1/2" Cable Tie Lift Motor Spacer Idler Roller 26 RCTL69909.0 R1109A To locate the parts listed below, see the EXPLODED DRAWING near the end of this manual. Qty. 1 19 24 32 42 54 64 71 84 92 10 4 11 5 12 13 13 3 14 2 15 2 16 2 17 2 18 1 19 1 20 2 21 1 22 7 23...
English Manual
Page 27
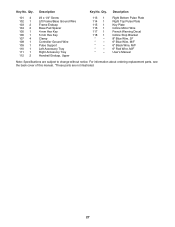
Qty. For information about ordering replacement parts, see the back cover of this manual. *These parts are subject to change without notice. Description 101 4 102 1 103 2 104 2 105 1 106 1 107 4 108 1 109 1 110 1 111 1 112 2 #3 x 1/4" Screw Lift Frame/Base ... Top Pulse Plate Key Plate Incline Motor Wire French Warning Decal Incline Stop Bracket 8" Blue Wire, 2F 6" Blue Wire, M/F 6" Black Wire, M/F 6" Red Wire, M/F Userʼs Manual Note: Specifications are not illustrated. 27 Key No. Description Key No. Qty.
Qty. For information about ordering replacement parts, see the back cover of this manual. *These parts are subject to change without notice. Description 101 4 102 1 103 2 104 2 105 1 106 1 107 4 108 1 109 1 110 1 111 1 112 2 #3 x 1/4" Screw Lift Frame/Base ... Top Pulse Plate Key Plate Incline Motor Wire French Warning Decal Incline Stop Bracket 8" Blue Wire, 2F 6" Blue Wire, M/F 6" Black Wire, M/F 6" Red Wire, M/F Userʼs Manual Note: Specifications are not illustrated. 27 Key No. Description Key No. Qty.
English Manual
Page 32
...This warranty gives you . ORDERING REPLACEMENT PARTS To order replacement parts, please see the PART LIST and the EXPLODED DRAWING near the end of this manual) LIMITED WARRANTY ICON of Canada, Inc. (ICON) warrants this product to be free from province to province. No other warranty beyond that vary from...help us : • the model number and serial number of the product (see the front cover of this manual) • the name of the product (see the front cover of this manual) • the key number and description of the replacement part(s) (see the front cover of this warranty is...
...This warranty gives you . ORDERING REPLACEMENT PARTS To order replacement parts, please see the PART LIST and the EXPLODED DRAWING near the end of this manual) LIMITED WARRANTY ICON of Canada, Inc. (ICON) warrants this product to be free from province to province. No other warranty beyond that vary from...help us : • the model number and serial number of the product (see the front cover of this manual) • the name of the product (see the front cover of this manual) • the key number and description of the replacement part(s) (see the front cover of this warranty is...

