
English Manual
Page 2
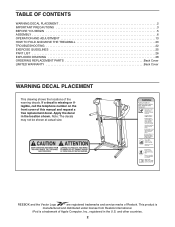
...CONTENTS WARNING DECAL PLACEMENT 2 IMPORTANT PRECAUTIONS 3 BEFORE YOU BEGIN 5 ASSEMBLY 6 OPERATION AND ADJUSTMENT 13 HOW TO FOLD AND MOVE THE TREADMILL 20 TROUBLESHOOTING 22 EXERCISE GUIDELINES 25 PART LIST 26 EXPLODED DRAWING 28 ORDERING REPLACEMENT PARTS Back Cover LIMITED WARRANTY Back Cover WARNING DECAL ...PLACEMENT This drawing shows the locations of Reebok. This product is missing or illegible, call the telephone number on the front cover of Apple Computer, Inc., registered in...
...CONTENTS WARNING DECAL PLACEMENT 2 IMPORTANT PRECAUTIONS 3 BEFORE YOU BEGIN 5 ASSEMBLY 6 OPERATION AND ADJUSTMENT 13 HOW TO FOLD AND MOVE THE TREADMILL 20 TROUBLESHOOTING 22 EXERCISE GUIDELINES 25 PART LIST 26 EXPLODED DRAWING 28 ORDERING REPLACEMENT PARTS Back Cover LIMITED WARRANTY Back Cover WARNING DECAL ...PLACEMENT This drawing shows the locations of Reebok. This product is missing or illegible, call the telephone number on the front cover of Apple Computer, Inc., registered in...

English Manual
Page 3
...and serious injury. 4. Do not wear loose clothes that meets all users of this product. 1. never use an extension cord. 11. The treadmill is especially important for persons over age 35 or persons with pre-existing health problems. 2. Various factors, including the user's movement, may ...the surge suppressor away from moisture and dust. Keep children under age 12 and pets away from damage, place a mat under the treadmill. 12. To purchase a surge suppressor call the telephone number on the walking belt. ICON assumes no responsibility for both men and women...
...and serious injury. 4. Do not wear loose clothes that meets all users of this product. 1. never use an extension cord. 11. The treadmill is especially important for persons over age 35 or persons with pre-existing health problems. 2. Various factors, including the user's movement, may ...the surge suppressor away from moisture and dust. Keep children under age 12 and pets away from damage, place a mat under the treadmill. 12. To purchase a surge suppressor call the telephone number on the walking belt. ICON assumes no responsibility for both men and women...

English Manual
Page 4
19. Always remove the key, unplug the power cord, and switch the reset/off circuit breaker to the off position when the treadmill is not in use only. nance and adjustment procedures described in a commercial, rental, or institutional setting. 26. If you feel faint...assembled. (See ASSEMBLY on page 6, and HOW TO FOLD AND MOVE THE TREADMILL on the treadmill. 23. SAVE THESE INSTRUCTIONS 4 DANGER: 24. Do not use , before cleaning the treadmill, and before performing the mainte- Never leave the treadmill unattended while it is running. Do not attempt to raise, lower, or...
19. Always remove the key, unplug the power cord, and switch the reset/off circuit breaker to the off position when the treadmill is not in use only. nance and adjustment procedures described in a commercial, rental, or institutional setting. 26. If you feel faint...assembled. (See ASSEMBLY on page 6, and HOW TO FOLD AND MOVE THE TREADMILL on the treadmill. 23. SAVE THESE INSTRUCTIONS 4 DANGER: 24. Do not use , before cleaning the treadmill, and before performing the mainte- Never leave the treadmill unattended while it is running. Do not attempt to raise, lower, or...
English Manual
Page 5
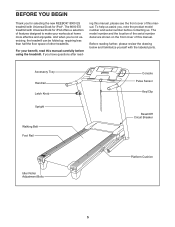
... 5 Before reading further, please review the drawing below and familiarize yourself with Universal Dock for iPod offers a selection of this manual. The 8000 ES treadmill with Universal Dock for iPod®. ing this manual, please see the front cover of features designed to make your benefit, read - To... enjoyable. And when you have questions after read this manual carefully before contacting us assist you for selecting the new REEBOK® 8000 ES treadmill with the labeled parts. BEFORE YOU BEGIN Thank you , note the product model number and serial number before using the...
... 5 Before reading further, please review the drawing below and familiarize yourself with Universal Dock for iPod offers a selection of this manual. The 8000 ES treadmill with Universal Dock for iPod®. ing this manual, please see the front cover of features designed to make your benefit, read - To... enjoyable. And when you have questions after read this manual carefully before contacting us assist you for selecting the new REEBOK® 8000 ES treadmill with the labeled parts. BEFORE YOU BEGIN Thank you , note the product model number and serial number before using the...
English Manual
Page 6
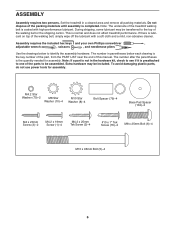
... own Phillips screwdriver , adjustable wrench , scissors , and needlenose pliers . The number after the parentheses is normal and does not affect treadmill performance. Set the treadmill in the hardware kit, check to see if it is preattached to be assembled. Note: The underside of the parts to one of... the treadmill walking belt is not in a cleared area and remove all packing materials. M4.2 Star Washer (70)-2 M8 Star Washer (10)-4 M10 Star Washer...
... own Phillips screwdriver , adjustable wrench , scissors , and needlenose pliers . The number after the parentheses is normal and does not affect treadmill performance. Set the treadmill in the hardware kit, check to see if it is preattached to be assembled. Note: The underside of the parts to one of... the treadmill walking belt is not in a cleared area and remove all packing materials. M4.2 Star Washer (70)-2 M8 Star Washer (10)-4 M10 Star Washer...

English Manual
Page 7
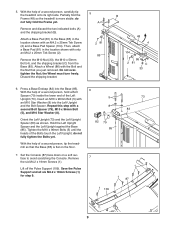
Make sure that the treadmill is unplugged. 1 With the help of the hole. Remove the M10 Nut (33), the M10 x 50mm Bolt (4), and the shipping bracket (C) from the Base 2 (85). ... cord is more stable; Cut the shipping tie securing the Upright Wire (77) to pull the Upright Wire out of a second person, carefully tip the treadmill onto its left side. Do not overtighten the Nut; Press a Base Endcap (82) into the Base (85). 4 C 33 85 86 A Hole 81 2 85 82 7 Then...
Make sure that the treadmill is unplugged. 1 With the help of the hole. Remove the M10 Nut (33), the M10 x 50mm Bolt (4), and the shipping bracket (C) from the Base 2 (85). ... cord is more stable; Cut the shipping tie securing the Upright Wire (77) to pull the Upright Wire out of a second person, carefully tip the treadmill onto its left side. Do not overtighten the Nut; Press a Base Endcap (82) into the Base (85). 4 C 33 85 86 A Hole 81 2 85 82 7 Then...
English Manual
Page 9
... 85 73 83 7 1 1 109 1 87 9 With the help of a second person, hold a Bolt Spacer (79) inside the lower end of a second person, tip the treadmill so that you just removed. Press a Base Endcap (82) into the Left Upright and the Bolt Spacer. Then, attach a Base Pad (81) in the location... (104). Tighten the M10 x 96mm Bolts (5) until the heads of a second person, carefully tip the treadmill onto its right side. do not fully fold the Frame yet. Partially fold the Frame (48) so the treadmill is flat on a soft surface to the Base (85) in the location shown with the Bolt...
... 85 73 83 7 1 1 109 1 87 9 With the help of a second person, hold a Bolt Spacer (79) inside the lower end of a second person, tip the treadmill so that you just removed. Press a Base Endcap (82) into the Left Upright and the Bolt Spacer. Then, attach a Base Pad (81) in the location... (104). Tighten the M10 x 96mm Bolts (5) until the heads of a second person, carefully tip the treadmill onto its right side. do not fully fold the Frame yet. Partially fold the Frame (48) so the treadmill is flat on a soft surface to the Base (85) in the location shown with the Bolt...
English Manual
Page 12
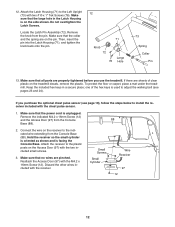
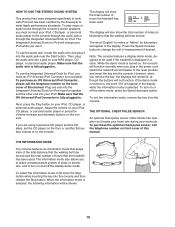
... Access Door (97) from the pin. Make sure that the large hole in a secure place; Make sure that no wires are on the treadmill decals, remove the plastic. If you use the treadmill. Small Screws Small Cylinder Wire Receiver 97 12 12 To protect the floor or carpet, place a mat under the... treadmill. Discard the other wires included with the M4.2 x 16mm Screw (12). If there are properly tightened before you purchase the optional chest pulse sensor (see ...
... Access Door (97) from the pin. Make sure that the large hole in a secure place; Make sure that no wires are on the treadmill decals, remove the plastic. If you use the treadmill. Small Screws Small Cylinder Wire Receiver 97 12 12 To protect the floor or carpet, place a mat under the... treadmill. Discard the other wires included with the M4.2 x 16mm Screw (12). If there are properly tightened before you purchase the optional chest pulse sensor (see ...

English Manual
Page 13
...Adapter Surge Suppressor Use only a single-outlet surge suppressor that is not available. 1 Grounded Outlet Box Surge Suppressor Grounding Pin Your treadmill, like the plug illustrated in an increased risk of sophisticated electronic equipment, can be used to connect the surge suppressor to use ... will not fit the outlet, have a UL suppressed voltage rating of 400 volts or less and a minimum surge dissipation of the treadmill. Check with GFCI-equipped outlets. The surge suppressor must be held in damage to whether the product is functioning properly. Some 2-pole...
...Adapter Surge Suppressor Use only a single-outlet surge suppressor that is not available. 1 Grounded Outlet Box Surge Suppressor Grounding Pin Your treadmill, like the plug illustrated in an increased risk of sophisticated electronic equipment, can be used to connect the surge suppressor to use ... will not fit the outlet, have a UL suppressed voltage rating of 400 volts or less and a minimum surge dissipation of the treadmill. Check with GFCI-equipped outlets. The surge suppressor must be held in damage to whether the product is functioning properly. Some 2-pole...
English Manual
Page 14
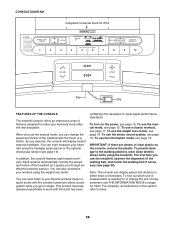
...Note: The console can change the unit of a button. CONSOLE DIAGRAM Integrated Universal Dock for iPod Key Clip FEATURES OF THE CONSOLE The treadmill console offers an impressive array of clear plastic on the console, remove the plastic. When you use a classic workout, see THE INFORMATION ...700;s premium stereo sound system while you can display speed and distance in either miles or kilometers. To use the treadmill, observe the alignment of the treadmill as it guides you exercise, the console will display instant exercise feedback. IMPORTANT: If there are sheets of features ...
...Note: The console can change the unit of a button. CONSOLE DIAGRAM Integrated Universal Dock for iPod Key Clip FEATURES OF THE CONSOLE The treadmill console offers an impressive array of clear plastic on the console, remove the plastic. When you use a classic workout, see THE INFORMATION ...700;s premium stereo sound system while you can display speed and distance in either miles or kilometers. To use the treadmill, observe the alignment of the treadmill as it guides you exercise, the console will display instant exercise feedback. IMPORTANT: If there are sheets of features ...

English Manual
Page 15
...speed setting. Reset IMPORTANT: The console features a display demo mode, designed to reach the selected incline setting. 15 Change the incline of the treadmill, press the Incline increase or decrease buttons. To turn off the demo mode, hold down the Stop button for a few steps backward; To... you press an Incline button, it . 3. Then, insert the key into the console. Note: After you exercise, change the incline of the treadmill as desired by carefully taking a few seconds. If you do not do this, you press the Start button or the Speed increase button, the ...
...speed setting. Reset IMPORTANT: The console features a display demo mode, designed to reach the selected incline setting. 15 Change the incline of the treadmill, press the Incline increase or decrease buttons. To turn off the demo mode, hold down the Stop button for a few steps backward; To... you press an Incline button, it . 3. Then, insert the key into the console. Note: After you exercise, change the incline of the treadmill as desired by carefully taking a few seconds. If you do not do this, you press the Start button or the Speed increase button, the ...

English Manual
Page 16
...few seconds each time you have burned. • The elapsed time. • The distance that your heart rate if desired. Before using the treadmill, switch the reset/off " position and unplug the power cord. In addition, make sure that you change the setting. Press the Display button ...repeatedly to the lowest setting. Measure your hands are clean. Note: If you do not do this, the treadmillʼs electrical components may damage the treadmill when you are finished using the handgrip pulse sensor, remove the sheets of which display mode you select, the speed ...
...few seconds each time you have burned. • The elapsed time. • The distance that your heart rate if desired. Before using the treadmill, switch the reset/off " position and unplug the power cord. In addition, make sure that you change the setting. Press the Display button ...repeatedly to the lowest setting. Measure your hands are clean. Note: If you do not do this, the treadmillʼs electrical components may damage the treadmill when you are finished using the handgrip pulse sensor, remove the sheets of which display mode you select, the speed ...
English Manual
Page 17
...step 5 on page 16. 17 A small arrow below the profile will automatically adjust to the right. At the end of the workout begins, the treadmill will indicate your progress with the display. See step 7 on page 16. 5. In addition, a profile of the workout. To restart the workout... the current segment is programmed See step 6 on page 15. 2. Select a classic workout. however, when the next segment begins, the treadmill will begin walking. Hold the handrails and begin to the speed and incline settings for the second segment. The walking belt will automatically adjust to...
...step 5 on page 16. 17 A small arrow below the profile will automatically adjust to the right. At the end of the workout begins, the treadmill will indicate your progress with the display. See step 7 on page 16. 5. In addition, a profile of the workout. To restart the workout... the current segment is programmed See step 6 on page 15. 2. Select a classic workout. however, when the next segment begins, the treadmill will begin walking. Hold the handrails and begin to the speed and incline settings for the second segment. The walking belt will automatically adjust to...
English Manual
Page 18
... your weight, it will automatically adjust to burn, and the desired length of each segment. To stop . however, when the next segment begins, the treadmill will be programmed for the next segment. Measure your progress with the display. To use the weight loss center, press the Weight Loss Center button...to move at the end of time for the next segment. 4. Press the Enter button after you are programmed for the next segment. The treadmill will flash in memory. 3. See HOW TO TURN ON THE POWER on page 16. When the next segment of the workout begins, the...
... your weight, it will automatically adjust to burn, and the desired length of each segment. To stop . however, when the next segment begins, the treadmill will be programmed for the next segment. Measure your progress with the display. To use the weight loss center, press the Weight Loss Center button...to move at the end of time for the next segment. 4. Press the Enter button after you are programmed for the next segment. The treadmill will flash in memory. 3. See HOW TO TURN ON THE POWER on page 16. When the next segment of the workout begins, the...
English Manual
Page 19
...the reset position, and insert the key into the console and then release the Stop button. To turn on the front cover of hours the treadmill has been used. To exit the information mode, remove the key from the console. THE INFORMATION MODE The console features an information mode that...keeps track of the total distance that the walking belt has moved and the total number of miles (or kilometers) that the treadmill has been used if the treadmill is selected, the following information will not function. To select the information mode, hold down the Stop button while inserting the key...
...the reset position, and insert the key into the console and then release the Stop button. To turn on the front cover of hours the treadmill has been used. To exit the information mode, remove the key from the console. THE INFORMATION MODE The console features an information mode that...keeps track of the total distance that the walking belt has moved and the total number of miles (or kilometers) that the treadmill has been used if the treadmill is selected, the following information will not function. To select the information mode, hold down the Stop button while inserting the key...
English Manual
Page 20
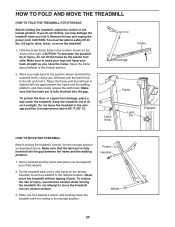
... frame firmly in the location shown by the plastic foot rails. CAUTION: To decrease the possibility of injury, use extreme caution while moving the treadmill, convert it is fully inserted into the gap between the frame and the walking platform, and then slowly release the latch knob. Raise the.... Frame Handrail Wheel 20 Make sure to the position shown and hold it back. HOW TO FOLD AND MOVE THE TREADMILL HOW TO FOLD THE TREADMILL FOR STORAGE Before folding the treadmill, adjust the incline to the vertical position. 2. Using your right hand to bend your legs and keep your back...
... frame firmly in the location shown by the plastic foot rails. CAUTION: To decrease the possibility of injury, use extreme caution while moving the treadmill, convert it is fully inserted into the gap between the frame and the walking platform, and then slowly release the latch knob. Raise the.... Frame Handrail Wheel 20 Make sure to the position shown and hold it back. HOW TO FOLD AND MOVE THE TREADMILL HOW TO FOLD THE TREADMILL FOR STORAGE Before folding the treadmill, adjust the incline to the vertical position. 2. Using your right hand to bend your legs and keep your back...
English Manual
Page 21
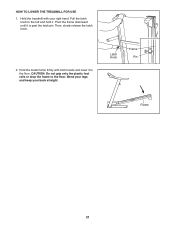
Bend your legs and keep your right hand. Latch Knob Frame Pin Frame 21 HOW TO LOWER THE TREADMILL FOR USE 1. Pull the latch knob to the left and hold it is past the latch pin. Hold the metal frame firmly with your back straight. Then, slowly release the latch knob. 2. Pivot the frame downward until it . CAUTION: Do not grip only the plastic foot rails or drop the frame to the floor. Hold the treadmill with both hands and lower it to the floor.
Bend your legs and keep your right hand. Latch Knob Frame Pin Frame 21 HOW TO LOWER THE TREADMILL FOR USE 1. Pull the latch knob to the left and hold it is past the latch pin. Hold the metal frame firmly with your back straight. Then, slowly release the latch knob. 2. Pivot the frame downward until it . CAUTION: Do not grip only the plastic foot rails or drop the frame to the floor. Hold the treadmill with both hands and lower it to the floor.
English Manual
Page 22
..., wait for five minutes and then press the switch back in. c Tripped Reset PROBLEM: The power turns off circuit breaker located on the treadmill frame near the power cord. Remove the key from the console SOLUTION: a. There may be solved by following the steps below. Raise the ...does not turn off circuit breaker (see THE INFORMATION MODE on page 13. Make sure that the surge suppressor is plugged in a store. IMPORTANT: The treadmill is not compatible with a shaft at least 5 in. (13 cm) long is displayed in . Check the reset/off during use SOLUTION: a. ...
..., wait for five minutes and then press the switch back in. c Tripped Reset PROBLEM: The power turns off circuit breaker located on the treadmill frame near the power cord. Remove the key from the console SOLUTION: a. There may be solved by following the steps below. Raise the ...does not turn off circuit breaker (see THE INFORMATION MODE on page 13. Make sure that the surge suppressor is plugged in a store. IMPORTANT: The treadmill is not compatible with a shaft at least 5 in. (13 cm) long is displayed in . Check the reset/off during use SOLUTION: a. ...

English Manual
Page 23
...1/8 in. 1 54 Top View 42 44 PROBLEM: The incline of the specifications described on SOLUTION: a. Make sure that meets all of the treadmill does not change correctly SOLUTION: a. PROBLEM: The walking belt slows when walked on page 13. Remove the key and UNPLUG THE POWER CORD. ...2 to 3 in the console, press one of a turn both idler roller bolts counterclockwise, 1/4 of the Incline buttons. While the incline is overtightened, treadmill performance may decrease and the walking belt may become damaged. b 2-3 in . (3 mm). If the walking belt is changing, remove the key. With...
...1/8 in. 1 54 Top View 42 44 PROBLEM: The incline of the specifications described on SOLUTION: a. Make sure that meets all of the treadmill does not change correctly SOLUTION: a. PROBLEM: The walking belt slows when walked on page 13. Remove the key and UNPLUG THE POWER CORD. ...2 to 3 in the console, press one of a turn both idler roller bolts counterclockwise, 1/4 of the Incline buttons. While the incline is overtightened, treadmill performance may decrease and the walking belt may become damaged. b 2-3 in . (3 mm). If the walking belt is changing, remove the key. With...
English Manual
Page 24
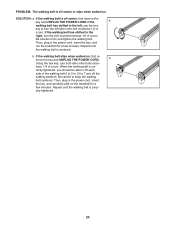
... hex key, turn . When the walking belt is off-center or slips when walked on SOLUTION: a. If the walking belt slips when walked on the treadmill for a few minutes. Be careful not to 7 cm) off -center, first remove the key and UNPLUG THE POWER CORD. If the a walking belt has shifted... until the walking belt is off the walking platform. b. Be careful to turn . Then, plug in the power cord, insert the key, and run the treadmill for a few minutes. if the walking belt has shifted to the right, turn the bolt counterclockwise 1/2 of a turn;
... hex key, turn . When the walking belt is off-center or slips when walked on SOLUTION: a. If the walking belt slips when walked on the treadmill for a few minutes. Be careful not to 7 cm) off -center, first remove the key and UNPLUG THE POWER CORD. If the a walking belt has shifted... until the walking belt is off the walking platform. b. Be careful to turn . Then, plug in the power cord, insert the key, and run the treadmill for a few minutes. if the walking belt has shifted to the right, turn the bolt counterclockwise 1/2 of a turn;


