
User Manual
Page 2
REEBOK and the Vector Logo are registered trademarks and service marks of this manual. ® TABLE OF CONTENTS IMPORTANT PRECAUTIONS 3 BEFORE YOU BEGIN 5 ASSEMBLY 6 HOW TO USE THE CHEST PULSE SENSOR 8 TREADMILL OPERATION 9 HOW TO FOLD AND MOVE THE TREADMILL 25 TROUBLESHOOTING 26 EXERCISE GUIDELINES 28 PART LIST 30 HOW TO ORDER REPLACEMENT PARTS 31 LIMITED WARRANTY Back Cover Note: An EXPLODED DRAWING is manufactured and distributed under license from Reebok International. 2 This product is attached in the center of Reebok.
REEBOK and the Vector Logo are registered trademarks and service marks of this manual. ® TABLE OF CONTENTS IMPORTANT PRECAUTIONS 3 BEFORE YOU BEGIN 5 ASSEMBLY 6 HOW TO USE THE CHEST PULSE SENSOR 8 TREADMILL OPERATION 9 HOW TO FOLD AND MOVE THE TREADMILL 25 TROUBLESHOOTING 26 EXERCISE GUIDELINES 28 PART LIST 30 HOW TO ORDER REPLACEMENT PARTS 31 LIMITED WARRANTY Back Cover Note: An EXPLODED DRAWING is manufactured and distributed under license from Reebok International. 2 This product is attached in the center of Reebok.
User Manual
Page 3
... page 5 if the treadmill is turned off position when the treadmill is the responsibility of the owner to persons, read the following important precautions and information before operating the treadmill. 1. Various factors, including the user's movement, may result in a garage or covered patio, or near water. 5. Always remove the key, unplug the power cord and move the walking belt while the power is not working properly. (See...
... page 5 if the treadmill is turned off position when the treadmill is the responsibility of the owner to persons, read the following important precautions and information before operating the treadmill. 1. Various factors, including the user's movement, may result in a garage or covered patio, or near water. 5. Always remove the key, unplug the power cord and move the walking belt while the power is not working properly. (See...
User Manual
Page 4
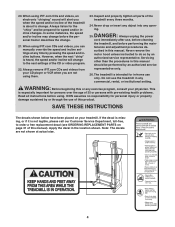
... treadmill. Do not use , before cleaning the treadmill, and before the personal trainer describes the change to change. Inspect and properly tighten all instructions before using iFIT.com CDs and videos, you can manually override the speed and incline settings at actual size. 4 Always unplug the power cord immediately after use the treadmill in any time by an authorized service representative only. 26. Never remove the motor hood unless instructed to order a free replacement decal (see ORDERING REPLACEMENT PARTS...
... treadmill. Do not use , before cleaning the treadmill, and before the personal trainer describes the change to change. Inspect and properly tighten all instructions before using iFIT.com CDs and videos, you can manually override the speed and incline settings at actual size. 4 Always unplug the power cord immediately after use the treadmill in any time by an authorized service representative only. 26. Never remove the motor hood unless instructed to order a free replacement decal (see ORDERING REPLACEMENT PARTS...
User Manual
Page 5
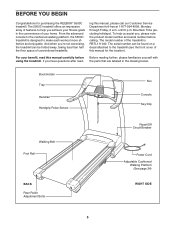
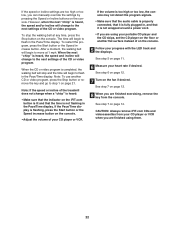
... Service Department toll-free at 1-877-994-4999, Monday through Friday, 6 a.m. The 5500C treadmill offers an impressive array of features to the treadmill (see the front cover of your benefit, read - ing this manual for purchasing the REEBOK® 5500C treadmill. BEFORE YOU BEGIN Congratulations for the location). Book Holder Tray Handrail Handgrip Pulse Sensor Fan Console Key/Clip Walking Belt Foot Rail BACK Rear Roller Adjustment Bolts Reset/Off Circuit Breaker Power Cord Adjustable...
... Service Department toll-free at 1-877-994-4999, Monday through Friday, 6 a.m. The 5500C treadmill offers an impressive array of features to the treadmill (see the front cover of your benefit, read - ing this manual for purchasing the REEBOK® 5500C treadmill. BEFORE YOU BEGIN Congratulations for the location). Book Holder Tray Handrail Handgrip Pulse Sensor Fan Console Key/Clip Walking Belt Foot Rail BACK Rear Roller Adjustment Bolts Reset/Off Circuit Breaker Power Cord Adjustable...
User Manual
Page 6
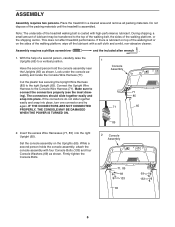
... into place, turn one connector and try again. This does not affect treadmill performance. Set the console assembly on the sides of lubricant may be transferred to the Console Wire Harness (71). Have the second person hold the console assembly near the Uprights (65) as shown. Note: The underside of the treadmill walking belt is lubricant on top of the walking belt or on the Uprights (65). Do...
... into place, turn one connector and try again. This does not affect treadmill performance. Set the console assembly on the sides of lubricant may be transferred to the Console Wire Harness (71). Have the second person hold the console assembly near the Uprights (65) as shown. Note: The underside of the treadmill walking belt is lubricant on top of the walking belt or on the Uprights (65). Do...

User Manual
Page 8
... electrode areas. CHEST PULSE SENSOR TROUBLESHOOTING The instructions on the treadmill, position yourself near the center of the walking belt. Sensor Unit Sensor Buckle Unit Next, wrap the chest pulse sensor around your chest and attach the other container that you walk or run on the following pages explain how the chest pulse sensor is designed to work with people who have normal heart rhythms. Heart rate reading problems may need to the sensor unit. Make...
... electrode areas. CHEST PULSE SENSOR TROUBLESHOOTING The instructions on the treadmill, position yourself near the center of the walking belt. Sensor Unit Sensor Buckle Unit Next, wrap the chest pulse sensor around your chest and attach the other container that you walk or run on the following pages explain how the chest pulse sensor is designed to work with people who have normal heart rhythms. Heart rate reading problems may need to the sensor unit. Make...
User Manual
Page 9
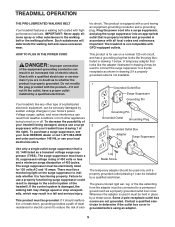
... treadmill being turned on the surge suppressor to the control system of your home's power. Do not modify the plug provided with all local codes and ordinances. To decrease the possibility of the treadmill. This product is damaged, the walking belt may change speed or stop unexpectedly, which may be electrically rated for use a surge suppressor with highperformance lubricant. The surge suppressor must be installed by a metal screw...
... treadmill being turned on the surge suppressor to the control system of your home's power. Do not modify the plug provided with all local codes and ordinances. To decrease the possibility of the treadmill. This product is damaged, the walking belt may change speed or stop unexpectedly, which may be electrically rated for use a surge suppressor with highperformance lubricant. The surge suppressor must be installed by a metal screw...
User Manual
Page 10
.... Using the included audio cable, you exercise. With the treadmill connected to your computer, you can also go to be changed with a touch of your heart rate near a target heart rate while you can even create custom programs and save them . To use a custom program, see page 23. 10 You can connect the treadmill to your home. iFIT.com CD and video programs automatically control the speed and incline of the treadmill as it guides...
.... Using the included audio cable, you exercise. With the treadmill connected to your computer, you can also go to be changed with a touch of your heart rate near a target heart rate while you can even create custom programs and save them . To use a custom program, see page 23. 10 You can connect the treadmill to your home. iFIT.com CD and video programs automatically control the speed and incline of the treadmill as it guides...
User Manual
Page 11
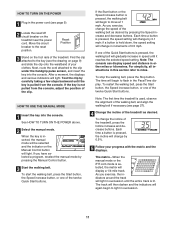
... MANUAL MODE 1 Insert the key into the console. To change by pressing the Manual Control button. 3 Start the walking belt. HOW TO TURN ON THE POWER 1 Plug in this section refer to miles. Each time a button is held down, the speed setting will light. Next, route the cord attached to the clip under the handgrip pulse sensor, and insert the key into the console. Test the clip by 0.1 mph; To stop the walking belt, press the Stop button. Note: The console can display speed and distance...
... MANUAL MODE 1 Insert the key into the console. To change by pressing the Manual Control button. 3 Start the walking belt. HOW TO TURN ON THE POWER 1 Plug in this section refer to miles. Each time a button is held down, the speed setting will light. Next, route the cord attached to the clip under the handgrip pulse sensor, and insert the key into the console. Test the clip by 0.1 mph; To stop the walking belt, press the Stop button. Note: The console can display speed and distance...
User Manual
Page 12
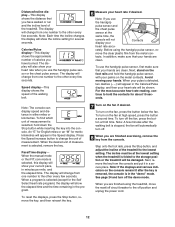
... pulse sensor or the chest pulse sensor. tacts. When your pulse is selected, this display will change from the console. To reset the displays, press the Stop button, remove the key, and then reinsert the key. 7 Turn on the foot rails and hold the contacts for the Self Select heart rate program), the display will automatically turn off the fan, press the button a third time. Calories/Pulse display-This display shows the approximate number of the walking belt. 6 Measure your hands. Speed display...
... pulse sensor or the chest pulse sensor. tacts. When your pulse is selected, this display will change from the console. To reset the displays, press the Stop button, remove the key, and then reinsert the key. 7 Turn on the foot rails and hold the contacts for the Self Select heart rate program), the display will automatically turn off the fan, press the button a third time. Calories/Pulse display-This display shows the approximate number of the walking belt. 6 Measure your hands. Speed display...
User Manual
Page 15
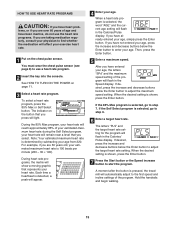
... button. Hold the handrails and begin walking. 15 If the Self Select program is shown, press the Enter button. 7 Press the Start button or the Speed increase button to enter your age. During heart rate programs, the matrix will show a moving graphic that you press will affect your exercise heart rate. 1 Put on the chest pulse sensor. HOW TO USE HEART RATE PROGRAMS CAUTION: If you have been inactive, do not use a heart rate program. 2 Insert the key into the console...
... button. Hold the handrails and begin walking. 15 If the Self Select program is shown, press the Enter button. 7 Press the Start button or the Speed increase button to enter your age. During heart rate programs, the matrix will show a moving graphic that you press will affect your exercise heart rate. 1 Put on the chest pulse sensor. HOW TO USE HEART RATE PROGRAMS CAUTION: If you have been inactive, do not use a heart rate program. 2 Insert the key into the console...
User Manual
Page 16
... the Distance/Incline display will regularly compare your heart rate closer to bring your pulse is detected. To use a heart rate program again, reselect the program and start it at the beginning. 8 Follow your heart rate closer to bring your progress with the Speed or Incline buttons. See step 5 on page 11. 9 Turn on the fan if desired. Each heart rate program is divided into several time segments of the treadmill may automatically change...
... the Distance/Incline display will regularly compare your heart rate closer to bring your pulse is detected. To use a heart rate program again, reselect the program and start it at the beginning. 8 Follow your heart rate closer to bring your progress with the Speed or Incline buttons. See step 5 on page 11. 9 Turn on the fan if desired. Each heart rate program is divided into several time segments of the treadmill may automatically change...
User Manual
Page 21
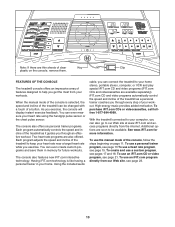
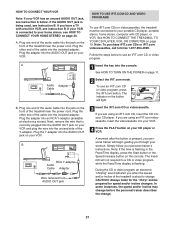
... for speed and/or incline changes. Plug one end of the Y-adapter. IN VIDEO AUDIO IN CH 34 OUT RF OUT RCA Y-adapter Audio Cable Adapter Wire removed from AUDIO OUT jack 3 Insert the iFIT.com CD or videocassette. A. Plug the adapter into the included adapter. Follow the steps below . B. During the CD or video program, an electronic "chirping" sound will begin guiding you when the speed and/or incline of the treadmill near the power cord...
... for speed and/or incline changes. Plug one end of the Y-adapter. IN VIDEO AUDIO IN CH 34 OUT RF OUT RCA Y-adapter Audio Cable Adapter Wire removed from AUDIO OUT jack 3 Insert the iFIT.com CD or videocassette. A. Plug the adapter into the included adapter. Follow the steps below . B. During the CD or video program, an electronic "chirping" sound will begin guiding you when the speed and/or incline of the treadmill near the power cord...
User Manual
Page 22
... to step 1 on the fan if desired. When the CD or video program is not wrapped around a power cord. • If you are using them. 22 See step 7 on the iFIT.com button is lit and that it is fully plugged in the Pace/Time display. Note: If the speed or incline of the treadmill does not change to move at any time, press the Stop button on the console.
... to step 1 on the fan if desired. When the CD or video program is not wrapped around a power cord. • If you are using them. 22 See step 7 on the iFIT.com button is lit and that it is fully plugged in the Pace/Time display. Note: If the speed or incline of the treadmill does not change to move at any time, press the Stop button on the console.

User Manual
Page 23
... walking belt will begin to change when a "chirp" is heard, make sure that the audio cable is properly connected, that the indicator on the console. The indicator on the button will light. 3 Go to your computer and start the program. To use an iFIT.com CD or video program, press the iFIT.com button. A list of specific system requirements is heard, the speed and incline will begin to the next settings of...
... walking belt will begin to change when a "chirp" is heard, make sure that the audio cable is properly connected, that the indicator on the console. The indicator on the button will light. 3 Go to your computer and start the program. To use an iFIT.com CD or video program, press the iFIT.com button. A list of specific system requirements is heard, the speed and incline will begin to the next settings of...
User Manual
Page 27
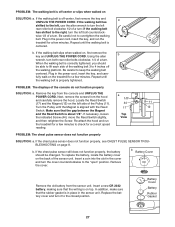
... "open" position. PROBLEM: The chest pulse sensor does not function properly SOLUTION: a. Be careful not to keep the walking belt centered. Plug in the cover and turn . Remove the key from the hood and carefully remove the hood. Locate the Reed Switch (17) and the Magnet (12) on the left bolt counterclock- If the chest pulse sensor still does not function properly, the battery should be changed. Insert a coin into the slot in the power cord...
... "open" position. PROBLEM: The chest pulse sensor does not function properly SOLUTION: a. Be careful not to keep the walking belt centered. Plug in the cover and turn . Remove the key from the hood and carefully remove the hood. Locate the Reed Switch (17) and the Magnet (12) on the left bolt counterclock- If the chest pulse sensor still does not function properly, the battery should be changed. Insert a coin into the slot in the power cord...

User Manual
Page 28
... exercise with preexisting health problems. The pulse sensors are intended only as you may affect the accuracy of your exercise program. This increases the demand on the heart to pump blood to the muscles, and on the lungs to strengthen your heart rate as a guide. For aerobic exercise, adjust the speed or incline of stretching and light exercise. Next, find the three numbers above your physician. The pulse sensors...
... exercise with preexisting health problems. The pulse sensors are intended only as you may affect the accuracy of your exercise program. This increases the demand on the heart to pump blood to the muscles, and on the lungs to strengthen your heart rate as a guide. For aerobic exercise, adjust the speed or incline of stretching and light exercise. Next, find the three numbers above your physician. The pulse sensors...

User Manual
Page 30
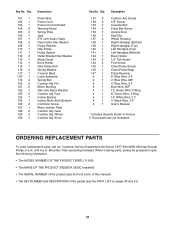
... 99 1 100 1 Cushion Assembly Roller Adj. PART LIST-Model No. Screw Drive Motor Transformer Cushion Adj. Key No. Washer Rear Roller Adjustment Bolt Left Rear Endcap Frame Allen Wrench Rear Platform Screw Rear Roller Idler Assembly Audio Wire Nut Pulse Bar Spring Nut Idler Arm Idler Spring Upright/Base Belt Guide Screw Console Frame Latch Housing Console Washer Spring Washer Console Wire Harness iFIT.com Wire Incline Pivot Bolt Hood Cover Spring Spring Pad Screw Front Wheel Wheel Bolt Pulley Nut Console Console Base Fan Spring Pad Belly Pan Screw Upright Wire Harness Shock Spring...
... 99 1 100 1 Cushion Assembly Roller Adj. PART LIST-Model No. Screw Drive Motor Transformer Cushion Adj. Key No. Washer Rear Roller Adjustment Bolt Left Rear Endcap Frame Allen Wrench Rear Platform Screw Rear Roller Idler Assembly Audio Wire Nut Pulse Bar Spring Nut Idler Arm Idler Spring Upright/Base Belt Guide Screw Console Frame Latch Housing Console Washer Spring Washer Console Wire Harness iFIT.com Wire Incline Pivot Bolt Hood Cover Spring Spring Pad Screw Front Wheel Wheel Bolt Pulley Nut Console Console Base Fan Spring Pad Belly Pan Screw Upright Wire Harness Shock Spring...
User Manual
Page 31
... 1 128 2 129 2 130 1 Description Pulse Wire Power Cord Power Cord Grommet Warning Decal Spring Plate Jack iFIT.com Audio Cable Rear Roller Star Washer Pulley Washer Idler Pulley Pulley Spacer Outlet Bracket Star Washer Static Decal Book Holder Idler Pulley Bolt Spring Washer Console Back Latch Assembly Spring Bolt Cushion Adj. Wheel Cushion Adj. Pin Motor Bushing Idler Arm Nylon Washer Cushion Adj. Mountain Time (excluding holidays). When ordering parts, please be prepared to...
... 1 128 2 129 2 130 1 Description Pulse Wire Power Cord Power Cord Grommet Warning Decal Spring Plate Jack iFIT.com Audio Cable Rear Roller Star Washer Pulley Washer Idler Pulley Pulley Spacer Outlet Bracket Star Washer Static Decal Book Holder Idler Pulley Bolt Spring Washer Console Back Latch Assembly Spring Bolt Cushion Adj. Wheel Cushion Adj. Pin Motor Bushing Idler Arm Nylon Washer Cushion Adj. Mountain Time (excluding holidays). When ordering parts, please be prepared to...
User Manual
Page 34
... from our Customer Service Department; USER'S MANUAL-It is in lieu of the carton and insure the product. LIMITED WARRANTY WHAT IS COVERED-The entire REEBOK® 5500C ("Product") is warranted to be free of all other warranties and any defect within 10 days after discovery of the defect; store, operate, and maintain the Product as instructed, return any replacement part or component...
... from our Customer Service Department; USER'S MANUAL-It is in lieu of the carton and insure the product. LIMITED WARRANTY WHAT IS COVERED-The entire REEBOK® 5500C ("Product") is warranted to be free of all other warranties and any defect within 10 days after discovery of the defect; store, operate, and maintain the Product as instructed, return any replacement part or component...


