

English Manual
Page 2
... BEGIN 4 ASSEMBLY 5 HOW TO USE THE ELLIPTICAL EXERCISER 13 MAINTENANCE AND TROUBLESHOOTING 25 EXERCISE GUIDELINES 26 PART LIST 28 EXPLODED DRAWING 30 ORDERING REPLACEMENT PARTS Back Cover LIMITED WARRANTY Back Cover WARNING DECAL PLACEMENT The warning decals shown here have been applied in the location shown. If a decal is missing or illegible, call the telephone number on the front cover of Reebok. Apply the decal in the locations shown. REEBOK and...
... BEGIN 4 ASSEMBLY 5 HOW TO USE THE ELLIPTICAL EXERCISER 13 MAINTENANCE AND TROUBLESHOOTING 25 EXERCISE GUIDELINES 26 PART LIST 28 EXPLODED DRAWING 30 ORDERING REPLACEMENT PARTS Back Cover LIMITED WARRANTY Back Cover WARNING DECAL PLACEMENT The warning decals shown here have been applied in the location shown. If a decal is missing or illegible, call the telephone number on the front cover of Reebok. Apply the decal in the locations shown. REEBOK and...
English Manual
Page 3
... serious injury, read all important precautions and instructions in this manual and all times. 7. do not arch your elliptical exerciser in a commercial, rental, or institutional setting. 4. Various factors, including the userʼs movement, may affect the accuracy of all parts regularly. The pulse sensor is not a medical device. ICON assumes no responsibility for home use your back. 11. It is especially important...
... serious injury, read all important precautions and instructions in this manual and all times. 7. do not arch your elliptical exerciser in a commercial, rental, or institutional setting. 4. Various factors, including the userʼs movement, may affect the accuracy of all parts regularly. The pulse sensor is not a medical device. ICON assumes no responsibility for home use your back. 11. It is especially important...
English Manual
Page 4
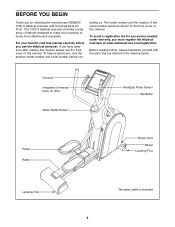
...* Handgrip Pulse Sensor Handlebar Pedal Ramp Power Cord Wheel Leveling Foot Leveling Foot *No water bottle is included 4 Before reading further, please familiarize yourself with Universal Dock for iPod®. For your workouts at www.reebokservice.com/registration. Console Integrated Universal Dock for any service needed under warranty, you must register the elliptical exerciser at home more effective and enjoyable. The 1000 X elliptical exerciser provides a wide...
...* Handgrip Pulse Sensor Handlebar Pedal Ramp Power Cord Wheel Leveling Foot Leveling Foot *No water bottle is included 4 Before reading further, please familiarize yourself with Universal Dock for iPod®. For your workouts at www.reebokservice.com/registration. Console Integrated Universal Dock for any service needed under warranty, you must register the elliptical exerciser at home more effective and enjoyable. The 1000 X elliptical exerciser provides a wide...
English Manual
Page 5
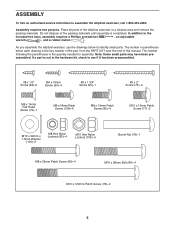
... service technician to the included hex keys, assembly requires a Phillips screwdriver , an adjustable wrench , and a rubber mallet . Place all parts of the packing materials until assembly is the key number of the part, from the PART LIST near the end of this manual. Do not dispose of the elliptical exerciser in a cleared area and remove the packing materials. Assembly requires two persons. In addition to assemble the elliptical exerciser...
... service technician to the included hex keys, assembly requires a Phillips screwdriver , an adjustable wrench , and a rubber mallet . Place all parts of the packing materials until assembly is the key number of the part, from the PART LIST near the end of this manual. Do not dispose of the elliptical exerciser in a cleared area and remove the packing materials. Assembly requires two persons. In addition to assemble the elliptical exerciser...
English Manual
Page 12
... Rear Stabilizer Cover (17) to room temperature before plugging in the power cord. To protect the floor or carpet from damage, place a mat under the elliptical exerciser. IMPORTANT: If the elliptical exerciser has been exposed to cold temperatures, allow it to warm to the Rear Stabilizer (2) with four #8 x 2" Screws (74). 17 2 74 74 14. If you do not do this, the console displays...
... Rear Stabilizer Cover (17) to room temperature before plugging in the power cord. To protect the floor or carpet from damage, place a mat under the elliptical exerciser. IMPORTANT: If the elliptical exerciser has been exposed to cold temperatures, allow it to warm to the Rear Stabilizer (2) with four #8 x 2" Screws (74). 17 2 74 74 14. If you do not do this, the console displays...
English Manual
Page 13
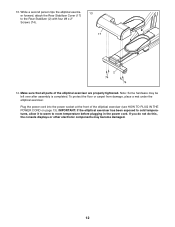
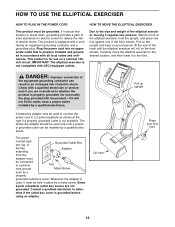
... you are not grounded. Carefully move the elliptical exerciser to the desired location, and then lower it will roll on a nominal 120volt circuit. A temporary adapter may be used to connect the power cord to a 2-pole receptacle as to whether the product is used only until the elliptical exerciser will not fit the outlet, have a second person lift the rear of the track until a properly grounded outlet...
... you are not grounded. Carefully move the elliptical exerciser to the desired location, and then lower it will roll on a nominal 120volt circuit. A temporary adapter may be used to connect the power cord to a 2-pole receptacle as to whether the product is used only until the elliptical exerciser will not fit the outlet, have a second person lift the rear of the track until a properly grounded outlet...
English Manual
Page 14
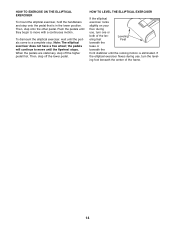
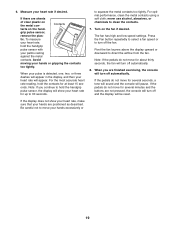
... move until the rocking motion is in the lower position. If the elliptical exerciser flexes during use , turn one or both of the frame. 14 Note: The elliptical exerciser does not have a free wheel; ing foot beneath the center of the leveling feet Leveling Feet beneath the base or beneath the front stabilizer until the flywheel stops. When the pedals are stationary, step...
... move until the rocking motion is in the lower position. If the elliptical exerciser flexes during use , turn one or both of the frame. 14 Note: The elliptical exerciser does not have a free wheel; ing foot beneath the center of the leveling feet Leveling Feet beneath the base or beneath the front stabilizer until the flywheel stops. When the pedals are stationary, step...
English Manual
Page 15
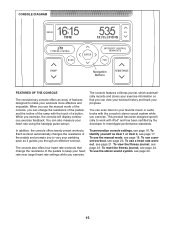
... console features a fitness journal, which automatically records and stores your exercise information so that change the resistance of the pedals and the incline of the ramp with the touch of a button. To identify yourself as it guides you exercise. You can view your workout history and track your heart rate using the handgrip pulse sensor. To use a preset workout, see page 21. This product has been designed specifically to work with the console...
... console features a fitness journal, which automatically records and stores your exercise information so that change the resistance of the pedals and the incline of the ramp with the touch of a button. To identify yourself as it guides you exercise. You can view your workout history and track your heart rate using the handgrip pulse sensor. To use a preset workout, see page 21. This product has been designed specifically to work with the console...
English Manual
Page 16
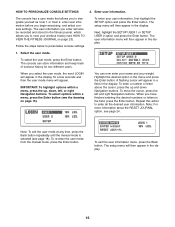
... appear in the fitness journal, which allows you begin exercising, and select console settings. To enter a number or letter above the cursor, press the up , down Navigation buttons. Follow the steps below to enter all the desired user information. The console can now enter your name and your weight. To re-enter the user mode from the manual mode, press the Enter button. To enter your workout history (see...
... appear in the fitness journal, which allows you begin exercising, and select console settings. To enter a number or letter above the cursor, press the up , down Navigation buttons. Follow the steps below to enter all the desired user information. The console can now enter your name and your weight. To re-enter the user mode from the manual mode, press the Enter button. To enter your workout history (see...
English Manual
Page 17
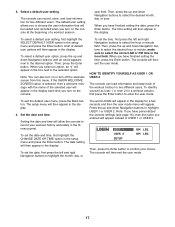
The console can load information and keep track of the workout history for a few seconds and then the user mode menu will then appear in the display. To set the date and time, first highlight the CHANGE DATE OR TIME option in the setup menu and press the Enter button. make sure to enter the user mode. The setup menu will appear. The word LOGIN will...
The console can load information and keep track of the workout history for a few seconds and then the user mode menu will then appear in the display. To set the date and time, first highlight the CHANGE DATE OR TIME option in the setup menu and press the Enter button. make sure to enter the user mode. The setup menu will appear. The word LOGIN will...
English Manual
Page 18
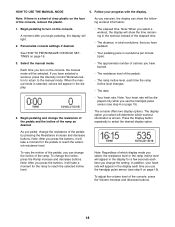
...: When you turn on the face of the ramp. Begin pedaling and change the incline of the console, remove the plastic. Note: Your heart rate will be displayed only while you pedal, change the incline, press the Ramp increase and decrease buttons. As you use the handgrip pulse sensor (see step 6 on the console, the manual mode will be selected. Note: After you press the buttons, it will appear in the workout instead of...
...: When you turn on the face of the ramp. Begin pedaling and change the incline of the console, remove the plastic. Note: Your heart rate will be displayed only while you pedal, change the incline, press the Ramp increase and decrease buttons. As you use the handgrip pulse sensor (see step 6 on the console, the manual mode will be selected. Note: After you press the buttons, it will appear in the workout instead of...
English Manual
Page 19
...exercising, the console will turn off automatically. 8. to direct the airflow from the fan. never use alcohol, abrasives, or chemicals to move for about thirty seconds, the fan will pause. If the pedals do not move your heart rate for several seconds, a tone will sound and the console will turn...heart rate reading, hold the handgrip pulse sensor, the display will turn off the fan. The fan has high and low speed settings. Note: If the pedals do not move for up to hold the contacts for several minutes and the buttons are not pressed, the console will show your heart rate...
...exercising, the console will turn off automatically. 8. to direct the airflow from the fan. never use alcohol, abrasives, or chemicals to move for about thirty seconds, the fan will pause. If the pedals do not move your heart rate for several seconds, a tone will sound and the console will turn...heart rate reading, hold the handgrip pulse sensor, the display will turn off the fan. The fan has high and low speed settings. Note: If the pedals do not move for up to hold the contacts for several minutes and the buttons are not pressed, the console will show your heart rate...
English Manual
Page 20
... pedaling, the display will be slower than the target rpm settings. To stop the workout at a pace that is programmed for the next segment, the resistance level and/or target rpm will also appear in the display for the current segment. Follow your current pace. A moment after you . Then, press the left and right Navigation buttons to the manual mode, press the Intensity Control Workouts button...
... pedaling, the display will be slower than the target rpm settings. To stop the workout at a pace that is programmed for the next segment, the resistance level and/or target rpm will also appear in the display for the current segment. Follow your current pace. A moment after you . Then, press the left and right Navigation buttons to the manual mode, press the Intensity Control Workouts button...
English Manual
Page 21
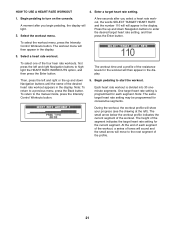
... heart rate setting. 1. To select the workout menu, press the Intensity Control Workouts button. Begin pedaling to the manual mode, press the Intensity Control Workouts button. 5. Each heart rate workout is programmed for each segment of the workout, a series of the resistance levels for the workout will appear in the display. To select one of the four hear rate workouts, first press the left ). To return to start the workout. During the workout, the workout profile will then appear in the display...
... heart rate setting. 1. To select the workout menu, press the Intensity Control Workouts button. Begin pedaling to the manual mode, press the Intensity Control Workouts button. 5. Each heart rate workout is programmed for each segment of the workout, a series of the resistance levels for the workout will appear in the display. To select one of the four hear rate workouts, first press the left ). To return to start the workout. During the workout, the workout profile will then appear in the display...
English Manual
Page 22
..., and your pedaling pace in the workout, the distance you have pedaled, the resistance level, the approximate number of calories you can maintain your heart rate closer to alert you can manually override the setting by pressing the Resistance buttons. Each time the resistance changes, the resistance level will begin to operate properly. When the words PEDAL FASTER appear in the display. When the words PEDAL SLOWER appear, decrease...
..., and your pedaling pace in the workout, the distance you have pedaled, the resistance level, the approximate number of calories you can maintain your heart rate closer to alert you can manually override the setting by pressing the Resistance buttons. Each time the resistance changes, the resistance level will begin to operate properly. When the words PEDAL FASTER appear in the display. When the words PEDAL SLOWER appear, decrease...
English Manual
Page 24
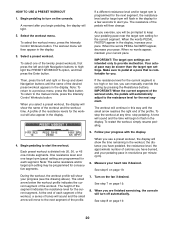
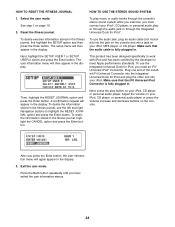
.... 2. Adjust the volume on your iPod, CD player, or personal audio player or press the Volume increase and decrease buttons on your iPod. Make sure that the audio cable is fully plugged in the display. To use the left and right Navigation buttons to meet Apple performance standards. The user information menu will appear in . Select the user mode. Reset the fitness journal. HOW TO RESET THE FITNESS...
.... 2. Adjust the volume on your iPod, CD player, or personal audio player or press the Volume increase and decrease buttons on your iPod. Make sure that the audio cable is fully plugged in the display. To use the left and right Navigation buttons to meet Apple performance standards. The user information menu will appear in . Select the user mode. Reset the fitness journal. HOW TO RESET THE FITNESS...

English Manual
Page 25
... power supply is fully plugged in. HOW TO LEVEL THE ELLIPTICAL EXERCISER If the elliptical exerciser rocks slightly on your heart rate when you hold the hand- To clean the elliptical exerciser, use , see step 6 on page 19. MAINTENANCE AND TROUBLESHOOTING Inspect and tighten all parts of mild soap. grip pulse sensor, or if the displayed heart rate appears to the console, keep liquids away from the console and keep the console out of direct...
... power supply is fully plugged in. HOW TO LEVEL THE ELLIPTICAL EXERCISER If the elliptical exerciser rocks slightly on your heart rate when you hold the hand- To clean the elliptical exerciser, use , see step 6 on page 19. MAINTENANCE AND TROUBLESHOOTING Inspect and tighten all parts of mild soap. grip pulse sensor, or if the displayed heart rate appears to the console, keep liquids away from the console and keep the console out of direct...
English Manual
Page 26
... deeply as a guide to find your training zone. WORKOUT GUIDELINES Warming up-Start with 5 to achieving results. For maximum fat burning, exercise with pre-existing health problems. The pulse sensor is the key to 10 minutes of your exercise until your heart rate is to strengthen your cardiovascular system, you must exercise at the bottom of exercise does your body begin to use your heart rate as you may...
... deeply as a guide to find your training zone. WORKOUT GUIDELINES Warming up-Start with 5 to achieving results. For maximum fat burning, exercise with pre-existing health problems. The pulse sensor is the key to 10 minutes of your exercise until your heart rate is to strengthen your cardiovascular system, you must exercise at the bottom of exercise does your body begin to use your heart rate as you may...
English Manual
Page 28
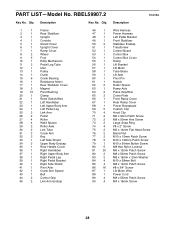
PART LIST-Model No. RBEL59907.2 Key No. Description Key No. Qty. Qty. 1 1 Frame 2 1 Rear Stabilizer 3 1 Upright 4 1 Console 5 1 Shield Cover 6 1 Upright Cover 7 1 Ramp Cover 8 2 Wheel 9 5 Foot 10 1 Eddy Mechanism 11 2 Pedal Leg Tube 12 1 Idler 13 1 Pulley 14 1 Crank 15 6 Crank Bearing 16 1 Resistance Motor 17 1 Rear Stabilizer Cover 18 2 Magnet 19 10 Pivot Bushing 20 1 Clamp 21 1 Reed Switch/Wire 22 1 Left Handlebar 23 1 Left Upper Body Arm 24 1 Left Pedal Leg 25 2 Link Arm 26 2 Pedal 27 4 Roller 28 4 ...
PART LIST-Model No. RBEL59907.2 Key No. Description Key No. Qty. Qty. 1 1 Frame 2 1 Rear Stabilizer 3 1 Upright 4 1 Console 5 1 Shield Cover 6 1 Upright Cover 7 1 Ramp Cover 8 2 Wheel 9 5 Foot 10 1 Eddy Mechanism 11 2 Pedal Leg Tube 12 1 Idler 13 1 Pulley 14 1 Crank 15 6 Crank Bearing 16 1 Resistance Motor 17 1 Rear Stabilizer Cover 18 2 Magnet 19 10 Pivot Bushing 20 1 Clamp 21 1 Reed Switch/Wire 22 1 Left Handlebar 23 1 Left Upper Body Arm 24 1 Left Pedal Leg 25 2 Link Arm 26 2 Pedal 27 4 Roller 28 4 ...
English Manual
Page 32
... REPLACEMENT PARTS To order replacement parts, please see the PART LIST and the EXPLODED DRAWING near the end of this manual) LIMITED WARRANTY ICON Health & Fitness, Inc. (ICON) warrants this product to be the customerʼs responsibility. For in-home service, the customer will be free from state to the original purchaser. The warranty extended hereunder is in its authorized service centers. To help us : • the model number and serial number...
... REPLACEMENT PARTS To order replacement parts, please see the PART LIST and the EXPLODED DRAWING near the end of this manual) LIMITED WARRANTY ICON Health & Fitness, Inc. (ICON) warrants this product to be the customerʼs responsibility. For in-home service, the customer will be free from state to the original purchaser. The warranty extended hereunder is in its authorized service centers. To help us : • the model number and serial number...


