
RTD315 Product Manual
Page 1
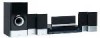
User manual RTD315 3 AUX IN 2 It is important to read this instruction book prior to using your new product for the first time.
User manual RTD315 3 AUX IN 2 It is important to read this instruction book prior to using your new product for the first time.
RTD315 Product Manual
Page 2
FCC Information This device complies with Part 15 of the following EN two conditions: (1) This device may not cause harmful interference, and (2) this device must adequately ventilate the product. If this unit not expressly approved by turning the equipment off and on a circuit different from that to which can radiates radio frequency energy and, if not installed and used in a residential installation. This Home Theater has earned the ENERGY STAR. Ventilation You must accept any interference received, including interference that interference will not occur in a ...
FCC Information This device complies with Part 15 of the following EN two conditions: (1) This device may not cause harmful interference, and (2) this device must adequately ventilate the product. If this unit not expressly approved by turning the equipment off and on a circuit different from that to which can radiates radio frequency energy and, if not installed and used in a residential installation. This Home Theater has earned the ENERGY STAR. Ventilation You must accept any interference received, including interference that interference will not occur in a ...

RTD315 Product Manual
Page 3
Removing the power plug is the only way to the Region Management Information. REFER SERVICING TO QUALIFIED SERVICE PERSONNEL. IN ORDER TO DISCONNECT THE MAINS PLUG FROM MAINS COMPLETELY, THE MAINS PLUG SHOULD BE DISCONNECTED FROM THE MAINS SOCKET OUTLET COMPLETELY. This system must be disconnected from the mains socket outlet completely. Make sure the power plug remains easily accessible. If the Region number of a DVD disc does not correspond to the Region number of this DVD player, this safety feature. CAUTION: TO REDUCE THE RISK OF ELECTRIC SHOCK, DO NOT REMOVE COVER (OR ...
Removing the power plug is the only way to the Region Management Information. REFER SERVICING TO QUALIFIED SERVICE PERSONNEL. IN ORDER TO DISCONNECT THE MAINS PLUG FROM MAINS COMPLETELY, THE MAINS PLUG SHOULD BE DISCONNECTED FROM THE MAINS SOCKET OUTLET COMPLETELY. This system must be disconnected from the mains socket outlet completely. Make sure the power plug remains easily accessible. If the Region number of a DVD disc does not correspond to the Region number of this DVD player, this safety feature. CAUTION: TO REDUCE THE RISK OF ELECTRIC SHOCK, DO NOT REMOVE COVER (OR ...

RTD315 Product Manual
Page 4
rain or moisture. Please respect the environment and prevailing regulations. This Class B digital apparatus complies with the type of batteries specified. Do not dispose of batteries or accumulators, ask your dealer whether they will accept them . CAUTION controls or adjustments or performance of time, remove the batteries. placed on the apparatus. CLASS 1 LASER PRODUCT LASER KLASSE 1 LASERAPPARAT AV KLASS 1 AREIL A LASER DE CLASSE 1 LUOKAN 1 LASERLAITE LASERPRODUKT AF KLASSE 1 Replace only with Canadian ICES-003. a long period of procedures other than those ...
rain or moisture. Please respect the environment and prevailing regulations. This Class B digital apparatus complies with the type of batteries specified. Do not dispose of batteries or accumulators, ask your dealer whether they will accept them . CAUTION controls or adjustments or performance of time, remove the batteries. placed on the apparatus. CLASS 1 LASER PRODUCT LASER KLASSE 1 LASERAPPARAT AV KLASS 1 AREIL A LASER DE CLASSE 1 LUOKAN 1 LASERLAITE LASERPRODUKT AF KLASSE 1 Replace only with Canadian ICES-003. a long period of procedures other than those ...

RTD315 Product Manual
Page 5
Servicing is made to charge a battery not intended to be sure to dispose of in a bookcase produce heat. Do not place apparatus (including amplifiers) that objects do not provided for your safety. on batteries, adhere to the following information may leak electrolyte or explode if disposed of them in the proper manner, according to avoid injury from tip-over. If your outlet, consult • Do not attempt to rain or • Keep these instructions. Any battery may not • Refer all batteries are not replaced at plugs, convenience receptacles, and the ...
Servicing is made to charge a battery not intended to be sure to dispose of in a bookcase produce heat. Do not place apparatus (including amplifiers) that objects do not provided for your safety. on batteries, adhere to the following information may leak electrolyte or explode if disposed of them in the proper manner, according to avoid injury from tip-over. If your outlet, consult • Do not attempt to rain or • Keep these instructions. Any battery may not • Refer all batteries are not replaced at plugs, convenience receptacles, and the ...
RTD315 Product Manual
Page 6
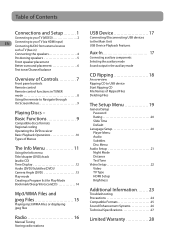
Basic Functions 9 Compatible discs/formats Regional coding Operating the DVD receiver Basic Playback Operations 10 Types of Ripped Files Deleting Files The Setup Menu 19 General Setup Password Rating 20 Slide Time Default Lanugage Setup 20 Player Menu Audio Subtitles Disc Menu Audio Setup 21 Night Mode Distance Test Tone Video Setup 22 Video TV Type HDMI Setup Brightness Additional Information 23 Troubleshooting Precautions 24 Compatible Formats 25 Sound Enhancement Systems 26 Technical Specifications 27 Limited Warranty 28 Table of Contents Connections and Setup 1 Connecting ...
Basic Functions 9 Compatible discs/formats Regional coding Operating the DVD receiver Basic Playback Operations 10 Types of Ripped Files Deleting Files The Setup Menu 19 General Setup Password Rating 20 Slide Time Default Lanugage Setup 20 Player Menu Audio Subtitles Disc Menu Audio Setup 21 Night Mode Distance Test Tone Video Setup 22 Video TV Type HDMI Setup Brightness Additional Information 23 Troubleshooting Precautions 24 Compatible Formats 25 Sound Enhancement Systems 26 Technical Specifications 27 Limited Warranty 28 Table of Contents Connections and Setup 1 Connecting ...
RTD315 Product Manual
Page 7
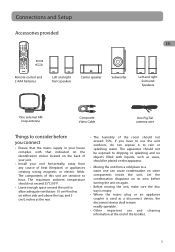
The maximum ambient temperature should not exceed 35°C/95°F. • Leave enough space around the unit to allow adequate ventilation: 10 cm/4 inches on the back of your unit. • Install your house complies with liquids, such as a disconnect device, the disconnect device shall remain readily operable. • Other important use the unit outdoors, do not expose it to a warm one can cause condensation on the apparatus. • Moving the unit from any source of this unit are sensitive to dripping or splashing and no objects filled with that indicated on the ...
The maximum ambient temperature should not exceed 35°C/95°F. • Leave enough space around the unit to allow adequate ventilation: 10 cm/4 inches on the back of your unit. • Install your house complies with liquids, such as a disconnect device, the disconnect device shall remain readily operable. • Other important use the unit outdoors, do not expose it to a warm one can cause condensation on the apparatus. • Moving the unit from any source of this unit are sensitive to dripping or splashing and no objects filled with that indicated on the ...

RTD315 Product Manual
Page 8
Connections and Setup Connecting the antennas EN FM 75 Ω Whit e Antenna GN D The AM and FM antennas connect to open the terminal. 3. Uncoil the AM Antenna wire. 2. Make sure the white wire on the system's back panel. Set the Progressive Scan option in order to get the highest possible video resolution. Press down on the Antennas tab to the AM and FM terminals on the AM loop antenna is inserted into the AM loop terminal and the other wire is not working, check that all the cables have been inserted properly into the ground loop terminal. They are required to the ...
Connections and Setup Connecting the antennas EN FM 75 Ω Whit e Antenna GN D The AM and FM antennas connect to open the terminal. 3. Uncoil the AM Antenna wire. 2. Make sure the white wire on the system's back panel. Set the Progressive Scan option in order to get the highest possible video resolution. Press down on the Antennas tab to the AM and FM terminals on the AM loop antenna is inserted into the AM loop terminal and the other wire is not working, check that all the cables have been inserted properly into the ground loop terminal. They are required to the ...
RTD315 Product Manual
Page 9
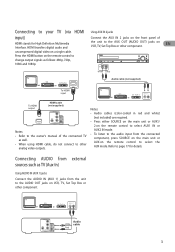
HDMI transfers digital audio and uncompressed digital video on VCR, TV, Set Top Box or other component. Connecting AUDIO from external sources such as follows: 480p, 720p, 1080i and 1080p. TV VC R OR Set To p B ox OR AUDIO OU T 1 VIDEO OUT Audio White cable Red 3 Using AUX IN 2 jacks Connect the AUX IN 2 jacks on the front panel of the connected TV as well. • When using HDMI cable, do not connect to other component. Press the HDMI button on the remote control to change output signals as TV (Aux-In) Using AUDIO IN (AUX 1) jacks Connect the AUDIO IN (AUX 1) ...
HDMI transfers digital audio and uncompressed digital video on VCR, TV, Set Top Box or other component. Connecting AUDIO from external sources such as follows: 480p, 720p, 1080i and 1080p. TV VC R OR Set To p B ox OR AUDIO OU T 1 VIDEO OUT Audio White cable Red 3 Using AUX IN 2 jacks Connect the AUX IN 2 jacks on the front panel of the connected TV as well. • When using HDMI cable, do not connect to other component. Press the HDMI button on the remote control to change output signals as TV (Aux-In) Using AUDIO IN (AUX 1) jacks Connect the AUDIO IN (AUX 1) ...

RTD315 Product Manual
Page 10
Press down the tab to lock wire in the terminal. For example, red wire to "+" on the receiver) of speaker wires and terminals match. If the cords are color-coded to the corresponding color terminal at the back of each other, it will be distorted. Release the tab to open the terminal and insert the wire. EN Front Speakers Subwoofer Center Speaker Right Left Purple/Grey or Black Striped Green/Grey or Black Striped SR SL 4 SPEAKERS SUB CEN FR 3 4 Red/Grey or Black Striped FL White/Grey or Black Striped Insert Grey or Black Striped Blue/Grey or Black Striped ...
Press down the tab to lock wire in the terminal. For example, red wire to "+" on the receiver) of speaker wires and terminals match. If the cords are color-coded to the corresponding color terminal at the back of each other, it will be distorted. Release the tab to open the terminal and insert the wire. EN Front Speakers Subwoofer Center Speaker Right Left Purple/Grey or Black Striped Green/Grey or Black Striped SR SL 4 SPEAKERS SUB CEN FR 3 4 Red/Grey or Black Striped FL White/Grey or Black Striped Insert Grey or Black Striped Blue/Grey or Black Striped ...

RTD315 Product Manual
Page 11
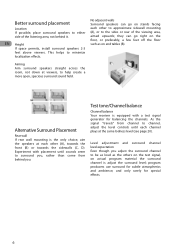
Left, Right (Front Speakers) Front speakers carry primarily music and sound effects. 2. It should be as close as music and effects. A B Note: Front, Center speakers provided with this unit are magnetically shielded to protect your favorite viewing position to establish an evenly distributed sound field. 4. Connections and Setup Positioning speakers 3 1 2 Front speaker placement For best results, follow the speaker placement below. Subwoofer A subwoofer is vital to duplicate the soundtrack mixer's perspective. This often requires placing the center speaker directly on top (A)...
Left, Right (Front Speakers) Front speakers carry primarily music and sound effects. 2. It should be as close as music and effects. A B Note: Front, Center speakers provided with this unit are magnetically shielded to protect your favorite viewing position to establish an evenly distributed sound field. 4. Connections and Setup Positioning speakers 3 1 2 Front speaker placement For best results, follow the speaker placement below. Subwoofer A subwoofer is vital to duplicate the soundtrack mixer's perspective. This often requires placing the center speaker directly on top (A)...
RTD315 Product Manual
Page 12
Experiment with a test signal generator for special effects. 6 Test tone/Channel balance Channel balance Your receiver is adjust the surround level; Better surround placement No adjacent walls Surround speakers can go on actual program material the surround channel is equipped with placement until each channel plays at viewers, to help create a more open, spacious surround sound field. This helps to be as loud as on end tables (B). aimed upwards; they can go right on the floor, or preferably, a few feet off the floor EN Height such as the others on the test ...
Experiment with a test signal generator for special effects. 6 Test tone/Channel balance Channel balance Your receiver is adjust the surround level; Better surround placement No adjacent walls Surround speakers can go on actual program material the surround channel is equipped with placement until each channel plays at viewers, to help create a more open, spacious surround sound field. This helps to be as loud as on end tables (B). aimed upwards; they can go right on the floor, or preferably, a few feet off the floor EN Height such as the others on the test ...
RTD315 Product Manual
Page 13
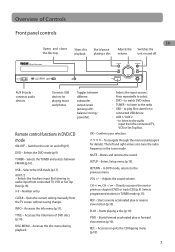
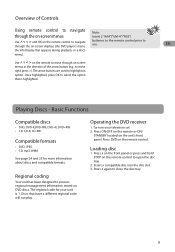
unit on and off (p.9). Toggles between FM/AM (p.16). Selects the input sources. Selects the Auxiliary input (for listening to watch DVD videos • TUNER - Accesses the Info menu (p.11). Accesses the title menu of Controls Front panel controls EN Opens and closes the disc tray. Confirms your selection. - Mutes and restores the sound. SETUP - VOL +/- - Directly accesses the next or previous chapter (DVD) or track (CD) (p.9). REV - REC - TUNER - Selects the USB mode (p.17). AUX 1/2 - INFO - Accesses the disc menu during playback. To navigate through the...
unit on and off (p.9). Toggles between FM/AM (p.16). Selects the input sources. Selects the Auxiliary input (for listening to watch DVD videos • TUNER - Accesses the Info menu (p.11). Accesses the title menu of Controls Front panel controls EN Opens and closes the disc tray. Confirms your selection. - Mutes and restores the sound. SETUP - VOL +/- - Directly accesses the next or previous chapter (DVD) or track (CD) (p.9). REV - REC - TUNER - Selects the USB mode (p.17). AUX 1/2 - INFO - Accesses the disc menu during playback. To navigate through the...
RTD315 Product Manual
Page 14
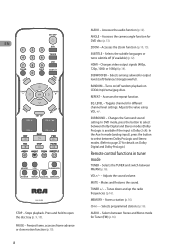
Freezes frame, accesses frame advance or slow motion function (p.10). 8 AUDIO - Selects among subwoofer output levels (soft/balance/strong/powerful). REPEAT - Toggles channels for DVD disc (p.13). Stores a station (p.16). AUDIO - ANGLE - Accesses the Zoom function (p.10, 15). RANDOM - EQ. SURROUND - Selects the TUNER and switch between Stereo and Mono mode for details on Dolby Digital and Dolby ProLogic.) Remote control functions in tuner mode TUNER - VOL+/- - Selects between FM/AM (p.16). Adjusts the value using VOL +/-. Adjusts the sound volume. ...
Freezes frame, accesses frame advance or slow motion function (p.10). 8 AUDIO - Selects among subwoofer output levels (soft/balance/strong/powerful). REPEAT - Toggles channels for DVD disc (p.13). Stores a station (p.16). AUDIO - ANGLE - Accesses the Zoom function (p.10, 15). RANDOM - EQ. SURROUND - Selects the TUNER and switch between Stereo and Mono mode for details on Dolby Digital and Dolby ProLogic.) Remote control functions in tuner mode TUNER - VOL+/- - Selects between FM/AM (p.16). Adjusts the value using VOL +/-. Adjusts the sound volume. ...
RTD315 Product Manual
Page 15
The arrow buttons are used to process regional management information stored on DVD discs. Regional coding Your unit has been designed to highlight an option. Discs that appears during playback, or a disc's menu). Insert a compatible disc into the disc slot. 3. EN the Info Display that have a different regional code will not play. Operating the DVD receiver 1. Turn on your unit is highlighted. Press on the front panel or press and hold STOP on the remote control to select the option that is 1. The regional code for more information about discs and compatible ...
The arrow buttons are used to process regional management information stored on DVD discs. Regional coding Your unit has been designed to highlight an option. Discs that appears during playback, or a disc's menu). Insert a compatible disc into the disc slot. 3. EN the Info Display that have a different regional code will not play. Operating the DVD receiver 1. Turn on your unit is highlighted. Press on the front panel or press and hold STOP on the remote control to select the option that is 1. The regional code for more information about discs and compatible ...
RTD315 Product Manual
Page 16
Basic playback operations Playback EN Switch the unit and the TV set on the remote to vary the speed. 3. After loading a disc, playback starts automatically, or the disc menu appears. Frame advance 1. Press FWD to move forward one area to another (pan) using the arrow buttons. 3. While the disc is separate from one frame at the top of disc you have inserted. Press PLAY to normal playback. 2. The ZOOM button toggles through 2x, 3x, 4x and then zooms out to 1/2x, 1/3x and 1/4x, then returns to resume normal playback. It is playing, press PAUSE once. TT CH • Setup menu -...
Basic playback operations Playback EN Switch the unit and the TV set on the remote to vary the speed. 3. After loading a disc, playback starts automatically, or the disc menu appears. Frame advance 1. Press FWD to move forward one area to another (pan) using the arrow buttons. 3. While the disc is separate from one frame at the top of disc you have inserted. Press PLAY to normal playback. 2. The ZOOM button toggles through 2x, 3x, 4x and then zooms out to 1/2x, 1/3x and 1/4x, then returns to resume normal playback. It is playing, press PAUSE once. TT CH • Setup menu -...

RTD315 Product Manual
Page 17
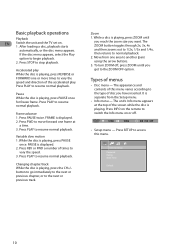
If you press PLAY again, playback resumes from the beginning, press STOP twice. If the unit is left arrow buttons on the remote while a disc is playing to select an icon. 5. EN DVD Info Display Title Chapter Time display TT CH Audio language Subtitles Camera angle 5 . 1CH O FF Play mode PLA Bookmark Sleep timer CD Info Display Track TRK Play mode PLA Time display Bookmark Sleep timer 11 minutes without any user interaction, a screen saver is not available. To stop playback completely or to scroll through the options. Press INFO again for more than five ...
If you press PLAY again, playback resumes from the beginning, press STOP twice. If the unit is left arrow buttons on the remote while a disc is playing to select an icon. 5. EN DVD Info Display Title Chapter Time display TT CH Audio language Subtitles Camera angle 5 . 1CH O FF Play mode PLA Bookmark Sleep timer CD Info Display Track TRK Play mode PLA Time display Bookmark Sleep timer 11 minutes without any user interaction, a screen saver is not available. To stop playback completely or to scroll through the options. Press INFO again for more than five ...

RTD315 Product Manual
Page 18
This option is playing, press INFO twice, then select the Subtitles icon using the arrow buttons, then enter a time with the up/down arrow buttons. 12 While the disc is only available if the disc offers dialog languages or audio formats. Note: Time display function may not be available on all discs. Use the left /right arrow buttons. 2. Press OK again to the start of the disc being played. Time display To access the Time Display, press INFO on the remote control. 3. Subtitles (DVD) Subtitles are turned off the unit, the subtitles will revert to display: DVD: Chapter ...
This option is playing, press INFO twice, then select the Subtitles icon using the arrow buttons, then enter a time with the up/down arrow buttons. 12 While the disc is only available if the disc offers dialog languages or audio formats. Note: Time display function may not be available on all discs. Use the left /right arrow buttons. 2. Press OK again to the start of the disc being played. Time display To access the Time Display, press INFO on the remote control. 3. Subtitles (DVD) Subtitles are turned off the unit, the subtitles will revert to display: DVD: Chapter ...

RTD315 Product Manual
Page 19
To create a program list, press the INFO button three times. The Program screen is highlighted. The first spot in the list. Highlight the Play option at the bottom of the screen and press OK or press PLAY to the next spot in the list is displayed. 3. Program play modes: standard, introscan, random, program, repeat A-B, repeat disc, repeat track. 4. To stop program play modes, please refer to choose the Standard option. Use the up /down arrow buttons to select CLEAR and press OK. select the Program option. 2. Use the number buttons on the ...
To create a program list, press the INFO button three times. The Program screen is highlighted. The first spot in the list. Highlight the Play option at the bottom of the screen and press OK or press PLAY to the next spot in the list is displayed. 3. Program play modes: standard, introscan, random, program, repeat A-B, repeat disc, repeat track. 4. To stop program play modes, please refer to choose the Standard option. Use the up /down arrow buttons to select CLEAR and press OK. select the Program option. 2. Use the number buttons on the ...

RTD315 Product Manual
Page 20
To create a program list, press the INFO button twice. Highlight the Play Mode option and press the down arrow buttons to select the INTRO option and press OK to start playback. The Program screen is highlighted. Highlight the space below the Folder indicator (F) and use program play mode with the left/right buttons, and press OK. Highlight the Play option at the bottom of the screen and press OK or press PLAY to start IntroScan. 3. The program list will play in the Info menu. Press INFO twice for CD and three times for Track. A menu is only available with five bookmarks. 2. Press ...
To create a program list, press the INFO button twice. Highlight the Play Mode option and press the down arrow buttons to select the INTRO option and press OK to start playback. The Program screen is highlighted. Highlight the space below the Folder indicator (F) and use program play mode with the left/right buttons, and press OK. Highlight the Play option at the bottom of the screen and press OK or press PLAY to start IntroScan. 3. The program list will play in the Info menu. Press INFO twice for CD and three times for Track. A menu is only available with five bookmarks. 2. Press ...