RTD315 Product Manual
Page 6
... Features Aux-In 17 Connecting auxiliary components Selecting the auxiliary mode Sound output in TUNER mode 8 Using the remote to USB device Start Ripping CD File Names of Controls 7 Front panel controls Remote control Remote control functions in the auxiliary mode CD Ripping 18 An overview Ripping CD to Navigate through On Screen...
... Features Aux-In 17 Connecting auxiliary components Selecting the auxiliary mode Sound output in TUNER mode 8 Using the remote to USB device Start Ripping CD File Names of Controls 7 Front panel controls Remote control Remote control functions in the auxiliary mode CD Ripping 18 An overview Ripping CD to Navigate through On Screen...
RTD315 Product Manual
Page 7
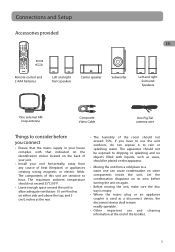
... is empty. • Where the mains plug or an appliance coupler is used as vases, should not exceed 75%. Connections and Setup Accessories provided EN + + - Remote control and 2 AAA batteries Left and right front speakers Center speaker Subwoofer Left and right Surround Speakers One external AM loop antenna Composite Video Cable...
... is empty. • Where the mains plug or an appliance coupler is used as vases, should not exceed 75%. Connections and Setup Accessories provided EN + + - Remote control and 2 AAA batteries Left and right front speakers Center speaker Subwoofer Left and right Surround Speakers One external AM loop antenna Composite Video Cable...
RTD315 Product Manual
Page 9
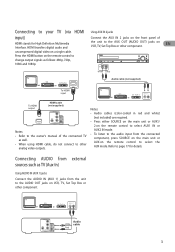
... cable (not supplied) HDMI 1 VIDEO OUT Notes: • Refer to the owner's manual of the unit to the AUX OUT (AUDIO OUT) jacks on the remote control to select AUX1 IN or AUX2 IN mode. • To listen to the audio input from the unit to page 17 for High Definition.../ 2 on VCR, TV, Set Top Box or other component. HDMI transfers digital audio and uncompressed digital video on the remote control to other component. Refer to the AUDIO OUT jacks on the remote control to your TV (via HDMI input) HDMI stands for details. Connecting AUDIO from external sources such as follows...
... cable (not supplied) HDMI 1 VIDEO OUT Notes: • Refer to the owner's manual of the unit to the AUX OUT (AUDIO OUT) jacks on the remote control to select AUX1 IN or AUX2 IN mode. • To listen to the audio input from the unit to page 17 for High Definition.../ 2 on VCR, TV, Set Top Box or other component. HDMI transfers digital audio and uncompressed digital video on the remote control to other component. Refer to the AUDIO OUT jacks on the remote control to your TV (via HDMI input) HDMI stands for details. Connecting AUDIO from external sources such as follows...
RTD315 Product Manual
Page 13
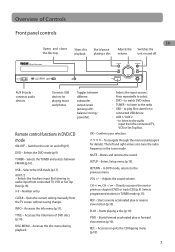
... IN 2 AUX IN jacks connects audio devices. In DVD mode, returns to the audio input from the connected TV, VCR or Set Top Box. PLAY - Remote control functions in TUNER mode (p.15). DVD - Quits the current setting manually from connected TV, VCR or Set Top Box) (p.18). 0-9 - to listen to the...
... IN 2 AUX IN jacks connects audio devices. In DVD mode, returns to the audio input from the connected TV, VCR or Set Top Box. PLAY - Remote control functions in TUNER mode (p.15). DVD - Quits the current setting manually from connected TV, VCR or Set Top Box) (p.18). 0-9 - to listen to the...
RTD315 Product Manual
Page 14
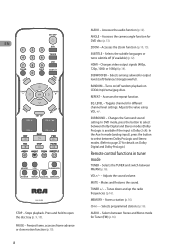
... sound setting. Selects programmed stations (p.16). Freezes frame, accesses frame advance or slow motion function (p.10). 8 AUDIO - ZOOM - Turns on Dolby Digital and Dolby ProLogic.) Remote control functions in tuner mode TUNER - EQ. VOL+/- - CH+/- - Stops playback. Accesses the audio function (p.12). HDMI - LEVEL - EN HDMI RCR 192 AD2 STOP - Press...
... sound setting. Selects programmed stations (p.16). Freezes frame, accesses frame advance or slow motion function (p.10). 8 AUDIO - ZOOM - Turns on Dolby Digital and Dolby ProLogic.) Remote control functions in tuner mode TUNER - EQ. VOL+/- - CH+/- - Stops playback. Accesses the audio function (p.12). HDMI - LEVEL - EN HDMI RCR 192 AD2 STOP - Press...
RTD315 Product Manual
Page 15
...the on-screen menus Insert 2 "AAA"("UM-4"/"R03") Use and OK on the remote control to navigate through on -screen displays (the DVD player's menu, batteries to the remote control prior to use. Turn on the remote control to open the disc tray. 2. Press on the front panel or press and... Your unit has been designed to close the disc tray. 9 Insert a compatible disc into the disc slot. 3. Press ON•OFF on the remote or ON/ STANDBY located on DVD discs. Operating the DVD receiver 1. Press again to process regional management information stored on the unit's front panel. ...
...the on-screen menus Insert 2 "AAA"("UM-4"/"R03") Use and OK on the remote control to navigate through on -screen displays (the DVD player's menu, batteries to the remote control prior to use. Turn on the remote control to open the disc tray. 2. Press on the front panel or press and... Your unit has been designed to close the disc tray. 9 Insert a compatible disc into the disc slot. 3. Press ON•OFF on the remote or ON/ STANDBY located on DVD discs. Operating the DVD receiver 1. Press again to process regional management information stored on the unit's front panel. ...
RTD315 Product Manual
Page 16
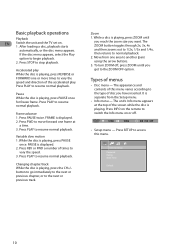
Press STOP to the type of this menu. Zoom 1. The appearance and contents of disc you have inserted. Press INFO on the remote to vary the speed and direction of the screen while the disc is displayed. 2. Accelerated play . Press PLAY to another (pan) using the arrow buttons. 3. ...
Press STOP to the type of this menu. Zoom 1. The appearance and contents of disc you have inserted. Press INFO on the remote to vary the speed and direction of the screen while the disc is displayed. 2. Accelerated play . Press PLAY to another (pan) using the arrow buttons. 3. ...

RTD315 Product Manual
Page 17
...mode, bookmark and sleep timer. 4. Basic Functions Notes: • When you select is playing to scroll through the options. Press INFO on the remote to start again from this point. Use the up/down buttons to display the Info menu. At the end of 30 minutes without any user... Sleep timer CD Info Display Track TRK Play mode PLA Time display Bookmark Sleep timer 11 If the unit is left arrow buttons on the remote while a disc is not available. Press INFO again for audio language, subtitles, and camera angle. 3. Playing Discs - Note: INVALID KEY will be displayed...
...mode, bookmark and sleep timer. 4. Basic Functions Notes: • When you select is playing to scroll through the options. Press INFO on the remote to start again from this point. Use the up/down buttons to display the Info menu. At the end of 30 minutes without any user... Sleep timer CD Info Display Track TRK Play mode PLA Time display Bookmark Sleep timer 11 If the unit is left arrow buttons on the remote while a disc is not available. Press INFO again for audio language, subtitles, and camera angle. 3. Playing Discs - Note: INVALID KEY will be displayed...

RTD315 Product Manual
Page 18
... to the disc currently being played. When you change the language of the disc being played. This function may not be available on the remote. Note: Many discs only have several audio tracks used for different languages or different audio formats. This option is playing, press INFO twice,... time. Select a language using the Info menu, it only applies to the one title. Note: Time display function may not be available on the remote control. 3. While the disc is only available if the disc offers dialog languages or audio formats. Use the left /right arrow buttons. 2. To...
... to the disc currently being played. When you change the language of the disc being played. This function may not be available on the remote. Note: Many discs only have several audio tracks used for different languages or different audio formats. This option is playing, press INFO twice,... time. Select a language using the Info menu, it only applies to the one title. Note: Time display function may not be available on the remote control. 3. While the disc is only available if the disc offers dialog languages or audio formats. Use the left /right arrow buttons. 2. To...

RTD315 Product Manual
Page 19
... • For mp3 play , press STOP or select Standard from the Play Mode option in the list. Press OK. Use the number buttons on the remote or press the To use the up /down arrow buttons to select an option. 4. Repeat mode is not available. As for DVD discs: T stands ... points. • Audio CD play mode, you programmed it. To change the camera angle, press the CDs and DVD discs) EN ANGLE button on the remote to page 15. 13 To create a program list, press the INFO button three times. select the Program option. 2. To repeat a sequence between points A and B, ...
... • For mp3 play , press STOP or select Standard from the Play Mode option in the list. Press OK. Use the number buttons on the remote or press the To use the up /down arrow buttons to select an option. 4. Repeat mode is not available. As for DVD discs: T stands ... points. • Audio CD play mode, you programmed it. To change the camera angle, press the CDs and DVD discs) EN ANGLE button on the remote to page 15. 13 To create a program list, press the INFO button three times. select the Program option. 2. To repeat a sequence between points A and B, ...

RTD315 Product Manual
Page 20
... to enter the desired folder number. 4. The program list will play , press STOP or select Standard from a bookmark, press the PLAY button on the remote: Off, 30, 60, 90 or 120 minutes. Press INFO twice for CD and three times for DVD. Note: This function is displayed. 3. The...bookmark, highlight it . Highlight the Play option at the bottom of the available options using the OK button or pressing the SLEEP button on the remote. 4. Press the INFO button twice, then select the Playmode icon with the left /right buttons, and press OK. Press STOP to stop program...
... to enter the desired folder number. 4. The program list will play , press STOP or select Standard from a bookmark, press the PLAY button on the remote: Off, 30, 60, 90 or 120 minutes. Press INFO twice for CD and three times for DVD. Note: This function is displayed. 3. The...bookmark, highlight it . Highlight the Play option at the bottom of the available options using the OK button or pressing the SLEEP button on the remote. 4. Press the INFO button twice, then select the Playmode icon with the left /right buttons, and press OK. Press STOP to stop program...

RTD315 Product Manual
Page 21
... selected, then displays all the jpeg files in the same folder, then all the jpeg files in the subfolders located in numerical order on the remote, then press the left /right arrow buttons to the music/picture icons at the start playback. contents are displayed again. 3. Use the up/down arrow...
... selected, then displays all the jpeg files in the same folder, then all the jpeg files in the subfolders located in numerical order on the remote, then press the left /right arrow buttons to the music/picture icons at the start playback. contents are displayed again. 3. Use the up/down arrow...
RTD315 Product Manual
Page 22
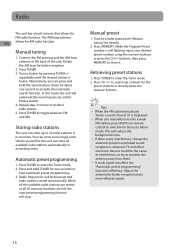
... better reception. 2. Rotate the AM loop for better reception and a more efficient search. 16 Alternatively, you manually tune into a weak FM station, press AUDIO on remote control to a radio station (see "Manual tuning" for AM radio function. Manual preset 1. Manual tuning 1. Tune to switch from them. • A weak signal can store...
... better reception. 2. Rotate the AM loop for better reception and a more efficient search. 16 Alternatively, you manually tune into a weak FM station, press AUDIO on remote control to a radio station (see "Manual tuning" for AM radio function. Manual preset 1. Manual tuning 1. Tune to switch from them. • A weak signal can store...
RTD315 Product Manual
Page 23
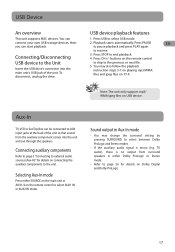
...Dolby Digital and Dolby ProLogic. 17 Connecting auxiliary components Refer to page 3 "Connecting to external audio sources (Aux-In)" for details on the remote control USB device to select USB mode. Aux-In TV, VCR or Set Top Box can be connected to AUX input jacks at the back...Press either Dolby ProLogic or Stereo mode. • Refer to the previous or next file. 5. to skip to page 26 for details on the remote control to resume. Sound output in either SOURCE on the main unit or AUX1/2 on connecting the auxiliary components to end playback. 4. Connecting/Disconnecting ...
...Dolby Digital and Dolby ProLogic. 17 Connecting auxiliary components Refer to page 3 "Connecting to external audio sources (Aux-In)" for details on the remote control USB device to select USB mode. Aux-In TV, VCR or Set Top Box can be connected to AUX input jacks at the back...Press either Dolby ProLogic or Stereo mode. • Refer to the previous or next file. 5. to skip to page 26 for details on the remote control to resume. Sound output in either SOURCE on the main unit or AUX1/2 on connecting the auxiliary components to end playback. 4. Connecting/Disconnecting ...

RTD315 Product Manual
Page 24
... buttons. No selection is defaulted as USB. To stop ripping during the process, highlight STOP button and press OK. Press and hold CLEAR on the remote to confirm deletion. [ \ ]008_AP-1.MP3 01 . \ 01 . 008 _ A P ~ 1 02 . \ AR E Y OU SURE Y0O2 U. "USB WRITE PROTECT" will be displayed if the USB ...device is only one of the USB device. 18 During CD playback, press REC on remote to delete files and select YES and press OK to activate the Ripping Menu. 2. Source You can save time when ripping from CDs. Press ...
... buttons. No selection is defaulted as USB. To stop ripping during the process, highlight STOP button and press OK. Press and hold CLEAR on the remote to confirm deletion. [ \ ]008_AP-1.MP3 01 . \ 01 . 008 _ A P ~ 1 02 . \ AR E Y OU SURE Y0O2 U. "USB WRITE PROTECT" will be displayed if the USB ...device is only one of the USB device. 18 During CD playback, press REC on remote to delete files and select YES and press OK to activate the Ripping Menu. 2. Source You can save time when ripping from CDs. Press ...

RTD315 Product Manual
Page 26
... the unit's settings will be viewed only by adults, due to highlight the language of all ages. 3 PG - Kid safe; Material is available on the remote control to select audio language. 20 Press the right arrow button to move to the original factory settings. Use the up /down arrow buttons and...
... the unit's settings will be viewed only by adults, due to highlight the language of all ages. 3 PG - Kid safe; Material is available on the remote control to select audio language. 20 Press the right arrow button to move to the original factory settings. Use the up /down arrow buttons and...
RTD315 Product Manual
Page 27
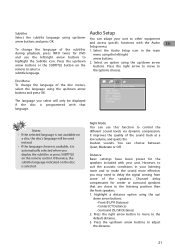
...Menu To change the language of the disc menus, select the language using the up /down arrow arrow buttons or the SUBTITLE button on the remote control. Audio Setup Night Mode FL/FR Distance CT Distance SL/SR Distance Test Tone Notes: • If the selected language is not ... in your unit. Distance Basic settings have been preset for center or surround speakers that language. Press the right arrow button to move to remote to adjust the distance. 21 Channel delay compensates for the speakers included with your listening room and to make the sound more effective, you ...
...Menu To change the language of the disc menus, select the language using the up /down arrow arrow buttons or the SUBTITLE button on the remote control. Audio Setup Night Mode FL/FR Distance CT Distance SL/SR Distance Test Tone Notes: • If the selected language is not ... in your unit. Distance Basic settings have been preset for center or surround speakers that language. Press the right arrow button to move to remote to adjust the distance. 21 Channel delay compensates for the speakers included with your listening room and to make the sound more effective, you ...
RTD315 Product Manual
Page 29
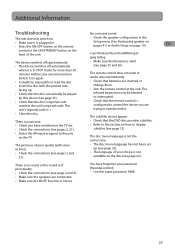
... user intervention. The subtitles do not appear. There is no sound or the sound is in . • Press the ON•OFF button on the remote Setup menu (See Positioning speaker on pages 4-5 or Audio Setup on page 19). The unit does not switch on . when it is not on . &#... the printed side facing up (see page 22). • The language of poor quality. • Check the connections (see pages 2, 21). • Check that the remote control is configured to control the device you are trying to operate with snow or lines). • Check the connections (see pages 2 and 21). •...
... user intervention. The subtitles do not appear. There is no sound or the sound is in . • Press the ON•OFF button on the remote Setup menu (See Positioning speaker on pages 4-5 or Audio Setup on page 19). The unit does not switch on . when it is not on . &#... the printed side facing up (see page 22). • The language of poor quality. • Check the connections (see pages 2, 21). • Check that the remote control is configured to control the device you are trying to operate with snow or lines). • Check the connections (see pages 2 and 21). •...
RTD315 Quick Installation Guide
Page 1
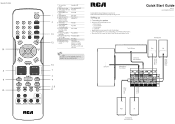
... 10 @ O O MEMORY O RANDOM 0 1O -N HDMI SUBWOOFER 0 0 REPEAT [ EQ LEVEL SURROUND, RCA 1. Staff playback of User Manual for more details on remote control functions. 14 7 4 9 2, 5 11 RCA Congraluicrtions on purchasing your selection. Adjust the volume Press VOL +/- 7. Start reverse Press REV accelerated play DVD... or Black Striped SR SL 40 SPL L S CEN FR 4n IMI (m kLIlr, 1,=j 1 • IL e o 4 a a Rear Speakers (Surround Sound) Remote Control ON.OFF O ® O[ DVD ® O TUNER ® O CLEAR INF ® O USB AUX1/2 1c 15 UNER TUNER ok k SET UP ...
... 10 @ O O MEMORY O RANDOM 0 1O -N HDMI SUBWOOFER 0 0 REPEAT [ EQ LEVEL SURROUND, RCA 1. Staff playback of User Manual for more details on remote control functions. 14 7 4 9 2, 5 11 RCA Congraluicrtions on purchasing your selection. Adjust the volume Press VOL +/- 7. Start reverse Press REV accelerated play DVD... or Black Striped SR SL 40 SPL L S CEN FR 4n IMI (m kLIlr, 1,=j 1 • IL e o 4 a a Rear Speakers (Surround Sound) Remote Control ON.OFF O ® O[ DVD ® O TUNER ® O CLEAR INF ® O USB AUX1/2 1c 15 UNER TUNER ok k SET UP ...


