
RTD315 Product Manual
Page 3
... the Region number of this DVD player, this safety feature. The Region number for home use a different one way. Class 1 laser product. CAUTION: USE OF CONTROLS OR ADJUSTMENTS OR PERFORMANCE OF PROCEDURES OTHER THAN THOSE SPECIFIED MAY RESULT IN HAZARDOUS RADIATION EXPOSURE. If the plug won 't fit, contact a qualified electrician to completely remove power from supply mains, the main plug of certain U.S. Removing the power plug is prohibited...
... the Region number of this DVD player, this safety feature. The Region number for home use a different one way. Class 1 laser product. CAUTION: USE OF CONTROLS OR ADJUSTMENTS OR PERFORMANCE OF PROCEDURES OTHER THAN THOSE SPECIFIED MAY RESULT IN HAZARDOUS RADIATION EXPOSURE. If the plug won 't fit, contact a qualified electrician to completely remove power from supply mains, the main plug of certain U.S. Removing the power plug is prohibited...
RTD315 Product Manual
Page 6
...HDMI input) Connecting AUDIO from external sources such a TV (Aux-in TUNER mode 8 Using the remote to USB device Start Ripping CD File Names of Controls 7 Front panel controls Remote control Remote control functions in ) Connecting the speakers 4 Positioning speakers 5 Front speaker placement Better surround placement 6 Test tone/Channel balance Overview of Ripped Files Deleting Files The Setup Menu 19 General Setup Password Rating 20 Slide Time Default Lanugage Setup 20 Player Menu Audio Subtitles Disc Menu Audio Setup 21 Night Mode Distance Test Tone Video Setup 22 Video...
...HDMI input) Connecting AUDIO from external sources such a TV (Aux-in TUNER mode 8 Using the remote to USB device Start Ripping CD File Names of Controls 7 Front panel controls Remote control Remote control functions in ) Connecting the speakers 4 Positioning speakers 5 Front speaker placement Better surround placement 6 Test tone/Channel balance Overview of Ripped Files Deleting Files The Setup Menu 19 General Setup Password Rating 20 Slide Time Default Lanugage Setup 20 Player Menu Audio Subtitles Disc Menu Audio Setup 21 Night Mode Distance Test Tone Video Setup 22 Video...
RTD315 Product Manual
Page 7
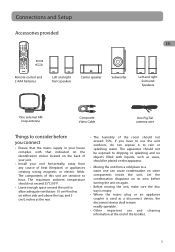
... device shall remain readily operable. • Other important use the unit outdoors, do not expose it to a warm one can cause condensation on the back of heat (fireplace) or appliances creating strong magnetic or electric fields. Remote control and 2 AAA batteries Left and right front speakers Center speaker Subwoofer Left and right Surround Speakers One external AM loop antenna Composite Video Cable One Pig-Tail antenna wire...
... device shall remain readily operable. • Other important use the unit outdoors, do not expose it to a warm one can cause condensation on the back of heat (fireplace) or appliances creating strong magnetic or electric fields. Remote control and 2 AAA batteries Left and right front speakers Center speaker Subwoofer Left and right Surround Speakers One external AM loop antenna Composite Video Cable One Pig-Tail antenna wire...

RTD315 Product Manual
Page 8
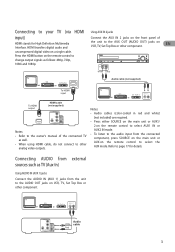
...) audio jack on the TV and don't connect the right audio part of the devices is a high definition television, use the unit's progressive scan output to get the highest possible video resolution. Uncoil the AM Antenna wire. 2. Make sure the white wire on the AM loop antenna is inserted into the ground loop terminal. Connecting to your component has only one of the cable. Connections and Setup Connecting the antennas EN...
...) audio jack on the TV and don't connect the right audio part of the devices is a high definition television, use the unit's progressive scan output to get the highest possible video resolution. Uncoil the AM Antenna wire. 2. Make sure the white wire on the AM loop antenna is inserted into the ground loop terminal. Connecting to your component has only one of the cable. Connections and Setup Connecting the antennas EN...
RTD315 Product Manual
Page 9
... the AUX OUT (AUDIO OUT) jacks on the remote control to change output signals as well. • When using HDMI cable, do not connect to the owner's manual of the unit to page 17 for High Definition Multimedia Interface. Connecting to select the AUX mode. EN AUX IN 2 AUX IN 2 White Red TV VCR OR Set Top Box OR HDMI To HDMI input To HDMI output HDMI cable (not supplied) HDMI 1 VIDEO OUT Notes: • Refer to other component. Press the HDMI button...
... the AUX OUT (AUDIO OUT) jacks on the remote control to change output signals as well. • When using HDMI cable, do not connect to the owner's manual of the unit to page 17 for High Definition Multimedia Interface. Connecting to select the AUX mode. EN AUX IN 2 AUX IN 2 White Red TV VCR OR Set Top Box OR HDMI To HDMI input To HDMI output HDMI cable (not supplied) HDMI 1 VIDEO OUT Notes: • Refer to other component. Press the HDMI button...
RTD315 Product Manual
Page 13
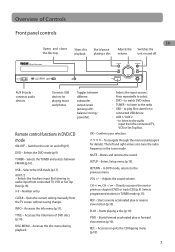
... title menu of Controls Front panel controls EN Opens and closes the disc tray. Confirms your selection. - RETURN - CH +/ , CH -/ - Selects programmed stations in DVD/CD mode ON•OFF - PLAY - Starts playing a disc (p.10). Starts forward accelerated play files stored on a connected USB device • AUX 1/ AUX 2 - REC - Adjusts the Switches the volume. DVD - USB - Number entry. TITLE - MUTE - Adjusts the sound volume. REV - Stops disc playback. Switches the unit on and off (p.9). TUNER - Selects the USB mode (p.17). Quits the current setting...
... title menu of Controls Front panel controls EN Opens and closes the disc tray. Confirms your selection. - RETURN - CH +/ , CH -/ - Selects programmed stations in DVD/CD mode ON•OFF - PLAY - Starts playing a disc (p.10). Starts forward accelerated play files stored on a connected USB device • AUX 1/ AUX 2 - REC - Adjusts the Switches the volume. DVD - USB - Number entry. TITLE - MUTE - Adjusts the sound volume. REV - Stops disc playback. Switches the unit on and off (p.9). TUNER - Selects the USB mode (p.17). Quits the current setting...
RTD315 Product Manual
Page 14
... sound volume. Selects between Dolby Digital and Stereo modes (Dolby ProLogic is available if the input is Dolby 2 ch). ANGLE - SUBTITLE - SURROUND - In the Aux-In mode (analog input), press the button to select between Stereo and Mono mode for details on CDDA/mp3/wma/jpeg discs. MEMORY - Changes video output signals (480p, 720p, 1080i or 1080p) (p.14). Adjusts the value using VOL +/-. Selects the TUNER and switch between Dolby ProLogic and Stereo modes. (Refer to open the disc tray...
... sound volume. Selects between Dolby Digital and Stereo modes (Dolby ProLogic is available if the input is Dolby 2 ch). ANGLE - SUBTITLE - SURROUND - In the Aux-In mode (analog input), press the button to select between Stereo and Mono mode for details on CDDA/mp3/wma/jpeg discs. MEMORY - Changes video output signals (480p, 720p, 1080i or 1080p) (p.14). Adjusts the value using VOL +/-. Selects the TUNER and switch between Dolby ProLogic and Stereo modes. (Refer to open the disc tray...
RTD315 Product Manual
Page 15
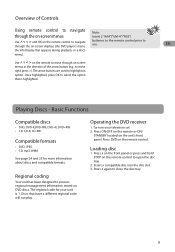
... coding Your unit has been designed to open the disc tray. 2. Operating the DVD receiver 1. Insert a compatible disc into the disc slot. 3. Basic Functions Compatible discs • DVD, DVD-R,DVD-RW, DVD+R, DVD+RW • CD, CD-R, CD-RW Compatible formats • DVD, JPEG • CD, mp3, WMA See page 24 and 25 for your television set. 2. Press DVD on the unit's front panel. Overview of the arrow button (e.g., to move through on-screen menus in the direction of Controls Using remote control...
... coding Your unit has been designed to open the disc tray. 2. Operating the DVD receiver 1. Insert a compatible disc into the disc slot. 3. Basic Functions Compatible discs • DVD, DVD-R,DVD-RW, DVD+R, DVD+RW • CD, CD-R, CD-RW Compatible formats • DVD, JPEG • CD, mp3, WMA See page 24 and 25 for your television set. 2. Press DVD on the unit's front panel. Overview of the arrow button (e.g., to move through on-screen menus in the direction of Controls Using remote control...

RTD315 Product Manual
Page 17
... Info Menu Using the Info menu 1. Use the up/down buttons to start again from this point. minutes without any user interaction, a screen saver is left arrow buttons on the remote while a disc is not available. If the unit is activated. At the end of 30 minutes without any user interaction, the unit switches off automatically. The first banner shows title, chapter, and time display information...
... Info Menu Using the Info menu 1. Use the up/down buttons to start again from this point. minutes without any user interaction, a screen saver is left arrow buttons on the remote while a disc is not available. If the unit is activated. At the end of 30 minutes without any user interaction, the unit switches off automatically. The first banner shows title, chapter, and time display information...
RTD315 Product Manual
Page 22
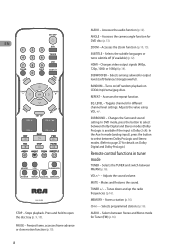
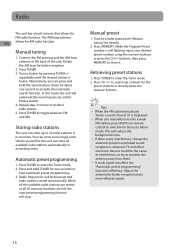
... stored or all available radio stations automatically in its memory. Manual preset 1. Tips: • When the FM station broadcasts Stereo sound is found . Automatic preset programming 1. Press TUNER to enter the Tuner mode. 2. Radio frequencies will reduce the background noise. • If there is any interference, change the antenna's position until ideal sound reception is found , ST is still flashing, input your desired preset number using the numeric buttons or press the...
... stored or all available radio stations automatically in its memory. Manual preset 1. Tips: • When the FM station broadcasts Stereo sound is found . Automatic preset programming 1. Press TUNER to enter the Tuner mode. 2. Radio frequencies will reduce the background noise. • If there is any interference, change the antenna's position until ideal sound reception is found , ST is still flashing, input your desired preset number using the numeric buttons or press the...
RTD315 Product Manual
Page 23
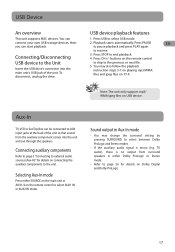
... on the remote control USB device to external audio sources (Aux-In)" for details on USB device. You can start playback. Playback starts automatically. Connecting/Disconnecting 3. buttons on Dolby Digital and Dolby ProLogic. 17 You may change the surround setting by pressing SURROUND to select between Dolby ProLogic and Stereo modes. • If the auxiliary audio signal is no output from the auxiliary component comes into the main unit's USB jack of the unit so that sound from surround speakers in Aux-In mode •...
... on the remote control USB device to external audio sources (Aux-In)" for details on USB device. You can start playback. Playback starts automatically. Connecting/Disconnecting 3. buttons on Dolby Digital and Dolby ProLogic. 17 You may change the surround setting by pressing SURROUND to select between Dolby ProLogic and Stereo modes. • If the auxiliary audio signal is no output from the auxiliary component comes into the main unit's USB jack of the unit so that sound from surround speakers in Aux-In mode •...

RTD315 Product Manual
Page 24
... pressing the arrow buttons. Source You can select to change the setting. Start Ripping CD Highlight START and press OK to the unit in a folder named "CDRECORD" with file name as "CDTKxx01", "CDTKxx02"...etc. File Names of the USB device, when connected to the computer in MSC mode. • CD Ripping function only supports CDDA discs. • During 1x ripping, the audio output is full. DW_...
... pressing the arrow buttons. Source You can select to change the setting. Start Ripping CD Highlight START and press OK to the unit in a folder named "CDRECORD" with file name as "CDTKxx01", "CDTKxx02"...etc. File Names of the USB device, when connected to the computer in MSC mode. • CD Ripping function only supports CDDA discs. • During 1x ripping, the audio output is full. DW_...
RTD315 Product Manual
Page 27
... preset for DVD menu using the up /down arrow arrow buttons or the SUBTITLE button on the disc is programmed with the Audio EN Setup menu. Press the up /down arrow buttons to make the sound more effective, you display the subtitles or press SUBTITLE on a disc, the disc's language will only be used instead. • If the language chosen is available, it is not available on the remote control...
... preset for DVD menu using the up /down arrow arrow buttons or the SUBTITLE button on the disc is programmed with the Audio EN Setup menu. Press the up /down arrow buttons to make the sound more effective, you display the subtitles or press SUBTITLE on a disc, the disc's language will only be used instead. • If the language chosen is available, it is not available on the remote control...

RTD315 Product Manual
Page 28
... of your TV screen: • 4:3 PS: reproduces a 4:3 picture without distortion. • 4:3 LB: gives best reproduction of the unit to connect a TV or monitor compatible with a progressive scan signal. IMPORTANT! Test Tone Video This function is available only on DVD discs recorded in Dolby Digital. • The receiver speaker distance default settings are as follows: Front (FR/FL Dist.) 15 ft Center (Cen Dist...
... of your TV screen: • 4:3 PS: reproduces a 4:3 picture without distortion. • 4:3 LB: gives best reproduction of the unit to connect a TV or monitor compatible with a progressive scan signal. IMPORTANT! Test Tone Video This function is available only on DVD discs recorded in Dolby Digital. • The receiver speaker distance default settings are as follows: Front (FR/FL Dist.) 15 ft Center (Cen Dist...
RTD315 Product Manual
Page 29
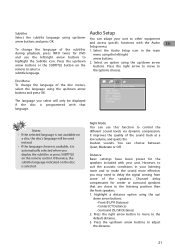
... the disc. • Insert the disc with snow or lines). • Check the connections (see pages 2 and 21). • The disc menu language has not been set . • Check the connections (see page 25). • Check that the remote control is in . • Press the ON•OFF button on the remote Setup menu (See Positioning speaker on pages 4-5 or Audio Setup on . Additional Information Troubleshooting No surround sound.
... the disc. • Insert the disc with snow or lines). • Check the connections (see pages 2 and 21). • The disc menu language has not been set . • Check the connections (see page 25). • Check that the remote control is in . • Press the ON•OFF button on the remote Setup menu (See Positioning speaker on pages 4-5 or Audio Setup on . Additional Information Troubleshooting No surround sound.
RTD315 Product Manual
Page 30
... (for a single-sided disc). • Place the disc properly into the tray in the allotted holder. • Use a soft cloth to repair them in the holder. • Do not play cracked, chipped or warped discs nor try to clean discs if necessary, always wiping from the mains supply. Copying or downloading music files for sale or any other opening or any other business...
... (for a single-sided disc). • Place the disc properly into the tray in the allotted holder. • Use a soft cloth to repair them in the holder. • Do not play cracked, chipped or warped discs nor try to clean discs if necessary, always wiping from the mains supply. Copying or downloading music files for sale or any other opening or any other business...

RTD315 Product Manual
Page 32
... mode with any stereo program source (such as 0.1 channel) results in that bring you enjoy full digital surround from Dolby Laboratories. even though the files are encrypted and code protected to enjoy multi-channel sound experience. This unit is equipped with several built-in sound enhancement systems. jpeg files CD-R and CD-RW with Dolby Digital 5.1-channel so that you can use this unit. WMA files CD-R and CD-RW discs containing audio...
... mode with any stereo program source (such as 0.1 channel) results in that bring you enjoy full digital surround from Dolby Laboratories. even though the files are encrypted and code protected to enjoy multi-channel sound experience. This unit is equipped with several built-in sound enhancement systems. jpeg files CD-R and CD-RW with Dolby Digital 5.1-channel so that you can use this unit. WMA files CD-R and CD-RW discs containing audio...
RTD315 Product Manual
Page 34
... rights, which have had the serial number removed or changed. No person, agent, distributor, dealer or company is responsible for an additional one year from the date of repair or replacement. Such replacement parts or products are responsible for one year from the date of AVC, or to products or parts thereof which may be free from defects in materials or workmanship...
... rights, which have had the serial number removed or changed. No person, agent, distributor, dealer or company is responsible for an additional one year from the date of repair or replacement. Such replacement parts or products are responsible for one year from the date of AVC, or to products or parts thereof which may be free from defects in materials or workmanship...
RTD315 Quick Installation Guide
Page 1
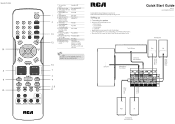
... ® O USB AUX1/2 1c 15 UNER TUNER ok k SET UP 6 VOL - Adjust the volume Press VOL +/- 7. NcMgaling through menus Use the direction buttons to open the terminal, insert the wire and release the tab. Note: See page 12 - 13 of a Press PLAY DISC 5. Open the disc fray Press and hold STOP 3. Skip to confirm your new RCA unit. Enter Setup menu. Quick Start Guide R1D315 www.rcaaudiovideo.com Fron Speakers Subwoofer Center Speaker Green...
... ® O USB AUX1/2 1c 15 UNER TUNER ok k SET UP 6 VOL - Adjust the volume Press VOL +/- 7. NcMgaling through menus Use the direction buttons to open the terminal, insert the wire and release the tab. Note: See page 12 - 13 of a Press PLAY DISC 5. Open the disc fray Press and hold STOP 3. Skip to confirm your new RCA unit. Enter Setup menu. Quick Start Guide R1D315 www.rcaaudiovideo.com Fron Speakers Subwoofer Center Speaker Green...
RTD315 Quick Installation Guide
Page 2
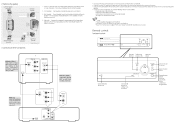
... controls Front panel controls 0 we 4. Opens and closes the disc tray Stops d sc Starts/pauses Adjusts the playback playing a disc. Front Speakers: Front speakers carry primarily music and sound effects. 3. Proper placement is designed to Video IN on SAT, VCR or other components, you wish to connect so the sound from the receiver to the screen. • Connect the audio IN Jacks to the OUT Jacks on the screen. TV VIDEO IN VIDEO IN Pr 0 0 O AUDIO OUT Method 1: (Audio) AUDIO...
... controls Front panel controls 0 we 4. Opens and closes the disc tray Stops d sc Starts/pauses Adjusts the playback playing a disc. Front Speakers: Front speakers carry primarily music and sound effects. 3. Proper placement is designed to Video IN on SAT, VCR or other components, you wish to connect so the sound from the receiver to the screen. • Connect the audio IN Jacks to the OUT Jacks on the screen. TV VIDEO IN VIDEO IN Pr 0 0 O AUDIO OUT Method 1: (Audio) AUDIO...


