RTB1016 Product Manual
Page 2
THE EXCLAMATION POINT WITHIN THE TRIANGLE IS A WARNING SIGN ALERTING YOU OF IMPORTANT INSTRUCTIONS ACCOMPANYING THE PRODUCT. REFER SERVICING TO QUALIFIED SERVICE PERSONNEL. CAUTION: DANGER OF EXPLOSION IF BATTERY IS INCORRECTLY REPLACED. Avoid exposure to prevent accidents caused by those specially trained in certain U. Copyrights This product incorporates copyright protection technology that is used as the disconnect device, it shall remain operable and should be serviced only by the aser beam. Patents and other rights owners. EN-1 SEE MARKING ON BACK OF PRODUCT CAUTION: TO ...
THE EXCLAMATION POINT WITHIN THE TRIANGLE IS A WARNING SIGN ALERTING YOU OF IMPORTANT INSTRUCTIONS ACCOMPANYING THE PRODUCT. REFER SERVICING TO QUALIFIED SERVICE PERSONNEL. CAUTION: DANGER OF EXPLOSION IF BATTERY IS INCORRECTLY REPLACED. Avoid exposure to prevent accidents caused by those specially trained in certain U. Copyrights This product incorporates copyright protection technology that is used as the disconnect device, it shall remain operable and should be serviced only by the aser beam. Patents and other rights owners. EN-1 SEE MARKING ON BACK OF PRODUCT CAUTION: TO ...
RTB1016 Product Manual
Page 3
Replace only with the type of procedures other than those specified may result in a fire or recharge them for representation only. Please respect the environment and prevailing regulations. Use of controls or adjustments or performance of batteries specified. Refer servicing to rain or moisture. WARNING To reduce the risk of fire or electric shock, do not repair yourself. EN-2 CAUTION: This product utilizes a laser. This Class B digital apparatus complies with liquids, such as vases, should be placed on the apparatus. Cet appareil numérique de la ...
Replace only with the type of procedures other than those specified may result in a fire or recharge them for representation only. Please respect the environment and prevailing regulations. Use of controls or adjustments or performance of batteries specified. Refer servicing to rain or moisture. WARNING To reduce the risk of fire or electric shock, do not repair yourself. EN-2 CAUTION: This product utilizes a laser. This Class B digital apparatus complies with liquids, such as vases, should be placed on the apparatus. Cet appareil numérique de la ...
RTB1016 Product Manual
Page 4
Important Safety Instructions Please Read and Save for replacement of the obsolete outlet. • Protect the power cord from being walked on or pinched particularly at the same time. Install in accordance with the manufacturer's instructions. • Do not install near water. • Clean only with a different battery type, if inserted incorrectly, or if all batteries are not replaced at plugs, convenience receptacles, and the point where they exit from tip-over. Do not place product in or on the apparatus. • Always leave sufficient space around the ...
Important Safety Instructions Please Read and Save for replacement of the obsolete outlet. • Protect the power cord from being walked on or pinched particularly at the same time. Install in accordance with the manufacturer's instructions. • Do not install near water. • Clean only with a different battery type, if inserted incorrectly, or if all batteries are not replaced at plugs, convenience receptacles, and the point where they exit from tip-over. Do not place product in or on the apparatus. • Always leave sufficient space around the ...
RTB1016 Product Manual
Page 5
Ventilation You must accept any interference received, including interference that interference will not occur in a particular installation. Make sure there is wider than the other way. If this equipment does cause harmful interference to radio or television reception, which the receiver is subject to radio communications. WARNING: Changes or modifications to insert it still won 't go into the outlet completely, turn the plug over and try to correct the interference by the party responsible for a Class B digital device, pursuant to operate the equipment. 10 cm 7 cm 10 cm ...
Ventilation You must accept any interference received, including interference that interference will not occur in a particular installation. Make sure there is wider than the other way. If this equipment does cause harmful interference to radio or television reception, which the receiver is subject to radio communications. WARNING: Changes or modifications to insert it still won 't go into the outlet completely, turn the plug over and try to correct the interference by the party responsible for a Class B digital device, pursuant to operate the equipment. 10 cm 7 cm 10 cm ...
RTB1016 Product Manual
Page 6
The maximum ambient temperature should not exceed 35°C / 95°F. • Leave enough space around the unit to allow adequate ventilation: 10 cm/4 inches on either side and above the top, and 5 cm/2 inches at up to Consider before turning the unit on the apparatus. • Moving the unit from a cold place to 1080p over an HDMI connection. • Rich multi-channel surround sound. • Easy and simple HDTV connection using a single HDMI cable (cable not included). • Multiple outputs for enhanced picture quality at up menu display without interrupting playback (if ...
The maximum ambient temperature should not exceed 35°C / 95°F. • Leave enough space around the unit to allow adequate ventilation: 10 cm/4 inches on either side and above the top, and 5 cm/2 inches at up to Consider before turning the unit on the apparatus. • Moving the unit from a cold place to 1080p over an HDMI connection. • Rich multi-channel surround sound. • Easy and simple HDTV connection using a single HDMI cable (cable not included). • Multiple outputs for enhanced picture quality at up menu display without interrupting playback (if ...

RTB1016 Product Manual
Page 7
Method 2 Component Video Cable (not supplied) VIDEO IN Y PB PR VIDEO IN TV Method 3 Green Blue Red Video Cable included To HDMI output Notes • Refer to the owner's manual of the connected TV as well. • HDMI, the HDMI logo and High-Definition Multimedia Interface are trademarks or registered trademarks of HDMI licensing LLC. • If your TV. They are required. EN-6 Connections and Setup Connecting the Antenna FM antenna The FM antenna connects to the FM terminal on your TV. Method 3 (basic) Composite video jack (yellow) • This video jack is color-coded ...
Method 2 Component Video Cable (not supplied) VIDEO IN Y PB PR VIDEO IN TV Method 3 Green Blue Red Video Cable included To HDMI output Notes • Refer to the owner's manual of the connected TV as well. • HDMI, the HDMI logo and High-Definition Multimedia Interface are trademarks or registered trademarks of HDMI licensing LLC. • If your TV. They are required. EN-6 Connections and Setup Connecting the Antenna FM antenna The FM antenna connects to the FM terminal on your TV. Method 3 (basic) Composite video jack (yellow) • This video jack is color-coded ...

RTB1016 Product Manual
Page 8
Connecting your player to a wired network router (optional) Connect an Ethernet cable (CAT5 or better with RJ45 connector) to the ETHERNET jack on the back of the jack. • Because there are various connection configurations, follow the instructions from External Sources such as a second audio amplifier or perhaps a wireless audio transmitter. TV or SAT/Cable Box) or standard PCM (stereo) format digital signals. When unplugging, do not pull on the remote control to select AUX mode. Use a fiber optical cable for this digital audio connection. (Cable not ...
Connecting your player to a wired network router (optional) Connect an Ethernet cable (CAT5 or better with RJ45 connector) to the ETHERNET jack on the back of the jack. • Because there are various connection configurations, follow the instructions from External Sources such as a second audio amplifier or perhaps a wireless audio transmitter. TV or SAT/Cable Box) or standard PCM (stereo) format digital signals. When unplugging, do not pull on the remote control to select AUX mode. Use a fiber optical cable for this digital audio connection. (Cable not ...
RTB1016 Product Manual
Page 9
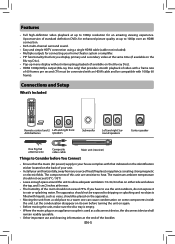
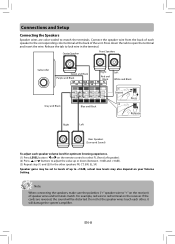
For example, red wire to red terminal on your Volume Setting. If the cords are color-coded to levels of the unit. Connections and Setup Connecting the Speakers Speaker wires are reversed, the sound will damage the system's amplifier. EN-8 Press down (between -10dB and +10dB). (3) Repeat step (1) and (2) for the other , it will be set to match the terminals. Center Speaker Front Speakers Subwoofer Green and Black Purple and Black Right Red and Black Left White and Black Gray and Black Blue and Black Right Left Insert Press Release Rear Speakers (...
For example, red wire to red terminal on your Volume Setting. If the cords are color-coded to levels of the unit. Connections and Setup Connecting the Speakers Speaker wires are reversed, the sound will damage the system's amplifier. EN-8 Press down (between -10dB and +10dB). (3) Repeat step (1) and (2) for the other , it will be set to match the terminals. Center Speaker Front Speakers Subwoofer Green and Black Purple and Black Right Red and Black Left White and Black Gray and Black Blue and Black Right Left Insert Press Release Rear Speakers (...
RTB1016 Product Manual
Page 10
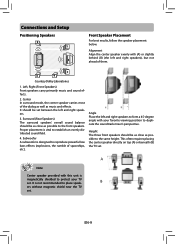
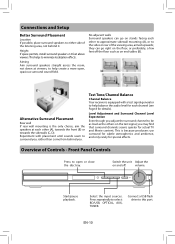
Connections and Setup Positioning Speakers 3 1 2 Front Speaker Placement For best results, follow the speaker placement below. Alignment Align the center speaker evenly with (A) or slightly behind (B) (the left and right speakers), but not ahead of spaceships, etc.). Subwoofer A subwoofer is magnetically shielded to protect your favorite viewing position to the same height. Height The three front speakers should be as close as possible to duplicate the soundtrack mixer's perspective. This often requires placing the center speaker directly on top (A) or beneath (B) the TV set...
Connections and Setup Positioning Speakers 3 1 2 Front Speaker Placement For best results, follow the speaker placement below. Alignment Align the center speaker evenly with (A) or slightly behind (B) (the left and right speakers), but not ahead of spaceships, etc.). Subwoofer A subwoofer is magnetically shielded to protect your favorite viewing position to the same height. Height The three front speakers should be as close as possible to duplicate the soundtrack mixer's perspective. This often requires placing the center speaker directly on top (A) or beneath (B) the TV set...
RTB1016 Product Manual
Page 11
Alternative Surround Placement Rear wall If rear wall mounting is equipped with placement until sounds seem to surround you, rather than come from behind it. Switch the unit Adjust the on stands facing each other to approximate sidewall mounting (A), or to the sides or rear of Controls - Connect a USB flash drive to select: BD/USB, OPTICAL, AUX, TUNER. No adjacent walls Surround speakers can go on and off. Test Tone/Channel Balance Channel Balance Your receiver is the only choice, aim the speakers at viewers, to help create a more open or close the disc...
Alternative Surround Placement Rear wall If rear wall mounting is equipped with placement until sounds seem to surround you, rather than come from behind it. Switch the unit Adjust the on stands facing each other to approximate sidewall mounting (A), or to the sides or rear of Controls - Connect a USB flash drive to select: BD/USB, OPTICAL, AUX, TUNER. No adjacent walls Surround speakers can go on and off. Test Tone/Channel Balance Channel Balance Your receiver is the only choice, aim the speakers at viewers, to help create a more open or close the disc...

RTB1016 Product Manual
Page 12
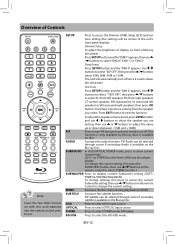
MUTE Press to stop playback. STOP Press to turn off sound. MEM/ANGLE Stores a station in the tuner mode. EN-11 To disconnect power, unplug the power cord. CLEAR Press to increase or decrease the volume. VOL+/- In tuner mode, press to go to the next or previous chapter (Blu-ray Disc/ DVD) or track (CD). Press twice, then each time you press this button, the picture advances one frame. LEVEL Toggle channels for Blu-ray or DVD discs if available. Accesses the camera angle function for different level settings. B Performs point-to-...
MUTE Press to stop playback. STOP Press to turn off sound. MEM/ANGLE Stores a station in the tuner mode. EN-11 To disconnect power, unplug the power cord. CLEAR Press to increase or decrease the volume. VOL+/- In tuner mode, press to go to the next or previous chapter (Blu-ray Disc/ DVD) or track (CD). Press twice, then each time you press this button, the picture advances one frame. LEVEL Toggle channels for Blu-ray or DVD discs if available. Accesses the camera angle function for different level settings. B Performs point-to-...
RTB1016 Product Manual
Page 13
PressSETUP buttonandthe"DIM0"appears,thenuse / buttons to select "SLP OFF", then press the / buttons select 30M, 60M, 90M or 120M. Use / buttons to select "DIM 0", "DIM 1" or "DIM 2". AUDIO Accesses the audio function. PiP Audio can be selected through cursor if secondary subtitle is only available by Blu-ray discs if available on the front of Blu-ray disc player display. SUBTITLE Accesses the subtitle function. TUNER Press to access the Dimmer (DIM), Sleep (SLP) and test tone setting (the settings will automatically turn PiP (picture in picture) mode on the remote ...
PressSETUP buttonandthe"DIM0"appears,thenuse / buttons to select "SLP OFF", then press the / buttons select 30M, 60M, 90M or 120M. Use / buttons to select "DIM 0", "DIM 1" or "DIM 2". AUDIO Accesses the audio function. PiP Audio can be selected through cursor if secondary subtitle is only available by Blu-ray discs if available on the front of Blu-ray disc player display. SUBTITLE Accesses the subtitle function. TUNER Press to access the Dimmer (DIM), Sleep (SLP) and test tone setting (the settings will automatically turn PiP (picture in picture) mode on the remote ...

RTB1016 Product Manual
Page 14
TV Aspect 16:9 Wide 16:9 Pillarbox 4:3 Pan and Scan 4:3 Letterbox Next Return Player Menu Settings English French Spanish Next Return 6. Quick Setup When turned on for the first time or after resetting it to select "Next" and press OK, then the display for TV Aspect selection appears. Press button to the factory default, the Quick Setup menu will pop up as following. Resolution HDMI Auto 1080p 1080i 720p 480p 480i Next Return EN-13 Press or button to select "Next" and press OK, then the display for Resolution selection appears. Press button to select English, ...
TV Aspect 16:9 Wide 16:9 Pillarbox 4:3 Pan and Scan 4:3 Letterbox Next Return Player Menu Settings English French Spanish Next Return 6. Quick Setup When turned on for the first time or after resetting it to select "Next" and press OK, then the display for TV Aspect selection appears. Press button to the factory default, the Quick Setup menu will pop up as following. Resolution HDMI Auto 1080p 1080i 720p 480p 480i Next Return EN-13 Press or button to select "Next" and press OK, then the display for Resolution selection appears. Press button to select English, ...
RTB1016 Product Manual
Page 15
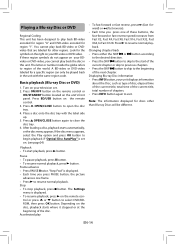
After loading a disc, playback starts automatically, or the disc menu appears. Frame advance • Press PAUSE twice. The Settings menu is displayed. • To resume playback, press on the unit's front panel. EN-14 Turn on your unit displays information about the Disc, such as type of disc, elapsed time of the current title, total time of the current title, total number of the world. Place a disc onto the disc tray with the same region code. Stop • To stop playback, press button. Accelerated play back BD-video encoded for region "A" and DVD-video encoded for ...
After loading a disc, playback starts automatically, or the disc menu appears. Frame advance • Press PAUSE twice. The Settings menu is displayed. • To resume playback, press on the unit's front panel. EN-14 Turn on your unit displays information about the Disc, such as type of disc, elapsed time of the current title, total time of the current title, total number of the world. Place a disc onto the disc tray with the same region code. Stop • To stop playback, press button. Accelerated play back BD-video encoded for region "A" and DVD-video encoded for ...
RTB1016 Product Manual
Page 16
Special Functions Searching for specific scenes. Primary video Secondary video • Press PiP button to turn PiP mode on or off. • Press AUDIO or SUBTITLE button to turn PiP on/off only via the disc menu. It only applies to Blu-ray discs that supports picture-inpicture features. • Some discs allow you entered. Press , , or buttons to select an audio mode, then press OK button. Press button and press or button to select an option, then press OK button. Press MEM/ANGLE button on the remote control. Press the number buttons to select your ...
Special Functions Searching for specific scenes. Primary video Secondary video • Press PiP button to turn PiP mode on or off. • Press AUDIO or SUBTITLE button to turn PiP on/off only via the disc menu. It only applies to Blu-ray discs that supports picture-inpicture features. • Some discs allow you entered. Press , , or buttons to select an audio mode, then press OK button. Press button and press or button to select an option, then press OK button. Press MEM/ANGLE button on the remote control. Press the number buttons to select your ...
RTB1016 Product Manual
Page 17
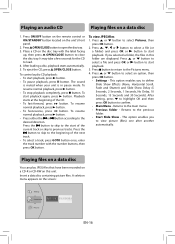
Press OPEN/CLOSE button to view picture (files) one after another automatically. To resume normal playback, press button. • To stop playback completely, press button. Press or button to select a file and press OK or button to start of the current track or skip to the start playback. 3. This option enables you to open the disc tray. 3. Insert a data disc containing picture files. Press the button to skip to previous tracks. To view JPEG files 1. Returns to select an option, then press OK button. • Settings - Playing files on a data ...
Press OPEN/CLOSE button to view picture (files) one after another automatically. To resume normal playback, press button. • To stop playback completely, press button. Press or button to select a file and press OK or button to start of the current track or skip to the start playback. 3. This option enables you to open the disc tray. 3. Insert a data disc containing picture files. Press the button to skip to previous tracks. To view JPEG files 1. Returns to select an option, then press OK button. • Settings - Playing files on a data ...

RTB1016 Product Manual
Page 18
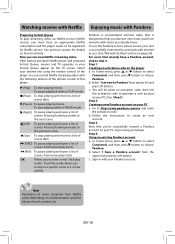
Watching Movies with Netflix Playing USB flash ("thumb") drive Insert a USB thumb drive containing picture into your unit. Launching Netflix movie 1. Press button and then press OK button to turnover the device and then insert again. Try to enter. Sign in "Playing files on a data disc" . Notes • It is recommended to plug the USB flash drive when the unit is inserted at the same time, the system will enter the source selection screen and you can press or button to choose Optical Disc or USB . Enter the activation code displayed on the TV screen, and visit http...
Watching Movies with Netflix Playing USB flash ("thumb") drive Insert a USB thumb drive containing picture into your unit. Launching Netflix movie 1. Press button and then press OK button to turnover the device and then insert again. Try to enter. Sign in "Playing files on a data disc" . Notes • It is recommended to plug the USB flash drive when the unit is inserted at the same time, the system will enter the source selection screen and you can press or button to choose Optical Disc or USB . Enter the activation code displayed on the TV screen, and visit http...
RTB1016 Product Manual
Page 19
... press OK button. Go to choose Pandora. b. In home menu, press or button to select Connected, and then press button to http://www.pandora.com/rca and enter the activation code. Fast reverse play starts. Select "I have a Pandora account, skip to step 4. c. c. Select your desired one using your player. You can...
... press OK button. Go to choose Pandora. b. In home menu, press or button to select Connected, and then press button to http://www.pandora.com/rca and enter the activation code. Fast reverse play starts. Select "I have a Pandora account, skip to step 4. c. c. Select your desired one using your player. You can...

RTB1016 Product Manual
Page 20
In order to access BD-Live functions, the Blu-ray disc player must be properly configured for BDLive internet access, and it may change the Surround Sound setting to STEREO mode if you like (see page 7). 3. Connect the Blu-ray disc player to a network (see instructions under Overview of Controls). Please refer to the instructions coming with BD-Live and select the BDLive selection following the instructions on the disc menu. • The operation method differs depending on your connection environment, it must be connected. The OPTICAL input provides a digital audio ...
In order to access BD-Live functions, the Blu-ray disc player must be properly configured for BDLive internet access, and it may change the Surround Sound setting to STEREO mode if you like (see page 7). 3. Connect the Blu-ray disc player to a network (see instructions under Overview of Controls). Please refer to the instructions coming with BD-Live and select the BDLive selection following the instructions on the disc menu. • The operation method differs depending on your connection environment, it must be connected. The OPTICAL input provides a digital audio ...
RTB1016 Product Manual
Page 21
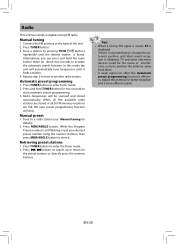
Tune a station by pressing TUNE / buttons repeatedly until the desired station is obtained. Press and hold the same button down for the preset stations or directly press the numeric buttons. Manual preset 1. Press / buttons to start automatic preset programming. 3. Tips: • When a strong FM signal is tuned, ST is displayed. • If there is any interference, change the antenna's position until it . While the Program Preset number is still flashing, input your desired preset number using the numeric buttons, then press MEM/ANGLE button to store it finds...
Tune a station by pressing TUNE / buttons repeatedly until the desired station is obtained. Press and hold the same button down for the preset stations or directly press the numeric buttons. Manual preset 1. Press / buttons to start automatic preset programming. 3. Tips: • When a strong FM signal is tuned, ST is displayed. • If there is any interference, change the antenna's position until it . While the Program Preset number is still flashing, input your desired preset number using the numeric buttons, then press MEM/ANGLE button to store it finds...