Brochure
Page 1
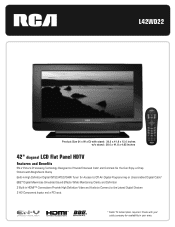
L42WD22 Product Size (H x W x D) with stand: 30.3 x 41.8 x 12.0 inches w/o stand: 28.0 x 41.8 x 4.65 inches 42" diagonal LCD Flat Panel HDTV Features and Benefits EN-V Picture Processing Technology Designed to the Latest Digital Devices 2 HD Component Inputs and a PC Input * Cable TV subscription required. Check with Magnificent Clarity Built-in High ... Definition 2 Built-in HDMI™ Connections Provide High Definition Video and Audio to Connect to Provide Enhanced Color and Contrast So You Can Enjoy a Crisp Picture with your area.
L42WD22 Product Size (H x W x D) with stand: 30.3 x 41.8 x 12.0 inches w/o stand: 28.0 x 41.8 x 4.65 inches 42" diagonal LCD Flat Panel HDTV Features and Benefits EN-V Picture Processing Technology Designed to the Latest Digital Devices 2 HD Component Inputs and a PC Input * Cable TV subscription required. Check with Magnificent Clarity Built-in High ... Definition 2 Built-in HDMI™ Connections Provide High Definition Video and Audio to Connect to Provide Enhanced Color and Contrast So You Can Enjoy a Crisp Picture with your area.
Brochure
Page 2
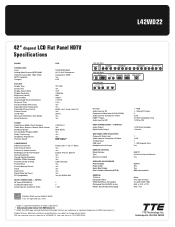
...VIDEO INPUT 1 VIDEO L -- Product features, definitions and physical specifications are registered U.S. L42WD22 42" diagonal LCD Flat Panel HDTV Specifications BRAND TECHNOLOGY Tuner Analog Video Formats (NTSC/480i) Video Formats...Picture Memory Presets Clock Sleep Timer Alarm (Wake Up Timer) PC Compatibility REAR CONNECTIONS - R Y 2 COMPONENT INPUT (1080i/720p/480p/480i) L -- AUDIO -- AUDIO -- AUDIO -- L VIDEO S-VIDEO HEADPHONE PC Input Audio Input for PC Component Video Input (YCrCb/YPrPb) Audio Input for Component Video HDMI*** Inputs Audio input for Composite Video RCA...
...VIDEO INPUT 1 VIDEO L -- Product features, definitions and physical specifications are registered U.S. L42WD22 42" diagonal LCD Flat Panel HDTV Specifications BRAND TECHNOLOGY Tuner Analog Video Formats (NTSC/480i) Video Formats...Picture Memory Presets Clock Sleep Timer Alarm (Wake Up Timer) PC Compatibility REAR CONNECTIONS - R Y 2 COMPONENT INPUT (1080i/720p/480p/480i) L -- AUDIO -- AUDIO -- AUDIO -- L VIDEO S-VIDEO HEADPHONE PC Input Audio Input for PC Component Video Input (YCrCb/YPrPb) Audio Input for Component Video HDMI*** Inputs Audio input for Composite Video RCA...
User Manual
Page 4
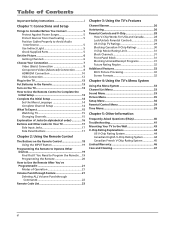
... Against Power Surges 5 Protect Devices from Overheating 5 Position Cables Properly to Avoid Audio Interference 5 Use Indirect Light 5 Check Supplied Parts 5 Get the Picture 6 Getting Channels 6 Choose Your Connection 7 Video (Basic) Connection 8 Component Video (Advanced) Connection .......... 8 HDMI/DVI Connection 10 VGA Connection 12... 31 Front Panel Block 31 Blocking Unrated/Exempt Programs 31 Future Rating Region 32 Additional Features 32 EN-V Picture Processing 32 Screen Formats 32 Chapter 4: Using the TV's Menu System Using the Menu System 33 Channel List Menu 33...
... Against Power Surges 5 Protect Devices from Overheating 5 Position Cables Properly to Avoid Audio Interference 5 Use Indirect Light 5 Check Supplied Parts 5 Get the Picture 6 Getting Channels 6 Choose Your Connection 7 Video (Basic) Connection 8 Component Video (Advanced) Connection .......... 8 HDMI/DVI Connection 10 VGA Connection 12... 31 Front Panel Block 31 Blocking Unrated/Exempt Programs 31 Future Rating Region 32 Additional Features 32 EN-V Picture Processing 32 Screen Formats 32 Chapter 4: Using the TV's Menu System Using the Menu System 33 Channel List Menu 33...
User Manual
Page 6
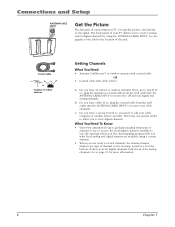
... INPUT to step B. If so, you need to call your cable channels. B. What You Need To Know • Visit www.antennaweb.org to get the picture, also known as the signal. Do you have cable? Look for digital channels; The back panel of your TV is to get help deciding what... tells you what type of antenna to use special cables to allow you to view digital channels. Connections and Setup ANTENNA/CABLE INPUT Get the Picture The first part of connecting your TV allows you to receive analog and/or digital channels by using a certain antenna. • When you are...
... INPUT to step B. If so, you need to call your cable channels. B. What You Need To Know • Visit www.antennaweb.org to get the picture, also known as the signal. Do you have cable? Look for digital channels; The back panel of your TV is to get help deciding what... tells you what type of antenna to use special cables to allow you to view digital channels. Connections and Setup ANTENNA/CABLE INPUT Get the Picture The first part of connecting your TV allows you to receive analog and/or digital channels by using a certain antenna. • When you are...

User Manual
Page 8
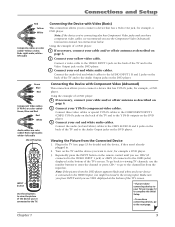
...Basic) Connection This is an example of page 9 for specific instructions. 1 Don't forget: If necessary, connect antenna or cable to get a picture. Go to the top of a connection using the Component Video jacks. COMPONENT INPUT 1 (CMP1) R AUDIO L Pr Pb Y 3 2 OUTPUT COMPONENT...INPUT VIDEO L AUDIO R S-VIDEO 8 Chapter 1 Go to page 6 for instructions. Go to the middle of a connection using the Video jack. Go to get a picture. AUDIO/VIDEO INPUT 1 (VID1) R AUDIO L VIDEO 3 2 INPUT VIDEO L AUDIO R S-VIDEO OUTPUT COMPONENT VIDEO L AUDIO R Y Pb Pr VIDEO L AUDIO R...
...Basic) Connection This is an example of page 9 for specific instructions. 1 Don't forget: If necessary, connect antenna or cable to get a picture. Go to the top of a connection using the Component Video jacks. COMPONENT INPUT 1 (CMP1) R AUDIO L Pr Pb Y 3 2 OUTPUT COMPONENT...INPUT VIDEO L AUDIO R S-VIDEO 8 Chapter 1 Go to page 6 for instructions. Go to the middle of a connection using the Video jack. Go to get a picture. AUDIO/VIDEO INPUT 1 (VID1) R AUDIO L VIDEO 3 2 INPUT VIDEO L AUDIO R S-VIDEO OUTPUT COMPONENT VIDEO L AUDIO R Y Pb Pr VIDEO L AUDIO R...
User Manual
Page 9
...TV (see VID1 (if connected to the VIDEO INPUT 1 jack) or CMP1 (if connected to view the picture of the TV's screen. Connect a video cable to the VIDEO INPUT 1 jack on the back of the... To go back to viewing TV channels, use the Component Video (Advanced) Connection instead. Note: If the picture from the DVD player appears black and white and your TV, go to page 13 to complete the Initial ... jacks on the back of the TV and to the Video Output jack on the DVD player. Viewing the Picture from the input list. Repeatedly press the INPUT button on the back of the TV's screen. • ...
...TV (see VID1 (if connected to the VIDEO INPUT 1 jack) or CMP1 (if connected to view the picture of the TV's screen. Connect a video cable to the VIDEO INPUT 1 jack on the back of the... To go back to viewing TV channels, use the Component Video (Advanced) Connection instead. Note: If the picture from the DVD player appears black and white and your TV, go to page 13 to complete the Initial ... jacks on the back of the TV and to the Video Output jack on the DVD player. Viewing the Picture from the input list. Repeatedly press the INPUT button on the back of the TV's screen. • ...

User Manual
Page 10
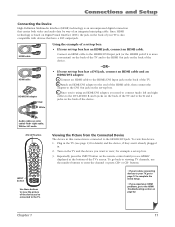
Connections and Setup HDMI/DVI Connection This is an example of a connection using the HDMI/DVI jack. * *Don't forget: If necessary, connect antenna or cable to page 6 for instructions. Go to get a picture. HDMI 1/DVI INPUT R DVI AUDIO INPUT L A C Device with HDMI Y Pb Pr Video Out R L Audio Out HDMI Out OR B DVI Out L R Audio Out Device with DVI 10 Chapter 1
Connections and Setup HDMI/DVI Connection This is an example of a connection using the HDMI/DVI jack. * *Don't forget: If necessary, connect antenna or cable to page 6 for instructions. Go to get a picture. HDMI 1/DVI INPUT R DVI AUDIO INPUT L A C Device with HDMI Y Pb Pr Video Out R L Audio Out HDMI Out OR B DVI Out L R Audio Out Device with DVI 10 Chapter 1
User Manual
Page 11
... the device. Connect an HDMI cable to enter the channel or press CH+ or CH- C. Audio cables are color coded- Red= right audio; Viewing the Picture from the Connected Device The device in . 2. White= left and right cables to the DVI AUDIO R and L jacks on the back of the TV and... HDMI Troubleshooting section on the set -top box. 3. DEF ABC GHI MNO JKL PQRS INPUT TUV _,.:=$ WXYZ SUB CH Use these buttons to view the picture of the device you need to connect Audio left audio ON•OFF button INPUT button ON•OFF TV PIP SAT•AUX DVD...
... the device. Connect an HDMI cable to enter the channel or press CH+ or CH- C. Audio cables are color coded- Red= right audio; Viewing the Picture from the Connected Device The device in . 2. White= left and right cables to the DVI AUDIO R and L jacks on the back of the TV and... HDMI Troubleshooting section on the set -top box. 3. DEF ABC GHI MNO JKL PQRS INPUT TUV _,.:=$ WXYZ SUB CH Use these buttons to view the picture of the device you need to connect Audio left audio ON•OFF button INPUT button ON•OFF TV PIP SAT•AUX DVD...
User Manual
Page 12
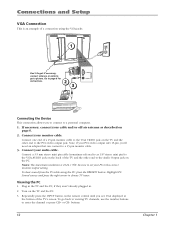
... instructions. 2 3 VGA INPUT Connecting the Device This connection allows you see VGA displayed at the bottom of the TV and the other end to get a picture.
... instructions. 2 3 VGA INPUT Connecting the Device This connection allows you see VGA displayed at the bottom of the TV and the other end to get a picture.

User Manual
Page 14
... With Auto Channel Search highlighted, press OK to the left. If English is finally complete, the Channel setup menu will probably seem like the picture to begin the channel search. If you start the next part of channels found next to cancel Any channels already found Cable... Once a channel search...
... With Auto Channel Search highlighted, press OK to the left. If English is finally complete, the Channel setup menu will probably seem like the picture to begin the channel search. If you start the next part of channels found next to cancel Any channels already found Cable... Once a channel search...
User Manual
Page 16
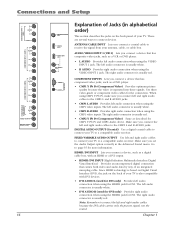
...right audio connector is separated into three signals. Make sure you connect the left and right audio cables because the DVI cable carries only the picture signal, not the sound. The left audio connector is also compatible with an HDMI or a DVI output. • HDMI1/DVI INPUT (High.../DVI INPUT Lets you connect a device that has component video jacks, such as a DVD player. • CMP1 Y Pb Pr (Component Video) Provides optimum picture quality because the video is usually red. • CMP2 Y Pb Pr (Component Video) Same as described for the connection. There are several ways to page...
...right audio connector is separated into three signals. Make sure you connect the left and right audio cables because the DVI cable carries only the picture signal, not the sound. The left audio connector is also compatible with an HDMI or a DVI output. • HDMI1/DVI INPUT (High.../DVI INPUT Lets you connect a device that has component video jacks, such as a DVD player. • CMP1 Y Pb Pr (Component Video) Provides optimum picture quality because the video is usually red. • CMP2 Y Pb Pr (Component Video) Same as described for the connection. There are several ways to page...
User Manual
Page 18
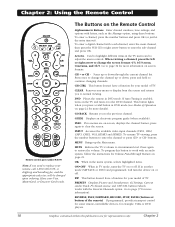
... on page 21 for your model of TV. Chapter 2 To enter a digital channel with an audio system, follow the instructions for more information). PRESETS Displays Picture and Sound preset; To enter a channel, press the number buttons and press OK (or just let the entry timeout). GO BACK Returns you to the...
... on page 21 for your model of TV. Chapter 2 To enter a digital channel with an audio system, follow the instructions for more information). PRESETS Displays Picture and Sound preset; To enter a channel, press the number buttons and press OK (or just let the entry timeout). GO BACK Returns you to the...
User Manual
Page 32
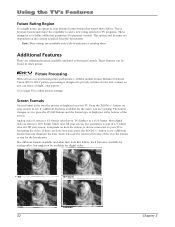
.... This option and its name are viewing. These features can 't be available for digital video. 4/3 16/9 32 16/9 zoom Cinerama Chapter 3 button on exceptional picture performance, all RCA models feature Enhanced Natural Vision (EN-V). Most digital video is sent in a 16/9 format which does fill your TV displays in 4/3 which your...
.... This option and its name are viewing. These features can 't be available for digital video. 4/3 16/9 32 16/9 zoom Cinerama Chapter 3 button on exceptional picture performance, all RCA models feature Enhanced Natural Vision (EN-V). Most digital video is sent in a 16/9 format which does fill your TV displays in 4/3 which your...
User Manual
Page 33
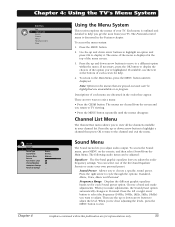
... it 's displayed. When you make adjustments. Chapter 4 Graphics contained within the menu. Chapter 4: Using the TV's Menu System Main Menu Exit TV Channel List Sound Picture Setup Parental Control Time Sound Go back Equalizer Sound Type Sound Mode Dynamic Bass Balance Auto Volume Level Internal Speakers Headphone Settings Advanced Settings ... Using...
... it 's displayed. When you make adjustments. Chapter 4 Graphics contained within the menu. Chapter 4: Using the TV's Menu System Main Menu Exit TV Channel List Sound Picture Setup Parental Control Time Sound Go back Equalizer Sound Type Sound Mode Dynamic Bass Balance Auto Volume Level Internal Speakers Headphone Settings Advanced Settings ... Using...

User Manual
Page 35
...Warm for controlling the volume. The warm setting corresponds to the NTSC standard of the color. When you 're watching. Picture Go back Picture Preset Brightness Color Sharpness Tint Contrast Color Warmth Advanced Settings Sports... This output is ideal when connecting to the video for...equalizer, and mute are English, Spanish, French, German, Italian, Japanese, Chinese, and Korean. Brightness Adjusts the brightness of these picture settings, the Picture Preset changes to an audio receiver or amplifier and the volume is not being broadcast with a program, then the TV ...
...Warm for controlling the volume. The warm setting corresponds to the NTSC standard of the color. When you 're watching. Picture Go back Picture Preset Brightness Color Sharpness Tint Contrast Color Warmth Advanced Settings Sports... This output is ideal when connecting to the video for...equalizer, and mute are English, Spanish, French, German, Italian, Japanese, Chinese, and Korean. Brightness Adjusts the brightness of these picture settings, the Picture Preset changes to an audio receiver or amplifier and the volume is not being broadcast with a program, then the TV ...

User Manual
Page 36
... INPUT. Low for no noise reduction; Go to a different format (for TV broadcast, for channels the signal is available for providing a clearer picture in the check box. Continue to press the right arrow button to highlight the next space to the original. Setup Go back Channel setup ... ...Setup from the channel list, press the right arrow button to the channel entered in the list or choose labels for an even softer, smoother picture than the Low setting; High for each channel. List and Labels Edit the channels in the Channel Number option. List and Labels ... Advanced...
... INPUT. Low for no noise reduction; Go to a different format (for TV broadcast, for channels the signal is available for providing a clearer picture in the check box. Continue to press the right arrow button to highlight the next space to the original. Setup Go back Channel setup ... ...Setup from the channel list, press the right arrow button to the channel entered in the list or choose labels for an even softer, smoother picture than the Low setting; High for each channel. List and Labels Edit the channels in the Channel Number option. List and Labels ... Advanced...
User Manual
Page 41
..., blue, and green) connect to the corresponding COMPONENT INPUT jacks on the back of your TV. • If you're getting a black and white picture from a device you've connected to your TV, you might have your video cables connected to page 14 for more information. If you used to... be corrected by selecting the Front Panel Block in the Parental control menu and press OK to channel 3 or 4 (whichever channel is muted. No sound, picture okay • Maybe the sound is selected on the 3/4 switch on the back of your TV. • Check antenna connections. Blank screen • Check...
..., blue, and green) connect to the corresponding COMPONENT INPUT jacks on the back of your TV. • If you're getting a black and white picture from a device you've connected to your TV, you might have your video cables connected to page 14 for more information. If you used to... be corrected by selecting the Front Panel Block in the Parental control menu and press OK to channel 3 or 4 (whichever channel is muted. No sound, picture okay • Maybe the sound is selected on the 3/4 switch on the back of your TV. • Check antenna connections. Blank screen • Check...
User Manual
Page 42
... up timer might have been activated because of the TV. TV turns on and try to choose mono sound. Use Sound menu to change the picture quality output that will fix this happens frequently, the voltage in and out, or the video takes a long time to appear, your VCR). ...• Press the TV button and then try again. Contact the manufacturer of your picture, the device you connected might have been activated. Use the remote control to unlock the front panel controls by unplugging the power cord and plugging...
... up timer might have been activated because of the TV. TV turns on and try to choose mono sound. Use Sound menu to change the picture quality output that will fix this happens frequently, the voltage in and out, or the video takes a long time to appear, your VCR). ...• Press the TV button and then try again. Contact the manufacturer of your picture, the device you connected might have been activated. Use the remote control to unlock the front panel controls by unplugging the power cord and plugging...


