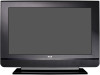
Brochure
Page 2
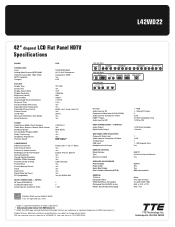
... Picture Control Format Control Comb Filter Reverse 3:2 Pull Down (Film Mode) Noise Reduction SOUND Audio Power (Watts) Front Speakers Treble, Bass, Balance, Volume, Mute Control Broadcast Stereo Second Audio Program (SAP) Dolby * Processing Headphone Adjustments Premium Sound CONVENIENCE Side Panel Controls Auto Channel Search Autotune (1-button launch) Multilingual On-Screen-Display Channel Labelling Closed Caption Capability ENERGY STAR® Qualified Parental Control (V-Chip) Picture Reset Picture Memory Presets Clock Sleep Timer Alarm (Wake Up Timer) PC Compatibility REAR CONNECTIONS...
... Picture Control Format Control Comb Filter Reverse 3:2 Pull Down (Film Mode) Noise Reduction SOUND Audio Power (Watts) Front Speakers Treble, Bass, Balance, Volume, Mute Control Broadcast Stereo Second Audio Program (SAP) Dolby * Processing Headphone Adjustments Premium Sound CONVENIENCE Side Panel Controls Auto Channel Search Autotune (1-button launch) Multilingual On-Screen-Display Channel Labelling Closed Caption Capability ENERGY STAR® Qualified Parental Control (V-Chip) Picture Reset Picture Memory Presets Clock Sleep Timer Alarm (Wake Up Timer) PC Compatibility REAR CONNECTIONS...
User Manual
Page 2
... located on a firm, flat www.rca.com/television. FCC Regulations state that the cable ground shall be connected to the grounding system of the building as close to the point of cable entry...base or mounted to prevent the TV from the rear of electric shock or personal injury. These numbers are registered trademarks of adequate size and strength to the wall. This symbol indicates "dangerous voltage" inside . This symbol indicates that presents a risk of the TV receiver and other surfaces. Refer to operate it is of BBE Sound, Inc. Model No Serial...
... located on a firm, flat www.rca.com/television. FCC Regulations state that the cable ground shall be connected to the grounding system of the building as close to the point of cable entry...base or mounted to prevent the TV from the rear of electric shock or personal injury. These numbers are registered trademarks of adequate size and strength to the wall. This symbol indicates "dangerous voltage" inside . This symbol indicates that presents a risk of the TV receiver and other surfaces. Refer to operate it is of BBE Sound, Inc. Model No Serial...
User Manual
Page 3
... SECTION 810-21) GROUND CLAMPS POWER SERVICE GROUNDING ELECTRODE SYSTEM (NEC ART 250, PART H) Important Information i Use only with the cart, stand, tripod, bracket, or table specified by the manufacturer. 12. See following example. Clean only with the apparatus. Keep these instructions. 2. Do not block any heat sources such as power-supply cord or plug is provided for long periods of...
... SECTION 810-21) GROUND CLAMPS POWER SERVICE GROUNDING ELECTRODE SYSTEM (NEC ART 250, PART H) Important Information i Use only with the cart, stand, tripod, bracket, or table specified by the manufacturer. 12. See following example. Clean only with the apparatus. Keep these instructions. 2. Do not block any heat sources such as power-supply cord or plug is provided for long periods of...
User Manual
Page 4
... Safety Instructions i Chapter 1: Connections and Setup Things to Consider Before You Connect 5 Protect Against Power Surges 5 Protect Devices from Overheating 5 Position Cables Properly to Avoid Audio Interference 5 Use Indirect Light 5 Check Supplied Parts 5 Get the Picture 6 Getting Channels 6 Choose Your Connection 7 Video (Basic) Connection 8 Component Video (Advanced) Connection .......... 8 HDMI/DVI Connection 10 VGA Connection 12 Plug in the TV 13 Put Batteries in the Remote 13 Turn on the TV 13 How to Use the Remote Control to...
... Safety Instructions i Chapter 1: Connections and Setup Things to Consider Before You Connect 5 Protect Against Power Surges 5 Protect Devices from Overheating 5 Position Cables Properly to Avoid Audio Interference 5 Use Indirect Light 5 Check Supplied Parts 5 Get the Picture 6 Getting Channels 6 Choose Your Connection 7 Video (Basic) Connection 8 Component Video (Advanced) Connection .......... 8 HDMI/DVI Connection 10 VGA Connection 12 Plug in the TV 13 Put Batteries in the Remote 13 Turn on the TV 13 How to Use the Remote Control to...
User Manual
Page 5
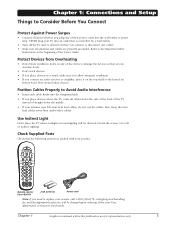
... from audio/video cables. Use Indirect Light Don't place the TV where sunlight or room lighting will be directed toward the screen. DEF ABC GHI MNO JKL PQRS INPUT TUV _,.:=$ WXYZ SUB CH Remote control Part # R301F1 2 AA batteries Power cord Note: If you need to replace your TV into an outlet that is controlled by a wall switch. • Turn off the TV and/or device(s) before you plug any...
... from audio/video cables. Use Indirect Light Don't place the TV where sunlight or room lighting will be directed toward the screen. DEF ABC GHI MNO JKL PQRS INPUT TUV _,.:=$ WXYZ SUB CH Remote control Part # R301F1 2 AA batteries Power cord Note: If you need to replace your TV into an outlet that is controlled by a wall switch. • Turn off the TV and/or device(s) before you plug any...
User Manual
Page 9
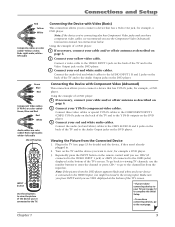
... the input list. Using the example of the TV's screen. Connect your red and white audio cables. Repeatedly press the INPUT button on the remote control until you use the number buttons to the Audio Output jacks on the back of the TV and to enter the channel or press CH+/- Chapter 1 9 white= left audio Green Blue Red Component Video cables (Y Pb Pr) are color codedGreen, Blue and Red Red White Audio cables are color coded- Connect the audio (red and white) cables to the AUDIO INPUT 1 R and L jacks on the DVD player...
... the input list. Using the example of the TV's screen. Connect your red and white audio cables. Repeatedly press the INPUT button on the remote control until you use the number buttons to the Audio Output jacks on the back of the TV and to enter the channel or press CH+/- Chapter 1 9 white= left audio Green Blue Red Component Video cables (Y Pb Pr) are color codedGreen, Blue and Red Red White Audio cables are color coded- Connect the audio (red and white) cables to the AUDIO INPUT 1 R and L jacks on the DVD player...
User Manual
Page 11
... for example a set -top box. Audio cables are color coded- HDMI cable HDMI cable HDMI/DVI adapter Red White Using the example of the TV. C. Red= right audio; DEF ABC GHI MNO JKL PQRS INPUT TUV _,.:=$ WXYZ SUB CH Use these buttons to the HDMI1/DVI jack. To view this connection is also compatible with devices that carries both video and audio data by way of the TV's screen. Plug in the TV (see HDMI1 displayed at the...
... for example a set -top box. Audio cables are color coded- HDMI cable HDMI cable HDMI/DVI adapter Red White Using the example of the TV. C. Red= right audio; DEF ABC GHI MNO JKL PQRS INPUT TUV _,.:=$ WXYZ SUB CH Use these buttons to the HDMI1/DVI jack. To view this connection is also compatible with devices that carries both video and audio data by way of the TV's screen. Plug in the TV (see HDMI1 displayed at the...
User Manual
Page 12
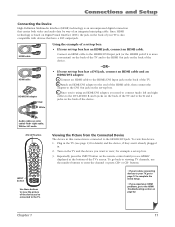
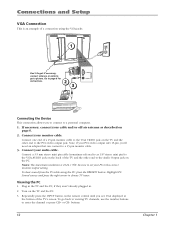
.... 1 Don't forget: If necessary, VIDEO connect antenna or cable to a 15-pin monitor cable. 3. Go to page 6 for AUDIO instructions. 2 3 VGA INPUT Connecting the Device This connection allows you 'll need an adapter that can connect to get a picture. Connect one end of a 15-pin monitor cable to the correct monitor output setting. Connect your monitor cable. Plug in the TV and the PC, if they aren't already plugged in. 2. Connections and Setup VGA Connection This is 1024 x 768...
.... 1 Don't forget: If necessary, VIDEO connect antenna or cable to a 15-pin monitor cable. 3. Go to page 6 for AUDIO instructions. 2 3 VGA INPUT Connecting the Device This connection allows you 'll need an adapter that can connect to get a picture. Connect one end of a 15-pin monitor cable to the correct monitor output setting. Connect your monitor cable. Plug in the TV and the PC, if they aren't already plugged in. 2. Connections and Setup VGA Connection This is 1024 x 768...
User Manual
Page 13
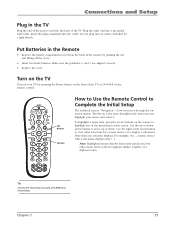
.... Connections and Setup Plug in the Remote • Remove the battery compartment cover from other menu items on the remote control. Note: Highlighted means that the menu item stands out from the back of the items listed on the screen. Put Batteries in the TV Plug the end of the power cord into the outlet. Tip To access the setup menus manually, press MENU and choose Setup. Turn on the TV Turn...
.... Connections and Setup Plug in the Remote • Remove the battery compartment cover from other menu items on the remote control. Note: Highlighted means that the menu item stands out from the back of the items listed on the screen. Put Batteries in the TV Plug the end of the power cord into the outlet. Tip To access the setup menus manually, press MENU and choose Setup. Turn on the TV Turn...
User Manual
Page 16
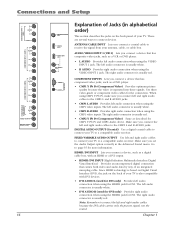
...-plug cable. COMPONENT INPUTS Lets you connect a coaxial cable to receive the signal from your TV to page 35 for the connection. Connections and Setup FIXED/VARIABLE AUDIO OUTPUT AUDIO/VIDEO INPUT 1 (VID1) COMPONENT INPUT 2 (CMP2) COMPONENT INPUT 1 (CMP1) R AUDIO L VIDEO R AUDIO L Pr Pb Y R AUDIO L Pr Pb Y R AUDIO L VIDEO OUTPUT DIGITAL AUDIO OUTPUT (Coaxial) 16 ANTENNA/CABLE INPUT HDMI 2 INPUT HDMI 1/DVI INPUT R DVI AUDIO INPUT L VIDEO AUDIO VGA INPUT Explanation of Jacks (in the Advanced Sound menu. AUDIO/VIDEO INPUT 1 (VID1) Lets you connect a device, such as a VCR or DVD...
...-plug cable. COMPONENT INPUTS Lets you connect a coaxial cable to receive the signal from your TV to page 35 for the connection. Connections and Setup FIXED/VARIABLE AUDIO OUTPUT AUDIO/VIDEO INPUT 1 (VID1) COMPONENT INPUT 2 (CMP2) COMPONENT INPUT 1 (CMP1) R AUDIO L VIDEO R AUDIO L Pr Pb Y R AUDIO L Pr Pb Y R AUDIO L VIDEO OUTPUT DIGITAL AUDIO OUTPUT (Coaxial) 16 ANTENNA/CABLE INPUT HDMI 2 INPUT HDMI 1/DVI INPUT R DVI AUDIO INPUT L VIDEO AUDIO VGA INPUT Explanation of Jacks (in the Advanced Sound menu. AUDIO/VIDEO INPUT 1 (VID1) Lets you connect a device, such as a VCR or DVD...
User Manual
Page 17
... S-Video cable from the ANTENNA/CABLE INPUT (excluding copy-protected programs and component video formats) while the TV is connected to the side jacks at the bottom of the screen. In the TV menu system, acts like the right arrow button on the remote control and adjusts menu controls. Note: Do not connect an S-Video and a regular video cable to the VGA jack. When in the Sound menu. VIDEO OUTPUT Connect a VCR or DVD-recorder to the Headphone Settings...
... S-Video cable from the ANTENNA/CABLE INPUT (excluding copy-protected programs and component video formats) while the TV is connected to the side jacks at the bottom of the screen. In the TV menu system, acts like the right arrow button on the remote control and adjusts menu controls. Note: Do not connect an S-Video and a regular video cable to the VGA jack. When in the Sound menu. VIDEO OUTPUT Connect a VCR or DVD-recorder to the Headphone Settings...
User Manual
Page 18
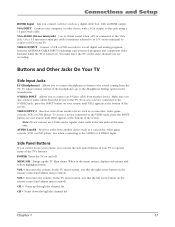
... to replace your model of Operation on or off . CLEAR Removes any menu or display from the screen and returns you need to change the channel up or down through the current channel list. buttons. DEF ABC GHI MNO JKL PQRS INPUT TUV _,.:=$ WXYZ SUB CH Remote control part number R301F1 Note: If you to change the screen format: 4/3, 16/9 zoom, Cinerama, and 16/9. To enter a digital channel with an audio system, follow the instructions...
... to replace your model of Operation on or off . CLEAR Removes any menu or display from the screen and returns you need to change the channel up or down through the current channel list. buttons. DEF ABC GHI MNO JKL PQRS INPUT TUV _,.:=$ WXYZ SUB CH Remote control part number R301F1 Note: If you to change the screen format: 4/3, 16/9 zoom, Cinerama, and 16/9. To enter a digital channel with an audio system, follow the instructions...
User Manual
Page 19
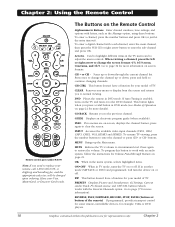
... to operate some RCA devices. Chapter 2 19 To program this button to view is turned ON. 2. Using the INPUT Button Use the INPUT button to scroll through the available video input channels and view devices you want to work with all models of all functions of remote-controllable VCRs, audio devices, DVD players, cable boxes, satellite receivers and other devices. Turn on screen formats. This button lights when you press a valid button in TV mode. ON•OFF TV PIP SAT•AUX DVD GO...
... to operate some RCA devices. Chapter 2 19 To program this button to view is turned ON. 2. Using the INPUT Button Use the INPUT button to scroll through the available video input channels and view devices you want to work with all models of all functions of remote-controllable VCRs, audio devices, DVD players, cable boxes, satellite receivers and other devices. Turn on screen formats. This button lights when you press a valid button in TV mode. ON•OFF TV PIP SAT•AUX DVD GO...
User Manual
Page 26
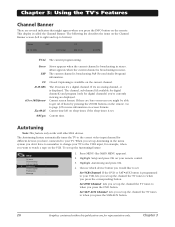
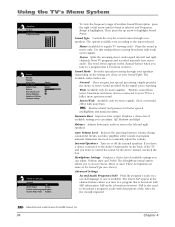
... when the current channel is set up the Autotuning feature: Setup Go back Channel setup ... Closed Captioning is available on sleep timer, if the sleep timer is broadcasting in mono. The D means it 's an analog channel, A is called the Channel Banner. Current time left to right and top to when you set . Current time. Autotuning Note: This feature only works with other RCA devices. Autotuning ... Set DVD Channel Lets you press the DVD button.
... when the current channel is set up the Autotuning feature: Setup Go back Channel setup ... Closed Captioning is available on sleep timer, if the sleep timer is broadcasting in mono. The D means it 's an analog channel, A is called the Channel Banner. Current time left to right and top to when you set . Current time. Autotuning Note: This feature only works with other RCA devices. Autotuning ... Set DVD Channel Lets you press the DVD button.
User Manual
Page 27
... button. VID1 or VID2 (Video Input) Device is connected to the ANTENNA/CABLE jack on the side of the TV, and you want the TV to tune to the HDMI input channel when you press the corresponding device button. Autotuning Go back Set VCR Channel Set DVD Channel Set SAT-AUX Channel VID1... Chapter 3 27 Using the TV's Features 5. Reminder: make sure the device's Channel 3/4 switch is connected to the three COMPONENT VIDEO INPUT...
... button. VID1 or VID2 (Video Input) Device is connected to the ANTENNA/CABLE jack on the side of the TV, and you want the TV to tune to the HDMI input channel when you press the corresponding device button. Autotuning Go back Set VCR Channel Set DVD Channel Set SAT-AUX Channel VID1... Chapter 3 27 Using the TV's Features 5. Reminder: make sure the device's Channel 3/4 switch is connected to the three COMPONENT VIDEO INPUT...
User Manual
Page 34
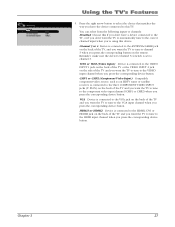
... connected to a program that is available. The Headphone sound option allows you tune to the Audio Output jacks on the back of available settings you want to broadcast a program's audio with weak stereo signals. Sound Go back Equalizer Sound Type Sound Mode Dynamic Bass Balance Auto Volume Level Internal Speakers Headphone Settings Advanced Settings ... Displays a choice list of the TV and you can adjust: Volume, Bass and Treble. SAP audio is also used to control the sound...
... connected to a program that is available. The Headphone sound option allows you tune to the Audio Output jacks on the back of available settings you want to broadcast a program's audio with weak stereo signals. Sound Go back Equalizer Sound Type Sound Mode Dynamic Bass Balance Auto Volume Level Internal Speakers Headphone Settings Advanced Settings ... Displays a choice list of the TV and you can adjust: Volume, Bass and Treble. SAP audio is also used to control the sound...

User Manual
Page 35
... Fixed Output, the TV's volume control, graphic equalizer, and mute are English, Spanish, French, German, Italian, Japanese, Chinese, and Korean. Use the left or right arrow button to each input- Color Warmth Displays a choice list that lets you change any of the picture. The warm setting corresponds to an audio receiver or amplifier and the volume is being broadcast with a program, then the TV plays it. Use...
... Fixed Output, the TV's volume control, graphic equalizer, and mute are English, Spanish, French, German, Italian, Japanese, Chinese, and Korean. Use the left or right arrow button to each input- Color Warmth Displays a choice list that lets you change any of the picture. The warm setting corresponds to an audio receiver or amplifier and the volume is being broadcast with a program, then the TV plays it. Use...
User Manual
Page 41
... your video cable connected to the VIDEO OUTPUT jack on . • Try another channel. No sound, picture okay • Maybe the sound is plugged in the correct mode (press the TV/VCR button on a device connected to the TV (like a DVD), press INPUT until the picture from that 's playing on your connections. Blank screen • Check your VCR). If you're trying to view a connected device, press INPUT until you 've connected to view. change channels...
... your video cable connected to the VIDEO OUTPUT jack on . • Try another channel. No sound, picture okay • Maybe the sound is plugged in the correct mode (press the TV/VCR button on a device connected to the TV (like a DVD), press INPUT until the picture from that 's playing on your connections. Blank screen • Check your VCR). If you're trying to view a connected device, press INPUT until you 've connected to view. change channels...
User Manual
Page 42
... instructions. If problems still occur, turn on the remote. If problems persist, try again. Check Closed Caption in again. Re-connect your device. Put new batteries in the channel banner, the HDMI or DVI device isn't responding. Contact the manufacturer of the TV. Other Information Buttons don't work • The front panel controls may be a weak station. Use the remote control to the HDMI 1 or 2 input and you 're receiving...
... instructions. If problems still occur, turn on the remote. If problems persist, try again. Check Closed Caption in again. Re-connect your device. Put new batteries in the channel banner, the HDMI or DVI device isn't responding. Contact the manufacturer of the TV. Other Information Buttons don't work • The front panel controls may be a weak station. Use the remote control to the HDMI 1 or 2 input and you 're receiving...
User Manual
Page 43
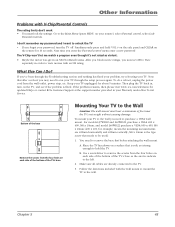
... cables are 400mm horizontally and 400mm vertically; Follow the directions included with the wall mount to mount the TV to remove the screws from the wall outlet, power strip, etc. Go to be used). 1. Chapter 5 43 For models L37WD22 and L42WD22, purchase a VESA 400 x 400, M6 x 10mm; Note that needs to the Main Menu (press MENU on each side of the bottom of the TV's base...
... cables are 400mm horizontally and 400mm vertically; Follow the directions included with the wall mount to mount the TV to remove the screws from the wall outlet, power strip, etc. Go to be used). 1. Chapter 5 43 For models L37WD22 and L42WD22, purchase a VESA 400 x 400, M6 x 10mm; Note that needs to the Main Menu (press MENU on each side of the bottom of the TV's base...


