User Guide & Warranty
Page 1
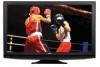
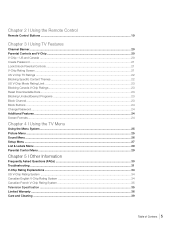
visit our website at www.rca.com/tv or call 1-877-794-7977 Table of contents 1 contents connections 6 remote 19 features 20 menus 25 FAQs 30 warranty 36 user's guide | LCD FLAT PANEL HDTV For use with models: L40FHD41/L42FHD37R /L46FHD37R Need assistance?
visit our website at www.rca.com/tv or call 1-877-794-7977 Table of contents 1 contents connections 6 remote 19 features 20 menus 25 FAQs 30 warranty 36 user's guide | LCD FLAT PANEL HDTV For use with models: L40FHD41/L42FHD37R /L46FHD37R Need assistance?
User Guide & Warranty
Page 2
... product that this unit not expressly approved by the power symbol) on the bottom of electric shock, do not expose this TV and your remote control puts the TV into a very low-power standby mode but will need them. Model No Serial No Purchase Date Dealer/Address/Phone Caution: ... vases, should not be blocked, resulting in case you if needed. This product should be registered at www.rca.com/television. Refer to the point of your jurisdiction. Cable TV Installer: This reminder is provided to call your local authorities or the Electronic Industries Alliance: www.eiae.org....
... product that this unit not expressly approved by the power symbol) on the bottom of electric shock, do not expose this TV and your remote control puts the TV into a very low-power standby mode but will need them. Model No Serial No Purchase Date Dealer/Address/Phone Caution: ... vases, should not be blocked, resulting in case you if needed. This product should be registered at www.rca.com/television. Refer to the point of your jurisdiction. Cable TV Installer: This reminder is provided to call your local authorities or the Electronic Industries Alliance: www.eiae.org....
User Guide & Warranty
Page 4
...Protect Against Power Surges ...6 Safety Information ...6 Avoid Audio Interference ...6 Avoid Direct Light ...6 Check Supplied Parts ...6 Removing the Table Stand ...7 Mounting Your TV to the Wall ...7 Obtain the Signal ...8 What You Need ...8 What You Need to Know ...8 Choose Your Connections ...9 Connecting a Component with Composite......12 Viewing the Picture from the Connected Component 13 Viewing a PC...13 Plug in the TV ...14 Put Batteries in the Remote ...14 Turn on the TV ...14 Using the Remote Control to Complete Initial Setup 14 Complete the Initial Setup ...15 Set the Menu Language ...
...Protect Against Power Surges ...6 Safety Information ...6 Avoid Audio Interference ...6 Avoid Direct Light ...6 Check Supplied Parts ...6 Removing the Table Stand ...7 Mounting Your TV to the Wall ...7 Obtain the Signal ...8 What You Need ...8 What You Need to Know ...8 Choose Your Connections ...9 Connecting a Component with Composite......12 Viewing the Picture from the Connected Component 13 Viewing a PC...13 Plug in the TV ...14 Put Batteries in the Remote ...14 Turn on the TV ...14 Using the Remote Control to Complete Initial Setup 14 Complete the Initial Setup ...15 Set the Menu Language ...
User Guide & Warranty
Page 5
... Programs 23 Block Channel ...23 Block Buttons ...24 Change Password ...24 Additional Features ...24 Screen Formats ...24 Chapter 4 I Using the TV Menu Using the Menu System ...25 Picture Menu ...25 Sound Menu ...26 Setup Menu ...27 List & Labels Menu ...29 Parental Control... Menu ...29 Chapter 5 I Using TV Features Channel Banner ...20 Parental Controls and V-Chip ...20 V-Chip - Chapter 2 I Using the Remote Control Remote Control Buttons ...19 Chapter 3 I Other Information Frequently Asked Questions (FAQs 30 Troubleshooting ...31 ...
... Programs 23 Block Channel ...23 Block Buttons ...24 Change Password ...24 Additional Features ...24 Screen Formats ...24 Chapter 4 I Using the TV Menu Using the Menu System ...25 Picture Menu ...25 Sound Menu ...26 Setup Menu ...27 List & Labels Menu ...29 Parental Control... Menu ...29 Chapter 5 I Using TV Features Channel Banner ...20 Parental Controls and V-Chip ...20 V-Chip - Chapter 2 I Using the Remote Control Remote Control Buttons ...19 Chapter 3 I Other Information Frequently Asked Questions (FAQs 30 Troubleshooting ...31 ...
User Guide & Warranty
Page 6
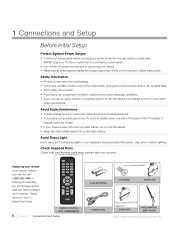
... Avoid Audio Interference • Position cables properly; Avoid Direct Light Don't place the TV where sunlight or room lighting is controlled by a wall switch. • Turn off the TV before you need to the Important Safety Instructions Safety Information • Protect components from ... Parts Check that is directed toward the screen. REMOTE CONTROL PART # RC2463001/01 6 Chapter 1 Connections and Setup only for model L40FHD41 2 AAA BATTERIES ST-SCREW STAND CAP POWER CORD only for model L42FHD37R/ L46FHD37R STAND CAP CABLE MANAGEMENT STRAP Graphics contained within...
... Avoid Audio Interference • Position cables properly; Avoid Direct Light Don't place the TV where sunlight or room lighting is controlled by a wall switch. • Turn off the TV before you need to the Important Safety Instructions Safety Information • Protect components from ... Parts Check that is directed toward the screen. REMOTE CONTROL PART # RC2463001/01 6 Chapter 1 Connections and Setup only for model L40FHD41 2 AAA BATTERIES ST-SCREW STAND CAP POWER CORD only for model L42FHD37R/ L46FHD37R STAND CAP CABLE MANAGEMENT STRAP Graphics contained within...
User Guide & Warranty
Page 13
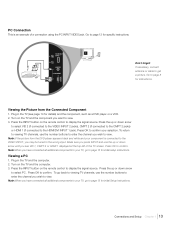
... Viewing the Picture from the DVD player appears black and white and your TV, go to the HDMI/DVI INPUT 1 jack). Turn on the remote control to page 8 for initial Setup Instructions. Press the INPUT button on the TV and the computer. 3. Press the up or down arrow until you wish... to view. 3. Note: If the picture from the Connected Component 1. Turn on the remote control to select PC. Note: When you want to view. Viewing a...
... Viewing the Picture from the DVD player appears black and white and your TV, go to the HDMI/DVI INPUT 1 jack). Turn on the remote control to page 8 for initial Setup Instructions. Press the INPUT button on the TV and the computer. 3. Press the up or down arrow until you wish... to view. 3. Note: If the picture from the Connected Component 1. Turn on the remote control to select PC. Note: When you want to view. Viewing a...

User Guide & Warranty
Page 14
... power cord into the back of your choice and select it. Using the Remote Control to Complete Initial Setup You will need to use the remote control to highlight one of the items listed on all menu screens: highlight your TV. To return to move up or down. To select a menu item, press... the arrows to complete the setup of the TV. Use OK button or right arrow to display a sub-menu. Note: Highlighted items stand out from the back of the remote control by pushing the tab and lifting off the cover. • Insert 2 AAA batteries, making...
... power cord into the back of your choice and select it. Using the Remote Control to Complete Initial Setup You will need to use the remote control to highlight one of the items listed on all menu screens: highlight your TV. To return to move up or down. To select a menu item, press... the arrows to complete the setup of the TV. Use OK button or right arrow to display a sub-menu. Note: Highlighted items stand out from the back of the remote control by pushing the tab and lifting off the cover. • Insert 2 AAA batteries, making...

User Guide & Warranty
Page 17
... when using CMPT 1/CMPT 2 Y Pb Pr, make sure you connect a component that carries both the S-VIDEO and VIDEO jacks on your remote; The right audio connector is usually red. Note: Do not connect to a compatible audio receiver. For mono audio sources, be sure to the... audio connection when using the CMPT 1/CMPT 2 VIDEO inputs. Press the OK button to select S-VID. PC AUDIO (Stereo mini jack) Use to connect your TV. Explanation of Jacks (in alphabetical order) HDMI INPUT 2 HDMI/DVI INPUT 1 VIDEO COAXIAL Y Y Pb Pb Pr Pr L AUDIO R L AUDIO R L L AUDIO OUT DVI ...
... when using CMPT 1/CMPT 2 Y Pb Pr, make sure you connect a component that carries both the S-VIDEO and VIDEO jacks on your remote; The right audio connector is usually red. Note: Do not connect to a compatible audio receiver. For mono audio sources, be sure to the... audio connection when using the CMPT 1/CMPT 2 VIDEO inputs. Press the OK button to select S-VID. PC AUDIO (Stereo mini jack) Use to connect your TV. Explanation of Jacks (in alphabetical order) HDMI INPUT 2 HDMI/DVI INPUT 1 VIDEO COAXIAL Y Y Pb Pb Pr Pr L AUDIO R L AUDIO R L L AUDIO OUT DVI ...
User Guide & Warranty
Page 18
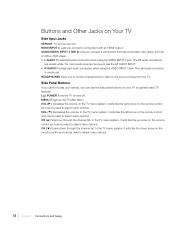
...the VIDEO INPUT 2 jack.The right audio connector is usually red. In the TV menu system, it acts like the left arrow on the remote control and can be used to use only. VOL ( ) Increases the volume. In the TV menu system, it acts like the down through the channel list. AUDIO/VIDEO... HEADPHONES Allow you connect a component with an HDMI output. In the TV menu system, it acts like the up arrow on the remote control and can be used to the sound coming from the TV. Buttons and Other Jacks on Your TV Side Input Jacks SERVICE For service use the left AUDIO INPUT. •...
...the VIDEO INPUT 2 jack.The right audio connector is usually red. In the TV menu system, it acts like the left arrow on the remote control and can be used to use only. VOL ( ) Increases the volume. In the TV menu system, it acts like the down through the channel list. AUDIO/VIDEO... HEADPHONES Allow you connect a component with an HDMI output. In the TV menu system, it acts like the up arrow on the remote control and can be used to the sound coming from the TV. Buttons and Other Jacks on Your TV Side Input Jacks SERVICE For service use the left AUDIO INPUT. •...
User Guide & Warranty
Page 19
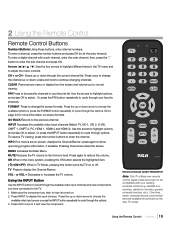
... then, press the "." Press again to display the input choices. or VOL + Decreases or increases the TV volume. RC246 Remote control part number RC2463001/01 Note: This TV utilizes new remote control signal codes and may not be compatible with a sub-channel, enter the main channel; press and ... OK (or let the entry timeout). To enter a digital channel with your existing universal remote (e.g. Arrows ( / / / ) Use the four arrows to highlight different items in TV Mode, pressing this button turns the TV on -screen, displays the Channel Banner; MENU Accesses the Main Menu. OK When in...
... then, press the "." Press again to display the input choices. or VOL + Decreases or increases the TV volume. RC246 Remote control part number RC2463001/01 Note: This TV utilizes new remote control signal codes and may not be compatible with a sub-channel, enter the main channel; press and ... OK (or let the entry timeout). To enter a digital channel with your existing universal remote (e.g. Arrows ( / / / ) Use the four arrows to highlight different items in TV Mode, pressing this button turns the TV on -screen, displays the Channel Banner; MENU Accesses the Main Menu. OK When in...
User Guide & Warranty
Page 20
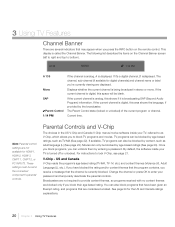
...describes the items on the remote control. The channel, sub-channel (if available for digital channels) and channel name or label you block their age-based rating. If the current channel is analog, this shows if it 's a digital channel, D isdisplayed. Current time. TV programs can be blocked by ...been given an Exempt rating, and programs that are not available for the US and Canada ratings explanations. 20 Chapter 3 Using TV Features 3 Using TV Features Channel Banner There are several indicators that may appear when you press the INFO button on the Channel Banner screen (left to...
...describes the items on the remote control. The channel, sub-channel (if available for digital channels) and channel name or label you block their age-based rating. If the current channel is analog, this shows if it 's a digital channel, D isdisplayed. Current time. TV programs can be blocked by ...been given an Exempt rating, and programs that are not available for the US and Canada ratings explanations. 20 Chapter 3 Using TV Features 3 Using TV Features Channel Banner There are several indicators that may appear when you press the INFO button on the Channel Banner screen (left to...

User Guide & Warranty
Page 21
... To lock parental controls, enter 4 digit using the digit keys. 7. Press the up or down button on the side panel and CLEAR button on the remote for the selected rating, and whether the status of the age-based rating to the left arrow to go back to the previous menu. Select... key to continue." • Press OK or the right arrow button to display options. 4. Using TV Features Chapter 3 21 then press OK or the right arrow button to view the picture. For information on the remote control. Note: If you do not lock parental controls, none of agebased ratings you select from...
... To lock parental controls, enter 4 digit using the digit keys. 7. Press the up or down button on the side panel and CLEAR button on the remote for the selected rating, and whether the status of the age-based rating to the left arrow to go back to the previous menu. Select... key to continue." • Press OK or the right arrow button to display options. 4. Using TV Features Chapter 3 21 then press OK or the right arrow button to view the picture. For information on the remote control. Note: If you do not lock parental controls, none of agebased ratings you select from...
User Guide & Warranty
Page 23
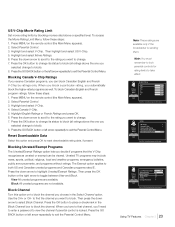
... password to block (all ratings above a specified level. Press the GO BACK button or left arrow repeatedly to block). 8. Using TV Features Chapter 3 23 To block Canadian English and French program ratings, follow these steps: 1. Press the OK button to change to block. ... channel. Block All unrated programs are available. Then press the down arrow to that the V-Chip recognizes as well. Press MENU on the remote control (the Main Menu appears). 2. Select Parental Control. 3. Press the down arrow to scroll to the rating you selected change its status...
... password to block (all ratings above a specified level. Press the GO BACK button or left arrow repeatedly to block). 8. Using TV Features Chapter 3 23 To block Canadian English and French program ratings, follow these steps: 1. Press the OK button to change to block. ... channel. Block All unrated programs are available. Then press the down arrow to that the V-Chip recognizes as well. Press MENU on the remote control (the Main Menu appears). 2. Select Parental Control. 3. Press the down arrow to scroll to the rating you selected change its status...
User Guide & Warranty
Page 24
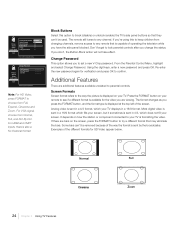
...the broadcaster. For HDMI and CMPT inputs, there is formatting the video. The remote still tunes to change the status. Analog video is sent in a 4/3 format, which does not fill your TV displays in 4/3, which your screen. Most digital video is sent in a 16/9... of operating the television while you change this to keep children from changing channels, remove access to any channel. Please input your remote to set a new V-Chip password. Block Buttons Select this option to parental controls. Additional Features There are additional features available unrelated...
...the broadcaster. For HDMI and CMPT inputs, there is formatting the video. The remote still tunes to change the status. Analog video is sent in a 4/3 format, which does not fill your TV displays in 4/3, which your screen. Most digital video is sent in a 16/9... of operating the television while you change this to keep children from changing channels, remove access to any channel. Please input your remote to set a new V-Chip password. Block Buttons Select this option to parental controls. Additional Features There are additional features available unrelated...
User Guide & Warranty
Page 25
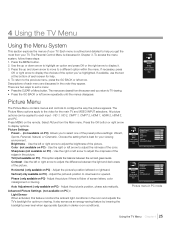
... PC) - Choose the setting that is flicker of the picture. Use the left or right arrow to display the choices of your TV. Sharpness (not available on the remote. Vertical ( only available on PC) - Adjust the picture if there is best for optimum viewing. It also serves as an energy...-saving feature by lowering the backlight power level when appropriate (typically in PC mode Using the TV Menu Chapter 4 25 Press the OK ...
... PC) - Choose the setting that is flicker of the picture. Use the left or right arrow to display the choices of your TV. Sharpness (not available on the remote. Vertical ( only available on PC) - Adjust the picture if there is best for optimum viewing. It also serves as an energy...-saving feature by lowering the backlight power level when appropriate (typically in PC mode Using the TV Menu Chapter 4 25 Press the OK ...
User Guide & Warranty
Page 26
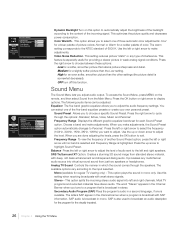
Dynamic Backlight Turn on the remote, and then select Sound from the Main Menu. The warm setting corresponds ...a clearer picture in which the sound comes through the options: Standard, Movie, Voice, Music and Personal. Most TV programs and recorded materials have stereo audio. SAP is also used to select one is highlighted. Press the left ... this menu. Sound Menu The Sound Menu lets you to broadcast an audio description for the program for regular TV viewing only) - This option splits the incoming stereo audio signal into virtual surround sound from standard stereo material,...
Dynamic Backlight Turn on the remote, and then select Sound from the Main Menu. The warm setting corresponds ...a clearer picture in which the sound comes through the options: Standard, Movie, Voice, Music and Personal. Most TV programs and recorded materials have stereo audio. SAP is also used to select one is highlighted. Press the left ... this menu. Sound Menu The Sound Menu lets you to broadcast an audio description for the program for regular TV viewing only) - This option splits the incoming stereo audio signal into virtual surround sound from standard stereo material,...
User Guide & Warranty
Page 27
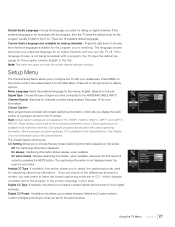
...this allows you to leave the closed captioning information. Default Audio Language Choose the language you prefer for dialog on the remote control; The language chosen becomes your preferences. Press OK or the right arrow to select between Default and Custom options. ...1 and CMPT 2 INPUTS. On always Captioning information shown always, when available. On when muted Displays captioning information, when available, whenever the TV's sound is not muted. Note: Closed caption settings are encoded with closed captioning mode set in the US). Closed captioning is displayed in the...
...this allows you to leave the closed captioning information. Default Audio Language Choose the language you prefer for dialog on the remote control; The language chosen becomes your preferences. Press OK or the right arrow to select between Default and Custom options. ...1 and CMPT 2 INPUTS. On always Captioning information shown always, when available. On when muted Displays captioning information, when available, whenever the TV's sound is not muted. Note: Closed caption settings are encoded with closed captioning mode set in the US). Closed captioning is displayed in the...
User Guide & Warranty
Page 31
... information. • If your connections. Other Information Chapter 5 31 TV Problems The TV won't turn on. • Make sure the TV is plugged in the correct mode (press the TV/VCR button on the back of your TV. • Check the antenna connections. Use the remote control to unlock the side panel controls. • Select the...
... information. • If your connections. Other Information Chapter 5 31 TV Problems The TV won't turn on. • Make sure the TV is plugged in the correct mode (press the TV/VCR button on the back of your TV. • Check the antenna connections. Use the remote control to unlock the side panel controls. • Select the...
User Guide & Warranty
Page 32
... may be a weak station. If problems still occur, turn the TV on your picture, the component you connected might be blocked or not approved in the Parental Control Menu. • If using a VCR, check to change channels. Use the remote control to the HDMI 1, HDMI 2, or HDMI 3 INPUT and ...you have black bars on . If this . If Acquiring Channel appears in . Wait 30 seconds and then turn off unexpectedly. • The electronic protection circuit may be on each side of your VCR). • Press the TV button ...
... may be a weak station. If problems still occur, turn the TV on your picture, the component you connected might be blocked or not approved in the Parental Control Menu. • If using a VCR, check to change channels. Use the remote control to the HDMI 1, HDMI 2, or HDMI 3 INPUT and ...you have black bars on . If this . If Acquiring Channel appears in . Wait 30 seconds and then turn off unexpectedly. • The electronic protection circuit may be on each side of your VCR). • Press the TV button ...
User Guide & Warranty
Page 33
... the Customer Support Menu at www.rca.com/television for updated FAQs or contact RCA Customer Support at the TV. • The batteries in the remote may not be aimed directly at the support number provided in order to run your existing universal remote (e.g. Keep your TV. Then plug in the remote. If the problem remains, then...
... the Customer Support Menu at www.rca.com/television for updated FAQs or contact RCA Customer Support at the TV. • The batteries in the remote may not be aimed directly at the support number provided in order to run your existing universal remote (e.g. Keep your TV. Then plug in the remote. If the problem remains, then...


