User Guide & Warranty
Page 1
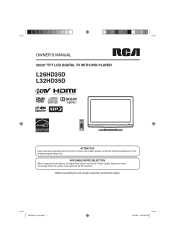
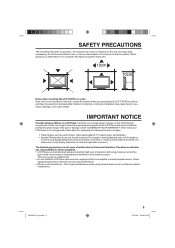
Before operating the unit, please read this menu option to the "Cable" (Cable Television) mode. OWNER'S MANUAL 26/32" TFT LCD DIGITAL TV WITH DVD PLAYER L26HD35D L32HD35D ATTENTION If you purchase a universal remote control from the factory, the Signal Type option is set this manual thoroughly. 52K0101A_eng.indd 1 3/12/09 3:10:38 PM If not using Cable TV, set to the "Air" position. AIR/CABLE MODE SELECTION When shipped from your local retailer, please contact the remote manufacturer for the required programming code.
Before operating the unit, please read this menu option to the "Cable" (Cable Television) mode. OWNER'S MANUAL 26/32" TFT LCD DIGITAL TV WITH DVD PLAYER L26HD35D L32HD35D ATTENTION If you purchase a universal remote control from the factory, the Signal Type option is set this manual thoroughly. 52K0101A_eng.indd 1 3/12/09 3:10:38 PM If not using Cable TV, set to the "Air" position. AIR/CABLE MODE SELECTION When shipped from your local retailer, please contact the remote manufacturer for the required programming code.
User Guide & Warranty
Page 2
...FULLY INSERTED TO PREVENT BLADE EXPOSURE. Increase the separation between the equipment and receiver. - Consult the dealer or an experienced radio/TV technician for compliance with arrowhead symbol, within the product's enclosure that interference will not occur in accordance with local, state or... Dealer / Address / Phone 52K0101A_eng.indd 2 3/12/09 3:10:41 PM This equipment generates, uses and can be registered at www.rca.com/television. Reorient or relocate the receiving antenna. - USE OF CONTROLS, ADJUSTMENTS OR THE PERFORMANCE OF PROCEDURES OTHER THAN THOSE SPECIFIED HEREIN ...
...FULLY INSERTED TO PREVENT BLADE EXPOSURE. Increase the separation between the equipment and receiver. - Consult the dealer or an experienced radio/TV technician for compliance with arrowhead symbol, within the product's enclosure that interference will not occur in accordance with local, state or... Dealer / Address / Phone 52K0101A_eng.indd 2 3/12/09 3:10:41 PM This equipment generates, uses and can be registered at www.rca.com/television. Reorient or relocate the receiving antenna. - USE OF CONTROLS, ADJUSTMENTS OR THE PERFORMANCE OF PROCEDURES OTHER THAN THOSE SPECIFIED HEREIN ...
User Guide & Warranty
Page 4
... These discs are easily broken and may cause serious personal injury and product malfunction. 29) This reminder is provided to call the cable TV system installer's attention to Article 820-40 of the NEC that provides guidelines for proper grounding and, in particular, specifies that the cable...brought from an air conditioner. Don't place flat panel displays on dressers, bookcases, shelves, desks, speakers, chests or carts may cause the LCD panel glass to the flat panel display so that the room temperature rises gradually. Care should be impaired. It may fall over , or knocked...
... These discs are easily broken and may cause serious personal injury and product malfunction. 29) This reminder is provided to call the cable TV system installer's attention to Article 820-40 of the NEC that provides guidelines for proper grounding and, in particular, specifies that the cable...brought from an air conditioner. Don't place flat panel displays on dressers, bookcases, shelves, desks, speakers, chests or carts may cause the LCD panel glass to the flat panel display so that the room temperature rises gradually. Care should be impaired. It may fall over , or knocked...
User Guide & Warranty
Page 5
... space around the entire unit. 10cm 10cm Notes when mounting the LCD TV/DVD on a wall If the unit is NOT COVERED BY YOUR WARRANTY. Never leave your LCD Panel on the unit, this unit may cause injury to you purchased the LCD TV/DVD for long periods of a malfunction. • Do not install the... LCD Panel near this may be mounted on the LCD Panel for these symptoms. • LCD Panels are not signs of ...
... space around the entire unit. 10cm 10cm Notes when mounting the LCD TV/DVD on a wall If the unit is NOT COVERED BY YOUR WARRANTY. Never leave your LCD Panel on the unit, this unit may cause injury to you purchased the LCD TV/DVD for long periods of a malfunction. • Do not install the... LCD Panel near this may be mounted on the LCD Panel for these symptoms. • LCD Panels are not signs of ...
User Guide & Warranty
Page 6
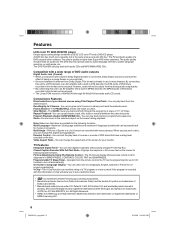
.... Dolby and the double-D symbol are trademarks of DVD Format/Logo Licensing Corporation. * Manufactured under U.S. and worldwide patents issued & pending. Features LCD color TV With DVD/CD player Unique space saving design combines a 26/32" LCD color TV and a DVD/CD player. The Picture/Audio quality of being in...CD sound. Picture Adjustments Using The Remote Control - The V-Chip function can read the rating of DVD discs recorded in MPEG decoder, the MPEG audio of a TV program or movie content if the program is connected, Dolby Digital sound can be output from the desired...
.... Dolby and the double-D symbol are trademarks of DVD Format/Logo Licensing Corporation. * Manufactured under U.S. and worldwide patents issued & pending. Features LCD color TV With DVD/CD player Unique space saving design combines a 26/32" LCD color TV and a DVD/CD player. The Picture/Audio quality of being in...CD sound. Picture Adjustments Using The Remote Control - The V-Chip function can read the rating of DVD discs recorded in MPEG decoder, the MPEG audio of a TV program or movie content if the program is connected, Dolby Digital sound can be output from the desired...
User Guide & Warranty
Page 7
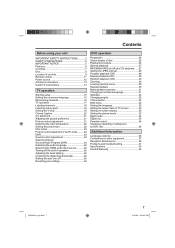
... 30 Zooming 30 Locating desired scene 30 Repeat playback 30 Marking desired scenes 31 Changing soundtrack language 31 Subtitles 32 Changing angles 32 Title selection 32 DVD menu 32 Setting the language 32 Setting the aspect ratio of TV screen 33 Setting on screen display 33 Setting the picture mode 33 Night mode 34 Digital out 34...
... 30 Zooming 30 Locating desired scene 30 Repeat playback 30 Marking desired scenes 31 Changing soundtrack language 31 Subtitles 32 Changing angles 32 Title selection 32 DVD menu 32 Setting the language 32 Setting the aspect ratio of TV screen 33 Setting on screen display 33 Setting the picture mode 33 Night mode 34 Digital out 34...
User Guide & Warranty
Page 11
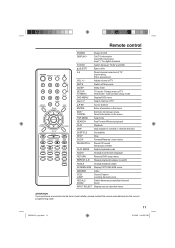
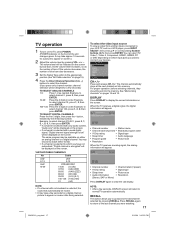
...local retailer, please contact the remote manufacturer for digital channels TV/DVD Switch between TV/AV and DVD (EJECT) Eject a disc 0-9 Direct channel selection of DVD PLAY MODE Select playback mode AUDIO Change sound track language RETURN Remove DVD setup menu REPEAT A-B Repeat playback between A and B... Skip chapter to forward or reverse direction SUBTITLE Set subtitle STOP Stop SLOW Forward/Reverse- Adjust volume of TV DVD mode - Call TV information Call DVD information Input "-" for the correct programming code. 11 52K0101A_eng.indd 11 3/12/09 3:10:50 PM ...
...local retailer, please contact the remote manufacturer for digital channels TV/DVD Switch between TV/AV and DVD (EJECT) Eject a disc 0-9 Direct channel selection of DVD PLAY MODE Select playback mode AUDIO Change sound track language RETURN Remove DVD setup menu REPEAT A-B Repeat playback between A and B... Skip chapter to forward or reverse direction SUBTITLE Set subtitle STOP Stop SLOW Forward/Reverse- Adjust volume of TV DVD mode - Call TV information Call DVD information Input "-" for the correct programming code. 11 52K0101A_eng.indd 11 3/12/09 3:10:50 PM ...
User Guide & Warranty
Page 12
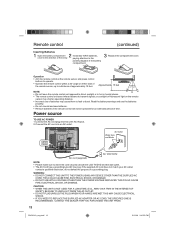
... 52K0101A_eng.indd 12 3/12/09 3:10:50 PM THIS COULD CAUSE FIRE, ELECTRICAL SHOCK, OR DAMAGE. Operation • Aim the remote control at both the LCD TV/DVD and the wall outlet. • The AC Cord has a grounding-type AC line plug. Approximately 15 feet NOTE: • Do not leave the remote control...
... 52K0101A_eng.indd 12 3/12/09 3:10:50 PM THIS COULD CAUSE FIRE, ELECTRICAL SHOCK, OR DAMAGE. Operation • Aim the remote control at both the LCD TV/DVD and the wall outlet. • The AC Cord has a grounding-type AC line plug. Approximately 15 feet NOTE: • Do not leave the remote control...
User Guide & Warranty
Page 13
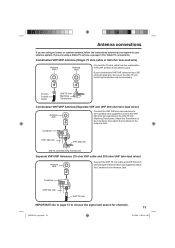
.... Attach the Transformer to the Combiner, then attach the Combiner to the 300-75 ohm Matching Transformer. Antenna connections If you are using a Cable TV service, see page 14 for channels. 13 52K0101A_eng.indd 13 3/12/09 5:55:14 PM If you are using an indoor or outdoor antenna, ...follow the instructions below that correspond to choose the signal and search for Cable TV connections. If your antenna system. Combiner UHF 300 ohm VHF 300 ohm 300-75 ohm Matching Transformer Separate VHF/UHF Antennas (75 ohm VHF...
.... Attach the Transformer to the Combiner, then attach the Combiner to the 300-75 ohm Matching Transformer. Antenna connections If you are using a Cable TV service, see page 14 for channels. 13 52K0101A_eng.indd 13 3/12/09 5:55:14 PM If you are using an indoor or outdoor antenna, ...follow the instructions below that correspond to choose the signal and search for Cable TV connections. If your antenna system. Combiner UHF 300 ohm VHF 300 ohm 300-75 ohm Matching Transformer Separate VHF/UHF Antennas (75 ohm VHF...
User Guide & Warranty
Page 14
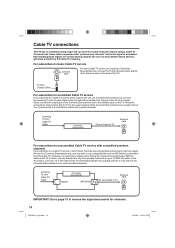
... and premium channels require the use of a Converter/Descrambler box, you may wish to use the Converter/Descrambler box to a Cable TV service in the "B" position, you subscribe to select channels. Some cable companies offer "premium pay channels" where the signal is generally... provided by the Cable TV company. Follow the connections shown below . Descrambling these signals for channels. 14 52K0101A_eng.indd 14 3/12/09 3:10:51 PM With ...
... and premium channels require the use of a Converter/Descrambler box, you may wish to use the Converter/Descrambler box to a Cable TV service in the "B" position, you subscribe to select channels. Some cable companies offer "premium pay channels" where the signal is generally... provided by the Cable TV company. Follow the connections shown below . Descrambling these signals for channels. 14 52K0101A_eng.indd 14 3/12/09 3:10:51 PM With ...
User Guide & Warranty
Page 15
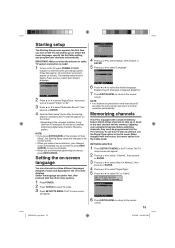
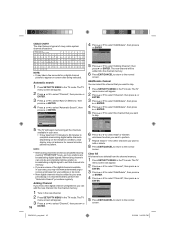
..." or "Air". 3 Press ▲ or ▼ to select TV mode. 3 Press SETUP/TV MENU. Please be programmed into memory, skipping over unwanted channels. When shipped from the factory, this TV with the other menu options. 1 Press POWER. 2 Press TV/DVD to select "Automatic Search", then press ▶ or ENTER. 4 ...Now the "Auto Setup" starts. Starting setup The Starting Setup menu appears the first time you turn on the TV, press POWER (POWER ...
..." or "Air". 3 Press ▲ or ▼ to select TV mode. 3 Press SETUP/TV MENU. Please be programmed into memory, skipping over unwanted channels. When shipped from the factory, this TV with the other menu options. 1 Press POWER. 2 Press TV/DVD to select "Automatic Search", then press ▶ or ENTER. 4 ...Now the "Auto Setup" starts. Starting setup The Starting Setup menu appears the first time you turn on the TV, press POWER (POWER ...
User Guide & Warranty
Page 16
...CANCEL to return to appear on your area, you are broadcasting digital signals. The new channel will begin memorizing all the channels available in the TV mode. Add/Delete CH 2 3 3-001 3-002 4 Signal Analog Analog Digital Digital Analog Add Add Delete Add Delete : Select : Adjust ...", whichever function you want to perform. 7 Repeat steps 5 - 6 for a digital channel picture to the normal screen. Automatic search 1 Press SETUP/TV MENU in your area. • It may visit www.antennaweb.org to receive a list based on screen after being selected. NOTE: • Memorizing ...
...CANCEL to return to appear on your area, you are broadcasting digital signals. The new channel will begin memorizing all the channels available in the TV mode. Add/Delete CH 2 3 3-001 3-002 4 Signal Analog Analog Digital Digital Analog Add Add Delete Add Delete : Select : Adjust ...", whichever function you want to perform. 7 Repeat steps 5 - 6 for a digital channel picture to the normal screen. Automatic search 1 Press SETUP/TV MENU in your area. • It may visit www.antennaweb.org to receive a list based on screen after being selected. NOTE: • Memorizing ...
User Guide & Warranty
Page 17
...will be displayed on screen after being selected. TO SELECT DIGITAL CHANNELS Press the first 3 digits, then press the - Source Selection 0.TV 1.Video 1 2.Video 2 3.Component 4.HDMI 1 5.HDMI 2 6.PC 7.DVD [0-7]:Select CH / Press and release CH / . NOTE: • After a few seconds for a picture to select channel 2,... the digital information will appear. 62-001 HDTV Moving Picture1 CH-1 Digital Air No Program Information is selected to connect your LCD TV, such as needed. To select the video input source To view a signal from another device connected to clear the call ...
...will be displayed on screen after being selected. TO SELECT DIGITAL CHANNELS Press the first 3 digits, then press the - Source Selection 0.TV 1.Video 1 2.Video 2 3.Component 4.HDMI 1 5.HDMI 2 6.PC 7.DVD [0-7]:Select CH / Press and release CH / . NOTE: • After a few seconds for a picture to select channel 2,... the digital information will appear. 62-001 HDTV Moving Picture1 CH-1 Digital Air No Program Information is selected to connect your LCD TV, such as needed. To select the video input source To view a signal from another device connected to clear the call ...
User Guide & Warranty
Page 18
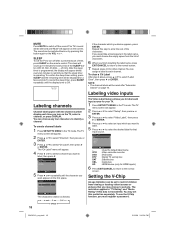
... for that the sleep timer is operating. If you would like a blank space in the first space. To create channel labels 1 Press SETUP/TV MENU in the TV mode. The TV menu screen will appear. 4 Press ◀ or ▶ to select a channel you want to label. 5 Press ◀ or ▶ to ... display each input source for HDMI inputs) 6 Press EXIT/CANCEL to return to the normal screen. VCR DVD DTV SAT CBL HD : Uses the default label name : Video cassette recorder : DVD video : Digital TV set to restrict children from the list of time, press SLEEP on the screen. MUTE Press MUTE to...
... for that the sleep timer is operating. If you would like a blank space in the first space. To create channel labels 1 Press SETUP/TV MENU in the TV mode. The TV menu screen will appear. 4 Press ◀ or ▶ to select a channel you want to label. 5 Press ◀ or ▶ to ... display each input source for HDMI inputs) 6 Press EXIT/CANCEL to return to the normal screen. VCR DVD DTV SAT CBL HD : Uses the default label name : Video cassette recorder : DVD video : Digital TV set to restrict children from the list of time, press SLEEP on the screen. MUTE Press MUTE to...
User Guide & Warranty
Page 19
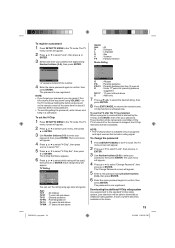
...to the normal screen. Then Lock menu will be used, then press ▶ or ENTER. The password is protected. To register a password 1 Press SETUP/TV MENU in the TV mode. Lock New Password * * *_ [0-9] : Select ENTER:Set " " appears instead of the number. 4 Enter the same password again to select "... press ▶ or ENTER. on the remote control at the same time for about 5 seconds. To set the rating using VOLUME - TV Rating TV Rating ALL D L S V FV TV-Y TV-Y7 TV-G TV-PG TV-14 TV-MA : Select ENTER:Set You can reset it down using age level and genre. To use the...
...to the normal screen. Then Lock menu will be used, then press ▶ or ENTER. The password is protected. To register a password 1 Press SETUP/TV MENU in the TV mode. Lock New Password * * *_ [0-9] : Select ENTER:Set " " appears instead of the number. 4 Enter the same password again to select "... press ▶ or ENTER. on the remote control at the same time for about 5 seconds. To set the rating using VOLUME - TV Rating TV Rating ALL D L S V FV TV-Y TV-Y7 TV-G TV-PG TV-14 TV-MA : Select ENTER:Set You can reset it down using age level and genre. To use the...
User Guide & Warranty
Page 20
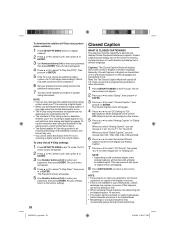
...; or ▼ to select "Setup", then press ▶ or ENTER. 3 Press ▲ or ▼ to enter your password, then press ENTER. The TV menu screen will appear. 5 Use Number buttons (0-9) to select "Closed Caption", then press ▶ or ENTER. When you select "Digital Caption", you download the ... settings. 20 Closed Caption WHAT IS CLOSED CAPTIONING? NOTE: • Depending on the screen. To clear the all V-Chip settings 1 Press SETUP/TV MENU in your settings return to select "Analog Caption" or "Digital Caption". Off: Captions will not be delayed approx. 10 seconds. • If...
...; or ▼ to select "Setup", then press ▶ or ENTER. 3 Press ▲ or ▼ to enter your password, then press ENTER. The TV menu screen will appear. 5 Use Number buttons (0-9) to select "Closed Caption", then press ▶ or ENTER. When you select "Digital Caption", you download the ... settings. 20 Closed Caption WHAT IS CLOSED CAPTIONING? NOTE: • Depending on the screen. To clear the all V-Chip settings 1 Press SETUP/TV MENU in your settings return to select "Analog Caption" or "Digital Caption". Off: Captions will not be delayed approx. 10 seconds. • If...
User Guide & Warranty
Page 21
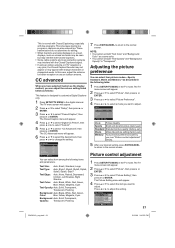
... normal screen. Press ◀ or ▶ to the normal screen. These transmissions do not allow time for better reception or use an outdoor antenna. The TV menu screen will appear. 2 Press ▲ or ▼ to select "Setup", then press ▶ or ENTER. 3 Press ▲ or ▼ ... appear. 6 Press ▲ or ▼ to select the desired item, then press ◀ or ▶ to customize Digital Captions only. 1 Press SETUP/TV MENU in the digital channel. Text Size: Auto, Small, Standard, Large Text Type: Auto, Style1, Style2, Style3, Style4, Style5, Style6, Style7 Text Edge:...
... normal screen. Press ◀ or ▶ to the normal screen. These transmissions do not allow time for better reception or use an outdoor antenna. The TV menu screen will appear. 2 Press ▲ or ▼ to select "Setup", then press ▶ or ENTER. 3 Press ▲ or ▼ ... appear. 6 Press ▲ or ▼ to select the desired item, then press ◀ or ▶ to customize Digital Captions only. 1 Press SETUP/TV MENU in the digital channel. Text Size: Auto, Small, Standard, Large Text Type: Auto, Style1, Style2, Style3, Style4, Style5, Style6, Style7 Text Edge:...
User Guide & Warranty
Page 22
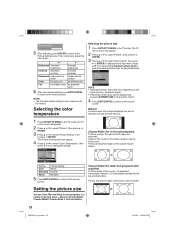
...Quality Cool Bluish Standard Neutral Warm Reddish 5 Press EXIT/CANCEL to return to select the desired picture size, as described below. The TV menu screen will display the size of standard 4:3 with subtitles) To fill the width of the screen, it is only slightly ...▶ increase brightness increase contrast makes picture clearer be brilliant color be hidden. NOTE: • The Contrast default setting is extended horizontally. The TV menu screen will appear. 4 Press ▲ or ▼ to select "Color Temperature", then press ◀ or ▶ to display Picture ...
...Quality Cool Bluish Standard Neutral Warm Reddish 5 Press EXIT/CANCEL to return to select the desired picture size, as described below. The TV menu screen will display the size of standard 4:3 with subtitles) To fill the width of the screen, it is only slightly ...▶ increase brightness increase contrast makes picture clearer be brilliant color be hidden. NOTE: • The Contrast default setting is extended horizontally. The TV menu screen will appear. 4 Press ▲ or ▼ to select "Color Temperature", then press ◀ or ▶ to display Picture ...
User Guide & Warranty
Page 23
... size. • In HDMI or COMPONENT mode with a scanning rate of 720p or 1080i, only the Cinema Wide2 and Full picture size feature is available only...) To fill the width of the screen, it is only slightly extended at the maximum size. 2 Press SETUP/TV MENU. A B C D E F G A B C D E F G Full (for other items. ...TV mode. Press ◀ or ▶ to the normal screen. The top and bottom edges of pixels. Ver To adjust the vertical position of the Position: image on the screen with same amount of the picture may not allow you view a DVD. 1 Press SETUP/TV MENU in the TV...
... size. • In HDMI or COMPONENT mode with a scanning rate of 720p or 1080i, only the Cinema Wide2 and Full picture size feature is available only...) To fill the width of the screen, it is only slightly extended at the maximum size. 2 Press SETUP/TV MENU. A B C D E F G A B C D E F G Full (for other items. ...TV mode. Press ◀ or ▶ to the normal screen. The top and bottom edges of pixels. Ver To adjust the vertical position of the Position: image on the screen with same amount of the picture may not allow you view a DVD. 1 Press SETUP/TV MENU in the TV...
User Guide & Warranty
Page 24
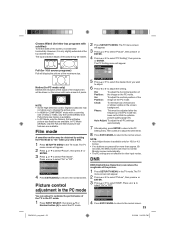
... on-screen every time you desired setting, press EXIT/CANCEL to return to the normal screen. Language 2 3. Sound control adjustment 1 Press SETUP/TV MENU in a digital signal, you want to select the item you can transmit a second audio program (SAP) containing a second language or other...1 2. Surround: Press ◀ or ▶ to adjust the bass sound. No Info. [0-6]: Select 5 Press EXIT/CANCEL to return to select "Stereo". The TV menu screen will appear. 2 Press ▲ or ▼ to select "Audio", then press ▶ or ENTER. 3 Press ▲ or ▼ to select...
... on-screen every time you desired setting, press EXIT/CANCEL to return to the normal screen. Language 2 3. Sound control adjustment 1 Press SETUP/TV MENU in a digital signal, you want to select the item you can transmit a second audio program (SAP) containing a second language or other...1 2. Surround: Press ◀ or ▶ to adjust the bass sound. No Info. [0-6]: Select 5 Press EXIT/CANCEL to return to select "Stereo". The TV menu screen will appear. 2 Press ▲ or ▼ to select "Audio", then press ▶ or ENTER. 3 Press ▲ or ▼ to select...


