
Warranty Card
Page 1
...; If your product is capable of storing content (such as an mp3 player, voice recorder, camcorder, digital photo frame, etc), it is to be delivered with factory default settings, and without charge for installation, removal or reinstallation of product, to corruptions caused by removal or defacement of the factory serial number/bar code label(s). Consumer will be repaired or replaced with the sale of this product.
...; If your product is capable of storing content (such as an mp3 player, voice recorder, camcorder, digital photo frame, etc), it is to be delivered with factory default settings, and without charge for installation, removal or reinstallation of product, to corruptions caused by removal or defacement of the factory serial number/bar code label(s). Consumer will be repaired or replaced with the sale of this product.

Owner/User Manual
Page 4
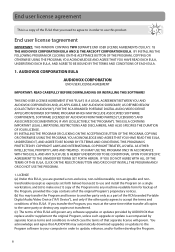
....rcaaudiovideo.com for technical support RCA EZ2050 RCA EZ2050RD RCA EZ2050BL This Class B digital apparatus complies with the limits for help. Cet appareil numérique de la classe B est conforme à la norme NMB-003 du Canada. 3 This device complies with the instructions, may cause undesired operation. This equipment generates, uses, and can be determined by turning the equipment off and...
....rcaaudiovideo.com for technical support RCA EZ2050 RCA EZ2050RD RCA EZ2050BL This Class B digital apparatus complies with the limits for help. Cet appareil numérique de la classe B est conforme à la norme NMB-003 du Canada. 3 This device complies with the instructions, may cause undesired operation. This equipment generates, uses, and can be determined by turning the equipment off and...
Owner/User Manual
Page 5
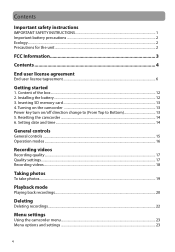
...safety instructions IMPORTANT SAFETY INSTRUCTIONS 1 Important battery precautions ...2 Ecology...2 Precautions for the unit ...2 FCC Information 3 Contents 4 End user license agreement End user license tagreement ...6 Getting started 1. Resetting the camcorder ...14 6. Setting date and time ...14 General controls General controls ...15 Operation modes ...16 Recording videos Recording quality...17 Quality settings...17 Recording videos...18 Taking photos To take photos...19 Playback mode Playing back recordings...20 Deleting Deleting recordings...22 Menu settings Using the camcorder menu...
...safety instructions IMPORTANT SAFETY INSTRUCTIONS 1 Important battery precautions ...2 Ecology...2 Precautions for the unit ...2 FCC Information 3 Contents 4 End user license agreement End user license tagreement ...6 Getting started 1. Resetting the camcorder ...14 6. Setting date and time ...14 General controls General controls ...15 Operation modes ...16 Recording videos Recording quality...17 Quality settings...17 Recording videos...18 Taking photos To take photos...19 Playback mode Playing back recordings...20 Deleting Deleting recordings...22 Menu settings Using the camcorder menu...
Owner/User Manual
Page 7
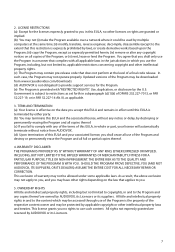
... the RCA branded Portable Digital Audio/Video Device ("A/V Device"), and only if the other party agrees to accept the terms and conditions of this product. End user license agreement This is accompanied by AUDIOVOX that replace and/or supplement the original Program, unless such upgrade or update is a copy of the EULA that you need to agree to in order to use and install...
... the RCA branded Portable Digital Audio/Video Device ("A/V Device"), and only if the other party agrees to accept the terms and conditions of this product. End user license agreement This is accompanied by AUDIOVOX that replace and/or supplement the original Program, unless such upgrade or update is a copy of the EULA that you need to agree to in order to use and install...
Owner/User Manual
Page 8
... not be used by multiple computers at the level of warranty may not operate properly. Government is expressly prohibited by applicable copyright or other licenses or rights are granted or implied. (b) You may terminate this EULA and the associated license, without notice from www.rcaaudiovideo.com/downloads (d) AUDIOVOX is not obligated to provide support services for...
... not be used by multiple computers at the level of warranty may not operate properly. Government is expressly prohibited by applicable copyright or other licenses or rights are granted or implied. (b) You may terminate this EULA and the associated license, without notice from www.rcaaudiovideo.com/downloads (d) AUDIOVOX is not obligated to provide support services for...
Owner/User Manual
Page 11
... mechanism used to abide by United States copyright laws, international treaty provisions, and all other copyrighted materials (e.g. You agree to restrict or control the functionality of ArcSoft and/or its third party licensors. ARCSOFT CORPORATION EULA ARCSOFT CORPORATION END USER LICENSE AGREEMENT IMPORTANT: READ CAREFULLY BEFORE DOWNLOADING OR INSTALLING THIS SOFTWARE! Carefully read this license agreement before downloading an updated version...
... mechanism used to abide by United States copyright laws, international treaty provisions, and all other copyrighted materials (e.g. You agree to restrict or control the functionality of ArcSoft and/or its third party licensors. ARCSOFT CORPORATION EULA ARCSOFT CORPORATION END USER LICENSE AGREEMENT IMPORTANT: READ CAREFULLY BEFORE DOWNLOADING OR INSTALLING THIS SOFTWARE! Carefully read this license agreement before downloading an updated version...
Owner/User Manual
Page 13
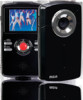
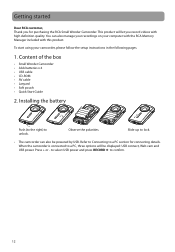
... the box • Small Wonder Camcorder • AAA batteries x 4 • USB cable • CD-ROM • AV cable • Lanyard • Soft pouch • Quick Start Guide 2. Slide up to lock. • The camcorder can also manage your recordings on your camcorder, please follow the setup instructions in the following pages. 1. You can also be displayed: USB connect, Web cam and USB power. Installing the battery 3 2 4 1 Push (to the right) to...
... the box • Small Wonder Camcorder • AAA batteries x 4 • USB cable • CD-ROM • AV cable • Lanyard • Soft pouch • Quick Start Guide 2. Slide up to lock. • The camcorder can also manage your recordings on your camcorder, please follow the setup instructions in the following pages. 1. You can also be displayed: USB connect, Web cam and USB power. Installing the battery 3 2 4 1 Push (to the right) to...
Owner/User Manual
Page 14
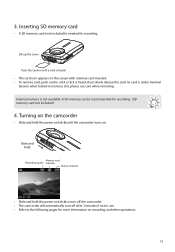
3. Internal memory is needed for recording. Slide and hold Memory card Recording quality indicator Battery indicator • Slide and hold the power switch until a click is under minimal tension when locked in use care when removing. A SD memory card is recommended for more information on recording and other operations. 13 Turning on . Inserting SD memory card • A SD memory card (not included) is not available. Lift up the cover Push the card in...
3. Internal memory is needed for recording. Slide and hold Memory card Recording quality indicator Battery indicator • Slide and hold the power switch until a click is under minimal tension when locked in use care when removing. A SD memory card is recommended for more information on recording and other operations. 13 Turning on . Inserting SD memory card • A SD memory card (not included) is not available. Lift up the cover Push the card in...

Owner/User Manual
Page 16
fast rewind or forward 15 Skip to access the connector) AV output Camcorder strap hole Play/pause Setup menu Record Audio speaker LCD screen Delete recordings MODE Record video/ take photo +/- - Adjust volume during playback/zoom during record and preview / - General controls General controls SD card slot (Lift up the cover to show the card slot) Recording indicator Microphone Lens On/off switch USB (Lift up the cover to previous or next recording ;
fast rewind or forward 15 Skip to access the connector) AV output Camcorder strap hole Play/pause Setup menu Record Audio speaker LCD screen Delete recordings MODE Record video/ take photo +/- - Adjust volume during playback/zoom during record and preview / - General controls General controls SD card slot (Lift up the cover to show the card slot) Recording indicator Microphone Lens On/off switch USB (Lift up the cover to previous or next recording ;
Owner/User Manual
Page 17
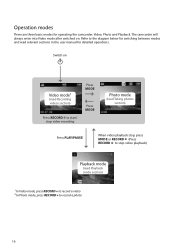
...modes and read Playback mode section) 1 In Video mode, press RECORD to record a video 2 In Photo mode, press RECORD to stop video playback) Playback mode (read relevant sections in the user manual for operating the camcorder: Video, Photo and Playback. The camcorder will always enter into Video mode after switched on Video mode1 (read Recording videos section) Press RECORD to start/ stop video recording Press MODE Press MODE Photo mode (read Taking photos section) Press PLAY/PAUSE When video playback stop, press MODE or RECORD (Press RECORD to record a photo 16 Operation modes...
...modes and read Playback mode section) 1 In Video mode, press RECORD to record a video 2 In Photo mode, press RECORD to stop video playback) Playback mode (read relevant sections in the user manual for operating the camcorder: Video, Photo and Playback. The camcorder will always enter into Video mode after switched on Video mode1 (read Recording videos section) Press RECORD to start/ stop video recording Press MODE Press MODE Photo mode (read Taking photos section) Press PLAY/PAUSE When video playback stop, press MODE or RECORD (Press RECORD to record a photo 16 Operation modes...
Owner/User Manual
Page 18
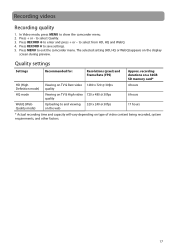
... the camcorder menu. 2. to select Quality. 3. recording durations on a 32GB SD memory card* HD (High Viewing on TV & Best video 1280 x 720 @ 30fps Definition mode) quality 4 hours HQ mode Viewing on TV & High video 720 x 480 @ 30fps quality 6 hours WebQ (Web Quality mode) Uploading to and viewing 320 x 240 @ 30fps on the web 17 hours * Actual recording time and capacity will vary depending on the display screen during...
... the camcorder menu. 2. to select Quality. 3. recording durations on a 32GB SD memory card* HD (High Viewing on TV & Best video 1280 x 720 @ 30fps Definition mode) quality 4 hours HQ mode Viewing on TV & High video 720 x 480 @ 30fps quality 6 hours WebQ (Web Quality mode) Uploading to and viewing 320 x 240 @ 30fps on the web 17 hours * Actual recording time and capacity will vary depending on the display screen during...
Owner/User Manual
Page 24
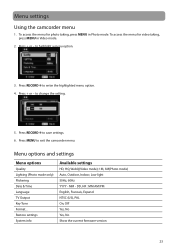
... - Press RECORD to save settings. 6. Press RECORD to enter the highlighted menu option. 4. Press MENU to highlight a menu option. 3. To access the menu for video taking , press MENU in Video mode. 2. Menu options and settings Menu options Quality Lighting (Photo mode only) Flickering Date & Time Language TV Output Key Tone Format... To access the menu for photo taking , press MENU in Photo mode. to exit the camcorder menu. Restore settings System info Available settings HD, HQ, WebQ(Video mode); 1M, 3M(Photo mode) Auto, Outdoor, Indoor, Low light 50Hz, 60Hz...
... - Press RECORD to save settings. 6. Press RECORD to enter the highlighted menu option. 4. Press MENU to highlight a menu option. 3. To access the menu for video taking , press MENU in Video mode. 2. Menu options and settings Menu options Quality Lighting (Photo mode only) Flickering Date & Time Language TV Output Key Tone Format... To access the menu for photo taking , press MENU in Photo mode. to exit the camcorder menu. Restore settings System info Available settings HD, HQ, WebQ(Video mode); 1M, 3M(Photo mode) Auto, Outdoor, Indoor, Low light 50Hz, 60Hz...
Owner/User Manual
Page 25
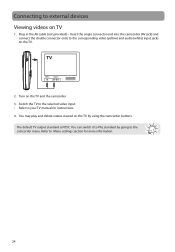
... information. 24 Plug in the AV cable (not provided) - The default TV output standard is NTSC. Switch the TV to the selected video input. • Refer to Menu settings section for instructions. 4. Turn on TV 1. You may play and delete videos viewed on the TV by going to the corresponding video (yellow) and audio (white) input jacks on the TV. 2. You can switch it to PAL standard by using the camcorder buttons. Insert...
... information. 24 Plug in the AV cable (not provided) - The default TV output standard is NTSC. Switch the TV to the selected video input. • Refer to Menu settings section for instructions. 4. Turn on TV 1. You may play and delete videos viewed on the TV by going to the corresponding video (yellow) and audio (white) input jacks on the TV. 2. You can switch it to PAL standard by using the camcorder buttons. Insert...

Owner/User Manual
Page 26
... to your recording device. After finished current video or photo playback, press to skip to next video or photo and then press PLAY to VHS tape or DVD 1. Switch recording device to the video input connected to the camcorder. • Refer to corresponding video (yellow) and audio (white) inputs of the recording device for instructions. 4. Turn on the camcorder and the recording device. 3. Plug in the AV cable (not provided) - Start recording of your user manual of the recording device (VHS or DVD recorder). 2. Recording videos to start playback (Video file only...
... to your recording device. After finished current video or photo playback, press to skip to next video or photo and then press PLAY to VHS tape or DVD 1. Switch recording device to the video input connected to the camcorder. • Refer to corresponding video (yellow) and audio (white) inputs of the recording device for instructions. 4. Turn on the camcorder and the recording device. 3. Plug in the AV cable (not provided) - Start recording of your user manual of the recording device (VHS or DVD recorder). 2. Recording videos to start playback (Video file only...
Owner/User Manual
Page 27
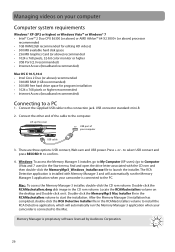
... the RCA Detective Installer file in the Start menu, find and open the drive letter associated with Memory Manager 3 and will automatically run the Memory Manager 3 application when your camcorder is proprietary software licensed by Audiovox Corporation. 26 USB connector standard: mini-B 2. Lift up the cover USB port of the cable to launch the installer. Double-click the RCAMacInstallers.dmg disk image in the RCAMacInstallers volume to the Mac...
... the RCA Detective Installer file in the Start menu, find and open the drive letter associated with Memory Manager 3 and will automatically run the Memory Manager 3 application when your camcorder is proprietary software licensed by Audiovox Corporation. 26 USB connector standard: mini-B 2. Lift up the cover USB port of the cable to launch the installer. Double-click the RCAMacInstallers.dmg disk image in the RCAMacInstallers volume to the Mac...
Owner/User Manual
Page 28
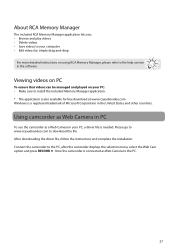
... the PC, after the camcorder displays the selection menu, select the Web Cam option and press RECORD . Connect the camcorder to download the file. Viewing videos on PC To ensure that videos can be managed and played on using RCA Memory Manager, please refer to the help section in the software. After downloading the driver file, follow the instructions and complete the installation. Now the camcorder is connected as a Web Camera in the United States and...
... the PC, after the camcorder displays the selection menu, select the Web Cam option and press RECORD . Connect the camcorder to download the file. Viewing videos on PC To ensure that videos can be managed and played on using RCA Memory Manager, please refer to the help section in the software. After downloading the driver file, follow the instructions and complete the installation. Now the camcorder is connected as a Web Camera in the United States and...
Owner/User Manual
Page 29
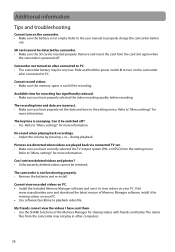
... view the videos I retrieve deleted videos and photos? • Unfortunately, deleted videos cannot be detected by pressing + or - Refer to PC. • The camcorder battery may not play in the setting menu. No sound when playing back recordings. • Adjust the volume by camcorder. • Make sure the SD card is not functioning properly. • Remove the batteries and re-install. Additional information Tips and troubleshooting Cannot turn on your PC. • Use software Quicktime to playback video file. The camcorder...
... view the videos I retrieve deleted videos and photos? • Unfortunately, deleted videos cannot be detected by pressing + or - Refer to PC. • The camcorder battery may not play in the setting menu. No sound when playing back recordings. • Adjust the volume by camcorder. • Make sure the SD card is not functioning properly. • Remove the batteries and re-install. Additional information Tips and troubleshooting Cannot turn on your PC. • Use software Quicktime to playback video file. The camcorder...
Owner/User Manual
Page 31
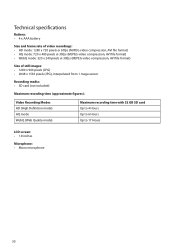
... (MJPEG video compression, AVI file format) Size of still images: • 1280 x 960 pixels (JPG) • 2048 x 1536 pixels (JPG), interpolated from 1 mega sensor Recording media: • SD card (not included) Maximum recording time (approximate figures): Video Recording Modes HD (High Definition mode) HQ mode WebQ (Web Quality mode) Maximum recording time with 32 GB SD card Up to 4 Hours Up to 6 Hours Up to 17 Hours LCD screen: • 1.8 inches Microphone...
... (MJPEG video compression, AVI file format) Size of still images: • 1280 x 960 pixels (JPG) • 2048 x 1536 pixels (JPG), interpolated from 1 mega sensor Recording media: • SD card (not included) Maximum recording time (approximate figures): Video Recording Modes HD (High Definition mode) HQ mode WebQ (Web Quality mode) Maximum recording time with 32 GB SD card Up to 4 Hours Up to 6 Hours Up to 17 Hours LCD screen: • 1.8 inches Microphone...
Owner/User Manual
Page 32
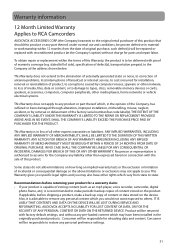
... of storing content (such as an mp3 player, voice recorder, camcorder, digital photo frame, etc), it is advisable to remove any personal content which may also have been installed in the originally purchased products. If applicable, before returning your product is capable of media, files, data or content, or to damage to tapes, discs, removable memory devices or cards, speakers, accessories, computers, computer peripherals, other...
... of storing content (such as an mp3 player, voice recorder, camcorder, digital photo frame, etc), it is advisable to remove any personal content which may also have been installed in the originally purchased products. If applicable, before returning your product is capable of media, files, data or content, or to damage to tapes, discs, removable memory devices or cards, speakers, accessories, computers, computer peripherals, other...

Quick Start Guide
Page 1
...off switch USB Camcorder strap hole Play/pause MODE Setup menu Record Audio speaker 4. Using camcorder as Web Camera in until a click is connected to Computer (Vista and 7 users) in the CD rom volume. The camcorder can also be powered by USB. General controls SD card slot Recording indicator Microphone Lens AV output LCD screen On/off The camcorder has three operation modes (Video, Photo and Playback). Switch on Product Registration and Fill Out the Brief Questionnaire Video recording and photo taking 13 2 MODE 1 Start, stop , enter Video mode from...
...off switch USB Camcorder strap hole Play/pause MODE Setup menu Record Audio speaker 4. Using camcorder as Web Camera in until a click is connected to Computer (Vista and 7 users) in the CD rom volume. The camcorder can also be powered by USB. General controls SD card slot Recording indicator Microphone Lens AV output LCD screen On/off The camcorder has three operation modes (Video, Photo and Playback). Switch on Product Registration and Fill Out the Brief Questionnaire Video recording and photo taking 13 2 MODE 1 Start, stop , enter Video mode from...


