User Guide & Warranty
Page 2
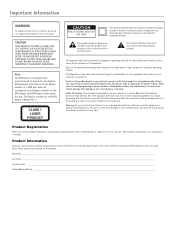
...shall be connected to the grounding system of the building as practical. Product Information Keep your sales receipt to unfreeze the picture at rca.com. The apparatus shall not be permanently imprinted on the picture tube. Important Information WARNING To reduce the risk of fire or ... PERFORMANCE OF PROCEDURES OTHER THAN THOSE SPECIFIED HEREIN MAY RESULT IN HAZARDOUS RADIATION EXPOSURE. Such damage is not covered by your warranty. Cable TV Installer: This reminder is Region No 1. Refer to rain or moisture. may void the user's authority to operate it immediately, or...
...shall be connected to the grounding system of the building as practical. Product Information Keep your sales receipt to unfreeze the picture at rca.com. The apparatus shall not be permanently imprinted on the picture tube. Important Information WARNING To reduce the risk of fire or ... PERFORMANCE OF PROCEDURES OTHER THAN THOSE SPECIFIED HEREIN MAY RESULT IN HAZARDOUS RADIATION EXPOSURE. Such damage is not covered by your warranty. Cable TV Installer: This reminder is Region No 1. Refer to rain or moisture. may void the user's authority to operate it immediately, or...
User Guide & Warranty
Page 3
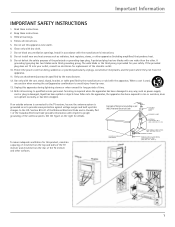
...Read these instructions. 3. Unplug this product, maintain a spacing of 4 inches from the top and sides of the TV receiver and 2 inches from being walked on the right for replacement of the TV receiver and other . In the U.S. If the provided plug does not fit into the apparatus, the apparatus has... qualified service personnel. Protect the power cord from the rear of the obsolete outlet. 10. If an outside antenna is connected to the TV receiver, be sure the antenna system is damaged, liquid has been spilled or objects have fallen into your safety. Do not use attachments/...
...Read these instructions. 3. Unplug this product, maintain a spacing of 4 inches from the top and sides of the TV receiver and 2 inches from being walked on the right for replacement of the TV receiver and other . In the U.S. If the provided plug does not fit into the apparatus, the apparatus has... qualified service personnel. Protect the power cord from the rear of the obsolete outlet. 10. If an outside antenna is connected to the TV receiver, be sure the antenna system is damaged, liquid has been spilled or objects have fallen into your safety. Do not use attachments/...
User Guide & Warranty
Page 4
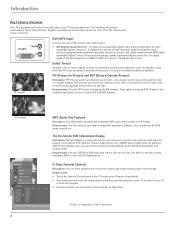
... Description: You can play , then press INFO to bring up the Parental Control menu in the TV's main menu (Chapter 4 has details). • The broadcasters must use them. Introduction Key Features Overview Your TV is 1080i for HDTV at a rate of 1.78 Gigabits per second. The following information summarizes a few of these settings...
... Description: You can play , then press INFO to bring up the Parental Control menu in the TV's main menu (Chapter 4 has details). • The broadcasters must use them. Introduction Key Features Overview Your TV is 1080i for HDTV at a rate of 1.78 Gigabits per second. The following information summarizes a few of these settings...
User Guide & Warranty
Page 5
Table of Contents IMPORTANT SAFETY INSTRUCTIONS 1 Introduction Key Features Overview 2 DVI-HDTV Input 2 Dolby* Virtual 2 PIP (Picture-In-Picture) and POP (Picture-Outside-Picture 2 MP3 Audio Disc Playback 2 The On-Screen DVD Information Display ........ 2 V-Chip: Parental ... Use the Autotuning Feature ...... 22 How to Set Up the Autotuning Feature ........ 22 Parental Controls and V-Chip 23 How V-Chip Works 23 V-Chip TV Rating 23 Blocking Specific Content Themes 24 Viewing Specific Content Themes 25 V-Chip Movie Rating Limit 25 V-Chip Unrated Program Block 25 Lock/Unlock Parental...
Table of Contents IMPORTANT SAFETY INSTRUCTIONS 1 Introduction Key Features Overview 2 DVI-HDTV Input 2 Dolby* Virtual 2 PIP (Picture-In-Picture) and POP (Picture-Outside-Picture 2 MP3 Audio Disc Playback 2 The On-Screen DVD Information Display ........ 2 V-Chip: Parental ... Use the Autotuning Feature ...... 22 How to Set Up the Autotuning Feature ........ 22 Parental Controls and V-Chip 23 How V-Chip Works 23 V-Chip TV Rating 23 Blocking Specific Content Themes 24 Viewing Specific Content Themes 25 V-Chip Movie Rating Limit 25 V-Chip Unrated Program Block 25 Lock/Unlock Parental...
User Guide & Warranty
Page 6
... DVD 29 Unlocking Your DVD 29 Changing Your Password 29 Setting the Ratings Limits 29 Unrated Titles 30 System Test 30 The Display Menu 30 TV Image 30 On-Screen Displays 30 The Sound Menu 31 Digital Output 31 Sound Logic 31 The Languages Menu 31 Changing the Player Menus, Disc... Menus, Audio or Subtitles Language Preferences ... 31 Glossary 32 Code List 32 Chapter 6: Using the TV's Menu System Sound Menu 33 Picture Menu 33 Channel Guide Menu 34 Time Menu 34 Parental Control Menu 34 PIP Menu 34 Setup Menu 35...
... DVD 29 Unlocking Your DVD 29 Changing Your Password 29 Setting the Ratings Limits 29 Unrated Titles 30 System Test 30 The Display Menu 30 TV Image 30 On-Screen Displays 30 The Sound Menu 31 Digital Output 31 Sound Logic 31 The Languages Menu 31 Changing the Player Menus, Disc... Menus, Audio or Subtitles Language Preferences ... 31 Glossary 32 Code List 32 Chapter 6: Using the TV's Menu System Sound Menu 33 Picture Menu 33 Channel Guide Menu 34 Time Menu 34 Parental Control Menu 34 PIP Menu 34 Setup Menu 35...
User Guide & Warranty
Page 7
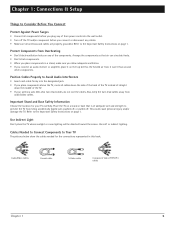
... air can circulate freely. • Don't stack components. • When you place components in this book. Use Indirect Light Don't place the TV where sunlight or room lighting will be directed toward the screen. Use soft or indirect lighting. Chapter 1: Connections & Setup Things to Consider Before You... or disconnect any cables. • Make sure all cables down the side of the back of the TV instead of straight down the middle of the TV. • If your TV carefully. Cables Needed to Connect Components to Avoid Audio Interference • Insert each cable firmly into the ...
... air can circulate freely. • Don't stack components. • When you place components in this book. Use Indirect Light Don't place the TV where sunlight or room lighting will be directed toward the screen. Use soft or indirect lighting. Chapter 1: Connections & Setup Things to Consider Before You... or disconnect any cables. • Make sure all cables down the side of the back of the TV instead of straight down the middle of the TV. • If your TV carefully. Cables Needed to Connect Components to Avoid Audio Interference • Insert each cable firmly into the ...
User Guide & Warranty
Page 8
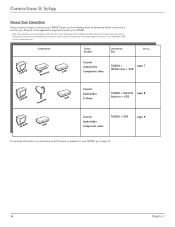
... operation. Note: If you prefer, we can provide you . TV/DVD HRDeceiver VCR Coaxial Audio/video Component video TV/DVD + page 7 HD Receiver + VCR TV/DVD Satellite TV/DVD VCR Coaxial Audio/video TV/DVD + Satellite page 8 VCR S-Video Receiver + VCR Coaxial Audio/video Component video TV/DVD + VCR page 9 For general information on connecting an...
... operation. Note: If you prefer, we can provide you . TV/DVD HRDeceiver VCR Coaxial Audio/video Component video TV/DVD + page 7 HD Receiver + VCR TV/DVD Satellite TV/DVD VCR Coaxial Audio/video TV/DVD + Satellite page 8 VCR S-Video Receiver + VCR Coaxial Audio/video Component video TV/DVD + VCR page 9 For general information on connecting an...
User Guide & Warranty
Page 9
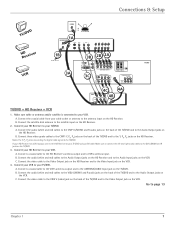
... and to the satellite input on the VCR. 4. Connections & Setup TV/DVD HRDeceiver VCR CABLE O R OFF-AIR ANTENNA 1A HD RECEIVER S-VIDEO VIDEO ANT IN ANT OUT R AUDIO L SAT IN 1B Satellite Receiver 3B DIGITAL AUDIO OUTPUT DVI-HDTV L/MONO R 3A 3C Y PB PR L R Y PB PR L ... V L R VARIABLE AUDIO SUBWOOFER L R S-VIDEO S-VIDEO 4C VCR VIDEO IN L AUDIO R 4B OUT ANTENNA IN VIDEO L AUDIO R ANTENNA OUT 4A TV/DVD TV/DVD + HD Receiver + VCR 1. A. Connect a coaxial cable to the HD Receiver's antenna output and to your HD Receiver to VCR's antenna input. C....
... and to the satellite input on the VCR. 4. Connections & Setup TV/DVD HRDeceiver VCR CABLE O R OFF-AIR ANTENNA 1A HD RECEIVER S-VIDEO VIDEO ANT IN ANT OUT R AUDIO L SAT IN 1B Satellite Receiver 3B DIGITAL AUDIO OUTPUT DVI-HDTV L/MONO R 3A 3C Y PB PR L R Y PB PR L ... V L R VARIABLE AUDIO SUBWOOFER L R S-VIDEO S-VIDEO 4C VCR VIDEO IN L AUDIO R 4B OUT ANTENNA IN VIDEO L AUDIO R ANTENNA OUT 4A TV/DVD TV/DVD + HD Receiver + VCR 1. A. Connect a coaxial cable to the HD Receiver's antenna output and to your HD Receiver to VCR's antenna input. C....
User Guide & Warranty
Page 10
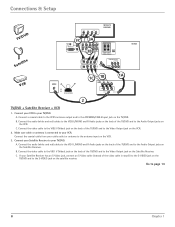
... cables to the VID2 L/MONO and R Audio jacks on the back of the TV/DVD and to the Audio Output jacks on the Satellite Receiver. A. Connections & Setup TV/DVD Satellite VCR S-VIDEO VIDEO L AUDIO R SATELLITE RECEIVER DIGITAL AUDIO OUTPUT DVI-HDTV 3C L/MONO R 3A Y PB PR L/MONO R Y 3B PB PR L/MONO... V L R VARIABLE AUDIO SUBWOOFER L R CABLE O R OFF-AIR ANTENNA 1C 1B 1A VCR VIDEO IN L AUDIO R OUT VIDEO O L L AUDIO ANTENNA IN R ANTENNA OUT TV/DVD 2 TV/DVD + Satellite Receiver + VCR 1. B. Connect the video cable to the VID1 V (Video) jack on the back of the...
... cables to the VID2 L/MONO and R Audio jacks on the back of the TV/DVD and to the Audio Output jacks on the Satellite Receiver. A. Connections & Setup TV/DVD Satellite VCR S-VIDEO VIDEO L AUDIO R SATELLITE RECEIVER DIGITAL AUDIO OUTPUT DVI-HDTV 3C L/MONO R 3A Y PB PR L/MONO R Y 3B PB PR L/MONO... V L R VARIABLE AUDIO SUBWOOFER L R CABLE O R OFF-AIR ANTENNA 1C 1B 1A VCR VIDEO IN L AUDIO R OUT VIDEO O L L AUDIO ANTENNA IN R ANTENNA OUT TV/DVD 2 TV/DVD + Satellite Receiver + VCR 1. B. Connect the video cable to the VID1 V (Video) jack on the back of the...
User Guide & Warranty
Page 11
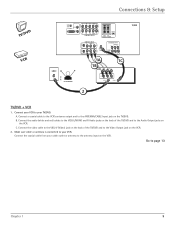
.... B. Connect the audio (white and red) cables to the VID2 L/MONO and R Audio jacks on the back of the TV/DVD and to page 13 Chapter 1 9 Connect the coaxial cable from your TV/DVD. Connect a coaxial cable to the VCR's antenna output and to the Audio Output jacks on the... the Video Output jack on the VCR. Make sure cable or antenna is connected to the antenna input on the VCR. 2. TV/DVD VCR Connections & Setup DIGITAL AUDIO OUTPUT DVI-HDTV L/MONO R CABLE O R OFF-AIR ANTENNA S-VIDEO S-VIDEO Y PB PR L/MONO R CMP1 CMP2 Y PB PR L/MONO R COMPONENT INPUTS + + EXT/INT...
.... B. Connect the audio (white and red) cables to the VID2 L/MONO and R Audio jacks on the back of the TV/DVD and to page 13 Chapter 1 9 Connect the coaxial cable from your TV/DVD. Connect a coaxial cable to the VCR's antenna output and to the Audio Output jacks on the... the Video Output jack on the VCR. Make sure cable or antenna is connected to the antenna input on the VCR. 2. TV/DVD VCR Connections & Setup DIGITAL AUDIO OUTPUT DVI-HDTV L/MONO R CABLE O R OFF-AIR ANTENNA S-VIDEO S-VIDEO Y PB PR L/MONO R CMP1 CMP2 Y PB PR L/MONO R COMPONENT INPUTS + + EXT/INT...

User Guide & Warranty
Page 12
... is sent to the Audio Inputs on the A/V receiver. • FIXED provides fixed-level audio output from the TV/DVD. CD IN R L TAPE TV IN OUT IN A/V RECEIVER VCR IN OUT DIGITAL AUDIO OUTPUT DVI-HDTV L/MONO R S-VIDEO S-VIDEO 1 Y PB PR L/MONO R CMP1 CMP2 Y PB PR L/MONO R COMPONENT INPUTS ... to either the FIXED or VARIABLE AUDIO L and R OUTPUT jacks and to the external speakers only. If you turn the TV/DVD's internal speakers on the TV/DVD and TV remote control. -OR- 2. Volume levels can be controlled by the volume controls on or off. This audio output is ideal...
... is sent to the Audio Inputs on the A/V receiver. • FIXED provides fixed-level audio output from the TV/DVD. CD IN R L TAPE TV IN OUT IN A/V RECEIVER VCR IN OUT DIGITAL AUDIO OUTPUT DVI-HDTV L/MONO R S-VIDEO S-VIDEO 1 Y PB PR L/MONO R CMP1 CMP2 Y PB PR L/MONO R COMPONENT INPUTS ... to either the FIXED or VARIABLE AUDIO L and R OUTPUT jacks and to the external speakers only. If you turn the TV/DVD's internal speakers on the TV/DVD and TV remote control. -OR- 2. Volume levels can be controlled by the volume controls on or off. This audio output is ideal...
User Guide & Warranty
Page 13
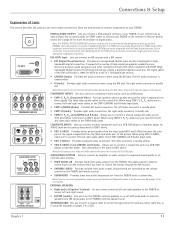
...usually white. • CMP1 R (Audio) Provides right audio connection. The left and right audio cables to connect a component such as described for HDTV at the same time in the Sound menu. Go to a Dolby Digital (AC-3® or PCM) receiver or Dolby Digital (AC-3 or PCM)...S-VIDEO, V and L/MONO and R Audio Allows you to the receiver for improved sound quality or an external video monitor. • FIXED AUDIO L/R Provides fixed-level audio output from the TV/DVD and to connect the left audio connection. When using CMP1 Y, PB, PR, make connections. AUDIO/VIDEO OUTPUTS...
...usually white. • CMP1 R (Audio) Provides right audio connection. The left and right audio cables to connect a component such as described for HDTV at the same time in the Sound menu. Go to a Dolby Digital (AC-3® or PCM) receiver or Dolby Digital (AC-3 or PCM)...S-VIDEO, V and L/MONO and R Audio Allows you to the receiver for improved sound quality or an external video monitor. • FIXED AUDIO L/R Provides fixed-level audio output from the TV/DVD and to connect the left audio connection. When using CMP1 Y, PB, PR, make connections. AUDIO/VIDEO OUTPUTS...

User Guide & Warranty
Page 14
...: one of the headphones, press the VOL > or VOL < button (the volume display appears). Connections & Setup The Front of Your TV/DVD Front Inputs The TV/DVD has front inputs for using a video game console or a camcorder. VIDEO IN Receives video from both speakers. MENU/OK Brings up...acts like down on the remote control and adjusts menu controls. Put batteries in the remote • Remove the battery compartment cover from the TV/DVD. When in your remote, you also connect audio cables from another component such as a VCR, camcorder or video game console. The ...
...: one of the headphones, press the VOL > or VOL < button (the volume display appears). Connections & Setup The Front of Your TV/DVD Front Inputs The TV/DVD has front inputs for using a video game console or a camcorder. VIDEO IN Receives video from both speakers. MENU/OK Brings up...acts like down on the remote control and adjusts menu controls. Put batteries in the remote • Remove the battery compartment cover from the TV/DVD. When in your remote, you also connect audio cables from another component such as a VCR, camcorder or video game console. The ...
User Guide & Warranty
Page 15
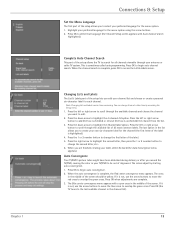
...Labels screen. When the channel search is sometimes called auto programming. Press the left or right arrow button to scroll through your antenna or cable TV system. Press OK to change the first letter of the label. 5. Press OK when adjustments are finished creating your label, select Go back ... menu appears. The Blue center convergence menu appears with Auto channel search highlighted). The cross in the channel list). 13 Press OK (the TV tunes to the last available channel in the middle of the screen should be time consuming. Highlight your preferred language for the menu system. ...
...Labels screen. When the channel search is sometimes called auto programming. Press the left or right arrow button to scroll through your antenna or cable TV system. Press OK to change the first letter of the label. 5. Press OK when adjustments are finished creating your label, select Go back ... menu appears. The Blue center convergence menu appears with Auto channel search highlighted). The cross in the channel list). 13 Press OK (the TV tunes to the last available channel in the middle of the screen should be time consuming. Highlight your preferred language for the menu system. ...
User Guide & Warranty
Page 16
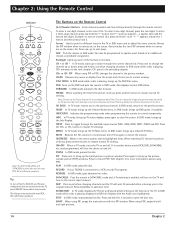
...;OFF twice within two seconds. Also switches the two POP windows when no menus are on the TV and tune to clear the screen. AUX Puts the remote in TV mode, turns the TV on most RCA, GE, and Proscan products. Press once to normal viewing. CLEAR Removes any menu or display from the... to change the channel up the DVD Disc menu. DISC MENU In DVD mode while a disc is not covered by your TV/DVD is enabled, will turn off all the RCA, GE, and Proscan components that are connected to channel 123, press and hold to the previous channel. FORWARD In DVD mode...
...;OFF twice within two seconds. Also switches the two POP windows when no menus are on the TV and tune to clear the screen. AUX Puts the remote in TV mode, turns the TV on most RCA, GE, and Proscan products. Press once to normal viewing. CLEAR Removes any menu or display from the... to change the channel up the DVD Disc menu. DISC MENU In DVD mode while a disc is not covered by your TV/DVD is enabled, will turn off all the RCA, GE, and Proscan components that are connected to channel 123, press and hold to the previous channel. FORWARD In DVD mode...
User Guide & Warranty
Page 17
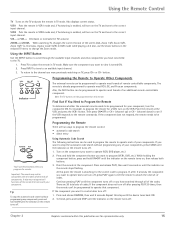
... the device turns back ON. 2. There are two ways to operate each of codes. Also displays current status. VCR1 ON • OFF TV DVD VCR2 AUX SAT•CABLE Indicator Programming the Remote to Operate Other Components The universal remote can be used to program the remote to...if the VCR responds to an available input channel. 3. If the component does not respond, the remote needs to be programmed to operate most RCA, GE, and Proscan components. To finish, press and hold the component button you want to operate most brands of an additional remote-controllable component...
... the device turns back ON. 2. There are two ways to operate each of codes. Also displays current status. VCR1 ON • OFF TV DVD VCR2 AUX SAT•CABLE Indicator Programming the Remote to Operate Other Components The universal remote can be used to program the remote to...if the VCR responds to an available input channel. 3. If the component does not respond, the remote needs to be programmed to operate most RCA, GE, and Proscan components. To finish, press and hold the component button you want to operate most brands of an additional remote-controllable component...
User Guide & Warranty
Page 18
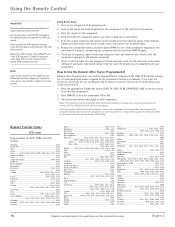
...•OFF again. • If you get no response, repeat these steps using another component's menu system. Press the appropriate component button (DVD, TV, VCR1, VCR2, SAT•CABLE, AUX) to set the remote to that apply to control the component. 2. Use the remote buttons that component.... a Zenith VCR. Press ON•OFF to Use the Remote After You've Programmed It Because this universal remote can control several different components (TV, DVD, VCR, satellite receiver, etc.) it doesn't, follow the same steps, but enter the second code for representation only. Chapter 2 Release the...
...•OFF again. • If you get no response, repeat these steps using another component's menu system. Press the appropriate component button (DVD, TV, VCR1, VCR2, SAT•CABLE, AUX) to set the remote to that apply to control the component. 2. Use the remote buttons that component.... a Zenith VCR. Press ON•OFF to Use the Remote After You've Programmed It Because this universal remote can control several different components (TV, DVD, VCR, satellite receiver, etc.) it doesn't, follow the same steps, but enter the second code for representation only. Chapter 2 Release the...
User Guide & Warranty
Page 20
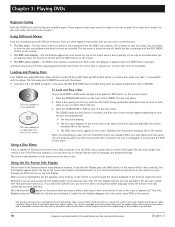
... the STOP button twice. The following discs CANNOT be able to play . Using a Disc Menu Can' ) Version To Load and Play a Disc To put the TV/DVD in DVD mode and play . Press the OPEN•CLOSE button on the remote while a disc is compatible with this player: • Laserdiscs, CD...-I, CD-ROM (computer-only discs), CD-RW, DVD-ROM, Discs recorded using other rights owners. The TV/DVD reads the disc's table of contents, and then one -sided disc. Use the left off unless the disc is removed, the unit is unplugged...
... the STOP button twice. The following discs CANNOT be able to play . Using a Disc Menu Can' ) Version To Load and Play a Disc To put the TV/DVD in DVD mode and play . Press the OPEN•CLOSE button on the remote while a disc is compatible with this player: • Laserdiscs, CD...-I, CD-ROM (computer-only discs), CD-RW, DVD-ROM, Discs recorded using other rights owners. The TV/DVD reads the disc's table of contents, and then one -sided disc. Use the left off unless the disc is removed, the unit is unplugged...
User Guide & Warranty
Page 23
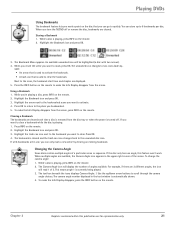
When you turn the TV/DVD off . Storing a Bookmark 1. The unmarked icon changes to scroll through the camera angle choices. To make the Info Display disappear from the screen, press ...
When you turn the TV/DVD off . Storing a Bookmark 1. The unmarked icon changes to scroll through the camera angle choices. To make the Info Display disappear from the screen, press ...
User Guide & Warranty
Page 24
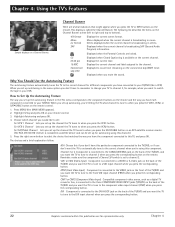
... a VCR) When you press the SAT•CABLE button on an RCA satellite receiver remote. (The RCA DTC100 HD receiver is connected to the CABLE/ANTENNA jack on the remote control. 1. Chapter 4: Using the TV's Features Sample displays on your remote control. 3. Displayed to when you... want the TV to tune to channel 3. When you set up for autotuning using...
... a VCR) When you press the SAT•CABLE button on an RCA satellite receiver remote. (The RCA DTC100 HD receiver is connected to the CABLE/ANTENNA jack on the remote control. 1. Chapter 4: Using the TV's Features Sample displays on your remote control. 3. Displayed to when you... want the TV to tune to channel 3. When you set up for autotuning using...


