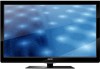
User Manual
Page 4
... Check Accessories ...8 Setup TV Table Stand ...8 Select TV Location ...8 Connection and Using ...8 TV Stand Installation ...9 TV Signal Connection ...10 Cable Connections ...11 Side Panel Connections ...12 Connecting AV Composite Video device (Good Video Quality 12 Connecting YPbPr Component device (Better Video Quality 13 Connecting HDMI device (Best Video Quality 14 Connecting a Computer...15 How to Obtain Various Kinds of Input Sources 15 TV Jacks Explanation ...16 Side Keypad and Front Panel ...17 Side Panel Buttons ...17 Front Panel ...17 Remote Control Instructions...18 Inserting...
... Check Accessories ...8 Setup TV Table Stand ...8 Select TV Location ...8 Connection and Using ...8 TV Stand Installation ...9 TV Signal Connection ...10 Cable Connections ...11 Side Panel Connections ...12 Connecting AV Composite Video device (Good Video Quality 12 Connecting YPbPr Component device (Better Video Quality 13 Connecting HDMI device (Best Video Quality 14 Connecting a Computer...15 How to Obtain Various Kinds of Input Sources 15 TV Jacks Explanation ...16 Side Keypad and Front Panel ...17 Side Panel Buttons ...17 Front Panel ...17 Remote Control Instructions...18 Inserting...
User Manual
Page 6
... magnitude to radio or television reception, which the receiver is no Guarantee that to which can radiate radio frequency energy and, if not installed and used in the literature accompanying the TV. If this equipment does cause harmful interference to consitute a risk of important operating and maintenance (servicing) instructions in accordance with the instructions, may cause harmful interference...
... magnitude to radio or television reception, which the receiver is no Guarantee that to which can radiate radio frequency energy and, if not installed and used in the literature accompanying the TV. If this equipment does cause harmful interference to consitute a risk of important operating and maintenance (servicing) instructions in accordance with the instructions, may cause harmful interference...
User Manual
Page 7
... to service this apparatus during a lightning storm, or when it from overheating. This will prevent damage to the TV due to the operating instructions. 16. This TV should not be blocked or covered. For TV remote control battery power, refer to lightning and power line surges. 14. Unplug the TV from the wall outlet and disconnect antenna or cable system...
... to service this apparatus during a lightning storm, or when it from overheating. This will prevent damage to the TV due to the operating instructions. 16. This TV should not be blocked or covered. For TV remote control battery power, refer to lightning and power line surges. 14. Unplug the TV from the wall outlet and disconnect antenna or cable system...
User Manual
Page 8
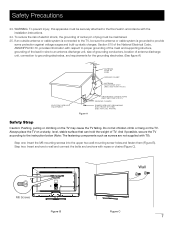
.... Step one: Insert the M6 mounting screws into the upper two wall mounting screw holes and fasten them (Figure B). If an outside antenna or cable system is connected to the TV, be sure the antenna or cable system is grounded to wall and connect the bolts and anchors with respect to proper grounding of the mast and supporting structure, grounding of the lead-in...
.... Step one: Insert the M6 mounting screws into the upper two wall mounting screw holes and fasten them (Figure B). If an outside antenna or cable system is connected to the TV, be sure the antenna or cable system is grounded to wall and connect the bolts and anchors with respect to proper grounding of the mast and supporting structure, grounding of the lead-in...

User Manual
Page 10
... on . 2. TV Stand Installation TV 39LB45RQ/42LB45RQ is packaged with the TV stand separated from being damaged. Choose an absolutely flat surface to prevent the LCD panel from the cabinet. Pedestal Screws Quantity Part # M4 x 10mm 4pcs RS01TB410H Step Three Take the base. To setup the TV table stand, please carry out the installation according to face the TV panel. Use soft cloth or...
... on . 2. TV Stand Installation TV 39LB45RQ/42LB45RQ is packaged with the TV stand separated from being damaged. Choose an absolutely flat surface to prevent the LCD panel from the cabinet. Pedestal Screws Quantity Part # M4 x 10mm 4pcs RS01TB410H Step Three Take the base. To setup the TV table stand, please carry out the installation according to face the TV panel. Use soft cloth or...
User Manual
Page 11
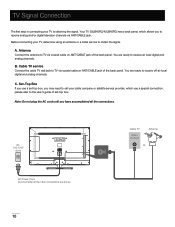
... Power Cord (Connect after all the connections. Before connecting your TV, determine using an antenna or a cable service to receive off-air local digital and analog channels. C. Note: Do not plug the AC cord until you may need to call your TV is obtaining the signal. You are ready to receive analog and/or digital television channels via coaxial cable on ANT/CABLE jack of the back panel. Your TV 39LB45RQ/42LB45RQ has a back panel, which use a set -top box...
... Power Cord (Connect after all the connections. Before connecting your TV, determine using an antenna or a cable service to receive off-air local digital and analog channels. C. Note: Do not plug the AC cord until you may need to call your TV is obtaining the signal. You are ready to receive analog and/or digital television channels via coaxial cable on ANT/CABLE jack of the back panel. Your TV 39LB45RQ/42LB45RQ has a back panel, which use a set -top box...

User Manual
Page 12
... VGA Audio-In PC INPUT PC INPUT VGA, Audio In Audio cable with 3.5mm terminal VGA cable Go to page 15 Note: HDMI, the HDMI logo, and High-Definition Multimedia Interface are trademarks or registered trademarks of HDMI Licensing LLC Caution: Unplug the AC cord when you connect other devices (such as DVD, VCR, Set-top box, etc.). Cable Connections Choose Your Connections TV 39LB45RQ/42LB45RQ supports various connections...
... VGA Audio-In PC INPUT PC INPUT VGA, Audio In Audio cable with 3.5mm terminal VGA cable Go to page 15 Note: HDMI, the HDMI logo, and High-Definition Multimedia Interface are trademarks or registered trademarks of HDMI Licensing LLC Caution: Unplug the AC cord when you connect other devices (such as DVD, VCR, Set-top box, etc.). Cable Connections Choose Your Connections TV 39LB45RQ/42LB45RQ supports various connections...
User Manual
Page 15
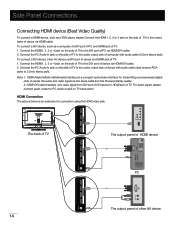
... panel. For audio signal, please connect audio output to the DVI port of device via HDMI-DVI cable. 2. HDMI Connection The picture below is a compact audio/video interface for transmitting uncompressed digital data. Note: 1. HDMI-DVI cable transfers only video signal from DVI port of DVI device to the DVI port of PC via HDMI-DVI cable. 2. Connect the HDMI1, 2, 3 or 4 jack on the side of TV to the audio output jack of device with audio cable (dual-channel RCA...
... panel. For audio signal, please connect audio output to the DVI port of device via HDMI-DVI cable. 2. HDMI Connection The picture below is a compact audio/video interface for transmitting uncompressed digital data. Note: 1. HDMI-DVI cable transfers only video signal from DVI port of DVI device to the DVI port of PC via HDMI-DVI cable. 2. Connect the HDMI1, 2, 3 or 4 jack on the side of TV to the audio output jack of device with audio cable (dual-channel RCA...
User Manual
Page 16
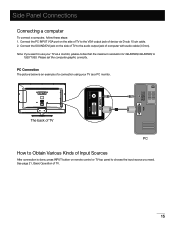
... with audio cable (3.5mm). Connect the PC INPUT VGA port on the side of TV to Obtain Various Kinds of Input Sources After connection is an example of device via D-sub 15-pin cable. 2. PC Connection The picture below is done, press INPUT button on remote control or TV top panel to choose the input source you want to the VGA output jack of a connection using your TV as a PC monitor. Connect the SOUND...
... with audio cable (3.5mm). Connect the PC INPUT VGA port on the side of TV to Obtain Various Kinds of Input Sources After connection is an example of device via D-sub 15-pin cable. 2. PC Connection The picture below is done, press INPUT button on remote control or TV top panel to choose the input source you want to the VGA output jack of a connection using your TV as a PC monitor. Connect the SOUND...
User Manual
Page 17
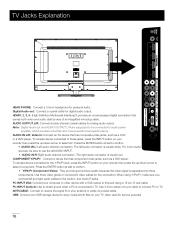
... antenna or cable via coaxial cable. USB: Connect your USB storage device to these jacks, press the INPUT button on your remote; AUDIO OUTPUT L/R: Connect double-channel coaxial cables for digital audio output. To access device connected to enjoy music/photo files on your TV. (Also used for service purpose) 16 V G A C A B L E A N T / USB Digital Audio-out: Connect a coaxial cable for analog audio output. then press the up /down arrow to the Audio L and Audio R jacks. Use three video-grade or component video cables for personal audio. When using...
... antenna or cable via coaxial cable. USB: Connect your USB storage device to these jacks, press the INPUT button on your remote; AUDIO OUTPUT L/R: Connect double-channel coaxial cables for digital audio output. To access device connected to enjoy music/photo files on your TV. (Also used for service purpose) 16 V G A C A B L E A N T / USB Digital Audio-out: Connect a coaxial cable for analog audio output. then press the up /down arrow to the Audio L and Audio R jacks. Use three video-grade or component video cables for personal audio. When using...
User Manual
Page 18
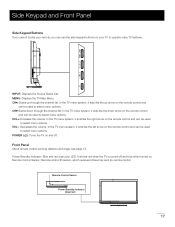
... the remote control and can be used to select menu options. Remote Control Sensor: Remote control IR sensor, which receives infrared ray sent by remote control. Remote Control Sensor Power/Standby Indicator (blue/red) 17 INPUT: Displays the Source Select List. It shows red when the TV is turned off . In the TV menu system, it acts like the down through the channel list. CH :Scans down arrow on the remote control and can be used to operate many TV features. Front Panel About remote control working...
... the remote control and can be used to select menu options. Remote Control Sensor: Remote control IR sensor, which receives infrared ray sent by remote control. Remote Control Sensor Power/Standby Indicator (blue/red) 17 INPUT: Displays the Source Select List. It shows red when the TV is turned off . In the TV menu system, it acts like the down through the channel list. CH :Scans down arrow on the remote control and can be used to operate many TV features. Front Panel About remote control working...

User Manual
Page 19
... power cord plugged in the Remote • Remove the cover of battery cabin on the back of children's reach. • DO NOT use accompanying codes and refer to your Universal Remote Control User Manual for basic Instruction for Fios Verizon: 0205, 0057, 0493, 0775 18 Codes for DIRECTV: 0178, 10178 Codes for Time Warner Cable: 0178, 10178 Codes for Cox Communications: 0178 Codes for Comcast: 10178 Codes for Dish Network: 627 Codes...
... power cord plugged in the Remote • Remove the cover of battery cabin on the back of children's reach. • DO NOT use accompanying codes and refer to your Universal Remote Control User Manual for basic Instruction for Fios Verizon: 0205, 0057, 0493, 0775 18 Codes for DIRECTV: 0178, 10178 Codes for Time Warner Cable: 0178, 10178 Codes for Cox Communications: 0178 Codes for Comcast: 10178 Codes for Dish Network: 627 Codes...
User Manual
Page 20
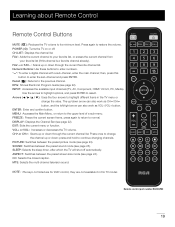
... and confirm button. PICTURE: Switches between the preset sound mode (see page 25). Remote control part number RE20QP80 19 Press again to enter numbers. CH.LIST: Displays the channel list. Recall ( ): Returns to select. INPUT: Accesses the available input channels (TV, AV, Component, HDMI 1/2/3/4, PC, Media). EXIT: Exits the current menu or function. SOUND: Switches between the preset picture mode (see page 24). CC: Selects the closed caption. LIST PICTURE SOUND NOTE : The keys not listed are for DVD control, they are not...
... and confirm button. PICTURE: Switches between the preset sound mode (see page 25). Remote control part number RE20QP80 19 Press again to enter numbers. CH.LIST: Displays the channel list. Recall ( ): Returns to select. INPUT: Accesses the available input channels (TV, AV, Component, HDMI 1/2/3/4, PC, Media). EXIT: Exits the current menu or function. SOUND: Switches between the preset picture mode (see page 24). CC: Selects the closed caption. LIST PICTURE SOUND NOTE : The keys not listed are for DVD control, they are not...
User Manual
Page 22
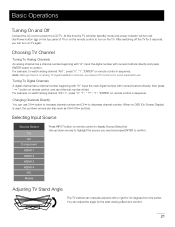
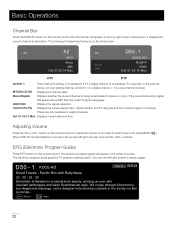
... turn on the remote control to display Source Select list. Changing Channels Directly You can also work as CH /CH buttons. Adjusting TV Stand Angle The TV cabinet can adjust the angle for 5 seconds, you need and press ENTER to watch analog channel "D31-1", press "3", "1", " ", "1", "ENTER" on remote control in sequence. You can manually adjust to decrease channel number. Use Power button ( ) on the top panel of TV or on TV again. When no OSD (On Screen Display...
... turn on the remote control to display Source Select list. Changing Channels Directly You can also work as CH /CH buttons. Adjusting TV Stand Angle The TV cabinet can adjust the angle for 5 seconds, you need and press ENTER to watch analog channel "D31-1", press "3", "1", " ", "1", "ENTER" on remote control in sequence. You can manually adjust to decrease channel number. Use Power button ( ) on the top panel of TV or on TV again. When no OSD (On Screen Display...
User Manual
Page 23
.../1080i Displays the signal resolution. 16:9/CC/TV-PG Displays the screen aspect ratio, closed caption and TV rating level of screen. The following list describes the items on the remote control to adjust the volume. Adjusting Volume Press the VOL+/VOL- The electronic program guide gives the TV program playing project. If it's a digital channel, D is displayed. If the current channel is not used, the arrows left/right can use left/right arrows to switch sound...
.../1080i Displays the signal resolution. 16:9/CC/TV-PG Displays the screen aspect ratio, closed caption and TV rating level of screen. The following list describes the items on the remote control to adjust the volume. Adjusting Volume Press the VOL+/VOL- The electronic program guide gives the TV program playing project. If it's a digital channel, D is displayed. If the current channel is not used, the arrows left/right can use left/right arrows to switch sound...
User Manual
Page 35
... channel list. Why does channel search find a lot of the screen. If you . Connect an antenna to the TV Input jack to display the Channel Bar. If there are available using an antenna as video On Demand. You probably want to remove these in the best way. Why does it take a long time when I try a different format that digital channel. 34 Besides using a certain antenna. Look at first time...
... channel list. Why does channel search find a lot of the screen. If you . Connect an antenna to the TV Input jack to display the Channel Bar. If there are available using an antenna as video On Demand. You probably want to remove these in the best way. Why does it take a long time when I try a different format that digital channel. 34 Besides using a certain antenna. Look at first time...
User Manual
Page 36
... the PARENTAL Menu and press ENTER to page 20 for detailed instructions. • The channel may be locked (disabled). The TV turns off unexpectedly. • The electronic protection circuit may be blank. TV Problems The TV can 't work . • The side panel may have plugged the connection into the Audio In L jack (white) on . • Make sure the AC cord is fine. • The sound...
... the PARENTAL Menu and press ENTER to page 20 for detailed instructions. • The channel may be locked (disabled). The TV turns off unexpectedly. • The electronic protection circuit may be blank. TV Problems The TV can 't work . • The side panel may have plugged the connection into the Audio In L jack (white) on . • Make sure the AC cord is fine. • The sound...

User Manual
Page 37
... there is turned on and the cables are experiencing problems with the HDMI Connection. • Make sure the HDMI device (DVD, video gamer, etc.) is a clear path. • The remote may not be aimed directly at the support number provided in your Warranty card. 36 Use the SOUND Menu and set Analog Sound as Mono. A black box appears on the screen. • Closed captioning might be blocking between the remote control and the remote sensor on each...
... there is turned on and the cables are experiencing problems with the HDMI Connection. • Make sure the HDMI device (DVD, video gamer, etc.) is a clear path. • The remote may not be aimed directly at the support number provided in your Warranty card. 36 Use the SOUND Menu and set Analog Sound as Mono. A black box appears on the screen. • Closed captioning might be blocking between the remote control and the remote sensor on each...
User Manual
Page 40
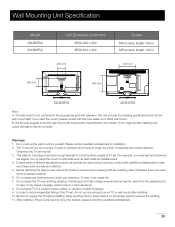
... sold with the installing rules. Transducers and high voltage wires should not be kept far away from the screen panel to move the cabinet, please contact the qualified professionals. 39 Wall Mounting Unit Specification Model 39LB45RQ 42LB45RQ Unit Dimension (unit:mm) VESA 200 x 200 VESA 400 x 400 200 mm Screw M6 screws, length 14mm M6 screws, length 12mm 400...
... sold with the installing rules. Transducers and high voltage wires should not be kept far away from the screen panel to move the cabinet, please contact the qualified professionals. 39 Wall Mounting Unit Specification Model 39LB45RQ 42LB45RQ Unit Dimension (unit:mm) VESA 200 x 200 VESA 400 x 400 200 mm Screw M6 screws, length 14mm M6 screws, length 12mm 400...
User Manual
Page 42
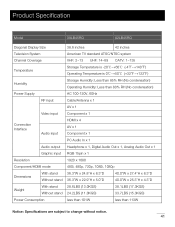
... (No condensation) Operating Humidity: Less than 80% RH (No condensation) Power Supply AC 100-120V, 60Hz RF input Cable/Antenna x 1 AV x 1 Video input Component x 1 Connection Interface Audio input HDMI x 4 AV x 1 Component x 1 PC Audio In x 1 Audio output Headphone x 1, Digital Audio Out x 1, Analog Audio Out x 1 Graphic input RGB 15pin x 1 Resolution 1920 x 1080 Component/HDMI mode 480i, 480p, 720p, 1080i, 1080p Dimensions With stand 36.3"W x 24.8"H x 8.3"D Without stand 36.3"W x 22.9"H x 5.0"D 40.0"W x 27.4"H x 8.3"D 40.0"W x 25.3"H x 4.3"D Weight With stand 28.6LBS...
... (No condensation) Operating Humidity: Less than 80% RH (No condensation) Power Supply AC 100-120V, 60Hz RF input Cable/Antenna x 1 AV x 1 Video input Component x 1 Connection Interface Audio input HDMI x 4 AV x 1 Component x 1 PC Audio In x 1 Audio output Headphone x 1, Digital Audio Out x 1, Analog Audio Out x 1 Graphic input RGB 15pin x 1 Resolution 1920 x 1080 Component/HDMI mode 480i, 480p, 720p, 1080i, 1080p Dimensions With stand 36.3"W x 24.8"H x 8.3"D Without stand 36.3"W x 22.9"H x 5.0"D 40.0"W x 27.4"H x 8.3"D 40.0"W x 25.3"H x 4.3"D Weight With stand 28.6LBS...


