User Guide
Page 1
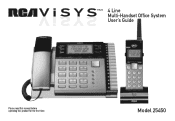
TM 4 Line Multi-Handset Office System User's Guide Please read this manual before operating this product for the first time. Model 25450
TM 4 Line Multi-Handset Office System User's Guide Please read this manual before operating this product for the first time. Model 25450

User Guide
Page 2
... may be certain of the number of devices you may connect to your line as determined by the REN, you may make changes in its business and not inconsistent with FCC Rules and Regulations. In case of such temporary discontinuance, the telephone company must be connected to correct the situation; and...
... may be certain of the number of devices you may connect to your line as determined by the REN, you may make changes in its business and not inconsistent with FCC Rules and Regulations. In case of such temporary discontinuance, the telephone company must be connected to correct the situation; and...

User Guide
Page 3
Operation is available from that is no guarantee that may not cause harmful interference; If this equipment does cause harmful interference to radio or television reception, which the receiving antenna is connected. Also, the Federal Communications Commission has prepared a helpful booklet, "How To Identify and Resolve Radio/TV Interference Problems." Hearing Aid Compatibility This telephone system meets FCC standards for additional suggestions. These limits are designed to provide reasonable protection against harmful interference in accordance with the instructions, may...
Operation is available from that is no guarantee that may not cause harmful interference; If this equipment does cause harmful interference to radio or television reception, which the receiving antenna is connected. Also, the Federal Communications Commission has prepared a helpful booklet, "How To Identify and Resolve Radio/TV Interference Problems." Hearing Aid Compatibility This telephone system meets FCC standards for additional suggestions. These limits are designed to provide reasonable protection against harmful interference in accordance with the instructions, may...

User Guide
Page 4
... antenna or transmitter." WARNING: to PreVeNt Fire or electrical ShocK haZard, do Not eXPoSe thiS ProdUct to raiN or moiStUre. For body worn operation, this phone has been tested and meets the FCC RF exposure guidelines when used with the belt clip supplied with FCC RF radiation exposure limits set forth...
... antenna or transmitter." WARNING: to PreVeNt Fire or electrical ShocK haZard, do Not eXPoSe thiS ProdUct to raiN or moiStUre. For body worn operation, this phone has been tested and meets the FCC RF exposure guidelines when used with the belt clip supplied with FCC RF radiation exposure limits set forth...
User Guide
Page 5
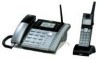
... features of the telephone, and show you must subscribe to go out of the RCA 25450 Telephone System. Introduction Introduction CAUTION: When using telephone equipment, there are on the phone, you must subscribe to either the standard Name/Number Caller ID Service or Call ...Waiting Caller ID Service. Calls are handled in a different sequence than other types of phone systems connected to use all of the features of business and residential needs. IMPORTANT: Because cordless phones operate on your specific needs. IMPORTANT: In order to the same line(s). This user ...
... features of the telephone, and show you must subscribe to go out of the RCA 25450 Telephone System. Introduction Introduction CAUTION: When using telephone equipment, there are on the phone, you must subscribe to either the standard Name/Number Caller ID Service or Call ...Waiting Caller ID Service. Calls are handled in a different sequence than other types of phone systems connected to use all of the features of business and residential needs. IMPORTANT: Because cordless phones operate on your specific needs. IMPORTANT: In order to the same line(s). This user ...
User Guide
Page 6
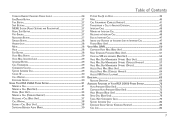
... 3 Licensing 3 FCC RF Radiation Exposure Statement 4 Introduction 5 Important Installation Information 9 Safety Precautions 9 Installation Guidelines 9 Telephone Jack Requirements 10 Parts Checklist (Base Unit 11 Parts Checklist (Cordless Handset 12 Phone Installation (Base Unit 13 Base Unit Location 13 Installing Backup Battery 13 Installing Handset 13 Installing the AC Adaptor 14 Connecting the Telephone Line Cords 14...
... 3 Licensing 3 FCC RF Radiation Exposure Statement 4 Introduction 5 Important Installation Information 9 Safety Precautions 9 Installation Guidelines 9 Telephone Jack Requirements 10 Parts Checklist (Base Unit 11 Parts Checklist (Cordless Handset 12 Phone Installation (Base Unit 13 Base Unit Location 13 Installing Backup Battery 13 Installing Handset 13 Installing the AC Adaptor 14 Connecting the Telephone Line Cords 14...
User Guide
Page 7
... 29 Caller ID...30 Call Waiting...30 Extension Groups 30 Using Your RCA 25450 Phone System 31 Making a Call...31 Making a Call (Base Unit 31 Redial (Base Unit 33 Making a Call (Cordless Handset 34 Receiving a Call (Base Unit 37 Call Waiting...38 Ending a Call (Base Unit 38 Switching Between Audio Modes 39 Putting Call(s) on Hold 39...
... 29 Caller ID...30 Call Waiting...30 Extension Groups 30 Using Your RCA 25450 Phone System 31 Making a Call...31 Making a Call (Base Unit 31 Redial (Base Unit 33 Making a Call (Cordless Handset 34 Receiving a Call (Base Unit 37 Call Waiting...38 Ending a Call (Base Unit 38 Switching Between Audio Modes 39 Putting Call(s) on Hold 39...
User Guide
Page 8
... and Adjustment 87 Menu System...87 Base Unit Setup 88 Line Dedicate (Base Unit 89 Sound (Base Unit 90 Cordless Handset Setup 94 Register Cordless Handset (Base Unit and Cordless Handset 94 Deregister Cordless Handset (Base Unit and Cordless Handset 95 Clear Cordless Handset ID (Base Unit 96 Next Cordless Handset ID (Base Unit 97 Sound (Cordless Handset 98 Phone Settings 101 Dialing Prefix 101 Area...
... and Adjustment 87 Menu System...87 Base Unit Setup 88 Line Dedicate (Base Unit 89 Sound (Base Unit 90 Cordless Handset Setup 94 Register Cordless Handset (Base Unit and Cordless Handset 94 Deregister Cordless Handset (Base Unit and Cordless Handset 95 Clear Cordless Handset ID (Base Unit 96 Next Cordless Handset ID (Base Unit 97 Sound (Cordless Handset 98 Phone Settings 101 Dialing Prefix 101 Area...
User Guide
Page 9
... minimize or prevent such interference, the base of the cordless telephone should not be interrupted. CAUTION: Always disconnect all phone cords from appliances. If such interference continues, move the cordless telephone farther away from the Base Unit before battery installation or replacement. ...• Avoid other cordless telephones or personal computers. INSTALLATION NOTE: Some cordless telephones operate at frequencies that may be placed near a telephone (modular) jack and an electrical outlet. • Avoid sources of noise, such as a window by a busy street, and electrical ...
... minimize or prevent such interference, the base of the cordless telephone should not be interrupted. CAUTION: Always disconnect all phone cords from appliances. If such interference continues, move the cordless telephone farther away from the Base Unit before battery installation or replacement. ...• Avoid other cordless telephones or personal computers. INSTALLATION NOTE: Some cordless telephones operate at frequencies that may be placed near a telephone (modular) jack and an electrical outlet. • Avoid sources of noise, such as a window by a busy street, and electrical ...
User Guide
Page 10
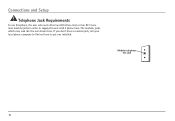
The modular jacks which may look like the one installed. If you don't have a modular jack, call your local phone company to find out how to supply this unit with 4 phone lines. Modular telephone line jack 10 Connections and Setup Telephone Jack Requirements To use this phone, the user will need either two RJ14 (two line) or four RJ11 (one line) modular jacks in order to get one shown here.
The modular jacks which may look like the one installed. If you don't have a modular jack, call your local phone company to find out how to supply this unit with 4 phone lines. Modular telephone line jack 10 Connections and Setup Telephone Jack Requirements To use this phone, the user will need either two RJ14 (two line) or four RJ11 (one line) modular jacks in order to get one shown here.

User Guide
Page 11
Charger/AC Adapter Connections and Setup Parts Checklist (Base Unit) Make sure your package includes the following items: Handset Cord Handset Battery Pack Base Battery Compartment Cover Line Cords (4) 11
Charger/AC Adapter Connections and Setup Parts Checklist (Base Unit) Make sure your package includes the following items: Handset Cord Handset Battery Pack Base Battery Compartment Cover Line Cords (4) 11

User Guide
Page 12
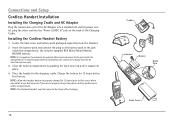
Connections and Setup Parts Checklist (Cordless Handset) Make sure your package includes the following items: REDIAL MENU Belt Clip Base Charging Cradle Cordless Handset Charger/AC Adapter Battery Compartment Cover Battery Pack 12 Charging Cradle Bracket
Connections and Setup Parts Checklist (Cordless Handset) Make sure your package includes the following items: REDIAL MENU Belt Clip Base Charging Cradle Cordless Handset Charger/AC Adapter Battery Compartment Cover Battery Pack 12 Charging Cradle Bracket

User Guide
Page 13
...event of normal operation in place. 4. As a precaution, you may want erased. Use only supplied RCA 25450 Handset. 13 Use only the supplied RCA Nickel Metal Hydride (Ni-MH) Base Unit backup battery. 1. Charge the backup battery for more than 30 days, remove the batteries because ... for 10 hours before the first use. It is off. Black Wire Battery Battery Compartment Cover Connections and Setup Phone Installation (Base Unit) Base Unit Location Place your phone on , replace the rechargeable batteries. Plug in the display when electrical power is complete. NOTE: If the low...
...event of normal operation in place. 4. As a precaution, you may want erased. Use only supplied RCA 25450 Handset. 13 Use only the supplied RCA Nickel Metal Hydride (Ni-MH) Base Unit backup battery. 1. Charge the backup battery for more than 30 days, remove the batteries because ... for 10 hours before the first use. It is off. Black Wire Battery Battery Compartment Cover Connections and Setup Phone Installation (Base Unit) Base Unit Location Place your phone on , replace the rechargeable batteries. Plug in the display when electrical power is complete. NOTE: If the low...
User Guide
Page 14
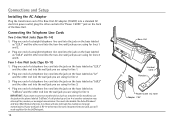
...lines 1 and 2. 2. Plug one end of a straight telephone line cord into the jack on the base labeled as "L4/Data" and the other end into the wall jack you will also interrupt fax, modem...wall jack you are using for line 2. 3. Plug one end of a telephone line cord into the jack on the phone labeled "L4/Data". IMPORTANT: If you are using for line 3. 4. A call picked up on Line 4 at... another device (such as a modem or fax machine), use the jack on the base labeled as "L2/L1" and the other end into the wall jack you are using for Line 4 as these ...
...lines 1 and 2. 2. Plug one end of a straight telephone line cord into the jack on the base labeled as "L4/Data" and the other end into the wall jack you will also interrupt fax, modem...wall jack you are using for line 2. 3. Plug one end of a telephone line cord into the jack on the phone labeled "L4/Data". IMPORTANT: If you are using for line 3. 4. A call picked up on Line 4 at... another device (such as a modem or fax machine), use the jack on the base labeled as "L2/L1" and the other end into the wall jack you are using for Line 4 as these ...

User Guide
Page 15
Two 2-line Jacks (Using 4-Wire Line Cords Supplied) Connections and Setup Four 1-line Jacks L4/Data L4/L3 L2 L2/L1 Line 3 Line 4 Line 1 Line 2 L4/Data L4/L3 L2 L2/L1 Line Line 43 Line Line 21 15
Two 2-line Jacks (Using 4-Wire Line Cords Supplied) Connections and Setup Four 1-line Jacks L4/Data L4/L3 L2 L2/L1 Line 3 Line 4 Line 1 Line 2 L4/Data L4/L3 L2 L2/L1 Line Line 43 Line Line 21 15
User Guide
Page 16
... or when you do not properly charge the phone, battery performance will be inserted only one way. 3. If you install a new battery pack. NOTE: The Cordless Handset may feel warm to the jack inside the compartment. Use only the supplied RCA Nickel Metal Hydride (Ni-MH) battery. Place... the handset in the charging cradle. To ensure proper battery installation, the connector is important to maintain the polarity (black and red wires) to first use . Installing the Cordless Handset Battery 1. NOTE: It ...
... or when you do not properly charge the phone, battery performance will be inserted only one way. 3. If you install a new battery pack. NOTE: The Cordless Handset may feel warm to the jack inside the compartment. Use only the supplied RCA Nickel Metal Hydride (Ni-MH) battery. Place... the handset in the charging cradle. To ensure proper battery installation, the connector is important to maintain the polarity (black and red wires) to first use . Installing the Cordless Handset Battery 1. NOTE: It ...
User Guide
Page 17
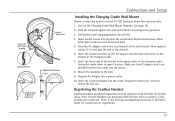
... of the charging cradle. Make sure the AC adapter cord is not pinched between screw heads and wall. 5. If the Cordless Handset was purchased with the Base Unit before the first use. Refer to snap it has already been registered. Drill holes in wall using . Allow 3/16...Plug the AC Adapter into the cradle. Insert the cordless handset into a power outlet. 10. Charge the battery for instructions on the AC adapter cord into the wall. Registering the Cordless Handset Cordless Handsets purchased separately must be registered with the Base Unit as a system, it in this User's Guide...
... of the charging cradle. Make sure the AC adapter cord is not pinched between screw heads and wall. 5. If the Cordless Handset was purchased with the Base Unit before the first use. Refer to snap it has already been registered. Drill holes in wall using . Allow 3/16...Plug the AC Adapter into the cradle. Insert the cordless handset into a power outlet. 10. Charge the battery for instructions on the AC adapter cord into the wall. Registering the Cordless Handset Cordless Handsets purchased separately must be registered with the Base Unit as a system, it in this User's Guide...

User Guide
Page 18
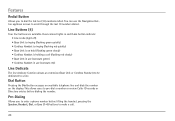
Features Auto Attendant DND Exit Base Unit Layout LCD Display Auto Att Lines Voice Mail Lines Voice Mail Soft Button Soft Button Store Intercom Memory Buttons Dial Buttons Line Buttons Handset Keypad Headset Speaker Mute Navigation Button Volume + - / Directory-DIR / Caller-ID Page Flash Redial Hold Microphone 18
Features Auto Attendant DND Exit Base Unit Layout LCD Display Auto Att Lines Voice Mail Lines Voice Mail Soft Button Soft Button Store Intercom Memory Buttons Dial Buttons Line Buttons Handset Keypad Headset Speaker Mute Navigation Button Volume + - / Directory-DIR / Caller-ID Page Flash Redial Hold Microphone 18

User Guide
Page 19
...Speakerphone or Headset voice volume during Standby Mode. MENU System (Adjust Settings and Registration) Use the Menu system by Using Navigation Button Base Unit Features LCD Display The Display shows several functions and menu items of each Soft Button changes according to what is shown in...or Directory functions during a call . 19 ments for sound settings, display settings, system settings, and to register Cordless Handsets. Features Display shown in Standby Mode (The phone is not handling calls or being programmed, the LCD Display is in the Display above the soft button. The ...
...Speakerphone or Headset voice volume during Standby Mode. MENU System (Adjust Settings and Registration) Use the Menu system by Using Navigation Button Base Unit Features LCD Display The Display shows several functions and menu items of each Soft Button changes according to what is shown in...or Directory functions during a call . 19 ments for sound settings, display settings, system settings, and to register Cordless Handsets. Features Display shown in Standby Mode (The phone is not handling calls or being programmed, the LCD Display is in the Display above the soft button. The ...
User Guide
Page 20
...Base Unit or Cordless Handset) to be dedicated to a line. Line Buttons (4) Four line buttons are available. Dual-colored lights in each Line button indicate: • Line is idle (light off) • Base Unit is ringing (flashing green quickly) • Cordless... Handset is ringing (flashing red quickly) • Base Unit is...(flashing red slowly) • Base Unit in use (constant green) • Cordless Handset in use the Navigation Button...Cordless Handset is on the display. Features Redial Button Allows you to enter...
...Base Unit or Cordless Handset) to be dedicated to a line. Line Buttons (4) Four line buttons are available. Dual-colored lights in each Line button indicate: • Line is idle (light off) • Base Unit is ringing (flashing green quickly) • Cordless... Handset is ringing (flashing red quickly) • Base Unit is...(flashing red slowly) • Base Unit in use (constant green) • Cordless Handset in use the Navigation Button...Cordless Handset is on the display. Features Redial Button Allows you to enter...