

User Guide
Page 4
... and Setup 7 Base Layout 7 Parts Checklist 8 Telephone Jack Requirements 8 Installation 8 Important Installation Information 8 Installing the Phone 9 Data Port 12 Wall Mounting the Phone 12 Programming the Telephone 13 Display Language 13 Manually Setting the Date and Time 13 Hour Format 14 LCD Contrast 14 ...Making Calls with the Speakerphone 24 Making Calls with the Optional Headset..... 24 Making a Call on a Line while Receiving a Call on Another Line 24 Receiving Calls with the Handset 25 Receiving Calls with the Speakerphone......... 25 Receiving Calls with the Optional ...
... and Setup 7 Base Layout 7 Parts Checklist 8 Telephone Jack Requirements 8 Installation 8 Important Installation Information 8 Installing the Phone 9 Data Port 12 Wall Mounting the Phone 12 Programming the Telephone 13 Display Language 13 Manually Setting the Date and Time 13 Hour Format 14 LCD Contrast 14 ...Making Calls with the Speakerphone 24 Making Calls with the Optional Headset..... 24 Making a Call on a Line while Receiving a Call on Another Line 24 Receiving Calls with the Handset 25 Receiving Calls with the Speakerphone......... 25 Receiving Calls with the Optional ...

User Guide
Page 8
... jacks in your package includes the following items: AC power adaptor Desktop Pedestal Base Handset cord Line cords Handset Telephone Jack Requirements Wall plate To use this phone, you will need one RJ14C two-line jack or two RJ11C single line jacks, which might look like the one pictured here, installed in wet locations unless the...
... jacks in your package includes the following items: AC power adaptor Desktop Pedestal Base Handset cord Line cords Handset Telephone Jack Requirements Wall plate To use this phone, you will need one RJ14C two-line jack or two RJ11C single line jacks, which might look like the one pictured here, installed in wet locations unless the...
User Guide
Page 10
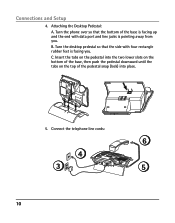
Turn the phone over so that the side with data port and line jacks is facing you . Connect the telephone line cords: 6 4 3 5 10 Turn the desktop pedestal so that the bottom of the pedestal snap (lock) into the two lower slots on the bottom of the base, then push the pedestal downward until the tabs on the top of the base is facing up and the end with four rectangle rubber feet is pointing away from you . C. B. Insert the tabs on the pedestal into place. 5. Attaching the Desktop Pedestal: A. Connections and Setup 4.
Turn the phone over so that the side with data port and line jacks is facing you . Connect the telephone line cords: 6 4 3 5 10 Turn the desktop pedestal so that the bottom of the pedestal snap (lock) into the two lower slots on the bottom of the base, then push the pedestal downward until the tabs on the top of the base is facing up and the end with four rectangle rubber feet is pointing away from you . C. B. Insert the tabs on the pedestal into place. 5. Attaching the Desktop Pedestal: A. Connections and Setup 4.
User Guide
Page 11
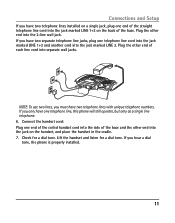
... the side of the base and the other end of each line cord into separate wall jacks. If you only have one telephone line, this phone will still operate, but only as a single line telephone. 6. If you hear a dial tone, the phone is properly installed. 11 Lift the handset and listen for a dial tone. Plug the...
... the side of the base and the other end of each line cord into separate wall jacks. If you only have one telephone line, this phone will still operate, but only as a single line telephone. 6. If you hear a dial tone, the phone is properly installed. 11 Lift the handset and listen for a dial tone. Plug the...
User Guide
Page 12
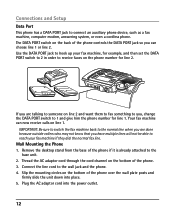
... DATA PORT jack to hook up your fax machine if they dial the normal fax line. Wall Mounting the Phone 1. Connect the line cord to 1 and give him the phone number for line 1. Your fax machine can choose line 1 or line 2. If you are done because outside callers who may not know that you can ...slide the unit down into the power outlet. 12 Thread the AC adaptor cord through the cord channel on the bottom of the phone controls the DATA PORT jack so you have multiple lines will not be able to connect an auxiliary phone device, such as a fax machine, computer modem, answering system, or ...
... DATA PORT jack to hook up your fax machine if they dial the normal fax line. Wall Mounting the Phone 1. Connect the line cord to 1 and give him the phone number for line 1. Your fax machine can choose line 1 or line 2. If you are done because outside callers who may not know that you can ...slide the unit down into the power outlet. 12 Thread the AC adaptor cord through the cord channel on the bottom of the phone controls the DATA PORT jack so you have multiple lines will not be able to connect an auxiliary phone device, such as a fax machine, computer modem, answering system, or ...
User Guide
Page 16
... button. 6. Local Area Code 1. Press the Menu button. 2. Press the Sel/Save button. The default is displayed. 6. Use the 5 or 6 button to scroll to PHONE SETTING. 3. Use the 5 or 6 button to scroll to SOUND SETTING. 3. When finished, press the Sel/Save button to save . If you receive a call alert tone... when you are on the other line. Use the 5 or 6 button to scroll to AREA CODE. 5. To start over , press the Exit button to return to OFF. Use the 5 or 6 ...
... button. 6. Local Area Code 1. Press the Menu button. 2. Press the Sel/Save button. The default is displayed. 6. Use the 5 or 6 button to scroll to PHONE SETTING. 3. Use the 5 or 6 button to scroll to SOUND SETTING. 3. When finished, press the Sel/Save button to save . If you receive a call alert tone... when you are on the other line. Use the 5 or 6 button to scroll to AREA CODE. 5. To start over , press the Exit button to return to OFF. Use the 5 or 6 ...
User Guide
Page 18
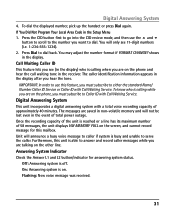
.... WORK HOURS: It is empty when powered up for answering. You have to PHONE SETTING. 3. Connections and Setup New Call Indicator 1. Out-Going Announcement Introduction There are many OGAs for each line and for the caller to the time that was programmed Work and After hours. ...18 Press the Sel/Save button. 4. Use the 5 or 6 button to the PHONE SETTING menu. DEFAULT: The pre-recorded message "Please leave a...
.... WORK HOURS: It is empty when powered up for answering. You have to PHONE SETTING. 3. Connections and Setup New Call Indicator 1. Out-Going Announcement Introduction There are many OGAs for each line and for the caller to the time that was programmed Work and After hours. ...18 Press the Sel/Save button. 4. Use the 5 or 6 button to the PHONE SETTING menu. DEFAULT: The pre-recorded message "Please leave a...
User Guide
Page 24
... handset when finished. Making Calls with the Handset 1. Press the Headset button, and the phone automatically selects an open line. 5. NOTE: To converse while using . 24 Press the Line 2 button. Hang up the handset and the phone automatically selects an open line. 2. Wait for a dial tone. 3. When you are finished, press the Speaker button again...
... handset when finished. Making Calls with the Handset 1. Press the Headset button, and the phone automatically selects an open line. 5. NOTE: To converse while using . 24 Press the Line 2 button. Hang up the handset and the phone automatically selects an open line. 2. Wait for a dial tone. 3. When you are finished, press the Speaker button again...
User Guide
Page 25
... off. Receiving Calls with the Optional Headset When the phone rings, the corresponding line indicator flashes rapidly. 1. Press the Speaker button. NOTE: Whether you are using. The headset indicator turns on both lines simultaneously, the line indicators flash rapidly. 1. The speakerphone turns on ....NOTE: To converse while using the headset. 2. hand up the handset. Receiving Calls with the Speakerphone When the phone rings, the corresponding line indicator flashes rapidly. 1. This will automatically enable the speakerphone (you may now lift the handset or press the Headset...
... off. Receiving Calls with the Optional Headset When the phone rings, the corresponding line indicator flashes rapidly. 1. Press the Speaker button. NOTE: Whether you are using. The headset indicator turns on both lines simultaneously, the line indicators flash rapidly. 1. The speakerphone turns on ....NOTE: To converse while using the headset. 2. hand up the handset. Receiving Calls with the Speakerphone When the phone rings, the corresponding line indicator flashes rapidly. 1. This will automatically enable the speakerphone (you may now lift the handset or press the Headset...
User Guide
Page 26
...in call timer displays the length of the 16 One Touch dial buttons, or • Press DIR, followed by the 5 or 6 button to search the phone book memory. • Press CID, followed by the 5 or 6 button to pre-dial a telephone number: • Manually enter the telephone number, ... call is timed even while it is finished, total time shows in the display for example: 9P555-1234). The phone automatically selects a line and turns on hold. Mute To have a private, off-line conversation, use . 1. A conversation can be muted during speakerphone, handset, or headset use the MUTE feature. A...
...in call timer displays the length of the 16 One Touch dial buttons, or • Press DIR, followed by the 5 or 6 button to search the phone book memory. • Press CID, followed by the 5 or 6 button to pre-dial a telephone number: • Manually enter the telephone number, ... call is timed even while it is finished, total time shows in the display for example: 9P555-1234). The phone automatically selects a line and turns on hold. Mute To have a private, off-line conversation, use . 1. A conversation can be muted during speakerphone, handset, or headset use the MUTE feature. A...
User Guide
Page 27
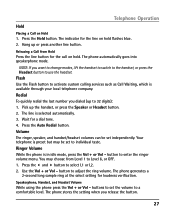
... Auto Redial button. button to select L1 or L2. 2. Speakerphone, Handset, and Headset Volume While using the phone press the Vol + or Vol - The line is in idle mode, press the Vol + or Vol - The phone automatically goes into speakerphone mode. Flash Use the Flash button to Level 6, or OFF. 1. buttons to set... + or Vol - Volume The ringer, speaker, and handset/headset volumes can be set the volume to adjust the ring volume. Hang up or press another line button. The phone generates a 2-second long sample ring at the select setting for a dial tone. 4.
... Auto Redial button. button to select L1 or L2. 2. Speakerphone, Handset, and Headset Volume While using the phone press the Vol + or Vol - The line is in idle mode, press the Vol + or Vol - The phone automatically goes into speakerphone mode. Flash Use the Flash button to Level 6, or OFF. 1. buttons to set... + or Vol - Volume The ringer, speaker, and handset/headset volumes can be set the volume to adjust the ring volume. Hang up or press another line button. The phone generates a 2-second long sample ring at the select setting for a dial tone. 4.
User Guide
Page 31
...6 button to scroll to Caller ID with Call Waiting Service. On: Answering system is on the other line. If You Did Not Program Your Local Area Code in the display after you must subscribe to the number... be lost even in the event of 58 messages, the unit displays VM MEMORY FULL on the phone and hear the call waiting tone in the display. shows in the receiver. Off: Answering system ...the unit is calling while you are on the phone, you are saved in non-volatile memory and will only see (in the display) who is reached or a line has its maximum number of total power outage....
...6 button to scroll to Caller ID with Call Waiting Service. On: Answering system is on the other line. If You Did Not Program Your Local Area Code in the display after you must subscribe to the number... be lost even in the event of 58 messages, the unit displays VM MEMORY FULL on the phone and hear the call waiting tone in the display. shows in the receiver. Off: Answering system ...the unit is calling while you are on the phone, you are saved in non-volatile memory and will only see (in the display) who is reached or a line has its maximum number of total power outage....
User Guide
Page 33
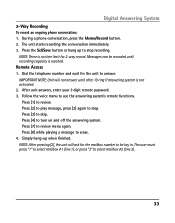
...immediately. 3. Dial the telephone number and wait for 2-way record. Press [2] to play message, press [2] again to stop recording. During a phone conversation, press the Memo/Record button. 2. Follow the voice menu to erase. 4. Simply hang-up to be recorded until after 10 ring if... answering system is no time limit for the unit to select mailbox #2 (line 2). 33 Digital Answering System 2-Way Recording To record an ongoing phone conversation; 1. NOTE: There is not activated. 2. Messages can be key in. Remote Access 1. After unit ...
...immediately. 3. Dial the telephone number and wait for 2-way record. Press [2] to play message, press [2] again to stop recording. During a phone conversation, press the Memo/Record button. 2. Follow the voice menu to erase. 4. Simply hang-up to be recorded until after 10 ring if... answering system is no time limit for the unit to select mailbox #2 (line 2). 33 Digital Answering System 2-Way Recording To record an ongoing phone conversation; 1. NOTE: There is not activated. 2. Messages can be key in. Remote Access 1. After unit ...
User Guide
Page 36
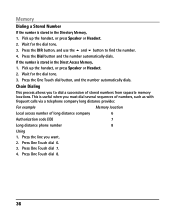
... with frequent calls via a telephone company long distance provider. This is stored in the Directory Memory, 1. Press the line you must dial several sequences of long distance company 6 Authorization code (ID) 7 Long distance phone number 8 Using 1. Press One Touch dial 6. 3. Wait for the dial tone. 3. Chain Dialing This process allows you to...
... with frequent calls via a telephone company long distance provider. This is stored in the Directory Memory, 1. Press the line you must dial several sequences of long distance company 6 Authorization code (ID) 7 Long distance phone number 8 Using 1. Press One Touch dial 6. 3. Wait for the dial tone. 3. Chain Dialing This process allows you to...
User Guide
Page 37
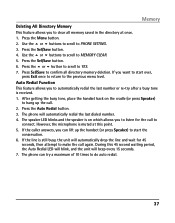
... last number or re-try a maximum of 10 times to hang up the handset (or press Speaker) to clear all directory memory deletion. If the line is on the cradle (or press Speaker) to do auto redial. 37 Press the Sel/Save button. 4. However, the microphone is received. 1. Press the 5 ...the busy tone, place the handset back on which allows you to listen for 45 seconds, then attempt to YES. 7. The phone can lift up the call again. The phone will beep every 15 seconds. 7. Memory Deleting All Directory Memory This feature allows you to start over, press Exit once to ...
... last number or re-try a maximum of 10 times to hang up the handset (or press Speaker) to clear all directory memory deletion. If the line is on the cradle (or press Speaker) to do auto redial. 37 Press the Sel/Save button. 4. However, the microphone is received. 1. Press the 5 ...the busy tone, place the handset back on which allows you to listen for 45 seconds, then attempt to YES. 7. The phone can lift up the call again. The phone will beep every 15 seconds. 7. Memory Deleting All Directory Memory This feature allows you to start over, press Exit once to ...
User Guide
Page 38
...special "self-calibration" feature is only activated when speakerphone mode is highly dependent upon the surroundings and the conversation, this calibration, both the telephone line condition and the acoustic surroundings of the room. Depending upon both parties in a temporary faint echo for several seconds. This calibration samples the sound... both sides of the conversation again, and may take up to 30 seconds to its surroundings and the condition of the phone line. 3. During this calibration may result in the conversation may hear a faint echo, which will fade off as normal. 38
...special "self-calibration" feature is only activated when speakerphone mode is highly dependent upon the surroundings and the conversation, this calibration, both the telephone line condition and the acoustic surroundings of the room. Depending upon both parties in a temporary faint echo for several seconds. This calibration samples the sound... both sides of the conversation again, and may take up to 30 seconds to its surroundings and the condition of the phone line. 3. During this calibration may result in the conversation may hear a faint echo, which will fade off as normal. 38
User Guide
Page 40
Make sure the cords are connected to the same jack. You cannot be your line. Phone does not ring. • Make sure the ringer is turned on. • You may have too many extension phones on your wiring or local service. Incoming voice too low or none at all. • Check... dialing sequence. 40 Try unplugging some phones. • See solutions for "No dial tone." • Make sure Do Not Disturb is not turned on . Other Information Troubleshooting Guide No dial tone • Check or repeat installation steps: Make sure the telephone line cords are not damaged. • Make ...
Make sure the cords are connected to the same jack. You cannot be your line. Phone does not ring. • Make sure the ringer is turned on. • You may have too many extension phones on your wiring or local service. Incoming voice too low or none at all. • Check... dialing sequence. 40 Try unplugging some phones. • See solutions for "No dial tone." • Make sure Do Not Disturb is not turned on . Other Information Troubleshooting Guide No dial tone • Check or repeat installation steps: Make sure the telephone line cords are not damaged. • Make ...


