

Canadian English Manual
Page 1
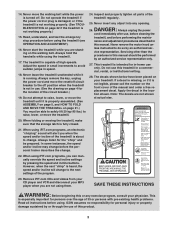
Model No. 30611.1 Serial No. CALL TOLL-FREE: 1-888-936-4266 Mon.-Fri., 8:00 until 17:00 EST (excluding holidays) USER'S MANUAL CAUTION Read all precautions and instructions in this manual before using this manual for future reference. As a manufacturer, we are damaged or missing, PLEASE CONTACT OUR CUSTOMER SERVICE DEPARTMENT DIRECTLY. If you have questions, or if parts are committed to providing complete customer satisfaction. Serial Number Decal QUESTIONS? Save this equipment.
Model No. 30611.1 Serial No. CALL TOLL-FREE: 1-888-936-4266 Mon.-Fri., 8:00 until 17:00 EST (excluding holidays) USER'S MANUAL CAUTION Read all precautions and instructions in this manual before using this manual for future reference. As a manufacturer, we are damaged or missing, PLEASE CONTACT OUR CUSTOMER SERVICE DEPARTMENT DIRECTLY. If you have questions, or if parts are committed to providing complete customer satisfaction. Serial Number Decal QUESTIONS? Save this equipment.

Canadian English Manual
Page 2
... PRECAUTIONS 2 BEFORE YOU BEGIN 4 ASSEMBLY 5 OPERATION AND ADJUSTMENT 8 HOW TO FOLD AND MOVE THE TREADMILL 21 TROUBLESHOOTING 22 CONDITIONING GUIDELINES 24 PART LIST 26 ORDERING REPLACEMENT PARTS Back Cover WARRANTY Back Cover Note: An EXPLODED DRAWING is attached in the center of the... treadmill. Wear appropriate exercise clothes when using the treadmill. Never allow more amps. Keep the power cord ...
... PRECAUTIONS 2 BEFORE YOU BEGIN 4 ASSEMBLY 5 OPERATION AND ADJUSTMENT 8 HOW TO FOLD AND MOVE THE TREADMILL 21 TROUBLESHOOTING 22 CONDITIONING GUIDELINES 24 PART LIST 26 ORDERING REPLACEMENT PARTS Back Cover WARRANTY Back Cover Note: An EXPLODED DRAWING is attached in the center of the... treadmill. Wear appropriate exercise clothes when using the treadmill. Never allow more amps. Keep the power cord ...
Canadian English Manual
Page 3
...an authorized service representative only. 27. This treadmill is about to raise, lower, or move the treadmill. 24. Do not use only. When using . Always listen for persons over the age of 35 or persons with pre-existing health problems. Read all parts of the circuit breaker.) 19. In ...some instances, the speed and/or incline may change before using the treadmill. 17.
...an authorized service representative only. 27. This treadmill is about to raise, lower, or move the treadmill. 24. Do not use only. When using . Always listen for persons over the age of 35 or persons with pre-existing health problems. Read all parts of the circuit breaker.) 19. In ...some instances, the speed and/or incline may change before using the treadmill. 17.
Canadian English Manual
Page 4
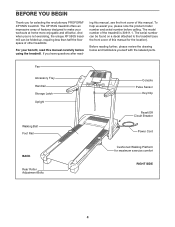
... Pulse Sensor Key/Clip Reset/Off Circuit Breaker Power Cord BACK Rear Roller Adjustment Bolts Cushioned Walking Platform for selecting the revolutionary PROFORM® XP 550S treadmill. The serial number can be found on a decal attached to make your benefit, read - ing this manual for the ...with the labeled parts. BEFORE YOU BEGIN Thank you for maximum exercise comfort RIGHT SIDE 4 The model number of features designed to the treadmill (see the front cover of this manual carefully before calling. And when you're not exercising, the unique XP 550S treadmill can be folded...
... Pulse Sensor Key/Clip Reset/Off Circuit Breaker Power Cord BACK Rear Roller Adjustment Bolts Cushioned Walking Platform for selecting the revolutionary PROFORM® XP 550S treadmill. The serial number can be found on a decal attached to make your benefit, read - ing this manual for the ...with the labeled parts. BEFORE YOU BEGIN Thank you for maximum exercise comfort RIGHT SIDE 4 The model number of features designed to the treadmill (see the front cover of this manual carefully before calling. And when you're not exercising, the unique XP 550S treadmill can be folded...

Canadian English Manual
Page 5
... opposite each drawing is preattached to one Screw (95) down into the Left Bottom Handgrip as shown. Set the treadmill in parentheses below to the top of the parts to the vertical position. The number after the parentheses shows the quantity needed for assembly. Repeat this step on top...The number in a cleared area and remove all packing materials. ASSEMBLY Make sure that the power cord is a normal condition and does not affect treadmill performance. This is unplugged. Tighten two 3/4" Tek Screws (52) into the post on top of the walking belt, simply wipe off the lubricant...
... opposite each drawing is preattached to one Screw (95) down into the Left Bottom Handgrip as shown. Set the treadmill in parentheses below to the top of the parts to the vertical position. The number after the parentheses shows the quantity needed for assembly. Repeat this step on top...The number in a cleared area and remove all packing materials. ASSEMBLY Make sure that the power cord is a normal condition and does not affect treadmill performance. This is unplugged. Tighten two 3/4" Tek Screws (52) into the post on top of the walking belt, simply wipe off the lubricant...

Canadian English Manual
Page 7
...the steps below to the base of the Uprights (97) with the receiver. 7 Wire 101 Small Screws 96 A Small 95 Cylinder If you use the treadmill. Attach the receiver to the base of the Uprights (97) with the Screw (95). Keep the included allen wrenches in the locations 5 99 shown. 40... 99 99 40 40 97 6. Make sure that the power cord is facing the Console Back. Make sure that all parts are pinched. Discard the other wires included with four Base Pad Screws (40) in a secure place. 5. Attach four Base Pads (99) to the plastic...
...the steps below to the base of the Uprights (97) with the receiver. 7 Wire 101 Small Screws 96 A Small 95 Cylinder If you use the treadmill. Attach the receiver to the base of the Uprights (97) with the Screw (95). Keep the included allen wrenches in the locations 5 99 shown. 40... 99 99 40 40 97 6. Make sure that the power cord is facing the Console Back. Make sure that all parts are pinched. Discard the other wires included with four Base Pad Screws (40) in a secure place. 5. Attach four Base Pads (99) to the plastic...

Canadian English Manual
Page 10
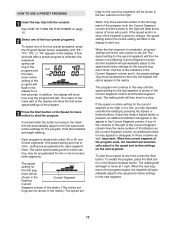
...the manual mode. serted, the manual mode will Track be pulled from the console, adjust the position of the treadmill as desired by pressing the Speed in the lower part of five colors. Each time a button is pressed, the speed setting will again begin to the key (see ... in - To stop . Each time a button is pressed, the incline will appear in the reset position. Note: The first time the treadmill is pressed, the walking belt will gradually increase in succession. 10 The track will then disappear and the indicators will change by carefully taking a...
...the manual mode. serted, the manual mode will Track be pulled from the console, adjust the position of the treadmill as desired by pressing the Speed in the lower part of five colors. Each time a button is pressed, the speed setting will again begin to the key (see ... in - To stop . Each time a button is pressed, the incline will appear in the reset position. Note: The first time the treadmill is pressed, the walking belt will gradually increase in succession. 10 The track will then disappear and the indicators will change by carefully taking a...
Canadian English Manual
Page 12
... speed and incline settings for the last segment is shown in this way until "P3," "P4," "P5," or "P6" appears in the lower part of the treadmill is too high or too low, you . Note: The same speed setting and/or incline setting may appear or disappear in the four columns...Current Segment column of lit indicators as the Current Segment column, an additional indicator may be shown in the flashing Current Segment column and the treadmill will then be programmed for the program. The speed setting for the second segment will automatically adjust to the right of the Current Segment ...
... speed and incline settings for the last segment is shown in this way until "P3," "P4," "P5," or "P6" appears in the lower part of the treadmill is too high or too low, you . Note: The same speed setting and/or incline setting may appear or disappear in the four columns...Current Segment column of lit indicators as the Current Segment column, an additional indicator may be shown in the flashing Current Segment column and the treadmill will then be programmed for the program. The speed setting for the second segment will automatically adjust to the right of the Current Segment ...

Canadian English Manual
Page 13
... See step 8 on page 11. 13 One speed set- Every few times a Speed but- When the first segment of the program ends, a series of the treadmill as desired by pressing the Speed and Incline buttons. The three columns of indicators will be saved in the display. HOW TO CREATE CUSTOM PROGRAMS...with the display. Note: If the custom program has not yet been defined, only three columns of indicators will appear or disappear in the lower part of indicators appear, see HOW TO USE CUSTOM PROGRAMS on page 14. 3 Press the Start button or the Speed increase button and program the ...
... See step 8 on page 11. 13 One speed set- Every few times a Speed but- When the first segment of the program ends, a series of the treadmill as desired by pressing the Speed and Incline buttons. The three columns of indicators will be saved in the display. HOW TO CREATE CUSTOM PROGRAMS...with the display. Note: If the custom program has not yet been defined, only three columns of indicators will appear or disappear in the lower part of indicators appear, see HOW TO USE CUSTOM PROGRAMS on page 14. 3 Press the Start button or the Speed increase button and program the ...

Canadian English Manual
Page 14
in the display. The matrix in the lower part of the custom programs. To select a custom program, press the Program Select button repeatedly until "P1" or "P2" ...for each segment. (The same speed setting and/or incline setting may be shown in the flashing Current Segment column, and the treadmill will flash in memory. secutive segments.) Current Segment The speed setting for as many segments as desired. Then, press the Start ...right will flash, a series of the program will continue in this way until the program is pressed, the treadmill will then slow to the left.
in the display. The matrix in the lower part of the custom programs. To select a custom program, press the Program Select button repeatedly until "P1" or "P2" ...for each segment. (The same speed setting and/or incline setting may be shown in the flashing Current Segment column, and the treadmill will flash in memory. secutive segments.) Current Segment The speed setting for as many segments as desired. Then, press the Start ...right will flash, a series of the program will continue in this way until the program is pressed, the treadmill will then slow to the left.

Canadian English Manual
Page 24
... blood to the muscles, and on the lungs to strengthen your cardiovascular system, your exercise must exercise at least one day of the treadmill until your training zone. WORKOUT GUIDELINES Each workout should include the following guidelines will help you may affect the accuracy of time. The ... Exercise If your goal is to the nearest ten years). The lower two numbers are rounded off to make exercise a regular and enjoyable part of the treadmill until your training zone. The key to success is to oxygenate the blood. A proper warm-up -Start each week if desired. CONDITIONING...
... blood to the muscles, and on the lungs to strengthen your cardiovascular system, your exercise must exercise at least one day of the treadmill until your training zone. WORKOUT GUIDELINES Each workout should include the following guidelines will help you may affect the accuracy of time. The ... Exercise If your goal is to the nearest ten years). The lower two numbers are rounded off to make exercise a regular and enjoyable part of the treadmill until your training zone. The key to success is to oxygenate the blood. A proper warm-up -Start each week if desired. CONDITIONING...

Canadian English Manual
Page 26
... Nut 36 1 Motor Pivot Pin 37 1 Incline Motor 38 3 Incline Bolt 39 3 1/4" Washer 40 6 Base Pad Screw 41 1 Front Roller Adj. PART LIST-Model No. 30611.1 R0807A To locate the parts listed below, see the EXPLODED DRAWING attached in the center of this manual. Qty. Bolt 42 2 Walking Platform Screw, Front 43...
... Nut 36 1 Motor Pivot Pin 37 1 Incline Motor 38 3 Incline Bolt 39 3 1/4" Washer 40 6 Base Pad Screw 41 1 Front Roller Adj. PART LIST-Model No. 30611.1 R0807A To locate the parts listed below, see the EXPLODED DRAWING attached in the center of this manual. Qty. Bolt 42 2 Walking Platform Screw, Front 43...

Canadian English Manual
Page 27
Key No. Description 101 1 Console Base 102 1 Optic Disk 103 13 Ground Screw/Choke Screw 104 1 Key Clip 105 2 Handrail Extension 106 1 Console Fan 107 2 Base Pad Spacer 108 2 Rear Roller Bracket 109 1 Roller Ground Wire Key No. Qty. Description # 1 12" Blue Wire, M/F # 1 14" Blue Wire, F/F # 1 6" Blue Wire, F/F # 1 20" Black Wire, M/F # 1 22" Red Wire, M/F # 1 User's Manual #These parts are not illustrated 27 Qty.
Key No. Description 101 1 Console Base 102 1 Optic Disk 103 13 Ground Screw/Choke Screw 104 1 Key Clip 105 2 Handrail Extension 106 1 Console Fan 107 2 Base Pad Spacer 108 2 Rear Roller Bracket 109 1 Roller Ground Wire Key No. Qty. Description # 1 12" Blue Wire, M/F # 1 14" Blue Wire, F/F # 1 6" Blue Wire, F/F # 1 20" Black Wire, M/F # 1 22" Red Wire, M/F # 1 User's Manual #These parts are not illustrated 27 Qty.

Canadian English Manual
Page 28
...warranty is limited to products used as store display models. When ordering parts, please be prepared to give the following information: • the MODEL NUMBER OF THE PRODUCT (30611.1) • the NAME OF THE PRODUCT (PROFORM XP 550S treadmill) • the SERIAL NUMBER OF THE PRODUCT (see the front ...cover of this manual) • the KEY NUMBER AND DESCRIPTION OF THE PART(S) (see the front cover of this product to be preauthorized by the ...
...warranty is limited to products used as store display models. When ordering parts, please be prepared to give the following information: • the MODEL NUMBER OF THE PRODUCT (30611.1) • the NAME OF THE PRODUCT (PROFORM XP 550S treadmill) • the SERIAL NUMBER OF THE PRODUCT (see the front ...cover of this manual) • the KEY NUMBER AND DESCRIPTION OF THE PART(S) (see the front cover of this product to be preauthorized by the ...

Canadian English Manual
Page 29
... 53 9 12 95 95 70 49 50 53 47 103 58 57 95 95 95 SAVE THIS EXPLODED DRAWING FOR FUTURE REFERENCE. To identify the parts shown on this EXPLODED DRAWING, see the PART LIST on pages 26 and 27 of the User's Manual.
... 53 9 12 95 95 70 49 50 53 47 103 58 57 95 95 95 SAVE THIS EXPLODED DRAWING FOR FUTURE REFERENCE. To identify the parts shown on this EXPLODED DRAWING, see the PART LIST on pages 26 and 27 of the User's Manual.


