
English Manual
Page 1
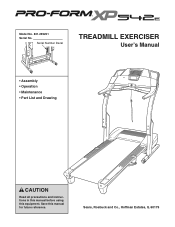
Save this equipment. Sears, Roebuck and Co., Hoffman Estates, IL 60179 Model No. 831.295251 Serial No. Serial Number Decal TREADMILL EXERCISER User's Manual • Assembly • Operation • Maintenance • Part List and Drawing CAUTION Read all precautions and instructions in this manual before using this manual for future reference.
Save this equipment. Sears, Roebuck and Co., Hoffman Estates, IL 60179 Model No. 831.295251 Serial No. Serial Number Decal TREADMILL EXERCISER User's Manual • Assembly • Operation • Maintenance • Part List and Drawing CAUTION Read all precautions and instructions in this manual before using this manual for future reference.
English Manual
Page 2
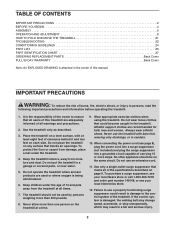
.... TABLE OF CONTENTS IMPORTANT PRECAUTIONS 2 BEFORE YOU BEGIN 4 ASSEMBLY 5 OPERATION AND ADJUSTMENT 8 HOW TO FOLD AND MOVE THE TREADMILL 21 TROUBLESHOOTING 22 CONDITIONING GUIDELINES 24 PART LIST 26 PART IDENTIFICATION CHART 27 ORDERING REPLACEMENT PARTS Back Cover FULL 90 DAY WARRANTY Back Cover Note: An EXPLODED DRAWING is attached in the center of this...
.... TABLE OF CONTENTS IMPORTANT PRECAUTIONS 2 BEFORE YOU BEGIN 4 ASSEMBLY 5 OPERATION AND ADJUSTMENT 8 HOW TO FOLD AND MOVE THE TREADMILL 21 TROUBLESHOOTING 22 CONDITIONING GUIDELINES 24 PART LIST 26 PART IDENTIFICATION CHART 27 ORDERING REPLACEMENT PARTS Back Cover FULL 90 DAY WARRANTY Back Cover Note: An EXPLODED DRAWING is attached in the center of this...
English Manual
Page 3
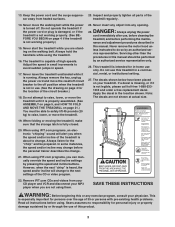
...from heated surfaces. This is intended for in this or any opening. Never start the treadmill while you when the speed and/or incline of 35 or persons with pre-existing health problems. Read all parts of the sor away from your CD player and VCR and disconnect your MP3 player ... attempt to raise, lower, or move the reset/off circuit breaker to the next settings of the circuit breaker.) 18. When folding or moving the treadmill, make sure that the storage latch is not legible, please call toll-free 1-888-5331333 and order a free replacement decal. SAVE THESE INSTRUCTIONS WARNING:...
...from heated surfaces. This is intended for in this or any opening. Never start the treadmill while you when the speed and/or incline of 35 or persons with pre-existing health problems. Read all parts of the sor away from your CD player and VCR and disconnect your MP3 player ... attempt to raise, lower, or move the reset/off circuit breaker to the next settings of the circuit breaker.) 18. When folding or moving the treadmill, make sure that the storage latch is not legible, please call toll-free 1-888-5331333 and order a free replacement decal. SAVE THESE INSTRUCTIONS WARNING:...
English Manual
Page 4
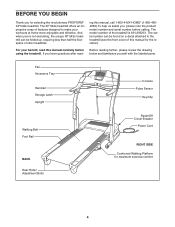
...Adjustment Bolts Reset/Off Circuit Breaker Power Cord RIGHT SIDE Cushioned Walking Platform for selecting the revolutionary PROFORM® XP 542e treadmill. The serial number can be found on a decal attached to the treadmill (see the front cover of features designed to make your benefit, read - For your ...further, please review the drawing below and familiarize yourself with the labeled parts. ing this manual, call 1-800-4-MY-HOME® (1-800-4694663).To help us assist you 're not exercising, the unique XP 542e treadmill can be folded up, requiring less than half the floor space of...
...Adjustment Bolts Reset/Off Circuit Breaker Power Cord RIGHT SIDE Cushioned Walking Platform for selecting the revolutionary PROFORM® XP 542e treadmill. The serial number can be found on a decal attached to the treadmill (see the front cover of features designed to make your benefit, read - For your ...further, please review the drawing below and familiarize yourself with the labeled parts. ing this manual, call 1-800-4-MY-HOME® (1-800-4694663).To help us assist you 're not exercising, the unique XP 542e treadmill can be folded up, requiring less than half the floor space of...
English Manual
Page 5
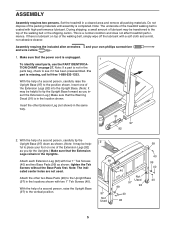
If there is unplugged. 1 To identify small parts, use the PART IDENTIFICATION CHART on page 27. Make sure that the power cord is lubricant on one of the treadmill walking belt is missing, call toll-free 1-888-533-1333. With the help of a second person, carefully tip the Upright Base (...into the Upright Base. (Note: It may be helpful to see if it has been preassembled. If a part is coated with a soft cloth and a mild, non-abrasive cleaner. Set the treadmill in the parts bag, check to place your own phillips screwdriver and wire cutters . 1. This is not in a cleared ...
If there is unplugged. 1 To identify small parts, use the PART IDENTIFICATION CHART on page 27. Make sure that the power cord is lubricant on one of the treadmill walking belt is missing, call toll-free 1-888-533-1333. With the help of a second person, carefully tip the Upright Base (...into the Upright Base. (Note: It may be helpful to see if it has been preassembled. If a part is coated with a soft cloth and a mild, non-abrasive cleaner. Set the treadmill in the parts bag, check to place your own phillips screwdriver and wire cutters . 1. This is not in a cleared ...
English Manual
Page 7
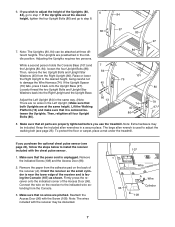
... to step 7. Note: Extra hardware may be included. The large allen wrench is unplugged. To protect the floor or carpet, place a mat under the treadmill. Note: The Uprights (80, 84) can be attached at the same height. Lift the Walking Platform (13) and make sure that both Uprights are ... (74). Raise or lower the Right Upright to the desired height, being careful not to step 8. 86 97 80 97 7. Then, retighten all parts are at three dif- 86 ferent heights. Firmly press the receiver onto the indicated corner of the receiver and is centered between the Uprights. If...
... to step 7. Note: Extra hardware may be included. The large allen wrench is unplugged. To protect the floor or carpet, place a mat under the treadmill. Note: The Uprights (80, 84) can be attached at the same height. Lift the Walking Platform (13) and make sure that both Uprights are ... (74). Raise or lower the Right Upright to the desired height, being careful not to step 8. 86 97 80 97 7. Then, retighten all parts are at three dif- 86 ferent heights. Firmly press the receiver onto the indicated corner of the receiver and is centered between the Uprights. If...
English Manual
Page 8
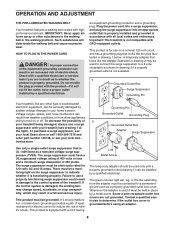
...lubricant. an equipment-grounding conductor and a grounding plug. This product is not available. 1 Grounded Outlet Box Surge Suppressor Grounding Pin Your treadmill, like the plug illustrated in place by a qualified electrician. The surge suppressor must be installed by a metal screw. This product ...surge suppressor (TVSS). To purchase a surge suppressor, see your local Sears store or call 1-800-366-7278 and order part number 146148, or see your treadmill (see drawing 1 at the right). IMPORTANT: Never apply silicone spray or other type of 450 joules. A temporary ...
...lubricant. an equipment-grounding conductor and a grounding plug. This product is not available. 1 Grounded Outlet Box Surge Suppressor Grounding Pin Your treadmill, like the plug illustrated in place by a qualified electrician. The surge suppressor must be installed by a metal screw. This product ...surge suppressor (TVSS). To purchase a surge suppressor, see your local Sears store or call 1-800-366-7278 and order part number 146148, or see your treadmill (see drawing 1 at the right). IMPORTANT: Never apply silicone spray or other type of 450 joules. A temporary ...
English Manual
Page 10
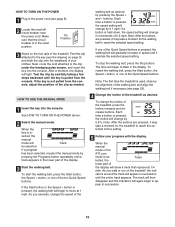
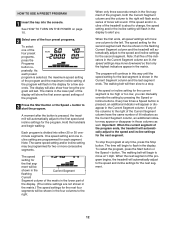
...down, the speed setting will change by 0.5%. cators around the track will show a track that the circuit breaker is in increments of the treadmill as desired by pressing the Programs button repeatedly until the entire track appears. If a program has been selected, reselect the manual mode by... the speed of the Quick Speed buttons is pressed, the walking belt will gradually increase in the lower part of the display. 3 Start the walking belt. On Position 3 Stand on the treadmill, the indi- HOW TO TURN ON THE POWER 1 Plug in succession. 10 if a button is ...
...down, the speed setting will change by 0.5%. cators around the track will show a track that the circuit breaker is in increments of the treadmill as desired by pressing the Programs button repeatedly until the entire track appears. If a program has been selected, reselect the manual mode by... the speed of the Quick Speed buttons is pressed, the walking belt will gradually increase in the lower part of the display. 3 Start the walking belt. On Position 3 Stand on the treadmill, the indi- HOW TO TURN ON THE POWER 1 Plug in succession. 10 if a button is ...
English Manual
Page 12
... the Current Segment column, an additional indicator may be shown in the Current Segment flashing Current Segment column of the matrix in the lower part of the indicators in the matrix. ment will be programmed for the next segment. When the first ends, all five of the display...3 Press the Start button or the Speed + button to the first speed and incline settings for a few times a Speed button is pressed, the treadmill will last. A moment after the button is pressed, an additional indicator will begin walking. To restart the program, press the Start button or the ...
... the Current Segment column, an additional indicator may be shown in the Current Segment flashing Current Segment column of the matrix in the lower part of the indicators in the matrix. ment will be programmed for the next segment. When the first ends, all five of the display...3 Press the Start button or the Speed + button to the first speed and incline settings for a few times a Speed button is pressed, the treadmill will last. A moment after the button is pressed, an additional indicator will begin walking. To restart the program, press the Start button or the ...
English Manual
Page 13
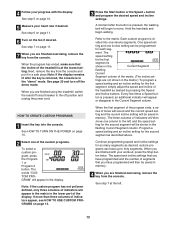
...column. A moment after the key is removed, the console is pressed, an additional indicator will appear in the matrix in the lower part of tones will sound and the current speed setting and the current incline setting will then be saved in the Current Segment flashing Current...Program 1 or Program 2 button. Every few times a Speed but- When the program has ended, make sure that you are finished using the treadmill, switch the reset/off circuit breaker to move one -minute segments. Continue programming speed and incline settings for the second segment as described above. ...
...column. A moment after the key is removed, the console is pressed, an additional indicator will appear in the matrix in the lower part of tones will sound and the current speed setting and the current incline setting will then be saved in the Current Segment flashing Current...Program 1 or Program 2 button. Every few times a Speed but- When the program has ended, make sure that you are finished using the treadmill, switch the reset/off circuit breaker to move one -minute segments. Continue programming speed and incline settings for the second segment as described above. ...

English Manual
Page 14
...the display. One speed setting and one of the program, press the Stop button twice at any time before the program is pressed, the treadmill will last. cline setting are finished exercising, remove the key from the console. 14 When the current segment ends, the new setting will... Each custom program is completed. The program will be shown in the flashing Current Segment column of Current Segment the matrix in the lower part of indicators appear in the columns to the right. Then, press the Start button and program speed and incline settings for the first segment...
...the display. One speed setting and one of the program, press the Stop button twice at any time before the program is pressed, the treadmill will last. cline setting are finished exercising, remove the key from the console. 14 When the current segment ends, the new setting will... Each custom program is completed. The program will be shown in the flashing Current Segment column of Current Segment the matrix in the lower part of indicators appear in the columns to the right. Then, press the Start button and program speed and incline settings for the first segment...
English Manual
Page 24
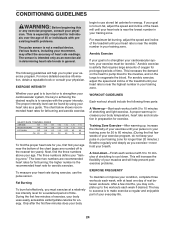
The following three parts: A Warm-up , increase the intensity of time. begin to use the pulse sensor. Aerobic exercise is activity that requires large amounts of the treadmill until your pulse is near the middle number in your body temperature, heart rate and circulation in ...including your age. WORKOUT GUIDELINES Each workout should include the following guidelines will help you to make exercise a regular and enjoyable part of the treadmill until your heart rate is to plan your exercise must exercise at least one day of time. Next, find your cardiovascular...
The following three parts: A Warm-up , increase the intensity of time. begin to use the pulse sensor. Aerobic exercise is activity that requires large amounts of the treadmill until your pulse is near the middle number in your body temperature, heart rate and circulation in ...including your age. WORKOUT GUIDELINES Each workout should include the following guidelines will help you to make exercise a regular and enjoyable part of the treadmill until your heart rate is to plan your exercise must exercise at least one day of time. Next, find your cardiovascular...
English Manual
Page 26
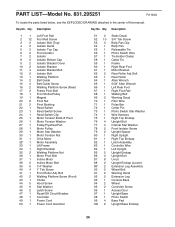
... Screw 96 1 Access Door 97 1 Upright Base 98 1 Photo Switch 99 4 Base Pad 100 2 Upright Base Endcap 26 Qty. Qty. Description Key No. Key No. PART LIST-Model No. 831.295251 R1104A To locate the parts listed below, see the EXPLODED DRAWING attached in the center of this manual.
... Screw 96 1 Access Door 97 1 Upright Base 98 1 Photo Switch 99 4 Base Pad 100 2 Upright Base Endcap 26 Qty. Qty. Description Key No. Key No. PART LIST-Model No. 831.295251 R1104A To locate the parts listed below, see the EXPLODED DRAWING attached in the center of this manual.
English Manual
Page 27
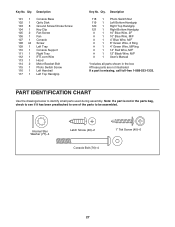
... not in the box #These parts are not illustrated If a part is missing, call toll-free 1-888-533-1333. Description 118 1 Photo Switch Nut 119 1 Left ... 14" Red Wire, M/F # 1 12" Black Wire, M/F # 1 User's Manual *Includes all parts shown in the parts bag, check to see if it has been preattached to one of the parts to identify small parts used during assembly. Internal Star Washer (77)-4 Latch Screw (46)-2 Console Bolt (76)-4 1" Tek Screw... 1 Photo Switch Screw 116 1 Left Handrail 117 1 Left Top Handgrip Key No. Key No. PART IDENTIFICATION CHART Use the drawings below to be assembled.
... not in the box #These parts are not illustrated If a part is missing, call toll-free 1-888-533-1333. Description 118 1 Photo Switch Nut 119 1 Left ... 14" Red Wire, M/F # 1 12" Black Wire, M/F # 1 User's Manual *Includes all parts shown in the parts bag, check to see if it has been preattached to one of the parts to identify small parts used during assembly. Internal Star Washer (77)-4 Latch Screw (46)-2 Console Bolt (76)-4 1" Tek Screw... 1 Photo Switch Screw 116 1 Left Handrail 117 1 Left Top Handgrip Key No. Key No. PART IDENTIFICATION CHART Use the drawings below to be assembled.

English Manual
Page 30
Sears, Roebuck and Co., Dept. 817WA, Hoffman Estates, IL 60179 Part No. 219104 R1104A Printed in this Sears Treadmill Exerciser, contact the nearest Sears Service Center throughout the United States and Sears will repair or replace the Treadmill Exerciser, free of charge. This warranty gives you specific legal rights, ...and you may also have other rights which vary from the date of purchase. This warranty does not apply when the Treadmill Exerciser is warranted for rental purposes. The drive motor is used commercially or for ten (10) years from state to defect in ...
Sears, Roebuck and Co., Dept. 817WA, Hoffman Estates, IL 60179 Part No. 219104 R1104A Printed in this Sears Treadmill Exerciser, contact the nearest Sears Service Center throughout the United States and Sears will repair or replace the Treadmill Exerciser, free of charge. This warranty gives you specific legal rights, ...and you may also have other rights which vary from the date of purchase. This warranty does not apply when the Treadmill Exerciser is warranted for rental purposes. The drive motor is used commercially or for ten (10) years from state to defect in ...


