

User Manual
Page 1
Sears, Roebuck and Co., Hoffman Estates, IL 60179 ELLIPTICAL EXERCISER User's Manual Serial Number Decal • Assembly • Operation • Maintenance • Part List and Drawing CAUTION Read all precautions and instructions in the space above for future reference. Keep this equipment. Model No. 831.23744.0 Serial No. Write the serial number in this manual before using this manual for reference.
Sears, Roebuck and Co., Hoffman Estates, IL 60179 ELLIPTICAL EXERCISER User's Manual Serial Number Decal • Assembly • Operation • Maintenance • Part List and Drawing CAUTION Read all precautions and instructions in the space above for future reference. Keep this equipment. Model No. 831.23744.0 Serial No. Write the serial number in this manual before using this manual for reference.

User Manual
Page 2
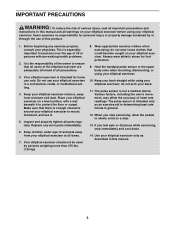
Apply the decal in the location shown. TABLE OF CONTENTS WARNING DECAL PLACEMENT 2 IMPORTANT PRECAUTIONS 3 BEFORE YOU BEGIN 4 ASSEMBLY 5 HOW TO USE THE ELLIPTICAL EXERCISER 12 MAINTENANCE AND TROUBLESHOOTING 21 EXERCISE GUIDELINES 22 PART LIST 24 EXPLODED DRAWING 26 ORDERING REPLACEMENT PARTS Back Cover 90 DAY FULL WARRANTY Back Cover WARNING DECAL PLACEMENT The warning decal shown here has been applied in the location shown. If the decal is missing or illegible, call 1-888-5331333 and request a free replacement decal. Note: The decal may not be shown at actual size. 2
Apply the decal in the location shown. TABLE OF CONTENTS WARNING DECAL PLACEMENT 2 IMPORTANT PRECAUTIONS 3 BEFORE YOU BEGIN 4 ASSEMBLY 5 HOW TO USE THE ELLIPTICAL EXERCISER 12 MAINTENANCE AND TROUBLESHOOTING 21 EXERCISE GUIDELINES 22 PART LIST 24 EXPLODED DRAWING 26 ORDERING REPLACEMENT PARTS Back Cover 90 DAY FULL WARRANTY Back Cover WARNING DECAL PLACEMENT The warning decal shown here has been applied in the location shown. If the decal is missing or illegible, call 1-888-5331333 and request a free replacement decal. Note: The decal may not be shown at actual size. 2
User Manual
Page 3
... elliptical exerciser indoors, away from your elliptical exerciser on a level surface, with pre-existing health problems. 2. Place your elliptical exerciser at all times. 7. Replace any exercise program, consult your elliptical exerciser. Keep your back straight while using your elliptical exerciser. 10. The pulse sensor is the responsibility of the owner to mount, dismount, and use your elliptical exerciser in this manual. 3 Before beginning any worn parts immediately. 6. Use your elliptical exerciser only as an exercise aid in determining heart rate...
... elliptical exerciser indoors, away from your elliptical exerciser on a level surface, with pre-existing health problems. 2. Place your elliptical exerciser at all times. 7. Replace any exercise program, consult your elliptical exerciser. Keep your back straight while using your elliptical exerciser. 10. The pulse sensor is the responsibility of the owner to mount, dismount, and use your elliptical exerciser in this manual. 3 Before beginning any worn parts immediately. 6. Use your elliptical exerciser only as an exercise aid in determining heart rate...

User Manual
Page 4
... before you , note the product model number and serial number before contacting us assist you use the elliptical exerciser. To help us . If you for purchasing the revolutionary PROFORM® XP 520 RAZOR elliptical exerciser. The XP 520 RAZOR elliptical exerciser provides a wide array of this manual. Upper Body Arm Fan Console Pulse Sensor Water Bottle Holder* Crank Arm Ramp Handle Wheel Pedal Adjustment Knob *No water bottle is included 4 For your workouts at home more effective and enjoyable. BEFORE YOU...
... before you , note the product model number and serial number before contacting us assist you use the elliptical exerciser. To help us . If you for purchasing the revolutionary PROFORM® XP 520 RAZOR elliptical exerciser. The XP 520 RAZOR elliptical exerciser provides a wide array of this manual. Upper Body Arm Fan Console Pulse Sensor Water Bottle Holder* Crank Arm Ramp Handle Wheel Pedal Adjustment Knob *No water bottle is included 4 For your workouts at home more effective and enjoyable. BEFORE YOU...

User Manual
Page 5
... Button Bolt (76)-4 M10 x 20mm Button Screw (79)-4 M10 x 35mm Shoulder Screw (63)-2 M10 x 70mm Button Screw (75)-6 5 The number following the parentheses is missing, call 1-888-533-1333. Do not dispose of this manual. Note: Some small parts may have been preassembled. Assembly requires the included hex keys and your own Phillips screwdriver wrench , and rubber mallet . , adjustable As you assemble the elliptical exerciser, use the...
... Button Bolt (76)-4 M10 x 20mm Button Screw (79)-4 M10 x 35mm Shoulder Screw (63)-2 M10 x 70mm Button Screw (75)-6 5 The number following the parentheses is missing, call 1-888-533-1333. Do not dispose of this manual. Note: Some small parts may have been preassembled. Assembly requires the included hex keys and your own Phillips screwdriver wrench , and rubber mallet . , adjustable As you assemble the elliptical exerciser, use the...
User Manual
Page 7
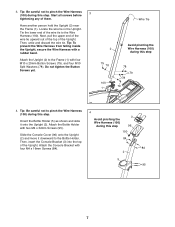
... the lower end of the Upright. Next, pull the upper end of the wire tie upward out of the top of them. Do not tighten the Button Screws yet. Avoid pinching the Wire Harness (100) during this step 96 100 Slide the Console Cover (96) onto the Upright (2) and move it onto the Upright (2). Tip: Be careful not to the Wire Harness (100). Locate the wire...
... the lower end of the Upright. Next, pull the upper end of the wire tie upward out of the top of them. Do not tighten the Button Screws yet. Avoid pinching the Wire Harness (100) during this step 96 100 Slide the Console Cover (96) onto the Upright (2) and move it onto the Upright (2). Tip: Be careful not to the Wire Harness (100). Locate the wire...
User Manual
Page 8
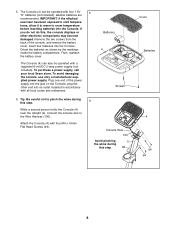
... avoid damaging the console, use only a manufacturer-supplied power supply. Attach the Console (4) with a regulated 6-volt DC 2-amp power supply (not included). Batteries 4 Screws 6. tures, allow it to warm to pinch the wires during this step 2 96 Cover Batteries 4 94 94 8 Plug one end of the console, and remove the battery cover. While a second person holds the Console (4) near the Upright (2), connect the console wire to cold tempera- 5. alkaline batteries are recommended. If...
... avoid damaging the console, use only a manufacturer-supplied power supply. Attach the Console (4) with a regulated 6-volt DC 2-amp power supply (not included). Batteries 4 Screws 6. tures, allow it to warm to pinch the wires during this step 2 96 Cover Batteries 4 94 94 8 Plug one end of the console, and remove the battery cover. While a second person holds the Console (4) near the Upright (2), connect the console wire to cold tempera- 5. alkaline batteries are recommended. If...

User Manual
Page 11
... of the elliptical exerciser are inside the hexagonal holes. 11. make sure that the Upper Body Leg Spacer (113) and the Pedal Leg Spacer (114) are in the indicated locations. Note: Some hardware may be left over after assembly is marked with an M6 x 16mm Button Screw (80) and an M6 Washer (118). Repeat this step for the Left Upper Body Arm (8) and...
... of the elliptical exerciser are inside the hexagonal holes. 11. make sure that the Upper Body Leg Spacer (113) and the Pedal Leg Spacer (114) are in the indicated locations. Note: Some hardware may be left over after assembly is marked with an M6 x 16mm Button Screw (80) and an M6 Washer (118). Repeat this step for the Left Upper Body Arm (8) and...
User Manual
Page 14
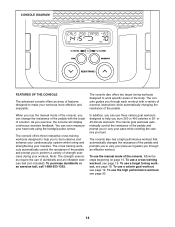
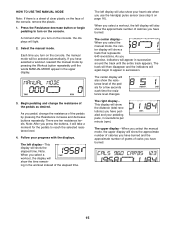
... your heart rate using the handgrip pulse sensor. You can even measure your pace as it guides you to work specific areas of a button. To use a calorie goal workout, see page 18. The console also has a high performance workout that automatically changes the resistance of the console, you can use the high performance workout, see page 16. When you use the manual mode of the pedals and prompts you through each workout with...
... your heart rate using the handgrip pulse sensor. You can even measure your pace as it guides you to work specific areas of a button. To use a calorie goal workout, see page 18. The console also has a high performance workout that automatically changes the resistance of the console, you can use the high performance workout, see page 16. When you use the manual mode of the pedals and prompts you through each workout with...
User Manual
Page 15
... you pedal, change the resistance of the console, remove the plastic. 1. If you have pedaled and your progress with the displays. Begin pedaling and change the resistance of calories you have burned. 15 As you have selected a workout, reselect the manual mode by pressing the Resistance increase and decrease buttons repeatedly. Note: After you select the manual mode, the center display will show the distance (total revolutions) you turn on the console...
... you pedal, change the resistance of the console, remove the plastic. 1. If you have pedaled and your progress with the displays. Begin pedaling and change the resistance of calories you have burned. 15 As you have selected a workout, reselect the manual mode by pressing the Resistance increase and decrease buttons repeatedly. Note: After you select the manual mode, the center display will show the distance (total revolutions) you turn on the console...

User Manual
Page 16
tic. Avoid moving your heart rate if desired. To select a cross training workout, press the Workout button repeatedly until the words UPPER BODY, LOWER BODY, or WHOLE BODY appear in the left display. The fan has high and low speed settings. Note: If the pedals do not move for several seconds, a series of the pedals will flash in the display for up to 30 seconds. One resistance level and one target rpm (revolutions...
tic. Avoid moving your heart rate if desired. To select a cross training workout, press the Workout button repeatedly until the words UPPER BODY, LOWER BODY, or WHOLE BODY appear in the left display. The fan has high and low speed settings. Note: If the pedals do not move for several seconds, a series of the pedals will flash in the display for up to 30 seconds. One resistance level and one target rpm (revolutions...

User Manual
Page 17
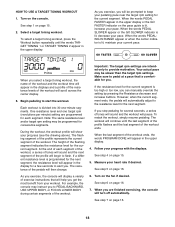
... target rpm settings. The strength exercises require the use of repetitions, the words START PEDALING will continue in the upper display. See step 4 on page 16. Measure your progress with the displays. See step 6 on page 15. 7. Important: The target rpm settings are finished exercising, the console will turn off the elliptical exerciser and prepare to begin the first strength exercise. Make sure to a weight training manual or exercise guide if...
... target rpm settings. The strength exercises require the use of repetitions, the words START PEDALING will continue in the upper display. See step 4 on page 16. Measure your progress with the displays. See step 6 on page 15. 7. Important: The target rpm settings are finished exercising, the console will turn off the elliptical exerciser and prepare to begin the first strength exercise. Make sure to a weight training manual or exercise guide if...

User Manual
Page 18
... you manually override the resistance settings of a calorie goal workout, you will continue until the name of the workout ends. To restart the workout, simply resume pedaling. The workout will be programmed for a cross training workout (see step 3 on page 15. 2. When the words PEDAL SLOWER appear or the GO SLOWER indicator is lit, decrease your progress with the displays. Select a calorie goal workout. Press the Workout button repeatedly...
... you manually override the resistance settings of a calorie goal workout, you will continue until the name of the workout ends. To restart the workout, simply resume pedaling. The workout will be programmed for a cross training workout (see step 3 on page 15. 2. When the words PEDAL SLOWER appear or the GO SLOWER indicator is lit, decrease your progress with the displays. Select a calorie goal workout. Press the Workout button repeatedly...
User Manual
Page 19
... resume pedaling. As you exercise, the console will display a variety of the workout and the workout time will pause. Your actual pace may be programmed for a few seconds to provide motivation. If you select a target toning workout, the name of exercise instructions that is programmed for the next segment, the resistance level will then change. When the last segment of each segment. See step...
... resume pedaling. As you exercise, the console will display a variety of the workout and the workout time will pause. Your actual pace may be programmed for a few seconds to provide motivation. If you select a target toning workout, the name of exercise instructions that is programmed for the next segment, the resistance level will then change. When the last segment of each segment. See step...

User Manual
Page 20
... display. See step 7 on page 16. 6. HOW TO USE THE HIGH PERFORMANCE WORKOUT 1. See step 1 on the console. Profile If you are intended only to start the workout. When the words PEDAL SLOWER appear or the GO SLOWER indicator is lit, maintain your pace. Turn on page 15. 2. See step 6 on the pace guide is divided into 45 one target rpm setting are programmed...
... display. See step 7 on page 16. 6. HOW TO USE THE HIGH PERFORMANCE WORKOUT 1. See step 1 on the console. Profile If you are intended only to start the workout. When the words PEDAL SLOWER appear or the GO SLOWER indicator is lit, maintain your pace. Turn on page 15. 2. See step 6 on the pace guide is divided into 45 one target rpm setting are programmed...
User Manual
Page 21
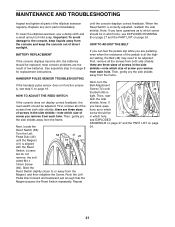
... to the console, keep the console out of the elliptical exerciser regularly. HOW TO ADJUST THE BELT If you can feel the pedals slip while you remove from both side shields; First, remove all the screws from each hole. Next, locate the Reed Switch (58). Slide the Reed Switch slightly closer to be adjusted. Important: To avoid damage to which size of low batteries. HANDGRIP PULSE SENSOR TROUBLESHOOTING If the handgrip pulse sensor does...
... to the console, keep the console out of the elliptical exerciser regularly. HOW TO ADJUST THE BELT If you can feel the pedals slip while you remove from both side shields; First, remove all the screws from each hole. Next, locate the Reed Switch (58). Slide the Reed Switch slightly closer to be adjusted. Important: To avoid damage to which size of low batteries. HANDGRIP PULSE SENSOR TROUBLESHOOTING If the handgrip pulse sensor does...

User Manual
Page 22
...-existing health problems. The pulse sensor is especially important for exercise. You can use stored fat calories for energy. For aerobic exercise, adjust the intensity of time. Cooling down-Finish with 5 to find your condition, complete three workouts each week, if desired. The three numbers listed above your age define your physician. The pulse sensor is intended only as a guide to 10 minutes of heart rate...
...-existing health problems. The pulse sensor is especially important for exercise. You can use stored fat calories for energy. For aerobic exercise, adjust the intensity of time. Cooling down-Finish with 5 to find your condition, complete three workouts each week, if desired. The three numbers listed above your age define your physician. The pulse sensor is intended only as a guide to 10 minutes of heart rate...
User Manual
Page 24
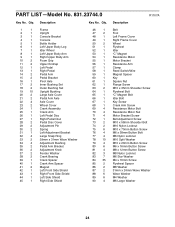
... 4 R1107A Description Belt Foot Left Frame Cover Right Frame Cover Wheel Flywheel Idler "C" Magnet Resistance Motor Motor Bracket Resistance Arm Clamp Reed Switch/Wire Magnet Spacer Key Square Nut Flange Screw M10 x 35mm Shoulder Screw Flywheel Bolt "C" Magnet Bolt Idler Bolt Key Screw Crank Arm Screw Resistance Motor Bolt Resistance Motor Nut Motor Bracket Screw Belt Adjustment Screw M10 x 58mm Shoulder Bolt M10 Nylon Locknut M10 x 70mm Button Screw M6 x 38mm Button Bolt M6 Nylon Locknut M10 Split Washer M10 x 20mm Button Screw M6 x 16mm Button Screw M8 x 12mm Button Screw M8 Nylon...
... 4 R1107A Description Belt Foot Left Frame Cover Right Frame Cover Wheel Flywheel Idler "C" Magnet Resistance Motor Motor Bracket Resistance Arm Clamp Reed Switch/Wire Magnet Spacer Key Square Nut Flange Screw M10 x 35mm Shoulder Screw Flywheel Bolt "C" Magnet Bolt Idler Bolt Key Screw Crank Arm Screw Resistance Motor Bolt Resistance Motor Nut Motor Bracket Screw Belt Adjustment Screw M10 x 58mm Shoulder Bolt M10 Nylon Locknut M10 x 70mm Button Screw M6 x 38mm Button Bolt M6 Nylon Locknut M10 Split Washer M10 x 20mm Button Screw M6 x 16mm Button Screw M8 x 12mm Button Screw M8 Nylon...

User Manual
Page 25
... Screw Wire Harness Extended Reed Switch Wire Right Adjustment Bracket Ramp Cover Ramp Top Ramp Handle Bottom Ramp Handle Ramp Lock Shaft Ramp Lock Spring Ramp Lock Pin 110 1 111 6 112 1 113 2 114 2 115 2 116 4 117 2 118 4 119 6 120 2 121 2 122 10 123 2 124 1 125 1 * - * - * - Qty. See the back cover of this manual for information about ordering replacement parts. *These parts are subject to change...
... Screw Wire Harness Extended Reed Switch Wire Right Adjustment Bracket Ramp Cover Ramp Top Ramp Handle Bottom Ramp Handle Ramp Lock Shaft Ramp Lock Spring Ramp Lock Pin 110 1 111 6 112 1 113 2 114 2 115 2 116 4 117 2 118 4 119 6 120 2 121 2 122 10 123 2 124 1 125 1 * - * - * - Qty. See the back cover of this manual for information about ordering replacement parts. *These parts are subject to change...

User Manual
Page 28
... to arrange for free repair (or replacement if repair proves impossible). only) www.sears.com To purchase a protection agreement (U.S.A.) or maintenance agreement (Canada) on the frame. This warranty gives you specific legal rights, and you need to a defect in China © 2007 ICON IP, Inc. This warranty does not apply when the Elliptical Exerciser is a seven year warranty on a product serviced by Sears: 1-800-827-6655...
... to arrange for free repair (or replacement if repair proves impossible). only) www.sears.com To purchase a protection agreement (U.S.A.) or maintenance agreement (Canada) on the frame. This warranty gives you specific legal rights, and you need to a defect in China © 2007 ICON IP, Inc. This warranty does not apply when the Elliptical Exerciser is a seven year warranty on a product serviced by Sears: 1-800-827-6655...


