
Uk Manual
Page 1
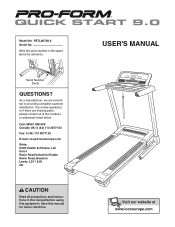
Model No. As a manufacturer, we are missing parts, please contact us at the numbers or addresses listed below: Call: 08457 089 009 Outside UK: 0 (44) 113 3877133 Fax: 0 (44) 113 3877125 E-mail: csuk@...
Model No. As a manufacturer, we are missing parts, please contact us at the numbers or addresses listed below: Call: 08457 089 009 Outside UK: 0 (44) 113 3877133 Fax: 0 (44) 113 3877125 E-mail: csuk@...
Uk Manual
Page 2
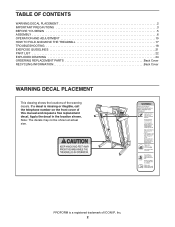
PROFORM is missing or illegible, call the telephone number on the front cover of this manual and request a free replacement decal. Note: The decals may not ... DECAL PLACEMENT 2 IMPORTANT PRECAUTIONS 3 BEFORE YOU BEGIN 5 ASSEMBLY 6 OPERATION AND ADJUSTMENT 10 HOW TO FOLD AND MOVE THE TREADMILL 17 TROUBLESHOOTING 18 EXERCISE GUIDELINES 21 PART LIST 22 EXPLODED DRAWING 24 ORDERING REPLACEMENT PARTS Back Cover RECYCLING INFORMATION Back Cover WARNING DECAL PLACEMENT This drawing shows the locations of ICON IP, Inc. 2 Apply...
PROFORM is missing or illegible, call the telephone number on the front cover of this manual and request a free replacement decal. Note: The decals may not ... DECAL PLACEMENT 2 IMPORTANT PRECAUTIONS 3 BEFORE YOU BEGIN 5 ASSEMBLY 6 OPERATION AND ADJUSTMENT 10 HOW TO FOLD AND MOVE THE TREADMILL 17 TROUBLESHOOTING 18 EXERCISE GUIDELINES 21 PART LIST 22 EXPLODED DRAWING 24 ORDERING REPLACEMENT PARTS Back Cover RECYCLING INFORMATION Back Cover WARNING DECAL PLACEMENT This drawing shows the locations of ICON IP, Inc. 2 Apply...

Uk Manual
Page 4
...representative. Do not use this manual. Inspect and properly tighten all parts of the treadmill regularly. nance and adjustment procedures described in this treadmill in a commercial, rental, or institutional setting. 23. 20. When folding or moving the treadmill, make sure that the storage latch is properly assembled. (See ...performing the mainte- Always unplug the power cord immediately after use only. less instructed to raise, lower, or move the treadmill. 21. Never remove the motor hood un- DANGER: 24. Do not attempt to do so by an authorized service ...
...representative. Do not use this manual. Inspect and properly tighten all parts of the treadmill regularly. nance and adjustment procedures described in this treadmill in a commercial, rental, or institutional setting. 23. 20. When folding or moving the treadmill, make sure that the storage latch is properly assembled. (See ...performing the mainte- Always unplug the power cord immediately after use only. less instructed to raise, lower, or move the treadmill. 21. Never remove the motor hood un- DANGER: 24. Do not attempt to do so by an authorized service ...

Uk Manual
Page 5
...parts that are shown on the front cover of features designed to make your benefit, read - The QUICK START 9.0 treadmill offers an impressive selection of this manual. And when you have questions after read this manual carefully before contacting us assist you for selecting the revolutionary PROFORM® QUICK START 9.0 treadmill.... The model number and the location of other treadmills. BEFORE YOU BEGIN Thank you , note the product model number and...
...parts that are shown on the front cover of features designed to make your benefit, read - The QUICK START 9.0 treadmill offers an impressive selection of this manual. And when you have questions after read this manual carefully before contacting us assist you for selecting the revolutionary PROFORM® QUICK START 9.0 treadmill.... The model number and the location of other treadmills. BEFORE YOU BEGIN Thank you , note the product model number and...
Uk Manual
Page 6
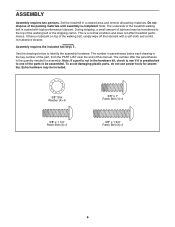
... x 1" Patch Bolt (1)-2 3/8" x 1 3/4" Patch Bolt (3)-2 6 This is completed. Note: If a part is not in the hardware kit, check to see if it is coated with a soft cloth and a mild, non-abrasive cleaner. Note: The underside of the treadmill walking belt is preattached to one of the walking belt or the...Extra hardware may be assembled. Set the treadmill in parentheses below to the top of the parts to be transferred to identify the assembly hardware. If there is the quantity needed for assembly. To avoid damaging plastic parts, do not use power tools for assembly...
... x 1" Patch Bolt (1)-2 3/8" x 1 3/4" Patch Bolt (3)-2 6 This is completed. Note: If a part is not in the hardware kit, check to see if it is coated with a soft cloth and a mild, non-abrasive cleaner. Note: The underside of the treadmill walking belt is preattached to one of the walking belt or the...Extra hardware may be assembled. Set the treadmill in parentheses below to the top of the parts to be transferred to identify the assembly hardware. If there is the quantity needed for assembly. To avoid damaging plastic parts, do not use power tools for assembly...
Uk Manual
Page 9
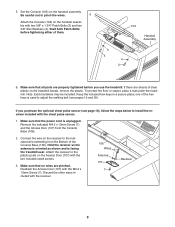
... the included hex keys in a secure place; one of them. 103 Handrail Assembly 4 3 4 3 6. Make sure that all parts are pinched. Connect the wire on the treadmill decals, remove the plastic. Hold the receiver so the antenna is oriented as shown and is used to adjust the walking belt...properly tightened before tightening either of the hex keys is facing the treadmill user. To protect the floor or carpet, place a mat under the treadmill. Discard the other wires included with the M4.2 x 13mm Screw (7). Start both Patch Bolts before you purchase the optional chest pulse sensor (see...
... the included hex keys in a secure place; one of them. 103 Handrail Assembly 4 3 4 3 6. Make sure that all parts are pinched. Connect the wire on the treadmill decals, remove the plastic. Hold the receiver so the antenna is oriented as shown and is used to adjust the walking belt...properly tightened before tightening either of the hex keys is facing the treadmill user. To protect the floor or carpet, place a mat under the treadmill. Discard the other wires included with the M4.2 x 13mm Screw (7). Start both Patch Bolts before you purchase the optional chest pulse sensor (see...
Uk Manual
Page 21
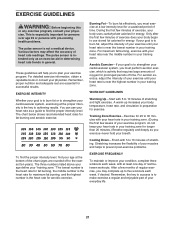
...to achieving results. After a few weeks of time. Remember, the key to success is to make exercise a regular and enjoyable part of the chart (ages are essential for exercise. This is especially important for persons over age 35 or persons with your heart ...temperature, heart rate, and circulation in your breath. The chart below shows recommended heart rates for aerobic exercise. WORKOUT GUIDELINES Warming Up-Start with 5 to 10 minutes of stretching. EXERCISE GUIDELINES WARNING: Before beginning this or any exercise program, consult your physician. For detailed ...
...to achieving results. After a few weeks of time. Remember, the key to success is to make exercise a regular and enjoyable part of the chart (ages are essential for exercise. This is especially important for persons over age 35 or persons with your heart ...temperature, heart rate, and circulation in your breath. The chart below shows recommended heart rates for aerobic exercise. WORKOUT GUIDELINES Warming Up-Start with 5 to 10 minutes of stretching. EXERCISE GUIDELINES WARNING: Before beginning this or any exercise program, consult your physician. For detailed ...

Uk Manual
Page 22
Key No. PART LIST-Model No. Qty. 1 2 2 2 3 2 4 6 5 5 6 9 7 45 8 3 9 2 10 2 11 2 12 1 13 1 14 2 15 1 16 12 17 10 18 2 19 2 20 4 21 2 22 6 23 2 24 3 25 1 26 2 27 5 ... Right Upright Cover Caution Decal Base Wheel Base Foot Spacer Base Foot Latch Bracket Releasable Tie 15 1/2" Cable Tie 22 PETL80708.0 R1208A To locate the parts listed below, see the EXPLODED DRAWING near the end of this manual.
Key No. PART LIST-Model No. Qty. 1 2 2 2 3 2 4 6 5 5 6 9 7 45 8 3 9 2 10 2 11 2 12 1 13 1 14 2 15 1 16 12 17 10 18 2 19 2 20 4 21 2 22 6 23 2 24 3 25 1 26 2 27 5 ... Right Upright Cover Caution Decal Base Wheel Base Foot Spacer Base Foot Latch Bracket Releasable Tie 15 1/2" Cable Tie 22 PETL80708.0 R1208A To locate the parts listed below, see the EXPLODED DRAWING near the end of this manual.

Uk Manual
Page 23
... Cable Tie Grommet Console Fan Foot Rail Insert Decal Key No. Key No. See the back cover of this manual for information about ordering replacement parts. *These parts are subject to change without notice.
... Cable Tie Grommet Console Fan Foot Rail Insert Decal Key No. Key No. See the back cover of this manual for information about ordering replacement parts. *These parts are subject to change without notice.

Uk Manual
Page 28
... • the name of the product (see the front cover of this manual) • the key number and description of the replacement part(s) (see the front cover of this type of waste in your local city office or the establishment where you purchased this product must not ...be recycled after its useful life as required by law. To preserve the environment, this product. ORDERING REPLACEMENT PARTS To order replacement parts, please see the PART LIST and the EXPLODED DRAWING near the end of this manual) RECYCLING INFORMATION This electronic product must be disposed of ...
... • the name of the product (see the front cover of this manual) • the key number and description of the replacement part(s) (see the front cover of this type of waste in your local city office or the establishment where you purchased this product must not ...be recycled after its useful life as required by law. To preserve the environment, this product. ORDERING REPLACEMENT PARTS To order replacement parts, please see the PART LIST and the EXPLODED DRAWING near the end of this manual) RECYCLING INFORMATION This electronic product must be disposed of ...


