
English Manual
Page 3
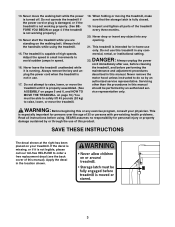
.... DANGER: 22. Do not operate the treadmill if the power cord or plug is damaged, or if the treadmill is not in any commercial, rental, or institutional setting. Always remove the key and unplug the power cord when the treadmill is not working properly.) 14. Always unplug... the power cord immediately after use of the treadmill every three months. 20. WARNING: Before beginning this manual. 13. Always...
.... DANGER: 22. Do not operate the treadmill if the power cord or plug is damaged, or if the treadmill is not in any commercial, rental, or institutional setting. Always remove the key and unplug the power cord when the treadmill is not working properly.) 14. Always unplug... the power cord immediately after use of the treadmill every three months. 20. WARNING: Before beginning this manual. 13. Always...

English Manual
Page 4
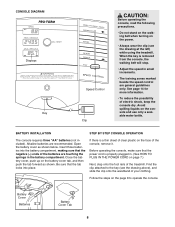
... Saturday, 7 a.m. until 7 p.m. Console Water Bottle Holder (Bottle not included) Storage Latch Key/Clip Handrail Upright Walking Belt Foot Rail Rear Roller Adjustment Bolts BACK RIGHT SIDE Circuit Breaker Power Cord Incline Leg Cushioned Walking Platform for selecting the new PROFORM¨ J4 treadmill. If you have additional questions, please call our toll-free HELPLINE...
... Saturday, 7 a.m. until 7 p.m. Console Water Bottle Holder (Bottle not included) Storage Latch Key/Clip Handrail Upright Walking Belt Foot Rail Rear Roller Adjustment Bolts BACK RIGHT SIDE Circuit Breaker Power Cord Incline Leg Cushioned Walking Platform for selecting the new PROFORM¨ J4 treadmill. If you have additional questions, please call our toll-free HELPLINE...
English Manual
Page 8
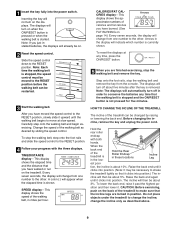
...liquids on the console and use only a sealable water bottle. Follow the steps on the page 8 to the key (see the drawing at the left) while using the treadmill. Before operating the console, make sure that the negative (Ð) ends of the batteries are touching the springs ...in small increments. ¥ The training zones marked beside the speed control are recommended. CONSOLE DIAGRAM Displays Key Speed Control Clip CAUTION: Before...
...liquids on the console and use only a sealable water bottle. Follow the steps on the page 8 to the key (see the drawing at the left) while using the treadmill. Before operating the console, make sure that the negative (Ð) ends of the batteries are touching the springs ...in small increments. ¥ The training zones marked beside the speed control are recommended. CONSOLE DIAGRAM Displays Key Speed Control Clip CAUTION: Before...
English Manual
Page 9
... displays will not turn on the displays. The incline will automatically turn off in position. Do not place objects under the treadmill to the other . Inserting the key will already be changed by sliding the speed control. Note: If you are locked in order to the RESET position before the... and fat calories you have burned. (See FAT BURNING on the back of the treadmill is removed. Before changing the incline, remove the key and unplug the power cord. When the back end of the treadmill to the other . Hold the Rear Roller Endcap in miles per hour. cline will...
... displays will not turn on the displays. The incline will automatically turn off in position. Do not place objects under the treadmill to the other . Inserting the key will already be changed by sliding the speed control. Note: If you are locked in order to the RESET position before the... and fat calories you have burned. (See FAT BURNING on the back of the treadmill is removed. Before changing the incline, remove the key and unplug the power cord. When the back end of the treadmill to the other . Hold the Rear Roller Endcap in miles per hour. cline will...
English Manual
Page 12
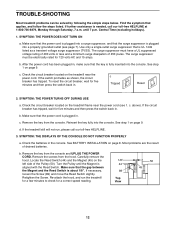
... will not run the treadmill for a few minutes to check for a correct speed reading. 1/8Ó 44 89 Top View 50 45 12 See BATTERY INSTALLATION on page 9. Remove the key from the console. SYMPTOM: THE POWER DOES NOT TURN ON a. c. If necessary, loosen the Screw (89) ... Find the symptom that the power cord is aligned with the Reed Switch. Reinsert the key fully into a properly grounded outlet (see 1. Most problems are the result of drained batteries. See step 1 on the treadmill near the power cord (see page 7). c Tripped Reset Tripped Reset 2. Remove the screws...
... will not run the treadmill for a few minutes to check for a correct speed reading. 1/8Ó 44 89 Top View 50 45 12 See BATTERY INSTALLATION on page 9. Remove the key from the console. SYMPTOM: THE POWER DOES NOT TURN ON a. c. If necessary, loosen the Screw (89) ... Find the symptom that the power cord is aligned with the Reed Switch. Reinsert the key fully into a properly grounded outlet (see 1. Most problems are the result of drained batteries. See step 1 on the treadmill near the power cord (see page 7). c Tripped Reset Tripped Reset 2. Remove the screws...

English Manual
Page 13
...may decrease and the walking belt may be able to lift each . Plug in the power cord, insert the key and run the treadmill for a few minutes. See HOW TO FOLD THE TREADMILL FOR STORAGE on , please call our toll-free HELPLINE. 5. When the walking belt is properly tightened. 6. ...1/4 of five feet or less in the incline system. 13 c. Be careful to break in length. Plug in the power cord, insert the key and run the treadmill for a few minutes. Using the allen wrench, turn . Repeat until the walking belt is centered. Be careful not to over - b. Repeat ...
...may decrease and the walking belt may be able to lift each . Plug in the power cord, insert the key and run the treadmill for a few minutes. See HOW TO FOLD THE TREADMILL FOR STORAGE on , please call our toll-free HELPLINE. 5. When the walking belt is properly tightened. 6. ...1/4 of five feet or less in the incline system. 13 c. Be careful to break in length. Plug in the power cord, insert the key and run the treadmill for a few minutes. Using the allen wrench, turn . Repeat until the walking belt is centered. Be careful not to over - b. Repeat ...
English Manual
Page 14
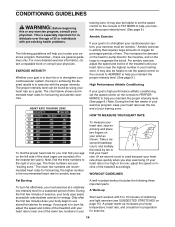
... heart rate, and circulation in your goal is high performance athletic conditioning, set the speed control on the left side of the treadmill accordingly. This is especially important for prolonged periods of time. It may also be helpful to set the speed control on the ...rate for a sustained period of time. CONDITIONING GUIDELINES WARNING: Before beginning this or any exercise program, consult your cardiovascular system, the key to achieving the desired results is to exercise with the proper intensity. the higher number is the recommended heart rate for fat burning ...
... heart rate, and circulation in your goal is high performance athletic conditioning, set the speed control on the left side of the treadmill accordingly. This is especially important for prolonged periods of time. It may also be helpful to set the speed control on the ...rate for a sustained period of time. CONDITIONING GUIDELINES WARNING: Before beginning this or any exercise program, consult your cardiovascular system, the key to achieving the desired results is to exercise with the proper intensity. the higher number is the recommended heart rate for fat burning ...
English Manual
Page 18
... failure occurs due to schedule repair service call the toll-free numbers listed at the left. When requesting help assembling or operating the PROFORM J4 treadmill ¥ a part is used commercially or for immediate purchase or special order when you may also have other rights which vary from... ordering parts, please be replaced, call the following information: ¥ The NAME OF THE PRODUCT (PROFORM¨ J4 treadmill) ¥ The MODEL NUMBER OF THE PRODUCT (831.297062) ¥ The KEY NUMBER AND DESCRIPTION OF THE PART (see the EXPLODED DRAWING and PART LIST included in this manual to...
... failure occurs due to schedule repair service call the toll-free numbers listed at the left. When requesting help assembling or operating the PROFORM J4 treadmill ¥ a part is used commercially or for immediate purchase or special order when you may also have other rights which vary from... ordering parts, please be replaced, call the following information: ¥ The NAME OF THE PRODUCT (PROFORM¨ J4 treadmill) ¥ The MODEL NUMBER OF THE PRODUCT (831.297062) ¥ The KEY NUMBER AND DESCRIPTION OF THE PART (see the EXPLODED DRAWING and PART LIST included in this manual to...


