
English Manual
Page 2
...on a level surface, with bare feet, wearing only stockings, or in a garage or covered patio, or near water. 9. Place the treadmill on the treadmill at all users of burns, fire, electric shock, or injury to ensure that blocks any air openings. When connecting the power cord (... and dust. TABLE OF CONTENTS IMPORTANT PRECAUTIONS 2 BEFORE YOU BEGIN 4 ASSEMBLY 5 OPERATION AND ADJUSTMENT 7 HOW TO FOLD AND MOVE THE TREADMILL 10 TROUBLE-SHOOTING 12 CONDITIONING GUIDELINES 14 ORDERING REPLACEMENT PARTS Back Cover FULL 90 DAY WARRANTY Back Cover Note: An EXPLODED DRAWING and a ...
...on a level surface, with bare feet, wearing only stockings, or in a garage or covered patio, or near water. 9. Place the treadmill on the treadmill at all users of burns, fire, electric shock, or injury to ensure that blocks any air openings. When connecting the power cord (... and dust. TABLE OF CONTENTS IMPORTANT PRECAUTIONS 2 BEFORE YOU BEGIN 4 ASSEMBLY 5 OPERATION AND ADJUSTMENT 7 HOW TO FOLD AND MOVE THE TREADMILL 10 TROUBLE-SHOOTING 12 CONDITIONING GUIDELINES 14 ORDERING REPLACEMENT PARTS Back Cover FULL 90 DAY WARRANTY Back Cover Note: An EXPLODED DRAWING and a ...
English Manual
Page 3
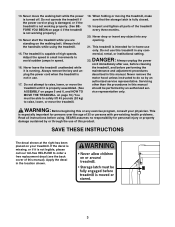
... for persons over the age of 35 or persons with pre-existing health problems. Read all parts of this or any exercise program, consult your treadmill. Do not attempt to order a free replacement decal (see the back cover of high speeds. WARNING: Before beginning this product. This is running. ... the power cord immediately after use this manual should be able to safely lift 45 pounds (20 kg) to raise, lower, or move the treadmill. 18. vice representative only. SAVE THESE INSTRUCTIONS The decal shown at the right has been placed on the walking belt. Apply the decal in...
... for persons over the age of 35 or persons with pre-existing health problems. Read all parts of this or any exercise program, consult your treadmill. Do not attempt to order a free replacement decal (see the back cover of high speeds. WARNING: Before beginning this product. This is running. ... the power cord immediately after use this manual should be able to safely lift 45 pounds (20 kg) to raise, lower, or move the treadmill. 18. vice representative only. SAVE THESE INSTRUCTIONS The decal shown at the right has been placed on the walking belt. Apply the decal in...

English Manual
Page 4
...BACK RIGHT SIDE Circuit Breaker Power Cord Incline Leg Cushioned Walking Platform for selecting the new PROFORM¨ J4 treadmill. And when youÕre not exercising, the unique J4 can be folded up, requiring less than half the floor space of your benefit, ...let you enjoy an excellent form of cardiovascular exercise in the convenience and privacy of other treadmills. For your home. BEFORE YOU BEGIN Thank you for maximum exercise comfort 4 The J4 treadmill combines advanced technology with the parts that are labeled. Central Time (excluding holidays). Monday ...
...BACK RIGHT SIDE Circuit Breaker Power Cord Incline Leg Cushioned Walking Platform for selecting the new PROFORM¨ J4 treadmill. And when youÕre not exercising, the unique J4 can be folded up, requiring less than half the floor space of your benefit, ...let you enjoy an excellent form of cardiovascular exercise in the convenience and privacy of other treadmills. For your home. BEFORE YOU BEGIN Thank you for maximum exercise comfort 4 The J4 treadmill combines advanced technology with the parts that are labeled. Central Time (excluding holidays). Monday ...
English Manual
Page 5
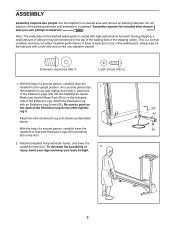
.... Be sure to one side slightly and holds it . 34 Attach the other Extension Leg (not shown) as shown. Hold the treadmill firmly with an Extension Leg Screw (53). With the help of the walking belt or the shipping carton. Attach the Extension Leg with both Extension... Legs (34) are resting flat on top of the Extension Legs (34) into the treadmill as described above. Set the treadmill in a cleared area and remove all packing materials. During shipping, a small amount of 2 injury, bend your legs and keep your own ...
.... Be sure to one side slightly and holds it . 34 Attach the other Extension Leg (not shown) as shown. Hold the treadmill firmly with an Extension Leg Screw (53). With the help of the walking belt or the shipping carton. Attach the Extension Leg with both Extension... Legs (34) are resting flat on top of the Extension Legs (34) into the treadmill as described above. Set the treadmill in a cleared area and remove all packing materials. During shipping, a small amount of 2 injury, bend your legs and keep your own ...
English Manual
Page 6
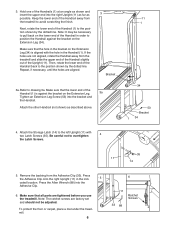
... lower end of the Handrail back to the position shown by the dotted line. Then, rotate the lower end of the Handrail away from the treadmill to pull back on the Extension Leg. 3a Tighten an Extension Leg Screw (53) into the bracket and the Handrail. Be careful not to drawing... right Upright (11) in the Handrail (1). Next, rotate the lower end of the Upright (11). To protect the floor or carpet, place a mat under the treadmill. 6 6 11 Ratchet Screws 33 88 3. Hold one of the Handrail in order to the left Upright (11) with the hole in the indi- 5 cated location...
... lower end of the Handrail back to the position shown by the dotted line. Then, rotate the lower end of the Handrail away from the treadmill to pull back on the Extension Leg. 3a Tighten an Extension Leg Screw (53) into the bracket and the Handrail. Be careful not to drawing... right Upright (11) in the Handrail (1). Next, rotate the lower end of the Upright (11). To protect the floor or carpet, place a mat under the treadmill. 6 6 11 Ratchet Screws 33 88 3. Hold one of the Handrail in order to the left Upright (11) with the hole in the indi- 5 cated location...
English Manual
Page 7
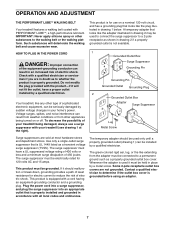
... If it must be used only until a properly grounded outlet (drawing 1) can result in place by a qualified electrician. Your treadmill, like the adapter illustrated in drawing 2 may be used it should be held in an increased risk of sophisticated electronic equipment, ... to whether the product is equipped with PERFORMANT LUBETM, a high-performance lubricant. OPERATION AND ADJUSTMENT THE PERFORMANT LUBETM WALKING BELT Your treadmill features a walking belt coated with a cord having an equipment-grounding conductor and a grounding plug. Use only a single-outlet surge...
... If it must be used only until a properly grounded outlet (drawing 1) can result in place by a qualified electrician. Your treadmill, like the adapter illustrated in drawing 2 may be used it should be held in an increased risk of sophisticated electronic equipment, ... to whether the product is equipped with PERFORMANT LUBETM, a high-performance lubricant. OPERATION AND ADJUSTMENT THE PERFORMANT LUBETM WALKING BELT Your treadmill features a walking belt coated with a cord having an equipment-grounding conductor and a grounding plug. Use only a single-outlet surge...
English Manual
Page 8
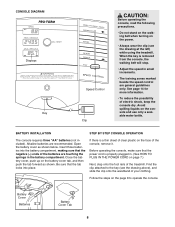
Alkaline batteries are general guidelines only. Follow the steps on the page 8 to the key (see the drawing at the left) while using the treadmill. See page 14 for more information. ¥ To reduce the possibility of the console, remove it. Close the battery cover, push up on ...the power cord is properly plugged in. (See HOW TO PLUG IN THE POWER CORD on page 7.) Next, step onto the foot rails of the treadmill. Find the clip attached to operate the console. CONSOLE DIAGRAM Displays Key Speed Control Clip CAUTION: Before operating the console, read the following precautions. ...
Alkaline batteries are general guidelines only. Follow the steps on the page 8 to the key (see the drawing at the left) while using the treadmill. See page 14 for more information. ¥ To reduce the possibility of the console, remove it. Close the battery cover, push up on ...the power cord is properly plugged in. (See HOW TO PLUG IN THE POWER CORD on page 7.) Next, step onto the foot rails of the treadmill. Find the clip attached to operate the console. CONSOLE DIAGRAM Displays Key Speed Control Clip CAUTION: Before operating the console, read the following precautions. ...
English Manual
Page 9
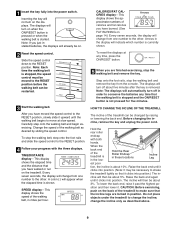
... will turn on . 2 Reset the speed control. CALORIES/FAT CALORIES displayÑThis Arrows display shows the ap- proximate numbers of the treadmill is stopped, the speed control must be moved to the RESET position before the walking belt can be changed by sliding the speed control. Note... end, raise it upward until it clicks into position. 1 Insert the key fully into position. (Note: It may be necessary to shake the treadmill lightly so that the incline legs are finished exercising, stop the walking belt and remove the key. A colon (:) will indicate which number is shown...
... will turn on . 2 Reset the speed control. CALORIES/FAT CALORIES displayÑThis Arrows display shows the ap- proximate numbers of the treadmill is stopped, the speed control must be moved to the RESET position before the walking belt can be changed by sliding the speed control. Note... end, raise it upward until it clicks into position. 1 Insert the key fully into position. (Note: It may be necessary to shake the treadmill lightly so that the incline legs are finished exercising, stop the walking belt and remove the key. A colon (:) will indicate which number is shown...

English Manual
Page 10
... order to the storage position as shown. 2. Place one foot on the base as described above 85¡ Fahrenheit. HOW TO MOVE THE TREADMILL Before moving the treadmill. To reduce the risk of injury, bend your legs and keep your right hand to lift with your back. HOW TO FOLD AND MOVE... THE TREADMILL HOW TO FOLD THE TREADMILL FOR STORAGE Before folding the treadmill, unplug the power cord. Place one foot on the front wheels. Caution: You must be able to safely lift 45...
... order to the storage position as shown. 2. Place one foot on the base as described above 85¡ Fahrenheit. HOW TO MOVE THE TREADMILL Before moving the treadmill. To reduce the risk of injury, bend your legs and keep your right hand to lift with your back. HOW TO FOLD AND MOVE... THE TREADMILL HOW TO FOLD THE TREADMILL FOR STORAGE Before folding the treadmill, unplug the power cord. Place one foot on the front wheels. Caution: You must be able to safely lift 45...

English Manual
Page 11
HOW TO LOWER THE TREADMILL FOR USE 1. Hold the upper end of injury, bend your legs and keep your back straight. Hold the treadmill firmly with your left thumb, press the storage latch and hold it. Pivot the treadmill until the frame and foot rail are past the storage latch. 2. Using your right hand as shown. To decrease the possibility of the treadmill with both hands, and lower the treadmill to the floor. Storage Unlatched Latch 11
HOW TO LOWER THE TREADMILL FOR USE 1. Hold the upper end of injury, bend your legs and keep your back straight. Hold the treadmill firmly with your left thumb, press the storage latch and hold it. Pivot the treadmill until the frame and foot rail are past the storage latch. 2. Using your right hand as shown. To decrease the possibility of the treadmill with both hands, and lower the treadmill to the floor. Storage Unlatched Latch 11
English Manual
Page 12
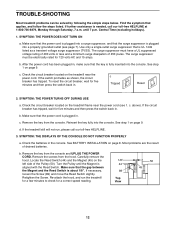
.... Check the circuit breaker located on the left side of drained batteries. Make sure that is about 1/8Ó. c. d. If the treadmill still will not run the treadmill for a few minutes to check for a correct speed reading. 1/8Ó 44 89 Top View 50 45 12 Remove the key from... switch back in . b. Remove the key from the console. SYMPTOM: THE DISPLAYS OF THE CONSOLE DO NOT FUNCTION PROPERLY a. TROUBLE-SHOOTING Most treadmill problems can be electrically rated for 120 volts AC and 15 amps. Make sure that the power cord is plugged into a properly grounded outlet (...
.... Check the circuit breaker located on the left side of drained batteries. Make sure that is about 1/8Ó. c. d. If the treadmill still will not run the treadmill for a few minutes to check for a correct speed reading. 1/8Ó 44 89 Top View 50 45 12 Remove the key from... switch back in . b. Remove the key from the console. SYMPTOM: THE DISPLAYS OF THE CONSOLE DO NOT FUNCTION PROPERLY a. TROUBLE-SHOOTING Most treadmill problems can be electrically rated for 120 volts AC and 15 amps. Make sure that the power cord is plugged into a properly grounded outlet (...

English Manual
Page 13
...allen wrench, b turn the left , first remove the key and UNPLUG THE POWER CORD. Repeat until the walking belt is overtightened, treadmill performance may decrease and the walking belt may be able to break in length. Using the allen wrench, c turn both rear roller adjustment... counterclockwise, 1/4 of a turn each . Be careful to keep the walking belt centered. SYMPTOM: THE INCLINE SYSTEM STICKS a. See HOW TO FOLD THE TREADMILL FOR STORAGE on , please call our toll-free HELPLINE. 5. b 2ÓÐ3Ó Rear Roller Adjustment Bolts c. If the walking belt has shifted...
...allen wrench, b turn the left , first remove the key and UNPLUG THE POWER CORD. Repeat until the walking belt is overtightened, treadmill performance may decrease and the walking belt may be able to break in length. Using the allen wrench, c turn both rear roller adjustment... counterclockwise, 1/4 of a turn each . Be careful to keep the walking belt centered. SYMPTOM: THE INCLINE SYSTEM STICKS a. See HOW TO FOLD THE TREADMILL FOR STORAGE on , please call our toll-free HELPLINE. 5. b 2ÓÐ3Ó Rear Roller Adjustment Bolts c. If the walking belt has shifted...
English Manual
Page 14
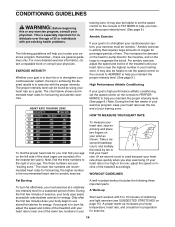
... the nearest ten years). RememberÑthese are rounded off to exercise with 5 to burn fat, adjust the speed and incline of the treadmill until your heart rate is near the low end of your physician. For more detailed exercise information, obtain a reputable book or consult your ..., consult your age. To measure your heart rate, stop exercising.) If your training zone. If your goal is to 10 minutes of the treadmill accordingly. The three numbers are your training zone. Take a sixsecond heartbeat count, and multiply the result by using your body uses easily accessible ...
... the nearest ten years). RememberÑthese are rounded off to exercise with 5 to burn fat, adjust the speed and incline of the treadmill until your heart rate is near the low end of your physician. For more detailed exercise information, obtain a reputable book or consult your ..., consult your age. To measure your heart rate, stop exercising.) If your training zone. If your goal is to 10 minutes of the treadmill accordingly. The three numbers are your training zone. Take a sixsecond heartbeat count, and multiply the result by using your body uses easily accessible ...

English Manual
Page 18
...amÐ7 pm Central Time (excluding holidays) The model number and serial number of the decal. When requesting help assembling or operating the PROFORM J4 treadmill ¥ a part is used commercially or for immediate purchase or special order when you find the location of your nearest SEARS Service ... to be replaced, call the toll-free numbers listed at the left. See the front cover of charge. If you visit your PROFORM¨ J4 treadmill are available for rental purposes. SEARS, ROEBUCK AND CO., DEPT. 817WA, HOFFMAN ESTATES, IL 60179 Part No. 152035 H04316AC R0399A...
...amÐ7 pm Central Time (excluding holidays) The model number and serial number of the decal. When requesting help assembling or operating the PROFORM J4 treadmill ¥ a part is used commercially or for immediate purchase or special order when you find the location of your nearest SEARS Service ... to be replaced, call the toll-free numbers listed at the left. See the front cover of charge. If you visit your PROFORM¨ J4 treadmill are available for rental purposes. SEARS, ROEBUCK AND CO., DEPT. 817WA, HOFFMAN ESTATES, IL 60179 Part No. 152035 H04316AC R0399A...


