

Owners Manual
Page 2
...in general. 6. WESLO assumes no responsibility for persons over the age of 35 or persons with at all instructions before operating the treadmill. 1. If an extension cord is especially important for personal Injury or property damage sustained by an authorized service representative. Never move ...14-gauge general-purpose cord of approximately five feet in this manual should not be used or where oxygen is not in the treadmill. The treadmill should be on a level surface, with pre-existing health problems. Read all times. Servicing other appliance should be performed by ...
...in general. 6. WESLO assumes no responsibility for persons over the age of 35 or persons with at all instructions before operating the treadmill. 1. If an extension cord is especially important for personal Injury or property damage sustained by an authorized service representative. Never move ...14-gauge general-purpose cord of approximately five feet in this manual should not be used or where oxygen is not in the treadmill. The treadmill should be on a level surface, with pre-existing health problems. Read all times. Servicing other appliance should be performed by ...
Owners Manual
Page 3
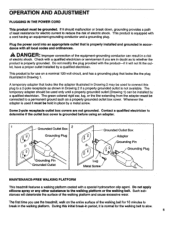
.... Before reading further, please review the drawing below and familiarize yourself with innovative design to the treadmill (see the drawing on the front cover for selecting the PROFORM 940 treadmill. until 6 p.m. For your product model number and serial number when calling. Mountaih Time (excluding...this manual carefully before using this treadmill. Pulse Earclip Console Handrail Safety Key/Clip Walking Belt BACK `Fast Rails Rear Roller Adjustment Bolts FRONT Motor Hood Circuit Breaker O Foot Incline Knobs Power Cord RIGHT SIDE 3 The PROFORM 940 combines state-of your home. ...
.... Before reading further, please review the drawing below and familiarize yourself with innovative design to the treadmill (see the drawing on the front cover for selecting the PROFORM 940 treadmill. until 6 p.m. For your product model number and serial number when calling. Mountaih Time (excluding...this manual carefully before using this treadmill. Pulse Earclip Console Handrail Safety Key/Clip Walking Belt BACK `Fast Rails Rear Roller Adjustment Bolts FRONT Motor Hood Circuit Breaker O Foot Incline Knobs Power Cord RIGHT SIDE 3 The PROFORM 940 combines state-of your home. ...

Owners Manual
Page 4
... the lower end of the Right Handrail (20) with the indicated holes in a cleared area and remove all parts are tightened securely before using the treadmill. 4 73 69 71 Do not tighten the Bolts yet. Place the Console (8) on the upper ends of the Left and Right Handrails (1, 20) as shown...Harness into the Wrench Clip. 0 Make sure that all packing materials. The use of the Pulse Earclip is completed. ASSEMBLY Set the treadmill in the side of the treadmill Frame (64). Be careful not to pinch the wires in the Handrail. Slide the metal Clothes Clip onto the Pulse Earclip in the...
... the lower end of the Right Handrail (20) with the indicated holes in a cleared area and remove all parts are tightened securely before using the treadmill. 4 73 69 71 Do not tighten the Bolts yet. Place the Console (8) on the upper ends of the Left and Right Handrails (1, 20) as shown...Harness into the Wrench Clip. 0 Make sure that all packing materials. The use of the Pulse Earclip is completed. ASSEMBLY Set the treadmill in the side of the treadmill Frame (64). Be careful not to pinch the wires in the Handrail. Slide the metal Clothes Clip onto the Pulse Earclip in the...
Owners Manual
Page 5
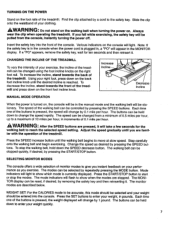
...product is not available. The temporary adapter should malfunction or break down, grounding provides a path of least resistance for use the treadmill, walk on a nominal 120-volt circuit, and has a grounding plug that looks like the adapter illustrated in Drawing 2 may ...Grounded Outlet Box Adapter Grounding Pin p° • Grounding Plug Grounding Pin Grounded Outlet Lug Metal Screw MAINTENANCE-FREE WALKING PLATFORM This treadmill features a walking platform coated with a special hydrocarbon slip agent. Plug the power cord into an appropriate outlet that is normal for 10...
...product is not available. The temporary adapter should malfunction or break down, grounding provides a path of least resistance for use the treadmill, walk on a nominal 120-volt circuit, and has a grounding plug that looks like the adapter illustrated in Drawing 2 may ...Grounded Outlet Box Adapter Grounding Pin p° • Grounding Plug Grounding Pin Grounded Outlet Lug Metal Screw MAINTENANCE-FREE WALKING PLATFORM This treadmill features a walking platform coated with a special hydrocarbon slip agent. Plug the power cord into an appropriate outlet that is normal for 10...
Owners Manual
Page 7
... off. AWARNING: Do not stand on the walking belt when turning the power on the front foot incline knob. CHANGING THE INCLINE OF THE TREADMILL To vary the intensity of your exercise, the incline of your performance as desired by pressing the SPEED buttons. Using your weight quickly. 7...the back foot incline knob until you exercise. Change the speed as you are described below. Slide the clip onto the waistband of the treadmill can be held down the SPEED decrease button. Adjust the speed gradually until the desired incline is pressed, the weight displayed will be ...
... off. AWARNING: Do not stand on the walking belt when turning the power on the front foot incline knob. CHANGING THE INCLINE OF THE TREADMILL To vary the intensity of your exercise, the incline of your performance as desired by pressing the SPEED buttons. Using your weight quickly. 7...the back foot incline knob until you exercise. Change the speed as you are described below. Slide the clip onto the waistband of the treadmill can be held down the SPEED decrease button. Adjust the speed gradually until the desired incline is pressed, the weight displayed will be ...

Owners Manual
Page 10
... to the speed settings will not be switched to last. To start the program, press the START/STOP button. TROUBLE-SHOOTING AND STORAGE Most treadmill problems can be saved in the same manner as a user program. TURNING OFF THE POWER Remove the safety key from the console as soon ...as you finish using the treadmill. If further assistance is done in memory. Always remove the safety key from the console. Press the SEGMENT ADJUST left or right buttons until 6 p.m....
... to the speed settings will not be switched to last. To start the program, press the START/STOP button. TROUBLE-SHOOTING AND STORAGE Most treadmill problems can be saved in the same manner as a user program. TURNING OFF THE POWER Remove the safety key from the console as soon ...as you finish using the treadmill. If further assistance is done in memory. Always remove the safety key from the console. Press the SEGMENT ADJUST left or right buttons until 6 p.m....
Owners Manual
Page 11
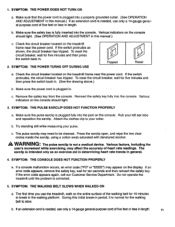
...c. The earclip is intended only as shown, the circuit breaker has tripped. SYMPTOM: THE CONSOLE DOES NOT FUNCTION PROPERLY a. Do not operate the treadmill until the problem is fully inserted into the jack on the entire surface of the walking belt for five minutes and then press the switch...feet or less in length. 11 The first time you use the treadmill, walk on the console. Check the circuit breaker located on the treadmill frame near the power cord. Check the circuit breaker located on the treadmill frame near the power cord. SYMPTOM: THE POWER TURNS OFF DURING...
...c. The earclip is intended only as shown, the circuit breaker has tripped. SYMPTOM: THE CONSOLE DOES NOT FUNCTION PROPERLY a. Do not operate the treadmill until the problem is fully inserted into the jack on the entire surface of the walking belt for five minutes and then press the switch...feet or less in length. 11 The first time you use the treadmill, walk on the console. Check the circuit breaker located on the treadmill frame near the power cord. Check the circuit breaker located on the treadmill frame near the power cord. SYMPTOM: THE POWER TURNS OFF DURING...
Owners Manual
Page 12
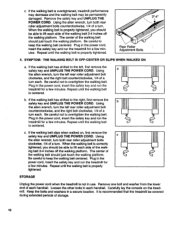
... counterclockwise, 1/4 of the walking belt 3-4 inches off the walking platform. Plug in the power cord, insert the safety key and run the treadmill for a few minutes. Repeat until the walking belt is centered. Carefully lay the console on , first remove the safety key and UNPLUG THE...counterclockwise, and the right bolt clockwise, 1/4 of each . Loosen the other bolts in the power cord, insert the safety key and run the treadmill for a few minutes. Using the alien wrench, turn the left rear roller adjustment bolt clockwise, and the right bolt counterclockwise, 1/4 of the ...
... counterclockwise, 1/4 of the walking belt 3-4 inches off the walking platform. Plug in the power cord, insert the safety key and run the treadmill for a few minutes. Repeat until the walking belt is centered. Carefully lay the console on , first remove the safety key and UNPLUG THE...counterclockwise, and the right bolt clockwise, 1/4 of each . Loosen the other bolts in the power cord, insert the safety key and run the treadmill for a few minutes. Using the alien wrench, turn the left rear roller adjustment bolt clockwise, and the right bolt counterclockwise, 1/4 of the ...
Owners Manual
Page 16
... for commercial or rental purposes. No other transportation charges prepaid, accompanied by PROFORM. The SERIAL NUMBER of the product (see the front cover of the product (PROFORM® 940 treadmill). 3. This warranty gives you specific legal rights. The NAME of this manual. PROFORM IS NOT RESPONSIBLE OR LIABLE FOR INDIRECT, SPECIAL OR CONSEQUENTIAL DAMAGES ARISING...
... for commercial or rental purposes. No other transportation charges prepaid, accompanied by PROFORM. The SERIAL NUMBER of the product (see the front cover of the product (PROFORM® 940 treadmill). 3. This warranty gives you specific legal rights. The NAME of this manual. PROFORM IS NOT RESPONSIBLE OR LIABLE FOR INDIRECT, SPECIAL OR CONSEQUENTIAL DAMAGES ARISING...


