
Canadian English Manual
Page 6
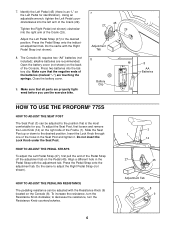
...(27) to the position that is an "L" on the Left Pedal for you use the exercise bike. 7 45 27 29 Adjustment Tab 8 Battery Clip 8 AA Batteries HOW TO USE THE PROFORM® 775S HOW TO ADJUST THE SEAT POST The Seat Post (3) can be adjusted to the desired position. ... battery cover (not shown) on the right side of the Crank (29). to adjust the Right Pedal Strap (not shown). Make sure that all parts are properly tightened before you . Press two batteries into the left arm of the Frame (1). To increase the resistance, turn the Resistance Knob counterclockwise....
...(27) to the position that is an "L" on the Left Pedal for you use the exercise bike. 7 45 27 29 Adjustment Tab 8 Battery Clip 8 AA Batteries HOW TO USE THE PROFORM® 775S HOW TO ADJUST THE SEAT POST The Seat Post (3) can be adjusted to the desired position. ... battery cover (not shown) on the right side of the Crank (29). to adjust the Right Pedal Strap (not shown). Make sure that all parts are properly tightened before you . Press two batteries into the left arm of the Frame (1). To increase the resistance, turn the Resistance Knob counterclockwise....
Canadian English Manual
Page 8
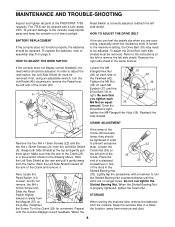
... M6 Nut 39 (39) on each side of direct sunlight. STORAGE When storing the exercise bike, remove the batteries from the frame. If the console does not display correct feedback, the ... especially when the resistance knob is correctly adjusted, reattach the left arm of the PROFORM® 775S regularly. Hold the Left Side Shield at the top and gently pull them apart....Lightly tap the screwdriver with a soft, damp cloth. MAINTENANCE AND TROUBLE-SHOOTING Inspect and tighten all parts of the Crank. To prevent damage to assembly step 8 on the pulley. Reattach the side ...
... M6 Nut 39 (39) on each side of direct sunlight. STORAGE When storing the exercise bike, remove the batteries from the frame. If the console does not display correct feedback, the ... especially when the resistance knob is correctly adjusted, reattach the left arm of the PROFORM® 775S regularly. Hold the Left Side Shield at the top and gently pull them apart....Lightly tap the screwdriver with a soft, damp cloth. MAINTENANCE AND TROUBLE-SHOOTING Inspect and tighten all parts of the Crank. To prevent damage to assembly step 8 on the pulley. Reattach the side ...


