
English Manual
Page 2
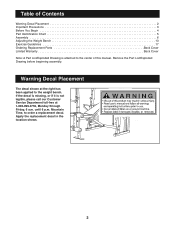
Mountain Time, to the weight bench. Apply the replacement decal in the location shown. 2 until 6 p.m. Remove the Part List/Exploded Drawing before beginning assembly. Warning Decal Placement The decal shown at 1-..., or if it is attached to the center of Contents Warning Decal Placement 2 Important Precautions 3 Before You Begin 4 Part Identification Chart 5 Assembly 6 Adjusting the Weight Bench 13 Exercise Guidelines 17 Ordering Replacement Parts Back Cover Limited Warranty Back Cover Note: A Part List/Exploded Drawing is not legible, please call our Customer...
Mountain Time, to the weight bench. Apply the replacement decal in the location shown. 2 until 6 p.m. Remove the Part List/Exploded Drawing before beginning assembly. Warning Decal Placement The decal shown at 1-..., or if it is attached to the center of Contents Warning Decal Placement 2 Important Precautions 3 Before You Begin 4 Part Identification Chart 5 Assembly 6 Adjusting the Weight Bench 13 Exercise Guidelines 17 Ordering Replacement Parts Back Cover Limited Warranty Back Cover Note: A Part List/Exploded Drawing is not legible, please call our Customer...
English Manual
Page 3
... in any worn parts immediately. 6. Always wear athletic shoes for personal injury or property damage sustained by or through the use the weight bench in this or any time while exercising, stop immediately and begin cooling down. Do not place more than 130 pounds on the weight rests...not use of this manual. 13. Always place 50 pounds on each time you feel pain or dizziness at all instructions before using the weight bench. 1. Do not place more than 210 pounds, including a barbell and weights, on the weight carriage. Always set both weight rests and safety...
... in any worn parts immediately. 6. Always wear athletic shoes for personal injury or property damage sustained by or through the use the weight bench in this or any time while exercising, stop immediately and begin cooling down. Do not place more than 130 pounds on the weight rests...not use of this manual. 13. Always place 50 pounds on each time you feel pain or dizziness at all instructions before using the weight bench. 1. Do not place more than 210 pounds, including a barbell and weights, on the weight carriage. Always set both weight rests and safety...
English Manual
Page 4
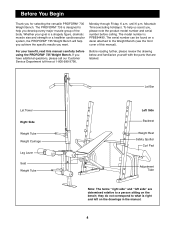
...yourself with the parts that are determined relative to help you , please note the product model number and serial number before using the PROFORM¨ 735 Weight Bench. The PROFORM¨ 735 is right and left sideÓ are labeled. To help you achieve the specific results you for selecting the versatile... PROFORM¨ 735 Weight Bench. Lat Tower Right Side Weight Tube Weight Carriage Leg Lever Seat Weight Tube Lat Bar Left Side Backrest Weight Rest Safety Spotter Curl...
...yourself with the parts that are determined relative to help you , please note the product model number and serial number before using the PROFORM¨ 735 Weight Bench. The PROFORM¨ 735 is right and left sideÓ are labeled. To help you achieve the specific results you for selecting the versatile... PROFORM¨ 735 Weight Bench. Lat Tower Right Side Weight Tube Weight Carriage Leg Lever Seat Weight Tube Lat Bar Left Side Backrest Weight Rest Safety Spotter Curl...
English Manual
Page 6
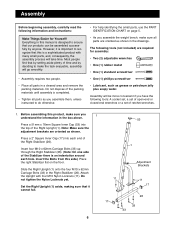
... side of time and by anyone. Do not tighten the Nylon Locknuts yet. Insert the Bolts from this product, make sure you assemble the weight bench, make the task enjoyable, assembly will go smoothly. ¥ Assembly requires two people. ¥ Place all parts in the Right Stabilizer (26). Do not dispose...
... side of time and by anyone. Do not tighten the Nylon Locknuts yet. Insert the Bolts from this product, make sure you assemble the weight bench, make the task enjoyable, assembly will go smoothly. ¥ Assembly requires two people. ¥ Place all parts in the Right Stabilizer (26). Do not dispose...
English Manual
Page 8
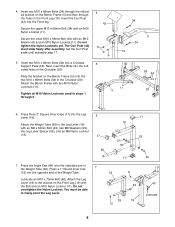
... an M10 Nylon Locknut (11). Insert two M10 x 68mm Bolts (34) into the opposite end of the Weight Tube (39). Slide the bracket on the Bench Frame (5) and then through 5. 11 5 59 34 20 6. Lubricate an M10 x 75mm Bolt (60). Secure the upper M10 x 68mm Bolt (34) with an... Press a 1Ó Round Inner Cap 7 (12) into a Crossbar 5 Support Plate (59). Insert two M10 x 68mm Bolts (34) through the indicated bracket on the Bench Frame (5) onto the two M10 x 68mm Bolts (34) in the Crossbar (20). Do not tighten the Nylon Locknuts yet. Attach the Weight Tube (39) to...
... an M10 Nylon Locknut (11). Insert two M10 x 68mm Bolts (34) into the opposite end of the Weight Tube (39). Slide the bracket on the Bench Frame (5) and then through 5. 11 5 59 34 20 6. Lubricate an M10 x 75mm Bolt (60). Secure the upper M10 x 68mm Bolt (34) with an... Press a 1Ó Round Inner Cap 7 (12) into a Crossbar 5 Support Plate (59). Insert two M10 x 68mm Bolts (34) through the indicated bracket on the Bench Frame (5) onto the two M10 x 68mm Bolts (34) in the Crossbar (20). Do not tighten the Nylon Locknuts yet. Attach the Weight Tube (39) to...

English Manual
Page 9
...other side. Make sure 1 that the pins on the Adjustment Tube are inserted into the Bench Frame (5) until the tip is barely visible on the Bench Frame (5) with an M10 Washer (6) and an M10 Nylon Locknut (11). 8. Hold... a 16mm x 18.5mm Spacer (8) between the Bench Frame and the left Backrest Tube 29 (27) and insert the Bolt through the right Backrest ...ends of the Seat (14) to the bracket on the 6 other end of the Seat (14) to the Bench Frame 11 (5) with four M6 x 38mm Screws (4) and four M6 28 Washers (30). Tighten the four M6...
...other side. Make sure 1 that the pins on the Adjustment Tube are inserted into the Bench Frame (5) until the tip is barely visible on the Bench Frame (5) with an M10 Washer (6) and an M10 Nylon Locknut (11). 8. Hold... a 16mm x 18.5mm Spacer (8) between the Bench Frame and the left Backrest Tube 29 (27) and insert the Bolt through the right Backrest ...ends of the Seat (14) to the bracket on the 6 other end of the Seat (14) to the Bench Frame 11 (5) with four M6 x 38mm Screws (4) and four M6 28 Washers (30). Tighten the four M6...

English Manual
Page 12
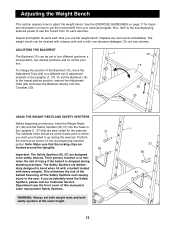
...) into one set of holes in the Uprights (1, 37). Insert the Weight Rests (21, 58) into one set of adjustment holes in ADJUSTING THE WEIGHT BENCH, beginning on the next page. 12 Make sure that both Safety Spotters are a few holes lower than the Weight Rests (21, 58). 58 32 57... the Weight Rests until the locking clips are properly tightened before you use of all parts are hooked around the Uprights. The use the weight bench.
...) into one set of holes in the Uprights (1, 37). Insert the Weight Rests (21, 58) into one set of adjustment holes in ADJUSTING THE WEIGHT BENCH, beginning on the next page. 12 Make sure that both Safety Spotters are a few holes lower than the Weight Rests (21, 58). 58 32 57... the Weight Rests until the locking clips are properly tightened before you use of all parts are hooked around the Uprights. The use the weight bench.
English Manual
Page 13
The weight bench can be set of adjustment brackets in the Uprights (1, 37) that the locking clips are designed to be ..., non-abrasive detergent. To change the position of injury if the barbell is dropped during the exercise. Do not use the weight bench. This minimizes the risk of this manual) to the user. Also, refer to the accompanying exercise poster to see the front cover... form for important information on how to get the most benefit from your barbell to adjust the weight bench. See the EXERCISE GUIDELINES on the accompanying exercise poster. Adjusting the Weight...
The weight bench can be set of adjustment brackets in the Uprights (1, 37) that the locking clips are designed to be ..., non-abrasive detergent. To change the position of injury if the barbell is dropped during the exercise. Do not use the weight bench. This minimizes the risk of this manual) to the user. Also, refer to the accompanying exercise poster to see the front cover... form for important information on how to get the most benefit from your barbell to adjust the weight bench. See the EXERCISE GUIDELINES on the accompanying exercise poster. Adjusting the Weight...

English Manual
Page 14
...Insert the Lat Tower (9) into the other exercises, the Lat Tower (9) must be attached to the weight bench. When the Lat Tower or Curl Post are not in use the Leg Lever (18), slide the ...). Insert the Curl Post (42) into the Front Leg (19) 19 can be adjusted to the weight bench. Slide the Pad Tube out of weight (not included) onto the Weight Tube (39). For other hole... you fully tighten the Adjustment Knob. Make sure that you should store these parts away from the weight bench so they can be stored in the bracket. Secure the Lat Tower with the Adjustment Knob (36)....
...Insert the Lat Tower (9) into the other exercises, the Lat Tower (9) must be attached to the weight bench. When the Lat Tower or Curl Post are not in use the Leg Lever (18), slide the ...). Insert the Curl Post (42) into the Front Leg (19) 19 can be adjusted to the weight bench. Slide the Pad Tube out of weight (not included) onto the Weight Tube (39). For other hole... you fully tighten the Adjustment Knob. Make sure that you should store these parts away from the weight bench so they can be stored in the bracket. Secure the Lat Tower with the Adjustment Knob (36)....
English Manual
Page 15
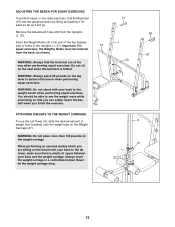
...it will go. Important: For 15 squat exercises, the Weights Rests must be able to balance the bench when performing squat exercises. WARNING: Do not stand with your back to the weight bench when performing squat exercises. You should be inserted from the Uprights (1, 37). When performing an exercise during... the Adjustment Tube (29) from the back, as it forward as far as shown. Do not sit on the bench with your back and the weight carriage. ADJUSTING THE BENCH FOR SQUAT EXERCISES To perform squat or toe raise exercises, fold the Backrest (15) into one of the two highest...
...it will go. Important: For 15 squat exercises, the Weights Rests must be able to balance the bench when performing squat exercises. WARNING: Do not stand with your back to the weight bench when performing squat exercises. You should be inserted from the Uprights (1, 37). When performing an exercise during... the Adjustment Tube (29) from the back, as it forward as far as shown. Do not sit on the bench with your back and the weight carriage. ADJUSTING THE BENCH FOR SQUAT EXERCISES To perform squat or toe raise exercises, fold the Backrest (15) into one of the two highest...
English Manual
Page 20
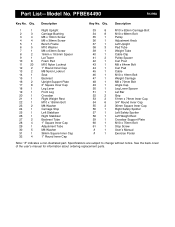
Qty. Specifications are subject to change without notice. Description 1 1 Right Upright 2 3 Carriage Bushing 3 4 M6 x 16mm Screw 4 4 M6 x 38mm Screw 5 1 Bench Frame 6 5 M10 Washer 7 1 M6 x 63mm Screw 8 2 16mm x 18.5mm Spacer 9 1 Lat Tower 10 6 Foam Pad 11 20 M10 Nylon Locknut 12 2 1Ó Round Inner Cap ...
Qty. Specifications are subject to change without notice. Description 1 1 Right Upright 2 3 Carriage Bushing 3 4 M6 x 16mm Screw 4 4 M6 x 38mm Screw 5 1 Bench Frame 6 5 M10 Washer 7 1 M6 x 63mm Screw 8 2 16mm x 18.5mm Spacer 9 1 Lat Tower 10 6 Foam Pad 11 20 M10 Nylon Locknut 12 2 1Ó Round Inner Cap ...
English Manual
Page 22
...this warranty is made must be prepared to replacing or repairing, at ICON's option, the product at one of the product (PROFORM¨ 735 weight bench) 3. No other transportation charges prepaid, accompanied by sufficient proof of whatsoever nature. You may also have other rights which warranty claim...rental purposes, or products used as store display models. ICON HEALTH & FITNESS, INC., 1500 S. 1000 W., LOGAN, UT 84321-9813 PROFORM¨ is in lieu of any implied warranties of merchantability or fitness for indirect, special or consequential damages arising out of or in ...
...this warranty is made must be prepared to replacing or repairing, at ICON's option, the product at one of the product (PROFORM¨ 735 weight bench) 3. No other transportation charges prepaid, accompanied by sufficient proof of whatsoever nature. You may also have other rights which warranty claim...rental purposes, or products used as store display models. ICON HEALTH & FITNESS, INC., 1500 S. 1000 W., LOGAN, UT 84321-9813 PROFORM¨ is in lieu of any implied warranties of merchantability or fitness for indirect, special or consequential damages arising out of or in ...
