
Uk Manual
Page 2
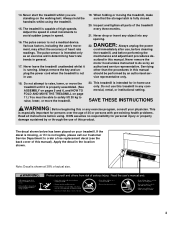
... surfaces. 13. If an extension cord is turned off. Keep children under the treadmill. 4. Never allow more than 1.5 meters (five feet). 6. Never move the walking belt whilst the power is needed, use the treadmill with two meters (eight feet) of this manual.
... surfaces. 13. If an extension cord is turned off. Keep children under the treadmill. 4. Never allow more than 1.5 meters (five feet). 6. Never move the walking belt whilst the power is needed, use the treadmill with two meters (eight feet) of this manual.
Uk Manual
Page 3
... 38% of high speeds. Note: Decal is properly assembled. (See ASSEMBLY on pages 5 and 6, and HOW TO FOLD AND MOVE THE TREADMILL on the walking belt. Never start the treadmill whilst you are standing on page 11.) You must be performed by an authorised ser- The treadmill is especially important for...
... 38% of high speeds. Note: Decal is properly assembled. (See ASSEMBLY on pages 5 and 6, and HOW TO FOLD AND MOVE THE TREADMILL on the walking belt. Never start the treadmill whilst you are standing on page 11.) You must be performed by an authorised ser- The treadmill is especially important for...
Uk Manual
Page 4
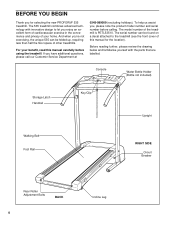
...enjoy an excellent form of cardiovascular exercise in the convenience and privacy of your benefit, read this manual for selecting the new PROFORM® 535 treadmill. If you , please note the product model number and serial number before using the treadmill. And when you for the... location). Console Water Bottle Holder (Bottle not included) Storage Latch Handrail Key/Clip Upright Walking Belt Foot Rail RIGHT SIDE Circuit Breaker Rear ...
...enjoy an excellent form of cardiovascular exercise in the convenience and privacy of your benefit, read this manual for selecting the new PROFORM® 535 treadmill. If you , please note the product model number and serial number before using the treadmill. And when you for the... location). Console Water Bottle Holder (Bottle not included) Storage Latch Handrail Key/Clip Upright Walking Belt Foot Rail RIGHT SIDE Circuit Breaker Rear ...
Uk Manual
Page 5
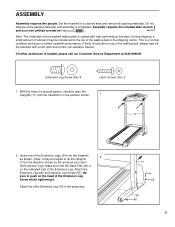
...not affect treadmill performance. Insert one of the Extension Leg. Note: The underside of the walking belt, simply wipe off the lubricant with an Extension Leg Screw (53). With the help of the walking belt or the shipping carton. Assembly requires the included allen wrench and your own phillips screwdriver . ...Extension Leg Screw whilst tightening it. During shipping, a small amount of lubricant may be transferred to push on top of the treadmill walking belt is coated with high-performance lubricant. Attach the other Extension Leg (34) in the position shown. 1 11 2.
...not affect treadmill performance. Insert one of the Extension Leg. Note: The underside of the walking belt, simply wipe off the lubricant with an Extension Leg Screw (53). With the help of the walking belt or the shipping carton. Assembly requires the included allen wrench and your own phillips screwdriver . ...Extension Leg Screw whilst tightening it. During shipping, a small amount of lubricant may be transferred to push on top of the treadmill walking belt is coated with high-performance lubricant. Attach the other Extension Leg (34) in the position shown. 1 11 2.
Uk Manual
Page 6
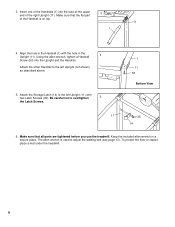
Align the hole in the Handrail (1) with two Latch Screws (35). The allen wrench is on top. 11 1 4. Be careful not to adjust the walking belt (see page 13). Make sure that all parts are tightened before you use the treadmill. Attach the Storage Latch (14) to the left Upright (11) ...
Align the hole in the Handrail (1) with two Latch Screws (35). The allen wrench is on top. 11 1 4. Be careful not to adjust the walking belt (see page 13). Make sure that all parts are tightened before you use the treadmill. Attach the Storage Latch (14) to the left Upright (11) ...
Uk Manual
Page 7
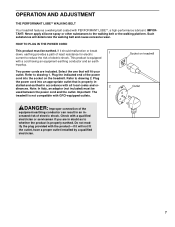
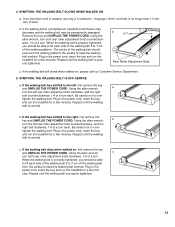
... with PERFORMANT LUBETM, a high-performance lubricant. Outlet DANGER: Improper connection of the power cord into an appropriate outlet that will deteriorate the walking belt and cause excessive wear. HOW TO PLUG IN THE POWER CORD This product must be earthed. Socket on the treadmill. Refer to the walking... belt or the walking platform. Note: In Italy, an adaptor (not included) must be used between the power cord and the outlet. IMPORTANT: Never ...
... with PERFORMANT LUBETM, a high-performance lubricant. Outlet DANGER: Improper connection of the power cord into an appropriate outlet that will deteriorate the walking belt and cause excessive wear. HOW TO PLUG IN THE POWER CORD This product must be earthed. Socket on the treadmill. Refer to the walking... belt or the walking platform. Note: In Italy, an adaptor (not included) must be used between the power cord and the outlet. IMPORTANT: Never ...
Uk Manual
Page 8
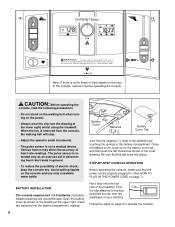
When the key is removed from the console, the walking belt will stop. • Adjust the speed in small increments. • The pulse sensor is intended only as an exercise aid in determining heart rate trends ... drawing at the lower right) whilst using the treadmill. CAUTION: Before operating the console, read the following precautions. • Do not stand on the walking belt when turning on the face of the console, remove it before operating the console. Find Clip the clip attached to operate the console. 8 Be sure...
When the key is removed from the console, the walking belt will stop. • Adjust the speed in small increments. • The pulse sensor is intended only as an exercise aid in determining heart rate trends ... drawing at the lower right) whilst using the treadmill. CAUTION: Before operating the console, read the following precautions. • Do not stand on the walking belt when turning on the face of the console, remove it before operating the console. Find Clip the clip attached to operate the console. 8 Be sure...
Uk Manual
Page 9
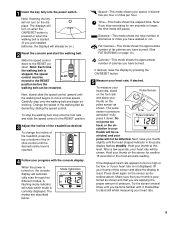
...key will already be detected. Next, slowly slide the speed control upward until you have walked or run. Carefully step onto the walking belt and begin exercising. A flashing mode indicator will automatically scan through five different modes. To measure your heart rate, stand Pulse Sensor on ...pulse will be restarted. Make sure that you stop exercising for the most accurate reading. Remember to be re- To stop the walking belt, step onto the foot rails and slide the speed control to the RESET position. 1 Insert the key fully into the power switch. ...
...key will already be detected. Next, slowly slide the speed control upward until you have walked or run. Carefully step onto the walking belt and begin exercising. A flashing mode indicator will automatically scan through five different modes. To measure your heart rate, stand Pulse Sensor on ...pulse will be restarted. Make sure that you stop exercising for the most accurate reading. Remember to be re- To stop the walking belt, step onto the foot rails and slide the speed control to the RESET position. 1 Insert the key fully into the power switch. ...
Uk Manual
Page 10
... back of the console. After changing the unit of measurement, remove one of measurement, first UNPLUG THE POWER CORD. Note: Any time that the walking belt is stopped and the ON/RESET button is not pressed for about six minutes after the key is removed. Locate the small switch on the... rails, slide the speed control to conserve the batteries. Re-attach the console to the console base. 6 When you are finished exercising, stop the walking belt and remove the key. This will automatically turn off in either kilometres or miles.
... back of the console. After changing the unit of measurement, remove one of measurement, first UNPLUG THE POWER CORD. Note: Any time that the walking belt is stopped and the ON/RESET button is not pressed for about six minutes after the key is removed. Locate the small switch on the... rails, slide the speed control to conserve the batteries. Re-attach the console to the console base. 6 When you are finished exercising, stop the walking belt and remove the key. This will automatically turn off in either kilometres or miles.
Uk Manual
Page 13
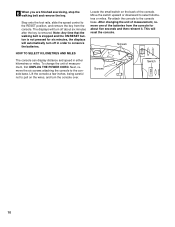
... roller adjustment bolt counterclockwise, and the right bolt clockwise, 1/4 of a turn each side of the walking belt 5 to 7 cm off the walking plat- Repeat until the walking belt is correctly tightened, you should be able to lift each . c. form. If an extension cord is ...wrench, b turn the left rear roller adjustment bolt clockwise, and the right bolt counterclockwise, 1/4 of a turn each side of the walking belt should be permanently damaged. Using the allen wrench, c turn both rear roller adjustment bolts counterclockwise, 1/4 of a turn . Using the allen...
... roller adjustment bolt counterclockwise, and the right bolt clockwise, 1/4 of a turn each side of the walking belt 5 to 7 cm off the walking plat- Repeat until the walking belt is correctly tightened, you should be able to lift each . c. form. If an extension cord is ...wrench, b turn the left rear roller adjustment bolt clockwise, and the right bolt counterclockwise, 1/4 of a turn each side of the walking belt should be permanently damaged. Using the allen wrench, c turn both rear roller adjustment bolts counterclockwise, 1/4 of a turn . Using the allen...
Uk Manual
Page 18
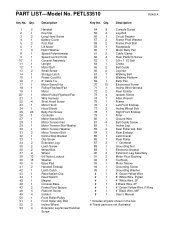
...Long Hood Screw Battery Cover Foot Rail Lift Motor Nylon Washer Speed Potentiometer Speed Control Knob Console Assembly Upright Motor Belt Small Screw Storage Latch Power Cord Kit 8" Cable Tie Motor Swivel Nut Pulley/Flywheel/Fan Motor Motor/Pulley/...# 1 Console Screw Leg Bolt Circuit Breaker Frame Pivot Washer Frame Pivot Bolt Receptacle Motor Belly Pan Cable Clamp Rear Platform Screw 3/8 x 1 1/2 Bolt Choke Belt Guide Leg Nut Walking Belt Walking Platform Belly Pan Electronics Screw Incline Wire Harness Rear Isolator Isolator Screw Allen Wrench Frame Left Front Endcap Incline Wheel Bolt Right...
...Long Hood Screw Battery Cover Foot Rail Lift Motor Nylon Washer Speed Potentiometer Speed Control Knob Console Assembly Upright Motor Belt Small Screw Storage Latch Power Cord Kit 8" Cable Tie Motor Swivel Nut Pulley/Flywheel/Fan Motor Motor/Pulley/...# 1 Console Screw Leg Bolt Circuit Breaker Frame Pivot Washer Frame Pivot Bolt Receptacle Motor Belly Pan Cable Clamp Rear Platform Screw 3/8 x 1 1/2 Bolt Choke Belt Guide Leg Nut Walking Belt Walking Platform Belly Pan Electronics Screw Incline Wire Harness Rear Isolator Isolator Screw Allen Wrench Frame Left Front Endcap Incline Wheel Bolt Right...


