
User Manual
Page 1
... technicians on our Customer Hot Line will provide immediate assistance, free of charge to you have questions, or if there are missing parts, we will guarantee complete satisfaction through direct assistance from our factory. MST CAUTION Read all precautions and instructions in the space above ...for future reference. If you . Save this equipment. Visit our website at www.proform.com new products, prizes, fitness tips, and much more! Serial Number Decal USER'S MANUAL QUESTIONS? TO AVOID DELAYS, PLEASE CALL DIRECT TO...
... technicians on our Customer Hot Line will provide immediate assistance, free of charge to you have questions, or if there are missing parts, we will guarantee complete satisfaction through direct assistance from our factory. MST CAUTION Read all precautions and instructions in the space above ...for future reference. If you . Save this equipment. Visit our website at www.proform.com new products, prizes, fitness tips, and much more! Serial Number Decal USER'S MANUAL QUESTIONS? TO AVOID DELAYS, PLEASE CALL DIRECT TO...

User Manual
Page 2
TABLE OF CONTENTS IMPORTANT PRECAUTIONS 3 BEFORE YOU BEGIN 5 ASSEMBLY 6 TREADMILL OPERATION 10 HOW TO FOLD AND MOVE THE TREADMILL 24 TROUBLESHOOTING 26 EXERCISE GUIDELINES 28 PART LIST 30 HOW TO ORDER REPLACEMENT PARTS Back Cover LIMITED WARRANTY Back Cover Note: An EXPLODED DRAWING is a registered trademark of this manual. PROFORM is attached in the center of ICON Health & Fitness, Inc. 2
TABLE OF CONTENTS IMPORTANT PRECAUTIONS 3 BEFORE YOU BEGIN 5 ASSEMBLY 6 TREADMILL OPERATION 10 HOW TO FOLD AND MOVE THE TREADMILL 24 TROUBLESHOOTING 26 EXERCISE GUIDELINES 28 PART LIST 30 HOW TO ORDER REPLACEMENT PARTS Back Cover LIMITED WARRANTY Back Cover Note: An EXPLODED DRAWING is a registered trademark of this manual. PROFORM is attached in the center of ICON Health & Fitness, Inc. 2

User Manual
Page 3
... with bare feet, wearing only stockings, or in general. 17. To protect the floor or carpet from moisture and dust. Never move the treadmill until it is the responsibility of the owner to raise, lower, or move the walking belt while the power is damaged, the walking belt ... Do not operate the treadmill where aerosol products are recommended for the location of the specifications described on page 24.) You must be on each side. Always wear athletic shoes. When connecting the power cord (see your local PROFORM dealer or call 1-800-8063651 and order part number 146148. 15. ...
... with bare feet, wearing only stockings, or in general. 17. To protect the floor or carpet from moisture and dust. Never move the treadmill until it is the responsibility of the owner to raise, lower, or move the walking belt while the power is damaged, the walking belt ... Do not operate the treadmill where aerosol products are recommended for the location of the specifications described on page 24.) You must be on each side. Always wear athletic shoes. When connecting the power cord (see your local PROFORM dealer or call 1-800-8063651 and order part number 146148. 15. ...
User Manual
Page 4
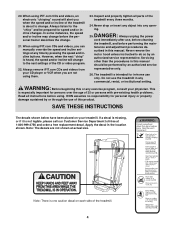
...no responsibility for persons over the age of 35 or persons with pre-existing health problems. Read all parts of the treadmill. 4 Always unplug the power cord immediately after use the treadmill in this manual. SAVE THESE INSTRUCTIONS The decals shown below have been placed on each side of the...iFIT.com CDs and videos, an electronic "chirping" sound will change to change . 21. Always remove iFIT.com CDs and videos from your treadmill. Servicing other than the procedures in any time by or through the use only. When using them. 23. Apply the decal in this ...
...no responsibility for persons over the age of 35 or persons with pre-existing health problems. Read all parts of the treadmill. 4 Always unplug the power cord immediately after use the treadmill in this manual. SAVE THESE INSTRUCTIONS The decals shown below have been placed on each side of the...iFIT.com CDs and videos, an electronic "chirping" sound will change to change . 21. Always remove iFIT.com CDs and videos from your treadmill. Servicing other than the procedures in any time by or through the use only. When using them. 23. Apply the decal in this ...
User Manual
Page 5
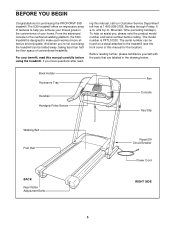
... Bolts Reset/Off Circuit Breaker Power Cord RIGHT SIDE 5 until 6 p.m. Before reading further, please familiarize yourself with the parts that are labeled in the convenience of this manual for purchasing the PROFORM® 530i treadmill. The 530i treadmill offers an impressive array of features to make each workout more effective and enjoyable. The model number is...
... Bolts Reset/Off Circuit Breaker Power Cord RIGHT SIDE 5 until 6 p.m. Before reading further, please familiarize yourself with the parts that are labeled in the convenience of this manual for purchasing the PROFORM® 530i treadmill. The 530i treadmill offers an impressive array of features to make each workout more effective and enjoyable. The model number is...

User Manual
Page 6
...Make sure that there are packaged in a cleared area and remove all packing materials. If a part is at the top as shown. Attach the Right Upright (82) to the 82 left side of the treadmill walking belt is not a wire harness on the left side. Attach the Left Upright (not...Wire Harness (83) into the Base (109) (only one is a normal condition and does not affect treadmill performance. Set the treadmill in separate part bags. This is shown). Note: The assembly hardware and other small parts are two U-Nuts (105) in the upper end of the hole. Note: There may be a ...
...Make sure that there are packaged in a cleared area and remove all packing materials. If a part is at the top as shown. Attach the Right Upright (82) to the 82 left side of the treadmill walking belt is not a wire harness on the left side. Attach the Left Upright (not...Wire Harness (83) into the Base (109) (only one is a normal condition and does not affect treadmill performance. Set the treadmill in separate part bags. This is shown). Note: The assembly hardware and other small parts are two U-Nuts (105) in the upper end of the hole. Note: There may be a ...

User Manual
Page 7
... 3/4" Tek Screws are shown). be removed. Hold the ends of the Console Frame (7). Firmly tighten the Screws. nector and try to the vertical position. Open part bag B. Attach the Pulse Bar with the indicated welds on the ground wire to the bottom of another person hold the Pulse Bar (110) firmly... and may need to be careful not to scratch the Console Base. Turn the Console Base (85) upside-down; Connect the Pulse Wire (118) in part bag C. 100 47 100 47 109 100 47 3. 2. Have another person, raise the Right Upright (82) and the Left Upright (not shown) to connect ...
... 3/4" Tek Screws are shown). be removed. Hold the ends of the Console Frame (7). Firmly tighten the Screws. nector and try to the vertical position. Open part bag B. Attach the Pulse Bar with the indicated welds on the ground wire to the bottom of another person hold the Pulse Bar (110) firmly... and may need to be careful not to scratch the Console Base. Turn the Console Base (85) upside-down; Connect the Pulse Wire (118) in part bag C. 100 47 100 47 109 100 47 3. 2. Have another person, raise the Right Upright (82) and the Left Upright (not shown) to connect ...
User Manual
Page 8
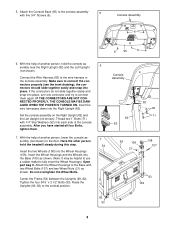
...). If the connectors do not slide together easily and snap into each side of the console assembly. With the help of another person, hold the treadmill steady during this step. Tighten the four 5/16" x 3 1/2" Bolts (93). 5. With the help of another person, lower the console assembly (not... shown) to fully insert the Wheel Housings.) Open part bag C. Make sure to the wire harness in the console assembly. the connectors should slide together easily and snap into the Base (109) as shown...
...). If the connectors do not slide together easily and snap into each side of the console assembly. With the help of another person, hold the treadmill steady during this step. Tighten the four 5/16" x 3 1/2" Bolts (93). 5. With the help of another person, lower the console assembly (not... shown) to fully insert the Wheel Housings.) Open part bag C. Make sure to the wire harness in the console assembly. the connectors should slide together easily and snap into the Base (109) as shown...

User Manual
Page 9
... halfway to each Crossbar Cap (84). 7 84 81 113 9. Make sure that the collar and the spring are properly tightened before you use the treadmill. The large allen wrench is positioned over the left side of the Frame (54). To protect the floor or carpet, place a mat under the... treadmill. 9 Tighten the two 3/8" x 3 1/2" Bolts (81). Make sure that the notch in place and tighten the two 3/4" Screws (6). Make sure that all parts are on the pin as shown. Press the Latch Cover (12) into the hole....
... halfway to each Crossbar Cap (84). 7 84 81 113 9. Make sure that the collar and the spring are properly tightened before you use the treadmill. The large allen wrench is positioned over the left side of the Frame (54). To protect the floor or carpet, place a mat under the... treadmill. 9 Tighten the two 3/8" x 3 1/2" Bolts (81). Make sure that the notch in place and tighten the two 3/4" Screws (6). Make sure that all parts are on the pin as shown. Press the Latch Cover (12) into the hole....
User Manual
Page 10
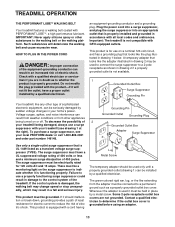
...cord into a surge suppressor, and plug the surge suppressor into an appropriate outlet that looks like any other type of 2 your treadmill being turned on the surge suppressor to the control system of electric shock. To decrease the possibility of sophisticated electronic equipment, can ...result in your local PROFORM dealer or call 1-800-806-3651 and order part number 146148. This product is properly installed and grounded in doubt as a properly grounded outlet box cover. ...
...cord into a surge suppressor, and plug the surge suppressor into an appropriate outlet that looks like any other type of 2 your treadmill being turned on the surge suppressor to the control system of electric shock. To decrease the possibility of sophisticated electronic equipment, can ...result in your local PROFORM dealer or call 1-800-806-3651 and order part number 146148. This product is properly installed and grounded in doubt as a properly grounded outlet box cover. ...

User Manual
Page 28
... to cool down. For aerobic exercise, adjust the speed or incline of your body begin to make exercise a regular and enjoyable part of the treadmill until your heart rate during exercise, use stored fat calories for fat burning; Next, find the three numbers above your "training zone...exercise aid in determining heart rate trends in your exercise program. The following three parts: A Warm-up increases your body temperature, heart rate and circulation in preparation for prolonged periods of the treadmill until your heart rate is near the highest number in your training zone for...
... to cool down. For aerobic exercise, adjust the speed or incline of your body begin to make exercise a regular and enjoyable part of the treadmill until your heart rate during exercise, use stored fat calories for fat burning; Next, find the three numbers above your "training zone...exercise aid in determining heart rate trends in your exercise program. The following three parts: A Warm-up increases your body temperature, heart rate and circulation in preparation for prolonged periods of the treadmill until your heart rate is near the highest number in your training zone for...

User Manual
Page 30
... Access Door Console Back Tie Holder Releasable Tie Plastic Tie Base Endcap Base Pad 30 Key No. Description Key No. PFTL51330 R1003A To locate the parts listed below, refer to the EXPLODED DRAWING attached in the center of this manual. Description 1 2 2 2 3 1 4 2 5 4 6 46 7 1 8 4 9 1 10 1 11 2 12 1 13 1 14 1 15 4 16 4 17 2 18... 8 99 2 100 6 Right Front Endcap Walking Belt Walking Platform Frame Platform Nut Right Foot Rail Rear Roller Right Rear Foot Allen Wrench Rear Roller Adj. PART LIST-Model No.
... Access Door Console Back Tie Holder Releasable Tie Plastic Tie Base Endcap Base Pad 30 Key No. Description Key No. PFTL51330 R1003A To locate the parts listed below, refer to the EXPLODED DRAWING attached in the center of this manual. Description 1 2 2 2 3 1 4 2 5 4 6 46 7 1 8 4 9 1 10 1 11 2 12 1 13 1 14 1 15 4 16 4 17 2 18... 8 99 2 100 6 Right Front Endcap Walking Belt Walking Platform Frame Platform Nut Right Foot Rail Rear Roller Right Rear Foot Allen Wrench Rear Roller Adj. PART LIST-Model No.

User Manual
Page 31
.../Pulley 10" Blue Wire, M/F 4" Blue Wire, 2 F 4" Blue Wire, M/F 4" Black Wire, M/F 4" Red Wire, M/F 12" Green Wire, F/Ring 8" Green Wire, 2 Ring User's Manual * Includes all parts shown in the box # These parts are not illustrated Specifications are subject to change without notice. 31 Qty. 118 1 119 1 120 1 # 1 # 1 # 1 # 1 # 1 # 1 # 1 # 1 Description Pulse Wire Front Roller Adj. Qty...
.../Pulley 10" Blue Wire, M/F 4" Blue Wire, 2 F 4" Blue Wire, M/F 4" Black Wire, M/F 4" Red Wire, M/F 12" Green Wire, F/Ring 8" Green Wire, 2 Ring User's Manual * Includes all parts shown in the box # These parts are not illustrated Specifications are subject to change without notice. 31 Qty. 118 1 119 1 120 1 # 1 # 1 # 1 # 1 # 1 # 1 # 1 # 1 Description Pulse Wire Front Roller Adj. Qty...

User Manual
Page 34
...or limitation of merchantability or fitness for commercial or rental purposes; ICON HEALTH & FITNESS, INC., 1500 S. 1000 W., LOGAN, UT 84321-9813 Part No. 201651 R1003A Printed in workmanship and material, under this product to be free from state to state. until 6 p.m. Accordingly, the above...be prepared to give the following information: • The MODEL NUMBER of the product (PFTL51330) • The NAME of the product (PROFORM® 530i treadmill) • The SERIAL NUMBER of the product (see the front cover of this manual) • The KEY NUMBER and DESCRIPTION of ...
...or limitation of merchantability or fitness for commercial or rental purposes; ICON HEALTH & FITNESS, INC., 1500 S. 1000 W., LOGAN, UT 84321-9813 Part No. 201651 R1003A Printed in workmanship and material, under this product to be free from state to state. until 6 p.m. Accordingly, the above...be prepared to give the following information: • The MODEL NUMBER of the product (PFTL51330) • The NAME of the product (PROFORM® 530i treadmill) • The SERIAL NUMBER of the product (see the front cover of this manual) • The KEY NUMBER and DESCRIPTION of ...


