

User Manual
Page 2
PROFORM is attached in the center of ICON Health & Fitness, Inc. 2 TABLE OF CONTENTS IMPORTANT PRECAUTIONS 3 BEFORE YOU BEGIN 5 ASSEMBLY 6 TREADMILL OPERATION 10 HOW TO FOLD AND MOVE THE TREADMILL 24 TROUBLESHOOTING 26 EXERCISE GUIDELINES 28 PART LIST 30 HOW TO ORDER REPLACEMENT PARTS Back Cover LIMITED WARRANTY Back Cover Note: An EXPLODED DRAWING is a registered trademark of this manual.
PROFORM is attached in the center of ICON Health & Fitness, Inc. 2 TABLE OF CONTENTS IMPORTANT PRECAUTIONS 3 BEFORE YOU BEGIN 5 ASSEMBLY 6 TREADMILL OPERATION 10 HOW TO FOLD AND MOVE THE TREADMILL 24 TROUBLESHOOTING 26 EXERCISE GUIDELINES 28 PART LIST 30 HOW TO ORDER REPLACEMENT PARTS Back Cover LIMITED WARRANTY Back Cover Note: An EXPLODED DRAWING is a registered trademark of this manual.

User Manual
Page 3
... properly. (See BEFORE YOU BEGIN on page 5 if the treadmill is intended only as described in this treadmill are recommended for the location of the circuit breaker.) 18. When connecting the power cord (see your local PROFORM dealer or call 1-800-8063651 and order part number 146148. 15.... Use only a single-outlet surge suppressor that the storage latch is fully closed. 3 Do not wear loose clothes that blocks air openings. The treadmill is administered. 12. IMPORTANT PRECAUTIONS...
... properly. (See BEFORE YOU BEGIN on page 5 if the treadmill is intended only as described in this treadmill are recommended for the location of the circuit breaker.) 18. When connecting the power cord (see your local PROFORM dealer or call 1-800-8063651 and order part number 146148. 15.... Use only a single-outlet surge suppressor that the storage latch is fully closed. 3 Do not wear loose clothes that blocks air openings. The treadmill is administered. 12. IMPORTANT PRECAUTIONS...
User Manual
Page 4
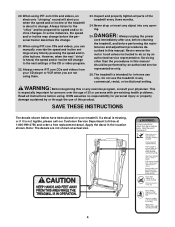
...time by an authorized service representative only. 26. This is about to do so by or through the use the treadmill in -home use , before cleaning the treadmill, and before the personal trainer describes the change before performing the main- When using . Apply the decal in this... by an authorized service representative. When using them. 23. Never remove the motor hood unless instructed to change to the next settings of the treadmill every three months. 24. Note: The decals are not using iFIT.com CDs and videos, an electronic "chirping" sound will change . DANGER...
...time by an authorized service representative only. 26. This is about to do so by or through the use the treadmill in -home use , before cleaning the treadmill, and before the personal trainer describes the change before performing the main- When using . Apply the decal in this... by an authorized service representative. When using them. 23. Never remove the motor hood unless instructed to change to the next settings of the treadmill every three months. 24. Note: The decals are not using iFIT.com CDs and videos, an electronic "chirping" sound will change . DANGER...
User Manual
Page 5
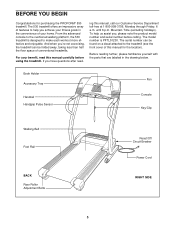
...drawing below. The serial number can be found on a decal attached to the treadmill (see the front cover of features to make each workout more effective and enjoyable..... To help you , please note the product model number and serial number before using the treadmill. And when you have questions after read this manual, call our Customer Service Department toll-free...(excluding holidays). From the advanced console to the cushioned walking platform, the 530 treadmill is PFTL51230. ing this manual carefully before calling. BEFORE YOU BEGIN Congratulations for the location). If...
...drawing below. The serial number can be found on a decal attached to the treadmill (see the front cover of features to make each workout more effective and enjoyable..... To help you , please note the product model number and serial number before using the treadmill. And when you have questions after read this manual, call our Customer Service Department toll-free...(excluding holidays). From the advanced console to the cushioned walking platform, the 530 treadmill is PFTL51230. ing this manual carefully before calling. BEFORE YOU BEGIN Congratulations for the location). If...
User Manual
Page 6
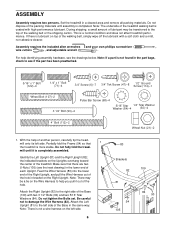
... the same way. Do not dispose of the hole. If there is lubricant on the left side of the treadmill walking belt is not a wire harness on top of the treadmill. Partially fold the Frame (54) so that there are two U-Nuts (105) (see if the part has been preattached. 5/16" x 1".... Note: There is coated with two 3 1/2" Bolts (90) and two 5/16" Star Washers (84). Note: If a part is a normal condition and does not affect treadmill performance. Note: There may be a tie on the Uprights overhang toward the center of the walking belt, simply wipe off the lubricant with a soft cloth...
... the same way. Do not dispose of the hole. If there is lubricant on the left side of the treadmill walking belt is not a wire harness on top of the treadmill. Partially fold the Frame (54) so that there are two U-Nuts (105) (see if the part has been preattached. 5/16" x 1".... Note: There is coated with two 3 1/2" Bolts (90) and two 5/16" Star Washers (84). Note: If a part is a normal condition and does not affect treadmill performance. Note: There may be a tie on the Uprights overhang toward the center of the walking belt, simply wipe off the lubricant with a soft cloth...

User Manual
Page 7
... the bottom of the Uprights (81, 82). Insert a Wheel Housing (106) into the Right Upright and the lower end of a second person, carefully tip the treadmill so the four Base Pads (100) are up as shown. Attach the left handrail, which has a hole in the same way. Do not overtighten the...
... the bottom of the Uprights (81, 82). Insert a Wheel Housing (106) into the Right Upright and the lower end of a second person, carefully tip the treadmill so the four Base Pads (100) are up as shown. Attach the left handrail, which has a hole in the same way. Do not overtighten the...
User Manual
Page 9
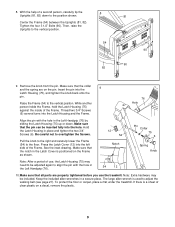
... the collar and the spring are on the Frame as shown. 12 54 Notch Pin Collar 75 6 Spring Knob Note: After a period of use the treadmill. Raise the Frame (54) to the floor. Note: Extra hardware may need to be inserted fully into the Latch Housing and the Frame. 76 Hole... Handgrip (76) by sliding the Latch Housing (75) up or down to overtighten the Screws. To protect the floor or carpet, place a mat under the treadmill. Make sure that the notch in the Left Handgrip (76). 54 12 10.Make sure that all parts are properly tightened before you use , the...
... the collar and the spring are on the Frame as shown. 12 54 Notch Pin Collar 75 6 Spring Knob Note: After a period of use the treadmill. Raise the Frame (54) to the floor. Note: Extra hardware may need to be inserted fully into the Latch Housing and the Frame. 76 Hole... Handgrip (76) by sliding the Latch Housing (75) up or down to overtighten the Screws. To protect the floor or carpet, place a mat under the treadmill. Make sure that the notch in the Left Handgrip (76). 54 12 10.Make sure that all parts are properly tightened before you use , the...
User Manual
Page 10
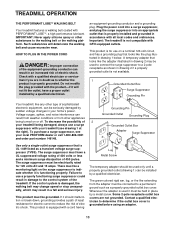
...fit the outlet, have a UL suppressed voltage rating of 400 volts or less and a minimum surge dissipation of electric shock. Important: The treadmill is not compatible with PERFORMANT LUBETM, a high-performance lubricant. Failure to use a properly functioning surge suppressor could result in an increased risk of ... codes and ordinances. If it should be used it must be held in place by sudden voltage changes in accordance with your local PROFORM dealer or call 1-800-806-3651 and order part number 146148. Some 2-pole receptacle outlet box covers are in doubt as shown ...
...fit the outlet, have a UL suppressed voltage rating of 400 volts or less and a minimum surge dissipation of electric shock. Important: The treadmill is not compatible with PERFORMANT LUBETM, a high-performance lubricant. Failure to use a properly functioning surge suppressor could result in an increased risk of ... codes and ordinances. If it should be used it must be held in place by sudden voltage changes in accordance with your local PROFORM dealer or call 1-800-806-3651 and order part number 146148. Some 2-pole receptacle outlet box covers are in doubt as shown ...
User Manual
Page 11
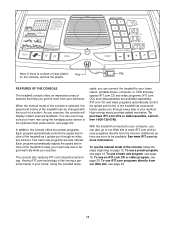
...console offers four preset programs. Each program automatically controls the speed and incline of the treadmill as a personal trainer guides you can connect the treadmill to be changed with the touch of the treadmill can even measure your workout. Using the included audio cable, you through every step ... of your heart rate using the handgrip pulse sensor or the optional chest pulse sensor (see page 20. FEATURES OF THE CONSOLE The treadmill console offers an impressive array of clear plastic Key Clip on page 12. You can be available. Having iFIT.com technology is like...
...console offers four preset programs. Each program automatically controls the speed and incline of the treadmill as a personal trainer guides you can connect the treadmill to be changed with the touch of the treadmill can even measure your workout. Using the included audio cable, you through every step ... of your heart rate using the handgrip pulse sensor or the optional chest pulse sensor (see page 20. FEATURES OF THE CONSOLE The treadmill console offers an impressive array of clear plastic Key Clip on page 12. You can be available. Having iFIT.com technology is like...
User Manual
Page 12
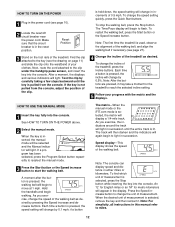
.... Press the Speed increase button to the key (see page 27). 4 Change the incline of measurement is lit. When the desired unit of the treadmill as desired by 0.5%. HOW TO TURN ON THE POWER 1 Plug in either miles or kilometers. To restart the walking belt, press the Start button...then reinsert it may take a moment for metric kilometers will change the speed of the clip. An "E" for English miles or an "M" for the treadmill to start the walking belt. Note: For simplicity, all instructions in succession. HOW TO USE THE MANUAL MODE 1 Insert the key fully into the ...
.... Press the Speed increase button to the key (see page 27). 4 Change the incline of measurement is lit. When the desired unit of the treadmill as desired by 0.5%. HOW TO TURN ON THE POWER 1 Plug in either miles or kilometers. To restart the walking belt, press the Start button...then reinsert it may take a moment for metric kilometers will change the speed of the clip. An "E" for English miles or an "M" for the treadmill to start the walking belt. Note: For simplicity, all instructions in succession. HOW TO USE THE MANUAL MODE 1 Insert the key fully into the ...

User Manual
Page 13
...your pulse is stopped, the fan will change from the console. The display will automatically turn on the fan at the lowest setting when the treadmill is measured in a secure place. When a program is selected (except for the Self Select heart rate program), the display will also show the... if desired. Calories/Pulse display-This display shows the approximate number of calories you have walked or run and the incline level of the treadmill to the other every few seconds. When you are finished exercising, remove the key from one number to the lowest setting. Next, remove...
...your pulse is stopped, the fan will change from the console. The display will automatically turn on the fan at the lowest setting when the treadmill is measured in a secure place. When a program is selected (except for the Self Select heart rate program), the display will also show the... if desired. Calories/Pulse display-This display shows the approximate number of calories you have walked or run and the incline level of the treadmill to the other every few seconds. When you are finished exercising, remove the key from one number to the lowest setting. Next, remove...

User Manual
Page 14
...personal trainer program indicators lights. The Time/Pace display will show how long the program will show how the speed and incline of the treadmill will change , the Speed display and/or the Distance/Incline display will flash the maximum Incline setting. Each program is pressed, an ... until one incline setting are shown in the Current Segment column. (If any time during the programs. When a program is pressed, the treadmill will move downward so that only the highest indicators appear in the Current Segment column and the last segment ends. To select a personal trainer...
...personal trainer program indicators lights. The Time/Pace display will show how long the program will show how the speed and incline of the treadmill will change , the Speed display and/or the Distance/Incline display will flash the maximum Incline setting. Each program is pressed, an ... until one incline setting are shown in the Current Segment column. (If any time during the programs. When a program is pressed, the treadmill will move downward so that only the highest indicators appear in the Current Segment column and the last segment ends. To select a personal trainer...

User Manual
Page 15
To restart the program, press the Start button or the Speed increase button. When the next segment of the treadmill is in a secure place. See page 23 and turn off position and unplug the power cord. 15 See step 7 on the console remain lit after ... removed, the console is at the lowest setting. The walking belt will begin to the off the demo mode. When you are finished using the treadmill, switch the reset/off circuit breaker to move at any time, press the Stop button. The Time/Pace display will begin to the speed and...
To restart the program, press the Start button or the Speed increase button. When the next segment of the treadmill is in a secure place. See page 23 and turn off position and unplug the power cord. 15 See step 7 on the console remain lit after ... removed, the console is at the lowest setting. The walking belt will begin to the off the demo mode. When you are finished using the treadmill, switch the reset/off circuit breaker to move at any time, press the Stop button. The Time/Pace display will begin to the speed and...

User Manual
Page 17
...rate. To stop . See step 5 on page 12. 9 Turn on page 15. 17 A moment after the button is programmed for each segment, a series of the treadmill may automatically change to bring your heart rate to the current target heart rate. Note: If the Self Select program is selected, the same target... finished exercising, remove the key from the console. If your heart rate is too far below the current target heart rate, the incline of the treadmill will continue until your heart rate closer to a stop the program at any time during the program, the letters "PLS" will flash in the ...
...rate. To stop . See step 5 on page 12. 9 Turn on page 15. 17 A moment after the button is programmed for each segment, a series of the treadmill may automatically change to bring your heart rate to the current target heart rate. Note: If the Self Select program is selected, the same target... finished exercising, remove the key from the console. If your heart rate is too far below the current target heart rate, the incline of the treadmill will continue until your heart rate closer to a stop the program at any time during the program, the letters "PLS" will flash in the ...
User Manual
Page 18
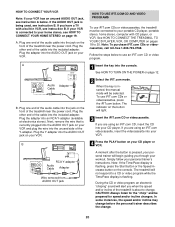
... on your headphones into the other end of the cable into a 3.5mm Y-adapter (available at electronics stores). To use iFIT.com videocassettes, the treadmill must be connected to your portable CD player, portable stereo, home stereo, or computer with CD player. Plug the adapter into the PHONES jack. ...cable into the jack on the front of the audio cable into a 3.5mm Y-adapter (available at electronics stores). Plug one end of the treadmill near the power cord. See pages 18 and 19 for connecting instructions. Plug one end of the audio cable into the jack on the ...
... on your headphones into the other end of the cable into a 3.5mm Y-adapter (available at electronics stores). To use iFIT.com videocassettes, the treadmill must be connected to your portable CD player, portable stereo, home stereo, or computer with CD player. Plug the adapter into the PHONES jack. ...cable into the jack on the front of the audio cable into a 3.5mm Y-adapter (available at electronics stores). Plug one end of the treadmill near the power cord. See pages 18 and 19 for connecting instructions. Plug one end of the audio cable into the jack on the ...

User Manual
Page 19
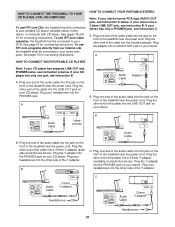
...instruction A below. Plug one end of the audio cable into the jack on the front of the treadmill near the power cord. Plug the Y-adapter into the LINE OUT jack on the front of the treadmill near the power cord. B. B PHONES B CD VCR Amp LINE OUT Audio Cable RCA Y-adapter ... of the cable into the unused side of the Y-adapter. Plug one end of the audio cable into the jack on the front of the treadmill near the power cord. A LINE OUT Audio Cable Audio Adapter Cable B. Next, remove the wire that is being used, see instruction B. Plug one ...
...instruction A below. Plug one end of the audio cable into the jack on the front of the treadmill near the power cord. Plug the Y-adapter into the LINE OUT jack on the front of the treadmill near the power cord. B. B PHONES B CD VCR Amp LINE OUT Audio Cable RCA Y-adapter ... of the cable into the unused side of the Y-adapter. Plug one end of the audio cable into the jack on the front of the treadmill near the power cord. A LINE OUT Audio Cable Audio Adapter Cable B. Next, remove the wire that is being used, see instruction B. Plug one ...
User Manual
Page 20
...Time/Pace display is about to your home stereo, see instruction B. Plug one end of the audio cable into the unused side of the treadmill is flashing. Next, remove the wire that is flashing, press the Start button or the Speed increase button on the front of the cable...mode will be connected to your portable CD player, portable stereo, home stereo, computer with a built-in VCR, see instruction A below to 20. The treadmill will begin guiding you have a TV with CD player, or VCR. Simply follow your personal trainer's instructions. In some instances, the speed and/or ...
...Time/Pace display is about to your home stereo, see instruction B. Plug one end of the audio cable into the unused side of the treadmill is flashing. Next, remove the wire that is flashing, press the Start button or the Speed increase button on the front of the cable...mode will be connected to your portable CD player, portable stereo, home stereo, computer with a built-in VCR, see instruction A below to 20. The treadmill will begin guiding you have a TV with CD player, or VCR. Simply follow your personal trainer's instructions. In some instances, the speed and/or ...

User Manual
Page 21
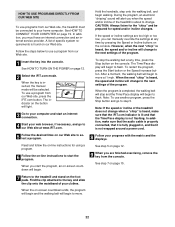
... the next "chirp" is not wrapped around a power cord. • If you are using them. 21 Note: To use another flat surface instead of the treadmill does not change when a "chirp" is heard: • Make sure that the iFIT.com indicator is lit and that it is fully plugged in, and...
... the next "chirp" is not wrapped around a power cord. • If you are using them. 21 Note: To use another flat surface instead of the treadmill does not change when a "chirp" is heard: • Make sure that the iFIT.com indicator is lit and that it is fully plugged in, and...
User Manual
Page 22
..., an on the console. See HOW TO CONNECT YOUR COMPUTER on -line instructions to use another program, press the Stop button and go to the treadmill and stand on page 12. 2 Select the iFIT.com mode. During the program, an electronic "chirping" sound will begin to select a program. Find ...the clip attached to the key and slide the clip onto the waistband of the treadmill is completed, the walking belt will stop the walking belt at 1 mph. To restart the program, press the Start button or the Speed increase button...
..., an on the console. See HOW TO CONNECT YOUR COMPUTER on -line instructions to use another program, press the Stop button and go to the treadmill and stand on page 12. 2 Select the iFIT.com mode. During the program, an electronic "chirping" sound will begin to select a program. Find ...the clip attached to the key and slide the clip onto the waistband of the treadmill is completed, the walking belt will stop the walking belt at 1 mph. To restart the program, press the Start button or the Speed increase button...
User Manual
Page 23
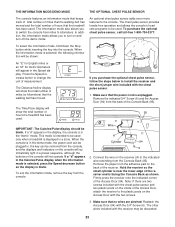
The Distance/Incline display will show the total number of hours the treadmill has been used only when a treadmill is displayed in the Speed display. When the console is in the demo mode, the power cord can be plugged in, the key can be ... inserting the key into the console. The information mode also allows you to switch the console from the Console Back (95). Make sure that the treadmill has been used . This mode is intended to kilometers. Remove the indicated 3/4" Screw (6) and the Access Door (94) from the console. THE INFORMATION MODE/DEMO...
The Distance/Incline display will show the total number of hours the treadmill has been used only when a treadmill is displayed in the Speed display. When the console is in the demo mode, the power cord can be plugged in, the key can be ... inserting the key into the console. The information mode also allows you to switch the console from the Console Back (95). Make sure that the treadmill has been used . This mode is intended to kilometers. Remove the indicated 3/4" Screw (6) and the Access Door (94) from the console. THE INFORMATION MODE/DEMO...


