
Uk Manual
Page 2
...loose clothing that is not working properly. (See 2 A 13 amp fuse should be used only by persons 13. Keep children under the treadmill. 4. IMPORTANT PRECAUTIONS WARNING: To reduce the risk of the owner to a plug. weighing 115 kgs or less. Athletic support clothes are ...1.5 meters. 12. TABLE OF CONTENTS IMPORTANT PRECAUTIONS 2 BEFORE YOU BEGIN 4 ASSEMBLY 5 OPERATION AND ADJUSTMENT 7 HOW TO FOLD AND MOVE THE TREADMILL 10 TROUBLE-SHOOTING 12 CONDITIONING GUIDELINES 14 HOW TO ORDER REPLACEMENT PARTS Back Cover Note: An EXPLODED DRAWING and a PART LIST are attached in sandals...
...loose clothing that is not working properly. (See 2 A 13 amp fuse should be used only by persons 13. Keep children under the treadmill. 4. IMPORTANT PRECAUTIONS WARNING: To reduce the risk of the owner to a plug. weighing 115 kgs or less. Athletic support clothes are ...1.5 meters. 12. TABLE OF CONTENTS IMPORTANT PRECAUTIONS 2 BEFORE YOU BEGIN 4 ASSEMBLY 5 OPERATION AND ADJUSTMENT 7 HOW TO FOLD AND MOVE THE TREADMILL 10 TROUBLE-SHOOTING 12 CONDITIONING GUIDELINES 14 HOW TO ORDER REPLACEMENT PARTS Back Cover Note: An EXPLODED DRAWING and a PART LIST are attached in sandals...
Uk Manual
Page 3
...to order a free replacement decal (see the back cover of heart rate readings. Do not attempt to avoid sudden jumps in this treadmill in general. 17. Inspect and tighten all instructions before performing the maintenance and adjustment procedures de- Servicing other than the procedures in ...this product. Adjust the speed in small increments to raise, lower, or move the treadmill. 14. The pulse sensor is fully closed. 20. scribed in -home use only. This treadmill is intended for personal injury or property damage sustained by or through the use this manual...
...to order a free replacement decal (see the back cover of heart rate readings. Do not attempt to avoid sudden jumps in this treadmill in general. 17. Inspect and tighten all instructions before performing the maintenance and adjustment procedures de- Servicing other than the procedures in ...this product. Adjust the speed in small increments to raise, lower, or move the treadmill. 14. The pulse sensor is fully closed. 20. scribed in -home use only. This treadmill is intended for personal injury or property damage sustained by or through the use this manual...
Uk Manual
Page 4
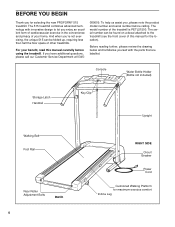
For your home. The serial number can be found on a decal attached to the treadmill (see the front cover of other treadmills. If you for selecting the new PROFORM® 515 treadmill. Console Water Bottle Holder (Bottle not included) Storage Latch Handrail Key/Clip Upright Walking Belt Foot ... Department at 0345- 089009. The model number of your benefit, read this manual for maximum exercise comfort Incline Leg The 515 treadmill combines advanced technology with the parts that are labelled. And when you enjoy an excellent form of cardiovascular exercise in the ...
For your home. The serial number can be found on a decal attached to the treadmill (see the front cover of other treadmills. If you for selecting the new PROFORM® 515 treadmill. Console Water Bottle Holder (Bottle not included) Storage Latch Handrail Key/Clip Upright Walking Belt Foot ... Department at 0345- 089009. The model number of your benefit, read this manual for maximum exercise comfort Incline Leg The 515 treadmill combines advanced technology with the parts that are labelled. And when you enjoy an excellent form of cardiovascular exercise in the ...
Uk Manual
Page 5
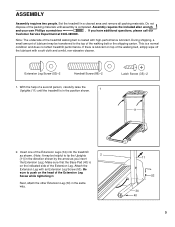
... of the Extension Leg. During shipping, a small amount of lubricant may be transferred to the top of the Extension Legs (34) into the treadmill as you have additional questions, please call our Customer Service Department at 0345-089009. Insert one of the walking belt or the shipping carton. Do... not dispose of the packing materials until the treadmill is in the direction shown by the arrow as shown. (Note: It may be helpful to push on the indicated side of the Extension...
... of the Extension Leg. During shipping, a small amount of lubricant may be transferred to the top of the Extension Legs (34) into the treadmill as you have additional questions, please call our Customer Service Department at 0345-089009. Insert one of the walking belt or the shipping carton. Do... not dispose of the packing materials until the treadmill is in the direction shown by the arrow as shown. (Note: It may be helpful to push on the indicated side of the Extension...
Uk Manual
Page 6
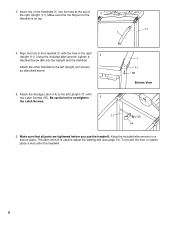
... View 11 35 14 6. Make sure that the flat part of the right Upright (11). To protect the floor or carpet, place a mat under the treadmill. 6 Be careful not to the left Upright (11) with the hole in a secure place. Make sure that all parts are tightened before you use the...
... View 11 35 14 6. Make sure that the flat part of the right Upright (11). To protect the floor or carpet, place a mat under the treadmill. 6 Be careful not to the left Upright (11) with the hole in a secure place. Make sure that all parts are tightened before you use the...
Uk Manual
Page 7
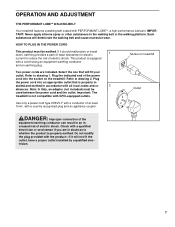
... compatible with a qualified electrician or serviceman if you are included. Refer to drawing 1. Plug the power cord into the socket on treadmill Two power cords are in doubt as to whether the product is properly in- HOW TO PLUG IN THE POWER CORD This product ...risk of electric shock. If it will deteriorate the walking belt and cause excessive wear. OPERATION AND ADJUSTMENT THE PERFORMANT LUBETM WALKING BELT Your treadmill features a walking belt coated with all local codes and or- 2 dinances. IMPORTANT: Never apply silicone spray or other substances to reduce...
... compatible with a qualified electrician or serviceman if you are included. Refer to drawing 1. Plug the power cord into the socket on treadmill Two power cords are in doubt as to whether the product is properly in- HOW TO PLUG IN THE POWER CORD This product ...risk of electric shock. If it will deteriorate the walking belt and cause excessive wear. OPERATION AND ADJUSTMENT THE PERFORMANT LUBETM WALKING BELT Your treadmill features a walking belt coated with all local codes and or- 2 dinances. IMPORTANT: Never apply silicone spray or other substances to reduce...
Uk Manual
Page 8
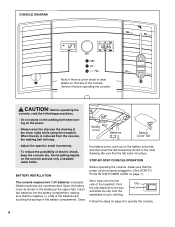
... is removed from the console, the walking belt will stop. • Adjust the speed in the drawing at the lower right) while using the treadmill. Avoid spilling liquids on page 9 to the key, and slide the clip onto the waistband of your clothing. Find Clip the clip attached to...are recommended. Close Battery Cover Batteries Battery Cover Tab the battery cover, push up on page 7.) Next, step onto the foot rails of the treadmill. Open the battery cover as shown in the battery compartment. STEP-BY-STEP CONSOLE OPERATION Before operating the console, make sure that the power ...
... is removed from the console, the walking belt will stop. • Adjust the speed in the drawing at the lower right) while using the treadmill. Avoid spilling liquids on page 9 to the key, and slide the clip onto the waistband of your clothing. Find Clip the clip attached to...are recommended. Close Battery Cover Batteries Battery Cover Tab the battery cover, push up on page 7.) Next, step onto the foot rails of the treadmill. Open the battery cover as shown in the battery compartment. STEP-BY-STEP CONSOLE OPERATION Before operating the console, make sure that the power ...
Uk Manual
Page 10
... the console base. Make sure that both incline pins are in the "locked" position shown in ei- After you raise the treadmill, make sure that both incline pins are three different in the locations shown at the same height. To decrease the possibility of injury, bend ...down- Caution: You must be changed. sole a few inches, being careful not to select kilo- ward to pull on page 11). Do not use the treadmill with your legs rather than your hands in - To change the incline, remove the incline pins from the console for about halfway to Screws Console...
... the console base. Make sure that both incline pins are in the "locked" position shown in ei- After you raise the treadmill, make sure that both incline pins are three different in the locations shown at the same height. To decrease the possibility of injury, bend ...down- Caution: You must be changed. sole a few inches, being careful not to select kilo- ward to pull on page 11). Do not use the treadmill with your legs rather than your hands in - To change the incline, remove the incline pins from the console for about halfway to Screws Console...
Uk Manual
Page 11
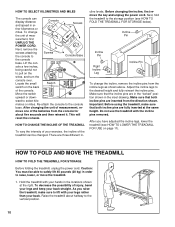
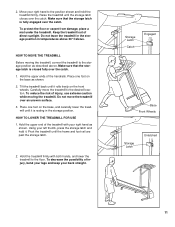
...direct sunlight. To reduce the risk of injury, use extreme caution while moving the treadmill, convert the treadmill to the desired location. HOW TO MOVE THE TREADMILL Before moving the treadmill. Do not move the treadmill to the storage position as shown. 2. Storage Latch Catch Engaged Base Front Wheels ...above 30° Celsius. Hold the upper end of injury, bend your legs and keep your right hand to the floor. Raise the treadmill until the frame and foot rail are past the storage latch. 2. Make sure that the storage latch is resting in temperatures above ....
...direct sunlight. To reduce the risk of injury, use extreme caution while moving the treadmill, convert the treadmill to the desired location. HOW TO MOVE THE TREADMILL Before moving the treadmill. Do not move the treadmill to the storage position as shown. 2. Storage Latch Catch Engaged Base Front Wheels ...above 30° Celsius. Hold the upper end of injury, bend your legs and keep your right hand to the floor. Raise the treadmill until the frame and foot rail are past the storage latch. 2. Make sure that the storage latch is resting in temperatures above ....
Uk Manual
Page 12
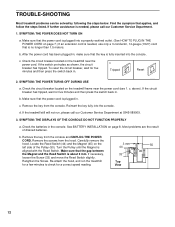
...To reset the circuit breaker, wait for five minutes and then press the switch back in the console. Check the circuit breaker located on the treadmill frame near the power cord. Reinsert the key fully into the console. Check the batteries in . 2. Locate the Reed Switch (44) ...Make sure that applies, and follow the steps listed. b. Turn the Pulley until the Magnet is fully inserted into the console. TROUBLE-SHOOTING Most treadmill problems can be solved by following the steps below. Find the symptom that the gap between the Magnet and the Reed Switch is plugged into...
...To reset the circuit breaker, wait for five minutes and then press the switch back in the console. Check the circuit breaker located on the treadmill frame near the power cord. Reinsert the key fully into the console. Check the batteries in . 2. Locate the Reed Switch (44) ...Make sure that applies, and follow the steps listed. b. Turn the Pulley until the Magnet is fully inserted into the console. TROUBLE-SHOOTING Most treadmill problems can be solved by following the steps below. Find the symptom that the gap between the Magnet and the Reed Switch is plugged into...
Uk Manual
Page 13
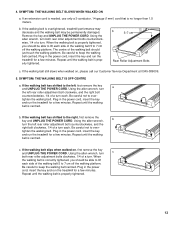
... CORD. SYMPTOM: THE WALKING BELT IS OFF-CENTRE a. b. tighten the walking belt. c. Plug in the power cord, insert the key and run the treadmill for a few minutes. 4. SYMPTOM: THE WALKING BELT SLOWS WHEN WALKED ON a. b. Be careful not to 7 cm off the walking platform. Repeat until... the walking belt is no longer than 1.5 meters. Repeat until the walking belt is overtightened, treadmill performance may decrease and the walking belt may be able to lift each side of a turn . Using the allen wrench, b turn the left...
... CORD. SYMPTOM: THE WALKING BELT IS OFF-CENTRE a. b. tighten the walking belt. c. Plug in the power cord, insert the key and run the treadmill for a few minutes. 4. SYMPTOM: THE WALKING BELT SLOWS WHEN WALKED ON a. b. Be careful not to 7 cm off the walking platform. Repeat until... the walking belt is no longer than 1.5 meters. Repeat until the walking belt is overtightened, treadmill performance may decrease and the walking belt may be able to lift each side of a turn . Using the allen wrench, b turn the left...
Uk Manual
Page 14
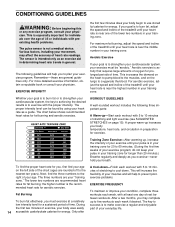
... minutes of exercise, your body uses easily part of time. For maximum fat burning, adjust the speed and incline of the treadmill until your heart rate is to use stored fat calories for prolonged periods of your "training exercise problems. zone." tween workouts.... exercise, adjust the speed and incline of time. The three numbers are recommended heart rates for a sustained period of the treadmill until your heart rate is near the highest number in your physician. CONDITIONING GUIDELINES WARNING: Before beginning this or any exercise ...
... minutes of exercise, your body uses easily part of time. For maximum fat burning, adjust the speed and incline of the treadmill until your heart rate is to use stored fat calories for prolonged periods of your "training exercise problems. zone." tween workouts.... exercise, adjust the speed and incline of time. The three numbers are recommended heart rates for a sustained period of the treadmill until your heart rate is near the highest number in your physician. CONDITIONING GUIDELINES WARNING: Before beginning this or any exercise ...
Uk Manual
Page 16
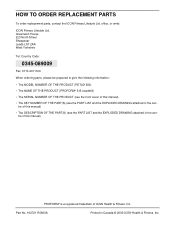
...PART LIST and the EXPLODED DRAWING attached in the cen- Part No. 162721 R0800A Printed in the cen- tre of ICON Health & Fitness, Inc. PROFORM® is a registered trademark of this manual) • The DESCRIPTION OF THE PART(S) (see the PART LIST and the EXPLODED DRAWING attached in ..., please be prepared to give the following information: • The MODEL NUMBER OF THE PRODUCT (PETL51500) • The NAME OF THE PRODUCT (PROFORM® 515 treadmill) • The SERIAL NUMBER OF THE PRODUCT (see the front cover of this manual). office, or write: ICON Fitness Lifestyle Ltd.
...PART LIST and the EXPLODED DRAWING attached in the cen- Part No. 162721 R0800A Printed in the cen- tre of ICON Health & Fitness, Inc. PROFORM® is a registered trademark of this manual) • The DESCRIPTION OF THE PART(S) (see the PART LIST and the EXPLODED DRAWING attached in ..., please be prepared to give the following information: • The MODEL NUMBER OF THE PRODUCT (PETL51500) • The NAME OF THE PRODUCT (PROFORM® 515 treadmill) • The SERIAL NUMBER OF THE PRODUCT (see the front cover of this manual). office, or write: ICON Fitness Lifestyle Ltd.


