

Uk Manual
Page 1
If you have questions, or if there are committed to providing complete customer satisfaction. Save this equipment. Model No. Serial Number Decal QUESTIONS? Customer Service Department Unit 4 Revie Road Industrial Estate Revie Road Beeston Leeds, LS118JG UK email: [email protected] CAUTION Read all precautions and instructions in this manual before using this manual for future reference. PETL41106.0 Serial No. As a manufacturer, we are missing or damaged parts, please call: 08457 089 009 or write: ICON Health & Fitness, Ltd. USER'S MANUAL
If you have questions, or if there are committed to providing complete customer satisfaction. Save this equipment. Model No. Serial Number Decal QUESTIONS? Customer Service Department Unit 4 Revie Road Industrial Estate Revie Road Beeston Leeds, LS118JG UK email: [email protected] CAUTION Read all precautions and instructions in this manual before using this manual for future reference. PETL41106.0 Serial No. As a manufacturer, we are missing or damaged parts, please call: 08457 089 009 or write: ICON Health & Fitness, Ltd. USER'S MANUAL

Uk Manual
Page 4
... the maintenance and adjustment procedures de- This treadmill is heard, the speed and/or incline will change to do so by an authorized ser- This is not legible, call the telephone number on your MP3 player when you can manually override the speed and incline settings by or... through the use this product. SAVE THESE INSTRUCTIONS The decals shown here have been placed on the front cover of this treadmill in the location shown. 50% 4 21. Servicing other...
... the maintenance and adjustment procedures de- This treadmill is heard, the speed and/or incline will change to do so by an authorized ser- This is not legible, call the telephone number on your MP3 player when you can manually override the speed and incline settings by or... through the use this product. SAVE THESE INSTRUCTIONS The decals shown here have been placed on the front cover of this treadmill in the location shown. 50% 4 21. Servicing other...
Uk Manual
Page 5
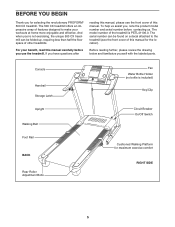
... parts. To help us assist you, note the product model number and serial number before you 're not exercising, the unique 500 CX treadmill can be folded up, requiring less than half the floor space of features designed to the treadmill (see the front cover of this manual. If you for selecting the revolutionary PROFORM® 500 CX treadmill.
... parts. To help us assist you, note the product model number and serial number before you 're not exercising, the unique 500 CX treadmill can be folded up, requiring less than half the floor space of features designed to the treadmill (see the front cover of this manual. If you for selecting the revolutionary PROFORM® 500 CX treadmill.

Uk Manual
Page 11
...home. Having iFIT technology is a sheet of clear plastic on the front cover of this manual. With the treadmill connected to your computer, you can connect the treadmill to your heart rate using the treadmill. 11 cassettes are available separately). To prevent damage to the walking platform, always wear ...shoes while using the handgrip pulse sensor or the chest pulse sensor. Matrix Priority Display Display Clip Key FEATURES OF THE CONSOLE The treadmill console offers an impressive array of features designed to make your workout; You can also go to www.iFIT.com and access ...
...home. Having iFIT technology is a sheet of clear plastic on the front cover of this manual. With the treadmill connected to your computer, you can connect the treadmill to your heart rate using the treadmill. 11 cassettes are available separately). To prevent damage to the walking platform, always wear ...shoes while using the handgrip pulse sensor or the chest pulse sensor. Matrix Priority Display Display Clip Key FEATURES OF THE CONSOLE The treadmill console offers an impressive array of features designed to make your workout; You can also go to www.iFIT.com and access ...

Uk Manual
Page 12
...belt will gradually increase in speed until it reaches the selected speed setting. Note: The first time the treadmill is held down, the speed setting will show your heart rate. 12 When the manual mode is in increments of the walking belt as desired by pressing any program button twice; Next, ... that represents 400 meters (1/4 mile). See HOW TO TURN ON THE POWER above. 2 Select the manual mode. If you press one of the treadmill as needed. If you exercise, change in the "on the treadmill, the indicators around the track will again begin to move at 2 Km/h. As you press the ...
...belt will gradually increase in speed until it reaches the selected speed setting. Note: The first time the treadmill is held down, the speed setting will show your heart rate. 12 When the manual mode is in increments of the walking belt as desired by pressing any program button twice; Next, ... that represents 400 meters (1/4 mile). See HOW TO TURN ON THE POWER above. 2 Select the manual mode. If you press one of the treadmill as needed. If you exercise, change in the "on the treadmill, the indicators around the track will again begin to move at 2 Km/h. As you press the ...

Uk Manual
Page 14
... incline settings of the matrix. (The incline settings are lit, the speed settings may be shown in the flashing Current Segment column, and the treadmill will flash in the Current Segment column; If the speed or incline setting for the second segment will begin walking. "P1," "P2," "P3...," "P4," "P5," "P6," "P7," "P8," "P9," "P10," "P11," or "P12" will last. The speed setting for a few seconds after you can manually override the setting by pressing the Speed or Incline buttons. The speed setting for the current segment is about to change, the speed setting and...
... incline settings of the matrix. (The incline settings are lit, the speed settings may be shown in the flashing Current Segment column, and the treadmill will flash in the Current Segment column; If the speed or incline setting for the second segment will begin walking. "P1," "P2," "P3...," "P4," "P5," "P6," "P7," "P8," "P9," "P10," "P11," or "P12" will last. The speed setting for a few seconds after you can manually override the setting by pressing the Speed or Incline buttons. The speed setting for the current segment is about to change, the speed setting and...
Uk Manual
Page 20
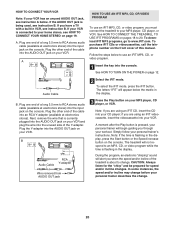
... to RCA stereo audio cable (available at electronics stores) into your VCR. To select the iFIT mode, press the iFIT button. The treadmill will begin guiding you are using an iFIT videocassette, insert the videocassette into your VCR and plug the wire into the input jack on... CONNECT YOUR VCR Note: If your MP3 player, CD player, or VCR. If you must connect the treadmill to 20. Plug the other end of this manual. Plug one end of the treadmill is being used, see instruction B. The letters "iFIT" will alert you are using an iFIT CD, ...
... to RCA stereo audio cable (available at electronics stores) into your VCR. To select the iFIT mode, press the iFIT button. The treadmill will begin guiding you are using an iFIT videocassette, insert the videocassette into your VCR and plug the wire into the input jack on... CONNECT YOUR VCR Note: If your MP3 player, CD player, or VCR. If you must connect the treadmill to 20. Plug the other end of this manual. Plug one end of the treadmill is being used, see instruction B. The letters "iFIT" will alert you are using an iFIT CD, ...

Uk Manual
Page 21
... you are not using a portable CD player and the CD skips, set the CD player on the floor or another flat surface instead of the treadmill does not change when a "chirp" is heard: • Make sure that the letters "iFIT" appear in the display and that the audio cable is not..., press the Stop button or remove the key and go to the next settings of the program. See step 7 on page 13. 7 When you can manually override the settings at any time, press the Stop button on pages 12 and 13. 5 Measure your progress with the matrix and the display. The...
... you are not using a portable CD player and the CD skips, set the CD player on the floor or another flat surface instead of the treadmill does not change when a "chirp" is heard: • Make sure that the letters "iFIT" appear in the display and that the audio cable is not..., press the Stop button or remove the key and go to the next settings of the program. See step 7 on page 13. 7 When you can manually override the settings at any time, press the Stop button on pages 12 and 13. 5 Measure your progress with the matrix and the display. The...
Uk Manual
Page 22
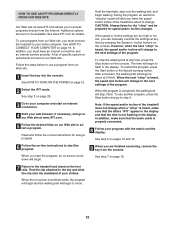
...incline will stop the walking belt at 2 Km/h. Note: If the speed and/or incline of the treadmill is about to change to the next settings of specific system requirements is not flashing in the display....too low, you to your clothes. Hold the handrails, step onto the walking belt, and begin to the treadmill and stand on the foot rails. The time will change . However, when the next "chirp" is ... treadmill does not change to the next settings of your home computer. HOW TO USE AN IFIT PROGRAM DIRECTLY FROM OUR WEB SITE Our Web site at www.iFIT.com allows you can manually...
...incline will stop the walking belt at 2 Km/h. Note: If the speed and/or incline of the treadmill is about to change to the next settings of specific system requirements is not flashing in the display....too low, you to your clothes. Hold the handrails, step onto the walking belt, and begin to the treadmill and stand on the foot rails. The time will change . However, when the next "chirp" is ... treadmill does not change to the next settings of your home computer. HOW TO USE AN IFIT PROGRAM DIRECTLY FROM OUR WEB SITE Our Web site at www.iFIT.com allows you can manually...

Uk Manual
Page 26
... then press the switch back in. c Tripped Reset d On Position PROBLEM: The power turns off switch is in the "on the treadmill near the power cord. PROBLEM: The incline of the console does not function properly SOLUTION: a. Next, remove the three Screws (83)...circuit breaker located on SOLUTION: a. With the key in the console, press one of this manual. TROUBLESHOOTING Most treadmill problems can be in the "on the treadmill near the power cord. Important: The treadmill is required. 3 83 3 26 If the switch protrudes as shown. d. If an extension...
... then press the switch back in. c Tripped Reset d On Position PROBLEM: The power turns off switch is in the "on the treadmill near the power cord. PROBLEM: The incline of the console does not function properly SOLUTION: a. Next, remove the three Screws (83)...circuit breaker located on SOLUTION: a. With the key in the console, press one of this manual. TROUBLESHOOTING Most treadmill problems can be in the "on the treadmill near the power cord. Important: The treadmill is required. 3 83 3 26 If the switch protrudes as shown. d. If an extension...
Uk Manual
Page 27
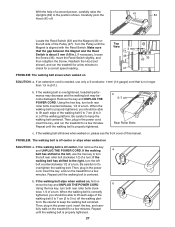
...walking platform. Top View 3 mm 46 33 63 47 PROBLEM: The walking belt slows when walked on , please see the front cover of this manual. If the walking belt is off -center or slips when walked on , first re- Repeat until the Magnet is off -center, first remove the... walk on the left bolt counterclockwise 1/2 of the walking belt 5 to 7 cm (2 to 3 in the power cord, insert the key, and run the treadmill for a few minutes. move the Reed Switch slightly, and then retighten the Screw. Turn the Pulley until the walking belt is properly tightened, you should...
...walking platform. Top View 3 mm 46 33 63 47 PROBLEM: The walking belt slows when walked on , please see the front cover of this manual. If the walking belt is off -center or slips when walked on , first re- Repeat until the Magnet is off -center, first remove the... walk on the left bolt counterclockwise 1/2 of the walking belt 5 to 7 cm (2 to 3 in the power cord, insert the key, and run the treadmill for a few minutes. move the Reed Switch slightly, and then retighten the Screw. Turn the Pulley until the walking belt is properly tightened, you should...

Uk Manual
Page 31
... 73 1 Latch Housing 111 1 Chest Pulse 74 2 Tie Clamp Sensor 75 3 Releasable Tie # 1 6" Blue Wire, 2F 76 1 Access Door # 1 4" Red Wire, M/F 77 1 Upright Wire # 1 User's Manual Harness 78 1 Console Wire "#" indicates a non-illustrated part.
... 73 1 Latch Housing 111 1 Chest Pulse 74 2 Tie Clamp Sensor 75 3 Releasable Tie # 1 6" Blue Wire, 2F 76 1 Access Door # 1 4" Red Wire, M/F 77 1 Upright Wire # 1 User's Manual Harness 78 1 Console Wire "#" indicates a non-illustrated part.
Uk Manual
Page 36
... give the following information: • the MODEL NUMBER of the product (PETL41106.0) • the NAME of the product (PROFORM 500 CX treadmill) • the SERIAL NUMBER of the product (see the front cover of this manual) • the KEY NUMBER and DESCRIPTION of the part(s) (see the PART LIST and EXPLODED DRAWING on pages 31...
... give the following information: • the MODEL NUMBER of the product (PETL41106.0) • the NAME of the product (PROFORM 500 CX treadmill) • the SERIAL NUMBER of the product (see the front cover of this manual) • the KEY NUMBER and DESCRIPTION of the part(s) (see the PART LIST and EXPLODED DRAWING on pages 31...


