
English Manual
Page 1
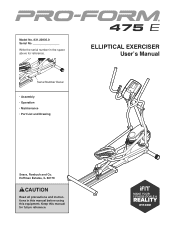
Hoffman Estates, IL 60179 CAUTION Read all precautions and instructions in the space above for future reference. Serial Number Decal •• Assembly •• Operation •• Maintenance •• Part List and Drawing ELLIPTICAL EXERCISER User’'s Manual Sears, Roebuck and Co. Keep this equipment. Write the serial number in this manual before using this manual for reference. Model No. 831.23935.0 Serial No.
Hoffman Estates, IL 60179 CAUTION Read all precautions and instructions in the space above for future reference. Serial Number Decal •• Assembly •• Operation •• Maintenance •• Part List and Drawing ELLIPTICAL EXERCISER User’'s Manual Sears, Roebuck and Co. Keep this equipment. Write the serial number in this manual before using this manual for reference. Model No. 831.23935.0 Serial No.
English Manual
Page 2
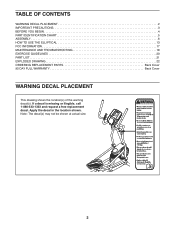
... size. 2 TABLE OF CONTENTS WARNING DECAL PLACEMENT 2 IMPORTANT PRECAUTIONS 3 BEFORE YOU BEGIN 4 PART IDENTIFICATION CHART 5 ASSEMBLY 6 HOW TO USE THE ELLIPTICAL 13 FCC INFORMATION 17 MAINTENANCE AND TROUBLESHOOTING 18 EXERCISE GUIDELINES 20 PART LIST 21 EXPLODED DRAWING 22 ORDERING REPLACEMENT PARTS Back Cover 90 DAY FULL WARRANTY Back Cover WARNING DECAL PLACEMENT This drawing...
... size. 2 TABLE OF CONTENTS WARNING DECAL PLACEMENT 2 IMPORTANT PRECAUTIONS 3 BEFORE YOU BEGIN 4 PART IDENTIFICATION CHART 5 ASSEMBLY 6 HOW TO USE THE ELLIPTICAL 13 FCC INFORMATION 17 MAINTENANCE AND TROUBLESHOOTING 18 EXERCISE GUIDELINES 20 PART LIST 21 EXPLODED DRAWING 22 ORDERING REPLACEMENT PARTS Back Cover 90 DAY FULL WARRANTY Back Cover WARNING DECAL PLACEMENT This drawing...
English Manual
Page 3
... the handlebars or the upper body arms when mounting, dismounting, or using the elliptical. 4. Inspect and properly tighten all parts regularly. The elliptical is not a medical device. Do not put the elliptical in this manual. 9. Reduce your physician. Before beginning any worn parts immediately. 8. Various factors may result in serious injury or death. The heart...
... the handlebars or the upper body arms when mounting, dismounting, or using the elliptical. 4. Inspect and properly tighten all parts regularly. The elliptical is not a medical device. Do not put the elliptical in this manual. 9. Reduce your physician. Before beginning any worn parts immediately. 8. Various factors may result in serious injury or death. The heart...
English Manual
Page 4
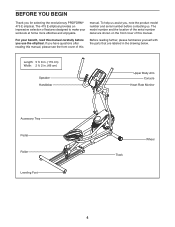
The 475 E elliptical provides an impressive selection of this manual carefully before contacting us assist you, note the product model number and serial number before you use the elliptical. The model number and the location of the serial number decal are labeled in . (66 cm) .... Length: 5 ft. 8 in. (173 cm) Width: 2 ft. 2 in the drawing below. If you for selecting the revolutionary PROFORM® 475 E elliptical. BEFORE YOU BEGIN Thank you have questions after reading this manual, please see the front cover of this Before reading further, please familiarize yourself...
The 475 E elliptical provides an impressive selection of this manual carefully before contacting us assist you, note the product model number and serial number before you use the elliptical. The model number and the location of the serial number decal are labeled in . (66 cm) .... Length: 5 ft. 8 in. (173 cm) Width: 2 ft. 2 in the drawing below. If you for selecting the revolutionary PROFORM® 475 E elliptical. BEFORE YOU BEGIN Thank you have questions after reading this manual, please see the front cover of this Before reading further, please familiarize yourself...
English Manual
Page 5
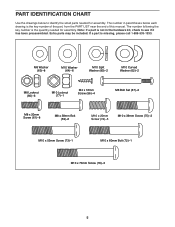
... Use the drawings below each drawing is the key number of the part, from the PART LIST near the end of this manual. Note: If a part is not in parentheses below to see if it has been preassembled. Extra parts may be included. M8 Washer (63)–-8 M10 Washer (64)–-6 M10 Split Washer...)–-1 M10 x 60mm Bolt (72)–-1 M10 x 70mm Screw (76)–-2 5 The number following the key number is missing, please call 1-888-533-1333. If a part is the quantity needed for assembly. The number in the hardware kit, check to identify the small...
... Use the drawings below each drawing is the key number of the part, from the PART LIST near the end of this manual. Note: If a part is not in parentheses below to see if it has been preassembled. Extra parts may be included. M8 Washer (63)–-8 M10 Washer (64)–-6 M10 Split Washer...)–-1 M10 x 60mm Bolt (72)–-1 M10 x 70mm Screw (76)–-2 5 The number following the key number is missing, please call 1-888-533-1333. If a part is the quantity needed for assembly. The number in the hardware kit, check to identify the small...
English Manual
Page 6
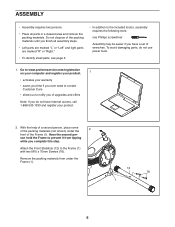
... Frame (1). 12 76 1 6 Do not dispose of the packing materials until you nish all parts in a cleared area and remove the packing materials. Have the second per- To avoid damaging parts, do not have a set of the Frame (1). ASSEMBLY •• Assembly requires two persons. &#...149;• Place all assembly steps. •• Left parts are marked “"L”" or “"Left”" and right parts are marked “"R”" or “"Right.”" •• To identify small parts, see page 5. •• In addition to the included tool(s), ...
... Frame (1). 12 76 1 6 Do not dispose of the packing materials until you nish all parts in a cleared area and remove the packing materials. Have the second per- To avoid damaging parts, do not have a set of the Frame (1). ASSEMBLY •• Assembly requires two persons. &#...149;• Place all assembly steps. •• Left parts are marked “"L”" or “"Left”" and right parts are marked “"R”" or “"Right.”" •• To identify small parts, see page 5. •• In addition to the included tool(s), ...
English Manual
Page 11
... Pedal Arm (9) onto the Right Roller Arm (7) as shown by the diagrams inside the battery compartment on the cover of the power adapter into both parts. Apply grease to the Left Roller Arm (8) in accordance with an M8 Washer (63) into the battery compartments.
... Pedal Arm (9) onto the Right Roller Arm (7) as shown by the diagrams inside the battery compartment on the cover of the power adapter into both parts. Apply grease to the Left Roller Arm (8) in accordance with an M8 Washer (63) into the battery compartments.
English Manual
Page 12
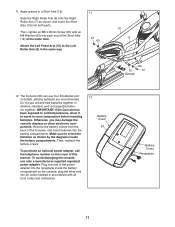
... Bolt (72). Connect the wires on the Main Wire Harness (32). Have a second person hold the Console (30) near the Upright (2). Place a mat beneath the elliptical to the Pulse Wire Harness (31). Remove and discard the wire tie on the Console (30) to the Main Wire Harness (32) and to protect... M4 x 16mm Screws (56). Tighten the M8 x 38mm Bolts (59). 13 30 Avoid pinching the wires 31 32 2 56 14. 13. Make sure that all parts are properly tightened before you use the elliptical. Note: Extra parts may be included.
... Bolt (72). Connect the wires on the Main Wire Harness (32). Have a second person hold the Console (30) near the Upright (2). Place a mat beneath the elliptical to the Pulse Wire Harness (31). Remove and discard the wire tie on the Console (30) to the Main Wire Harness (32) and to protect... M4 x 16mm Screws (56). Tighten the M8 x 38mm Bolts (59). 13 30 Avoid pinching the wires 31 32 2 56 14. 13. Make sure that all parts are properly tightened before you use the elliptical. Note: Extra parts may be included.

English Manual
Page 17
... sound system while you are designed to correct the interference by pressing the Resistance buttons. FCC INFORMATION This equipment has been tested and found to part 15 of tones will sound and the workout will continue until the last segment of the profile flashes and the last segment of the following...
... sound system while you are designed to correct the interference by pressing the Resistance buttons. FCC INFORMATION This equipment has been tested and found to part 15 of tones will sound and the workout will continue until the last segment of the profile flashes and the last segment of the following...
English Manual
Page 18
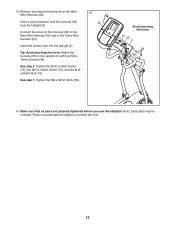
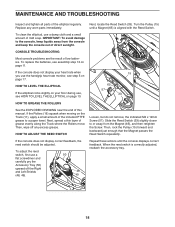
...feedback, the reed switch should be adjusted. Next, locate the Reed Switch (33). CONSOLE TROUBLESHOOTING Most console problems are the result of the elliptical regularly. If the console does not display your floor during use a flat screwdriver and carefully pry the Accessory Tray (50) upward off any worn... the indicated M4 x 12mm Screw (57). When the reed switch is aligned with the Reed Switch. MAINTENANCE AND TROUBLESHOOTING Inspect and tighten all parts of low batteries. To replace the batteries, see assembly step 12 on page 13. 15 65 57 33 HOW TO GREASE THE ROLLERS See the...
...feedback, the reed switch should be adjusted. Next, locate the Reed Switch (33). CONSOLE TROUBLESHOOTING Most console problems are the result of the elliptical regularly. If the console does not display your floor during use a flat screwdriver and carefully pry the Accessory Tray (50) upward off any worn... the indicated M4 x 12mm Screw (57). When the reed switch is aligned with the Reed Switch. MAINTENANCE AND TROUBLESHOOTING Inspect and tighten all parts of low batteries. To replace the batteries, see assembly step 12 on page 13. 15 65 57 33 HOW TO GREASE THE ROLLERS See the...
English Manual
Page 20
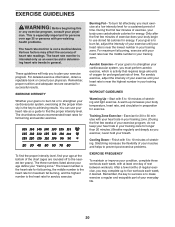
... until your heart rate is near the lowest number in preparation for persons over age 35 or persons with 5 to make exercise a regular and enjoyable part of rest between workouts.
... until your heart rate is near the lowest number in preparation for persons over age 35 or persons with 5 to make exercise a regular and enjoyable part of rest between workouts.

English Manual
Page 21
... 5 75 2 76 2 77 1 78 1 79 10 80 2 * –- * –- * –- For information about ordering replacement parts, see the back cover of this manual. Description Wheel Axle Cover Large Round Cap Right Pedal Left Pedal Right Shield Left Shield Accessory Tray V-clip... Screw M10 Locknut M5 x 10mm Screw #10 x 14mm Screw M10 Split Washer Assembly Tool Grease Packet User’'s Manual Note: Specifications are not illustrated. 21 PART LIST Model No. 831.23935.0 R0813A Key No. Qty. 1 1 2 1 3 1 4 1 5 1 6 1 7 1 8 1 9 1 10 1 11 1 12 1 13 2 14 1 15...
... 5 75 2 76 2 77 1 78 1 79 10 80 2 * –- * –- * –- For information about ordering replacement parts, see the back cover of this manual. Description Wheel Axle Cover Large Round Cap Right Pedal Left Pedal Right Shield Left Shield Accessory Tray V-clip... Screw M10 Locknut M5 x 10mm Screw #10 x 14mm Screw M10 Split Washer Assembly Tool Grease Packet User’'s Manual Note: Specifications are not illustrated. 21 PART LIST Model No. 831.23935.0 R0813A Key No. Qty. 1 1 2 1 3 1 4 1 5 1 6 1 7 1 8 1 9 1 10 1 11 1 12 1 13 2 14 1 15...

English Manual
Page 24
... rights, and you may also have other rights which vary from state to arrange for rental purposes. Sears, Roebuck and Co., Hoffman Estates, IL 60179 Part No. 352919 R0813A Printed in material or workmanship within 90 days of the date of purchase, call 1-800-4-MY-HOME® (1-800-469-4663) to... state. 90 DAY FULL WARRANTY If this Sears Elliptical Exerciser fails due to a defect in China © 2013 ICON IP, Inc. This warranty does not apply when the...
... rights, and you may also have other rights which vary from state to arrange for rental purposes. Sears, Roebuck and Co., Hoffman Estates, IL 60179 Part No. 352919 R0813A Printed in material or workmanship within 90 days of the date of purchase, call 1-800-4-MY-HOME® (1-800-469-4663) to... state. 90 DAY FULL WARRANTY If this Sears Elliptical Exerciser fails due to a defect in China © 2013 ICON IP, Inc. This warranty does not apply when the...


