

Uk Manual
Page 1
As a manufacturer, we will guarantee complete satisfaction through our Customer Service Department. Save this equipment. Class HC Fitness Product USERÕS MANUAL Please CALL: 0345-089009 Or WRITE: ICON Fitness Lifestyle Ltd. Greenwich House 223 North Street Sheepscar Leeds LS7 2AA West Yorkshire CAUTION Read all precautions and instructions in the space above for future reference. Serial Number Decal QUESTIONS? Write the serial number in this manual before using this manual for reference. Model No. PETL32571 Serial No. If you have questions, or if there are missing...
As a manufacturer, we will guarantee complete satisfaction through our Customer Service Department. Save this equipment. Class HC Fitness Product USERÕS MANUAL Please CALL: 0345-089009 Or WRITE: ICON Fitness Lifestyle Ltd. Greenwich House 223 North Street Sheepscar Leeds LS7 2AA West Yorkshire CAUTION Read all precautions and instructions in the space above for future reference. Serial Number Decal QUESTIONS? Write the serial number in this manual before using this manual for reference. Model No. PETL32571 Serial No. If you have questions, or if there are missing...
Uk Manual
Page 2
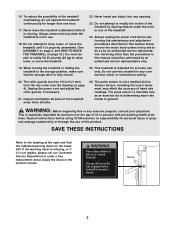
IMPORTANT PRECAUTIONS WARNING: To reduce the risk of burns, fire, electric shock, or injury to ensure that could become caught in the treadmill. Always wear athletic shoes. No other appliance should be fitted to avoid sudden jumps in speed. 2 Do not put the treadmill in this manual. 3. Keep the power cord away from damage, place a mat under the age of clearance behind it. Never move the walking belt whilst the power is being administered. 6. Adjust the speed in small increments to the fuse carrier; Remove the PART LIST and EXPLODED DRAWING before operating the ...
IMPORTANT PRECAUTIONS WARNING: To reduce the risk of burns, fire, electric shock, or injury to ensure that could become caught in the treadmill. Always wear athletic shoes. No other appliance should be fitted to avoid sudden jumps in speed. 2 Do not put the treadmill in this manual. 3. Keep the power cord away from damage, place a mat under the age of clearance behind it. Never move the walking belt whilst the power is being administered. 6. Adjust the speed in small increments to the fuse carrier; Remove the PART LIST and EXPLODED DRAWING before operating the ...
Uk Manual
Page 3
Do not attempt to raise, lower, or move the treadmill. 22. Always unplug the power cord before using. Servicing other than one hour. 17. This treadmill is especially important for in this treadmill in use only. The pulse sensor is running. This is intended for persons over the age of 35 or persons with pre-existing health problems. Read all parts of heart rate readings. Decal 3 16. Do not attempt to raise, lower, or move the treadmill until it is properly assembled. (See ASSEMBLY on page 5, and HOW TO MOVE THE TREADMILL on page 4). Do not use of the treadmill ...
Do not attempt to raise, lower, or move the treadmill. 22. Always unplug the power cord before using. Servicing other than one hour. 17. This treadmill is especially important for in this treadmill in use only. The pulse sensor is running. This is intended for persons over the age of 35 or persons with pre-existing health problems. Read all parts of heart rate readings. Decal 3 16. Do not attempt to raise, lower, or move the treadmill until it is properly assembled. (See ASSEMBLY on page 5, and HOW TO MOVE THE TREADMILL on page 4). Do not use of the treadmill ...
Uk Manual
Page 4
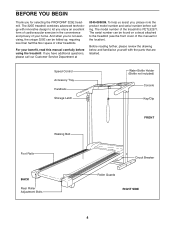
... the drawing below and familiarise yourself with innovative design to the treadmill (see the front cover of your benefit, read this manual for selecting the PROFORM¨ 325E treadmill. If you have additional questions, please call our Customer Service Department at 0345-089009. And when youÕre not exercising, the...
... the drawing below and familiarise yourself with innovative design to the treadmill (see the front cover of your benefit, read this manual for selecting the PROFORM¨ 325E treadmill. If you have additional questions, please call our Customer Service Department at 0345-089009. And when youÕre not exercising, the...
Uk Manual
Page 5
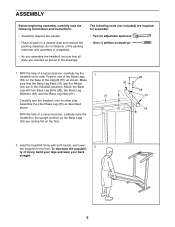
ASSEMBLY Before beginning assembly, carefully read the following tools (not included) are in a cleared area and remove the packing materials; With the help of injury, bend your legs and keep your back straight. 5 Assemble the other side. Make sure that all parts in the indicated positions. The following information and instructions: ¥ Assembly requires two people. ¥ Place all parts are oriented as shown in the drawings. Hold the treadmill firmly with two Base Leg Bolts (28), two Base Leg Washers (68), and two Base Leg Nuts (61). 37 Carefully turn the ...
ASSEMBLY Before beginning assembly, carefully read the following tools (not included) are in a cleared area and remove the packing materials; With the help of injury, bend your legs and keep your back straight. 5 Assemble the other side. Make sure that all parts in the indicated positions. The following information and instructions: ¥ Assembly requires two people. ¥ Place all parts are oriented as shown in the drawings. Hold the treadmill firmly with two Base Leg Bolts (28), two Base Leg Washers (68), and two Base Leg Nuts (61). 37 Carefully turn the ...
Uk Manual
Page 6
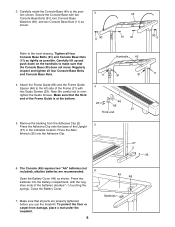
Carefully rotate the Console Base (45) to over- Carefully lift up and push down on the handrails to make sure that the thick end of the Upright (37) in the indicated location. tighten the Guide Screws. Close the Battery Cover. 49 48 7. Attach the Frame Guide (66) and the Frame Guide 4 Spacer (46) to the inset drawing. Press the Allen Wrench (35) into the battery compartment, with the negative ends of the Frame (21) with two Console Base Bolts (91), two Console Base Washers (90), and two Console Base Nuts (11) as shown. 11 90 45 91 91 90 11 Refer to the left ...
Carefully rotate the Console Base (45) to over- Carefully lift up and push down on the handrails to make sure that the thick end of the Upright (37) in the indicated location. tighten the Guide Screws. Close the Battery Cover. 49 48 7. Attach the Frame Guide (66) and the Frame Guide 4 Spacer (46) to the inset drawing. Press the Allen Wrench (35) into the battery compartment, with the negative ends of the Frame (21) with two Console Base Bolts (91), two Console Base Washers (90), and two Console Base Nuts (11) as shown. 11 90 45 91 91 90 11 Refer to the left ...
Uk Manual
Page 7
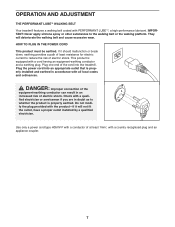
Plug one end of electric shock. fied electrician or serviceman if you are in doubt as to whether the product is properly installed and earthed in an increased risk of at least 1mm2, with a cord having an equipment-earthing conductor and a earthing plug. This product is equipped with a country recognised plug and an appliance coupler. 7 HOW TO PLUG IN THE POWER CORD This product must be earthed. Use only a power cord type H05VV-F with a conductor of electric shock. Plug the power cord into the treadmill. fy the plug provided with all local codes and ordinances...
Plug one end of electric shock. fied electrician or serviceman if you are in doubt as to whether the product is properly installed and earthed in an increased risk of at least 1mm2, with a cord having an equipment-earthing conductor and a earthing plug. This product is equipped with a country recognised plug and an appliance coupler. 7 HOW TO PLUG IN THE POWER CORD This product must be earthed. Use only a power cord type H05VV-F with a conductor of electric shock. Plug the power cord into the treadmill. fy the plug provided with all local codes and ordinances...
Uk Manual
Page 8
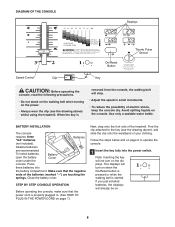
BATTERY INSTALLATION The console requires three "AA" batteries Batteries (not included). Press three batteries into the power switch. Follow the steps below and on page 9 to the key (see the drawing above ), and slide the clip onto the waistband of the treadmill. Note: Inserting the key will stop. ¥ Adjust the speed in . (See HOW TO PLUG IN THE POWER CORD on page 7.) Next, step onto the foot rails of your clothing. Alkaline batteries are touching the springs. Make sure that the power cord is removed from the console, the walking belt will not turn on when ...
BATTERY INSTALLATION The console requires three "AA" batteries Batteries (not included). Press three batteries into the power switch. Follow the steps below and on page 9 to the key (see the drawing above ), and slide the clip onto the waistband of the treadmill. Note: Inserting the key will stop. ¥ Adjust the speed in . (See HOW TO PLUG IN THE POWER CORD on page 7.) Next, step onto the foot rails of your clothing. Alkaline batteries are touching the springs. Make sure that the power cord is removed from the console, the walking belt will not turn on when ...
Uk Manual
Page 9
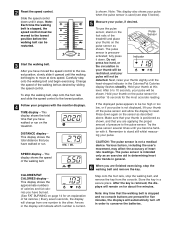
Note: Each time the walking belt is used (see step 5 below). 5 Measure your pulse when the pulse sensor is stopped, the speed control must be moved to reset. ly shown. Note: This display also shows your pulse, if desired. The pulse sensor is not displayed, lift your thumb off in the display will change from the console. Do not press too hard, or the circulation in general. 6 When you are finished exercising, stop the walking belt and remove the key. Hold your thumb on for the most accurate reading. 4 Follow your progress with it down until it upward until the walking ...
Note: Each time the walking belt is used (see step 5 below). 5 Measure your pulse when the pulse sensor is stopped, the speed control must be moved to reset. ly shown. Note: This display also shows your pulse, if desired. The pulse sensor is not displayed, lift your thumb off in the display will change from the console. Do not press too hard, or the circulation in general. 6 When you are finished exercising, stop the walking belt and remove the key. Hold your thumb on for the most accurate reading. 4 Follow your progress with it down until it upward until the walking ...
Uk Manual
Page 10
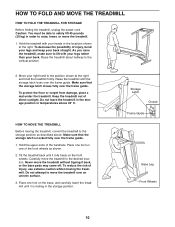
As you raise the treadmill, make sure to the storage position as shown. 2. HOW TO MOVE THE TREADMILL Before moving the treadmill. Hold the upper ends of injury, bend your legs and keep your hands in order to the vertical position. 2. Tilt the treadmill back until it rolls freely on one of the front wheels as described above 34o C. Never move the treadmill to the desired location. Place one foot on the front wheels. To decrease the possibility of the handrails. Move your back. Keep the treadmill out of injury, use extreme caution whilst moving the treadmill, ...
As you raise the treadmill, make sure to the storage position as shown. 2. HOW TO MOVE THE TREADMILL Before moving the treadmill. Hold the upper ends of injury, bend your legs and keep your hands in order to the vertical position. 2. Tilt the treadmill back until it rolls freely on one of the front wheels as described above 34o C. Never move the treadmill to the desired location. Place one foot on the front wheels. To decrease the possibility of the handrails. Move your back. Keep the treadmill out of injury, use extreme caution whilst moving the treadmill, ...

Uk Manual
Page 11
Storage Opened Latch Frame Guide 11 HOW TO LOWER THE TREADMILL FOR USE 1. Hold the treadmill firmly with your right hand as shown. Hold the upper end of injury, bend your legs and keep your left hand, slide open the storage latch. Pivot the treadmill until the frame guide and the foot rail are past the storage latch. 2. Using your back straight. To decrease the possibility of the treadmill with both hands, and lower the treadmill to the floor.
Storage Opened Latch Frame Guide 11 HOW TO LOWER THE TREADMILL FOR USE 1. Hold the treadmill firmly with your right hand as shown. Hold the upper end of injury, bend your legs and keep your left hand, slide open the storage latch. Pivot the treadmill until the frame guide and the foot rail are past the storage latch. 2. Using your back straight. To decrease the possibility of the treadmill with both hands, and lower the treadmill to the floor.
Uk Manual
Page 12
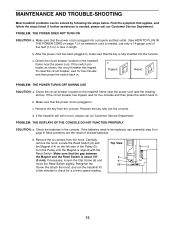
c. c Tripped Reset Tripped Reset PROBLEM: THE POWER TURNS OFF DURING USE SOLUTION: a. Make sure that the power cord is aligned with the Reed Switch. d. If the treadmill still will not run the treadmill for a few minutes to be solved by following the steps below. Check the batteries in . b. Turn the Pulley until the Magnet is plugged in length. Re-attach the hood, and run , please call our Customer Service Department. PROBLEM: THE POWER DOES NOT TURN ON SOLUTION: a. Most problems are the result of the Pulley (5). If necessary, loosen the Clip Screw (9) and ...
c. c Tripped Reset Tripped Reset PROBLEM: THE POWER TURNS OFF DURING USE SOLUTION: a. Make sure that the power cord is aligned with the Reed Switch. d. If the treadmill still will not run the treadmill for a few minutes to be solved by following the steps below. Check the batteries in . b. Turn the Pulley until the Magnet is plugged in length. Re-attach the hood, and run , please call our Customer Service Department. PROBLEM: THE POWER DOES NOT TURN ON SOLUTION: a. Most problems are the result of the Pulley (5). If necessary, loosen the Clip Screw (9) and ...
Uk Manual
Page 13
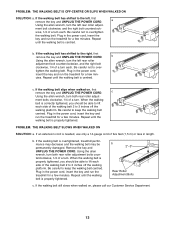
If the walking belt has shifted to overtighten the walking belt. Be careful not to the left, first remove the key and UNPLUG THE POWER CORD. Be careful not to the right, first remove the key and UNPLUG THE POWER CORD. c Using the allen wrench, turn both rear roller adjustment bolts counterclockwise, 1/4 of a turn both rear roller adjust- b. If the walking belt is correctly tightened, you should be able to keep the walking belt centred. If the walking belt has shifted to over- Plug in length. If the walking belt slips when walked on , please call our ...
If the walking belt has shifted to overtighten the walking belt. Be careful not to the left, first remove the key and UNPLUG THE POWER CORD. Be careful not to the right, first remove the key and UNPLUG THE POWER CORD. c Using the allen wrench, turn both rear roller adjustment bolts counterclockwise, 1/4 of a turn both rear roller adjust- b. If the walking belt is correctly tightened, you should be able to keep the walking belt centred. If the walking belt has shifted to over- Plug in length. If the walking belt slips when walked on , please call our ...
Uk Manual
Page 14
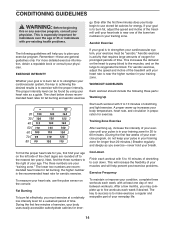
Only after the first few months, you must be found by using your training zone. Aerobic Exercise The following three parts: Warming Up Start each week if desired. The three numbers are your exercise must exercise at least one of your muscles and will help prevent post-exercise problems. Exercise Frequency To maintain or improve your breath. This will increase the flexibility of the lower two numbers in your age. After a few minutes does your body begin to plan your exercise program. CONDITIONING GUIDELINES WARNING: Before beginning this or any ...
Only after the first few months, you must be found by using your training zone. Aerobic Exercise The following three parts: Warming Up Start each week if desired. The three numbers are your exercise must exercise at least one of your muscles and will help prevent post-exercise problems. Exercise Frequency To maintain or improve your breath. This will increase the flexibility of the lower two numbers in your age. After a few minutes does your body begin to plan your exercise program. CONDITIONING GUIDELINES WARNING: Before beginning this or any ...
Uk Manual
Page 15
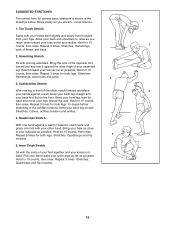
Allow your back and shoulders to your back leg as possible. Hold for 15 counts, then relax. Keep your back leg straight and your hips toward the wall. To cause further stretching of the opposite foot toward your knees outward. Hold for 15 counts, then relax. Hold for 15 counts, then relax. Hold for 15 counts, then relax. Repeat 3 times for balance, reach back and grasp one foot with the soles of your toes as far as possible. Repeat 3 times. Stretches: Hamstrings, back of the other hand. Calf/Achilles Stretch With one leg extended. Bring your heel...
Allow your back and shoulders to your back leg as possible. Hold for 15 counts, then relax. Keep your back leg straight and your hips toward the wall. To cause further stretching of the opposite foot toward your knees outward. Hold for 15 counts, then relax. Hold for 15 counts, then relax. Hold for 15 counts, then relax. Repeat 3 times for balance, reach back and grasp one foot with the soles of your toes as far as possible. Repeat 3 times. Stretches: Hamstrings, back of the other hand. Calf/Achilles Stretch With one leg extended. Bring your heel...
Uk Manual
Page 16
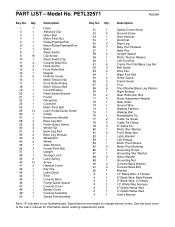
Bolt Roller Adjustment Washer Rear Roller Ground Wire Walking Platform Walking Belt Releaseable Tie Cable Tie Screw Cable Tie Clamp 8Ó Cable Tie Motor Star Washer Front Roller Nut Latch Bracket Left Endcap Motor Pivot Sleeve Motor Pivot Bushing Grounding Screw Grounding Star Washer Nylon Washer Grounding Nut Console Base Washer Console Base Bolt Bracket 10Ó Black Wire, 2 Female 8Ó Black Wire, Male/Female 4Ó Black Wire, 2 Female 10Ó White Wire Harness 8Ó Green/Yellow Wire 4Ó Green/Yellow Wire UserÕs Manual Note: Ò#Ó indicates a non-...
Bolt Roller Adjustment Washer Rear Roller Ground Wire Walking Platform Walking Belt Releaseable Tie Cable Tie Screw Cable Tie Clamp 8Ó Cable Tie Motor Star Washer Front Roller Nut Latch Bracket Left Endcap Motor Pivot Sleeve Motor Pivot Bushing Grounding Screw Grounding Star Washer Nylon Washer Grounding Nut Console Base Washer Console Base Bolt Bracket 10Ó Black Wire, 2 Female 8Ó Black Wire, Male/Female 4Ó Black Wire, 2 Female 10Ó White Wire Harness 8Ó Green/Yellow Wire 4Ó Green/Yellow Wire UserÕs Manual Note: Ò#Ó indicates a non-...
Uk Manual
Page 18
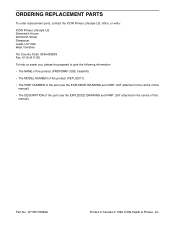
... Code: 0345-089009 Fax: 0113-2411120 To help us assist you, please be prepared to give the following information: ¥ The NAME of the product (PROFORM¨ 325E treadmill) ¥ The MODEL NUMBER of the product (PETL32571) ¥ The PART NUMBER of the part (see the EXPLODED DRAWING and PART LIST...
... Code: 0345-089009 Fax: 0113-2411120 To help us assist you, please be prepared to give the following information: ¥ The NAME of the product (PROFORM¨ 325E treadmill) ¥ The MODEL NUMBER of the product (PETL32571) ¥ The PART NUMBER of the part (see the EXPLODED DRAWING and PART LIST...