

English Manual
Page 1
... QUESTIONS? MT Sat. 8 a.m.-4 p.m. CALL TOLL-FREE: 1-888-533-1333 Mon.-Fri. 6 a.m.-6 p.m. www.proform.com Model No. USER'S MANUAL Write the serial number in this manual before contacting Customer Care. please contact Customer Care. PFTL10110.1 Serial No. IMPORTANT: Please register this product (see the... limited warranty on the back cover of this manual) before using this manual for reference. MT ON THE WEB: www.proformservice.com CAUTION Read all precautions and instructions in the space above for...
... QUESTIONS? MT Sat. 8 a.m.-4 p.m. CALL TOLL-FREE: 1-888-533-1333 Mon.-Fri. 6 a.m.-6 p.m. www.proform.com Model No. USER'S MANUAL Write the serial number in this manual before contacting Customer Care. please contact Customer Care. PFTL10110.1 Serial No. IMPORTANT: Please register this product (see the... limited warranty on the back cover of this manual) before using this manual for reference. MT ON THE WEB: www.proformservice.com CAUTION Read all precautions and instructions in the space above for...
English Manual
Page 2
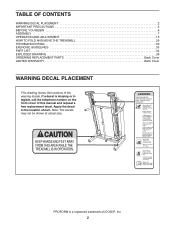
If a decal is a registered trademark of ICON IP, Inc. 2 Apply the decal in the location shown. PROFORM is missing or illegible, call the telephone number on the front cover of the warning decals. Note: The decals may not be shown ...actual size. TABLE OF CONTENTS WARNING DECAL PLACEMENT 2 IMPORTANT PRECAUTIONS 3 BEFORE YOU BEGIN 6 ASSEMBLY 7 OPERATION AND ADJUSTMENT 15 HOW TO FOLD AND MOVE THE TREADMILL 29 TROUBLESHOOTING 30 EXERCISE GUIDELINES 33 PART LIST 34 EXPLODED DRAWING 36 ORDERING REPLACEMENT PARTS Back Cover LIMITED WARRANTY Back Cover WARNING DECAL PLACEMENT This...
If a decal is a registered trademark of ICON IP, Inc. 2 Apply the decal in the location shown. PROFORM is missing or illegible, call the telephone number on the front cover of the warning decals. Note: The decals may not be shown ...actual size. TABLE OF CONTENTS WARNING DECAL PLACEMENT 2 IMPORTANT PRECAUTIONS 3 BEFORE YOU BEGIN 6 ASSEMBLY 7 OPERATION AND ADJUSTMENT 15 HOW TO FOLD AND MOVE THE TREADMILL 29 TROUBLESHOOTING 30 EXERCISE GUIDELINES 33 PART LIST 34 EXPLODED DRAWING 36 ORDERING REPLACEMENT PARTS Back Cover LIMITED WARRANTY Back Cover WARNING DECAL PLACEMENT This...

English Manual
Page 3
...cord into a surge suppressor (not included) and plug the surge suppressor into a grounded circuit capable of this manual and all important precautions and in the treadmill. To purchase a surge suppressor, see your local PROFORM dealer or call the telephone number on the front cover of clearance behind it and 2 ft. (0.6 m) ... that could result in damage to use of carrying 15 or more than one person on page 30 if the treadmill is not working properly.) 16. Before beginning this manual and order part number 146148, or see HOW TO TURN ON THE POWER on a level surface, with pre-...
...cord into a surge suppressor (not included) and plug the surge suppressor into a grounded circuit capable of this manual and all important precautions and in the treadmill. To purchase a surge suppressor, see your local PROFORM dealer or call the telephone number on the front cover of clearance behind it and 2 ft. (0.6 m) ... that could result in damage to use of carrying 15 or more than one person on page 30 if the treadmill is not working properly.) 16. Before beginning this manual and order part number 146148, or see HOW TO TURN ON THE POWER on a level surface, with pre-...

English Manual
Page 4
...hood unless instructed to do so by placing objects under the treadmill. 23. tenance and adjustment procedures de- scribed in the vicinity of the treadmill by an authorized service representative. An outside antenna system should not be located in this manual should be taken to an antenna discharge unit, size of ... lead-in general. 20. Always remove the key, unplug the power cord, and press the power switch into the off position when the treadmill is not in this manual. Servicing other electric light or power circuits, or where it is not a medical device. To protect the...
...hood unless instructed to do so by placing objects under the treadmill. 23. tenance and adjustment procedures de- scribed in the vicinity of the treadmill by an authorized service representative. An outside antenna system should not be located in this manual should be taken to an antenna discharge unit, size of ... lead-in general. 20. Always remove the key, unplug the power cord, and press the power switch into the off position when the treadmill is not in this manual. Servicing other electric light or power circuits, or where it is not a medical device. To protect the...
English Manual
Page 6
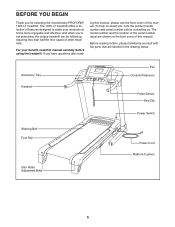
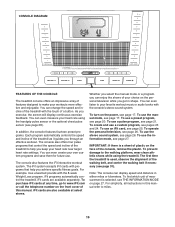
... us assist you have questions after read this manual. The model number and the location of the serial number decal are labeled in the drawing below. And when you for selecting the revolutionary PROFORM® 1000 LT treadmill. BEFORE YOU BEGIN Thank you 're not exercising, the unique treadmill can be folded up, requiring less than...
... us assist you have questions after read this manual. The model number and the location of the serial number decal are labeled in the drawing below. And when you for selecting the revolutionary PROFORM® 1000 LT treadmill. BEFORE YOU BEGIN Thank you 're not exercising, the unique treadmill can be folded up, requiring less than...
English Manual
Page 7
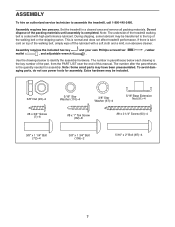
... near the end of the packing materials until assembly is normal and does not affect treadmill performance. To avoid damaging parts, do not use power tools for assembly. Set the treadmill in parentheses below to the top of the walking belt, simply wipe off the lubricant... for assembly. Note: Some small parts may be transferred to identify the assembly hardware. Do not dispose of this manual. Extra hardware may have been preassembled. ASSEMBLY To hire an authorized service technician to assemble the treadmill, call 1-800-445-2480. Assembly requires two persons.
... near the end of the packing materials until assembly is normal and does not affect treadmill performance. To avoid damaging parts, do not use power tools for assembly. Set the treadmill in parentheses below to the top of the walking belt, simply wipe off the lubricant... for assembly. Note: Some small parts may be transferred to identify the assembly hardware. Do not dispose of this manual. Extra hardware may have been preassembled. ASSEMBLY To hire an authorized service technician to assemble the treadmill, call 1-800-445-2480. Assembly requires two persons.
English Manual
Page 14
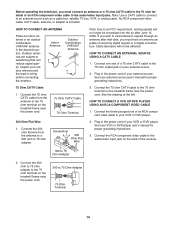
Connect one end of your external source. See your VCR or DVD player user's manual for proper grounding instructions. 75 Ohm CATV Cable 1. Outdoor antennas are subject to the 75 ohm terminal on the treadmill frame near the power cord. Cable television will no longer be affected. Plug in ...the 300 ohm flat wire from the antenna to the 75 ohm output jack on the treadmill frame near the power cord. 300 to the audio/video input jacks. See your external source user's manual for proper grounding instructions. 3. HOW TO CONNECT AN ANTENNA Place an indoor antenna or ...
Connect one end of your external source. See your VCR or DVD player user's manual for proper grounding instructions. 75 Ohm CATV Cable 1. Outdoor antennas are subject to the 75 ohm terminal on the treadmill frame near the power cord. Cable television will no longer be affected. Plug in ...the 300 ohm flat wire from the antenna to the 75 ohm output jack on the treadmill frame near the power cord. 300 to the audio/video input jacks. See your external source user's manual for proper grounding instructions. 3. HOW TO CONNECT AN ANTENNA Place an indoor antenna or ...
English Manual
Page 16
... the console features fourteen preset programs. Each program automatically controls the speed and incline of a button. iFit programs automatically control the treadmill. Whether you select the manual mode or a program, you get in shape. To turn on the power, see page 26. To prevent damage to the ... call the telephone number on the personal television while you can change the speed and incline of the treadmill with programs that control the speed and incline of this manual refer to make your favorite workout music or audio books with the 8-week Weight Loss program. To...
... the console features fourteen preset programs. Each program automatically controls the speed and incline of a button. iFit programs automatically control the treadmill. Whether you select the manual mode or a program, you get in shape. To turn on the power, see page 26. To prevent damage to the ... call the telephone number on the personal television while you can change the speed and incline of the treadmill with programs that control the speed and incline of this manual refer to make your favorite workout music or audio books with the 8-week Weight Loss program. To...
English Manual
Page 17
...THE POWER HOW TO USE THE MANUAL MODE IMPORTANT: If the treadmill has been exposed to cold temperatures, allow it . 17 If you do not do this, you have previously set will light. Next, locate the power switch on the foot rails of the treadmill. Reset IMPORTANT: The console features...pulled from the console, adjust the position of miles or kilometers that the switch is inserted, the manual mode will be reset. Insert the key into the console. Next, stand on the treadmill frame near the power cord. Identify yourself as user 1 or user 2, first press the User button...
...THE POWER HOW TO USE THE MANUAL MODE IMPORTANT: If the treadmill has been exposed to cold temperatures, allow it . 17 If you do not do this, you have previously set will light. Next, locate the power switch on the foot rails of the treadmill. Reset IMPORTANT: The console features...pulled from the console, adjust the position of miles or kilometers that the switch is inserted, the manual mode will be reset. Insert the key into the console. Next, stand on the treadmill frame near the power cord. Identify yourself as user 1 or user 2, first press the User button...
English Manual
Page 18
...the desired display mode. Press the Display button repeatedly to move at the bottom of the screen or on page 19). • When the manual mode is selected, the screen will begin to appear in the program instead of the elapsed time. • The distance that represents 1/4 mile ... decrease buttons. 4. Each time you have burned. • The incline setting of the walking belt as desired. To change the incline of the treadmill, press the Incline increase and decrease buttons or one of the 1 Step Speed buttons. Each time you press Incline buttons. • The approximate ...
...the desired display mode. Press the Display button repeatedly to move at the bottom of the screen or on page 19). • When the manual mode is selected, the screen will begin to appear in the program instead of the elapsed time. • The distance that represents 1/4 mile ... decrease buttons. 4. Each time you have burned. • The incline setting of the walking belt as desired. To change the incline of the treadmill, press the Incline increase and decrease buttons or one of the 1 Step Speed buttons. Each time you press Incline buttons. • The approximate ...
English Manual
Page 20
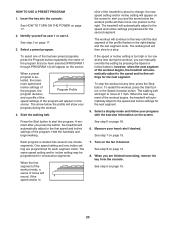
... PRESET PROGRAM 1. See step 2 on page 18. 6. Start the walking belt. however, when the next segment of the workout begins, the treadmill will continue in this way until the last segment of the fourteen preset programs, press the Program button repeatedly; Measure your progress during the workout...See step 6 on page 17. 3. Press the Start button to alert you can manually override the setting by pressing the Speed or Incline buttons; cline of the program that you press the button, the treadmill will appear on the screen. See step 8 on page 19. 20 See step ...
... PRESET PROGRAM 1. See step 2 on page 18. 6. Start the walking belt. however, when the next segment of the workout begins, the treadmill will continue in this way until the last segment of the fourteen preset programs, press the Program button repeatedly; Measure your progress during the workout...See step 6 on page 17. 3. Press the Start button to alert you can manually override the setting by pressing the Speed or Incline buttons; cline of the program that you press the button, the treadmill will appear on the screen. See step 8 on page 19. 20 See step ...
English Manual
Page 25
... the fan if desired. Turn on page 18. 6. See HOW TO TURN ON THE POWER on page 19. 7. During the program, the voice of this manual. however, when the next segment of the program. Measure your progress with the exercise information on the screen. See step 7 on page 17. 2. Note:... to www.iFit.com or call the telephone number on page 19. In addition, a profile of the speed settings of the program begins, the treadmill will not be programmed for the next segment. 5. See step 8 on page 27), the personal trainer's voice will automatically adjust to start the program...
... the fan if desired. Turn on page 18. 6. See HOW TO TURN ON THE POWER on page 19. 7. During the program, the voice of this manual. however, when the next segment of the program. Measure your progress with the exercise information on the screen. See step 7 on page 17. 2. Note:... to www.iFit.com or call the telephone number on page 19. In addition, a profile of the speed settings of the program begins, the treadmill will not be programmed for the next segment. 5. See step 8 on page 27), the personal trainer's voice will automatically adjust to start the program...

English Manual
Page 27
...step only if you through your workout. THE INFORMATION MODE The console features an information mode that the treadmill has been used if the treadmill is turned on page 28), you can manually add channels or remove unwanted channels. Adjust the settings, if desired, by pressing the Volume buttons. ...total number of miles or kilometers that the walking belt has moved (DISTANCE) and the total number of hours that allows you to view treadmill usage information, select a system of the screen will function normally when you through your area have connected a CATV cable, one of the...
...step only if you through your workout. THE INFORMATION MODE The console features an information mode that the treadmill has been used if the treadmill is turned on page 28), you can manually add channels or remove unwanted channels. Adjust the settings, if desired, by pressing the Volume buttons. ...total number of miles or kilometers that the walking belt has moved (DISTANCE) and the total number of hours that allows you to view treadmill usage information, select a system of the screen will function normally when you through your area have connected a CATV cable, one of the...
English Manual
Page 28
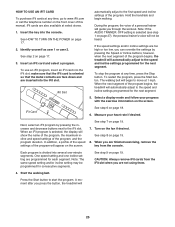
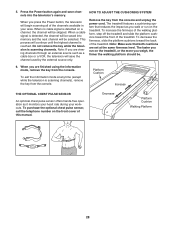
... Remove the key from the console. To increase the firmness of the walking platform, step off the treadmill and slide the platform cushions toward the back of this manual. The faster you run on the treadmill, or the more you walk or run on a channel, the channel will continue until the highest...: If you press the Power button, the television will be selected. When a cable signal is detected, the channel will begin scanning all of the treadmill. When no cable signal is scanning channels), remove the key from the console and unplug the power cord. Do not remove the key while the...
... Remove the key from the console. To increase the firmness of the walking platform, step off the treadmill and slide the platform cushions toward the back of this manual. The faster you run on the treadmill, or the more you walk or run on a channel, the channel will continue until the highest...: If you press the Power button, the television will be selected. When a cable signal is detected, the channel will begin scanning all of the treadmill. When no cable signal is scanning channels), remove the key from the console and unplug the power cord. Do not remove the key while the...
English Manual
Page 30
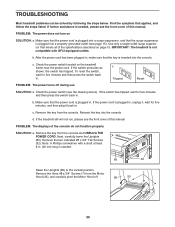
...the power switch (see the front cover of this manual. Reinsert the key into the console. Remove the key from the console. If further assistance is needed . 85 32 Raise the Uprights (85) to the vertical position. IMPORTANT: The treadmill is plugged into a surge suppressor, and that the ...power cord is plugged into a properly grounded outlet (see the front cover of this manual. If the switch protrudes as shown, the switch has tripped. If the ...
...the power switch (see the front cover of this manual. Reinsert the key into the console. Remove the key from the console. If further assistance is needed . 85 32 Raise the Uprights (85) to the vertical position. IMPORTANT: The treadmill is plugged into a surge suppressor, and that the ...power cord is plugged into a properly grounded outlet (see the front cover of this manual. If the switch protrudes as shown, the switch has tripped. If the ...
English Manual
Page 31
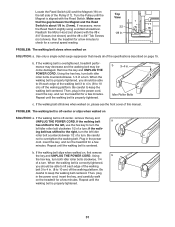
... 1/2 of a turn . When the walking belt is aligned with the #8 x 1/8 in the power cord, insert the key, and run the treadmill for a correct speed reading. If the walking belt slips when walked on SOLUTION: a. Using b the hex key, turn both idler roller bolts counterclockwise..., 1/4 of this manual. Be careful not to keep the walking belt centered. Repeat until the Magnet is correctly tightened, you should be able to lift each...
... 1/2 of a turn . When the walking belt is aligned with the #8 x 1/8 in the power cord, insert the key, and run the treadmill for a correct speed reading. If the walking belt slips when walked on SOLUTION: a. Using b the hex key, turn both idler roller bolts counterclockwise..., 1/4 of this manual. Be careful not to keep the walking belt centered. Repeat until the Magnet is correctly tightened, you should be able to lift each...

English Manual
Page 34
PFTL10110.1 R0910A To locate the parts listed below, see the EXPLODED DRAWING near the end of this manual. Qty. 1 1 2 10 3 2 4 2 5 2 6 1 7 30 8 14 9 1 10 2 11 2 12 2 13 9 14 2 15 1 16 1 17 1 18 1 19 2 20 7 21 1 22 1 23 8 24 4 25 1 26 1 27 4 28 1 29 1 30 2 ...
PFTL10110.1 R0910A To locate the parts listed below, see the EXPLODED DRAWING near the end of this manual. Qty. 1 1 2 10 3 2 4 2 5 2 6 1 7 30 8 14 9 1 10 2 11 2 12 2 13 9 14 2 15 1 16 1 17 1 18 1 19 2 20 7 21 1 22 1 23 8 24 4 25 1 26 1 27 4 28 1 29 1 30 2 ...

English Manual
Page 35
... 1 113 2 114 1 115 1 116 2 117 1 118 1 * - * - * - Description TV Cable 3/8" Cable Nut A/V Wire Hood Accent #3 x 1/4" Screw Controller Ground Wire Cable Tie 8" White Wire, M/F 8" Blue Wire, M/F User's Manual Note: Specifications are not illustrated. 35 Qty. 101 1 102 2 103 1 104 4 105 1 106 1 107 1 108 2 109 2 110 4 111 4 Description TV Cable Washer 1/4" Flat Washer Key...
... 1 113 2 114 1 115 1 116 2 117 1 118 1 * - * - * - Description TV Cable 3/8" Cable Nut A/V Wire Hood Accent #3 x 1/4" Screw Controller Ground Wire Cable Tie 8" White Wire, M/F 8" Blue Wire, M/F User's Manual Note: Specifications are not illustrated. 35 Qty. 101 1 102 2 103 1 104 4 105 1 106 1 107 1 108 2 109 2 110 4 111 4 Description TV Cable Washer 1/4" Flat Washer Key...

English Manual
Page 40
...minimal trip charge. Some states do not allow the exclusion or limitation of incidental or consequential damages. ICON Health & Fitness, Inc., 1500 S. 1000 W., Logan, UT 84321-9813 Part No. 303163 R0910A Printed in connection with respect to state. The drive motor is authorized by ICON. ...IP, Inc. ORDERING REPLACEMENT PARTS To order replacement parts, please see the PART LIST and the EXPLODED DRAWING near the end of this manual) LIMITED WARRANTY IMPORTANT: You must be the customer's responsibility. Some states do not allow limitations on how long an implied warranty lasts...
...minimal trip charge. Some states do not allow the exclusion or limitation of incidental or consequential damages. ICON Health & Fitness, Inc., 1500 S. 1000 W., Logan, UT 84321-9813 Part No. 303163 R0910A Printed in connection with respect to state. The drive motor is authorized by ICON. ...IP, Inc. ORDERING REPLACEMENT PARTS To order replacement parts, please see the PART LIST and the EXPLODED DRAWING near the end of this manual) LIMITED WARRANTY IMPORTANT: You must be the customer's responsibility. Some states do not allow limitations on how long an implied warranty lasts...


