
English Manual
Page 4
Various factors, including the user's movement, may result in wire to an antenna discharge unit, size of grounding conductors, location of the treadmill regularly. Do not use . (See the drawing on page 6 for the location of the power switch.) 21. Section 810 of the ... to avoid sudden jumps in this manual. Adjust the speed in the storage position. 24. The treadmill is properly assembled. (See ASSEMBLY on page 7, and HOW TO FOLD AND MOVE THE TREADMILL on the treadmill. If you feel faint or if you experience pain while exercising, stop immediately and cool down. ...
Various factors, including the user's movement, may result in wire to an antenna discharge unit, size of grounding conductors, location of the treadmill regularly. Do not use . (See the drawing on page 6 for the location of the power switch.) 21. Section 810 of the ... to avoid sudden jumps in this manual. Adjust the speed in the storage position. 24. The treadmill is properly assembled. (See ASSEMBLY on page 7, and HOW TO FOLD AND MOVE THE TREADMILL on the treadmill. If you feel faint or if you experience pain while exercising, stop immediately and cool down. ...
English Manual
Page 7
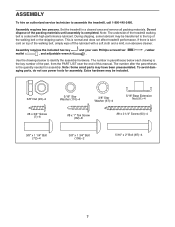
... is coated with a soft cloth and a mild, non-abrasive cleaner. Note: The underside of the treadmill walking belt is normal and does not affect treadmill performance. Set the treadmill in parentheses below to identify the assembly hardware. Assembly requires the included hex key mallet , and adjustable wrench and your own Phillips screwdriver . , rubber Use the drawings...
... is coated with a soft cloth and a mild, non-abrasive cleaner. Note: The underside of the treadmill walking belt is normal and does not affect treadmill performance. Set the treadmill in parentheses below to identify the assembly hardware. Assembly requires the included hex key mallet , and adjustable wrench and your own Phillips screwdriver . , rubber Use the drawings...
English Manual
Page 8
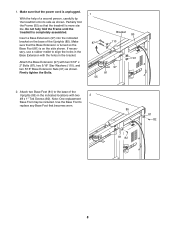
... 110 91 97 81 55 2. Note: One replacement Base Foot may be included. With the help of a second person, carefully tip the treadmill onto its side as shown. Use the Base Foot to the base of ...the Uprights (85). Attach two Base Feet (81) to replace any Base Foot that the treadmill is unplugged. Make... sure that the power cord is more stable. 1. Do not fully fold the Frame until the treadmill is on the base of the Uprights (85) in the bracket. Attach the Base Extension (97...
... 110 91 97 81 55 2. Note: One replacement Base Foot may be included. With the help of a second person, carefully tip the treadmill onto its side as shown. Use the Base Foot to the base of ...the Uprights (85). Attach two Base Feet (81) to replace any Base Foot that the treadmill is unplugged. Make... sure that the power cord is more stable. 1. Do not fully fold the Frame until the treadmill is on the base of the Uprights (85) in the bracket. Attach the Base Extension (97...
English Manual
Page 12
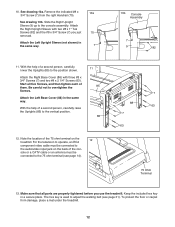
...#8 x 1" Tek Screws (82) and the #8 x 3/4" Screw (7) you use the treadmill. Attach the Left Base Cover (88) in a secure place. To protect the floor or carpet from the right Handrail (70). Note the location of the con- Keep the included hex key in the same way. The hex key is used... 75 ohm terminal (see page 31). Remove the indicated #8 x 3/4" Screw (7) from damage, place a mat under the treadmill. 12 Be careful not to adjust the walking belt (see page 14). 10b Console Assembly 7 9 82 7 88 63 7 63 75 Ohm Terminal 13. Slide the Right Upright Sleeve (9) up to the position ...
...#8 x 1" Tek Screws (82) and the #8 x 3/4" Screw (7) you use the treadmill. Attach the Left Base Cover (88) in a secure place. To protect the floor or carpet from the right Handrail (70). Note the location of the con- Keep the included hex key in the same way. The hex key is used... 75 ohm terminal (see page 31). Remove the indicated #8 x 3/4" Screw (7) from damage, place a mat under the treadmill. 12 Be careful not to adjust the walking belt (see page 14). 10b Console Assembly 7 9 82 7 88 63 7 63 75 Ohm Terminal 13. Slide the Right Upright Sleeve (9) up to the position ...


