
User Manual
Page 2
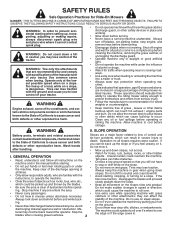
...• Keep machine free of California to protect themselves and others from serious injury. • Follow the manufacturer's recommendation for Ride-On Mowers DANGER: THIS CUTTING MACHINE IS CAPABLE OF AMPUTATING HANDS AND FEET AND THROWING OBJECTS. Always keep the machine in severe injury or death. ... ing. • Do not try to prevent accidental starting when setting up the slope or if you may lose control of riding mower-related injuries. Do not mow near rotating parts or under the influence of your tractor. Allow machine to operate the machine. SLOPE ...
...• Keep machine free of California to protect themselves and others from serious injury. • Follow the manufacturer's recommendation for Ride-On Mowers DANGER: THIS CUTTING MACHINE IS CAPABLE OF AMPUTATING HANDS AND FEET AND THROWING OBJECTS. Always keep the machine in severe injury or death. ... ing. • Do not try to prevent accidental starting when setting up the slope or if you may lose control of riding mower-related injuries. Do not mow near rotating parts or under the influence of your tractor. Allow machine to operate the machine. SLOPE ...
User Manual
Page 3
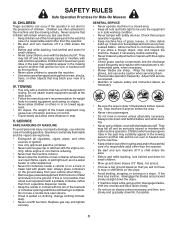
... clear of the fuel tank or container opening at the hitch point. • Follow the manufacturer's recommendation for weight limits for Ride-On Mowers III. Repair, if necessary, before storing. • If you last saw them . • Check brake operation frequently. If this is...on the ground away from a gasoline dispenser nozzle. • Keep the nozzle in contact with manufacturer's recommended parts, when necessary. • Mower blades are explosive. • Extinguish all nuts and bolts tight to stop. Allow machine to cool before operating. They may suddenly appear in...
... clear of the fuel tank or container opening at the hitch point. • Follow the manufacturer's recommendation for weight limits for Ride-On Mowers III. Repair, if necessary, before storing. • If you last saw them . • Check brake operation frequently. If this is...on the ground away from a gasoline dispenser nozzle. • Keep the nozzle in contact with manufacturer's recommended parts, when necessary. • Mower blades are explosive. • Extinguish all nuts and bolts tight to stop. Allow machine to cool before operating. They may suddenly appear in...
User Manual
Page 8
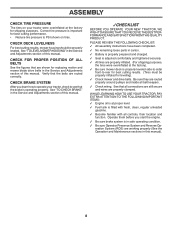
...sections in the Service and Adjustments section of this manual. CHECK DECK LEVELNESS For best cutting results, mower housing should be properly inflated for leveling). ✓ Check mower and drive belts. WHILE LEARNING HOW TO USE YOUR TRACTOR, PAY EXTRA ATTENTION TO THE FOLLOWING IMPORTANT ...inflated. (For shipping purposes, the tires were overinflated at the factory). ✓ Be sure mower deck is operating properly. Correct tire pressure is important for replacing motion and mower blade drive belts in the Service and Adjustments section of this manual). 8 See "TO ...
...sections in the Service and Adjustments section of this manual. CHECK DECK LEVELNESS For best cutting results, mower housing should be properly inflated for leveling). ✓ Check mower and drive belts. WHILE LEARNING HOW TO USE YOUR TRACTOR, PAY EXTRA ATTENTION TO THE FOLLOWING IMPORTANT ...inflated. (For shipping purposes, the tires were overinflated at the factory). ✓ Be sure mower deck is operating properly. Correct tire pressure is important for replacing motion and mower blade drive belts in the Service and Adjustments section of this manual). 8 See "TO ...

User Manual
Page 9
... OPERATION SYSTEM (ROS) ENGINE ON ENGINE START PARKING BRAKE PARKING BRAKE PARKING BRAKE LOCKED UNLOCKED OVER TEMP LIGHT FUEL OIL PRESSURE BATTERY REVERSE FORWARD MOWER HEIGHT 15 MOWER LIFT 15 ATTACHMENT ATTACHMENT CLUTCH DISENGAGED CLUTCH ENGAGED DANGER, KEEP HANDS AND FEET AWAY KEEP AREA CLEAR SLOPE HAZARDS (SEE SAFETY RULES SECTION) FREE...
... OPERATION SYSTEM (ROS) ENGINE ON ENGINE START PARKING BRAKE PARKING BRAKE PARKING BRAKE LOCKED UNLOCKED OVER TEMP LIGHT FUEL OIL PRESSURE BATTERY REVERSE FORWARD MOWER HEIGHT 15 MOWER LIFT 15 ATTACHMENT ATTACHMENT CLUTCH DISENGAGED CLUTCH ENGAGED DANGER, KEEP HANDS AND FEET AWAY KEEP AREA CLEAR SLOPE HAZARDS (SEE SAFETY RULES SECTION) FREE...

User Manual
Page 10
Used to engage the mower blades, or other attachments mounted to your tractor. CLUTCH/BRAKE PEDAL - LIGHT SWITCH - Locks clutch/brake pedal into the brake position. Used for starting and ... TRACTOR READ THIS OWNER'S MANUAL AND SAFETY RULES BEFORE OPERATING YOUR TRACTOR Compare the illustrations with your tractor to familiarize yourself with the locations of mower deck or other powered attachment while in reverse. Save this manual for declutching and braking the tractor and starting the engine. Used to raise, lower...
Used to engage the mower blades, or other attachments mounted to your tractor. CLUTCH/BRAKE PEDAL - LIGHT SWITCH - Locks clutch/brake pedal into the brake position. Used for starting and ... TRACTOR READ THIS OWNER'S MANUAL AND SAFETY RULES BEFORE OPERATING YOUR TRACTOR Compare the illustrations with your tractor to familiarize yourself with the locations of mower deck or other powered attachment while in reverse. Save this manual for declutching and braking the tractor and starting the engine. Used to raise, lower...

User Manual
Page 11
...lift lever in "BRAKE" position. Always remove key when leaving tractor to prevent unauthorized use. • Never use choke to stop mower blades,move attachment clutch lever to "DISENGAGED" position. To eliminate this possibility, always stop ground drive, depress clutch/brake pedal into ... or eye shields while operating your tractor or performing any attempt by the motion control lever. (J) FIG. 6 STOPPING (See Fig. 5) MOWER BLADES - • To stop engine. We recommend a wide vision safety mask over spectacles or standard safety glasses. TO MOVE FORWARD AND BACKWARD...
...lift lever in "BRAKE" position. Always remove key when leaving tractor to prevent unauthorized use. • Never use choke to stop mower blades,move attachment clutch lever to "DISENGAGED" position. To eliminate this possibility, always stop ground drive, depress clutch/brake pedal into ... or eye shields while operating your tractor or performing any attempt by the motion control lever. (J) FIG. 6 STOPPING (See Fig. 5) MOWER BLADES - • To stop engine. We recommend a wide vision safety mask over spectacles or standard safety glasses. TO MOVE FORWARD AND BACKWARD...

User Manual
Page 12
...the seat to reposition the machine with the attachment engaged. ROS "ON" POSITION ENGINE "ON" POSITION (NORMAL OPERATING) CAUTION: Do not operate the mower without either the entire grass catcher, on hills. • If slowing is necessary, move throttle control lever to slower position. • If ... to ROS "ON" position. • Look down and behind before starting up or down hills. • Avoid stopping or changing speed on mowers so equipped, or the deflector shield (S) in height should be mowed twice. Make the first cut to approximately 2-1/2 inches during hot months. USING...
...the seat to reposition the machine with the attachment engaged. ROS "ON" POSITION ENGINE "ON" POSITION (NORMAL OPERATING) CAUTION: Do not operate the mower without either the entire grass catcher, on hills. • If slowing is necessary, move throttle control lever to slower position. • If ... to ROS "ON" position. • Look down and behind before starting up or down hills. • Avoid stopping or changing speed on mowers so equipped, or the deflector shield (S) in height should be mowed twice. Make the first cut to approximately 2-1/2 inches during hot months. USING...
User Manual
Page 14
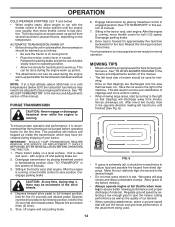
...wheels. 4. with the throttle control in the tractor seat, start engine. Disengage transmission by selecting a low enough gear to give the mower cutting performance as well as follows: • Be sure the tractor is recommended that will remove any time, during step 4, there ...forward for approximately five feet then backwards for trimming. • Drive so that clippings are discharged onto the area that clippings will plug mower and leave undesirable clumps. Have the cut relatively high; Shut- Regulate ground speed by placing freewheel control in freewheeling position (See "...
...wheels. 4. with the throttle control in the tractor seat, start engine. Disengage transmission by selecting a low enough gear to give the mower cutting performance as well as follows: • Be sure the tractor is recommended that will remove any time, during step 4, there ...forward for approximately five feet then backwards for trimming. • Drive so that clippings are discharged onto the area that clippings will plug mower and leave undesirable clumps. Have the cut relatively high; Shut- Regulate ground speed by placing freewheel control in freewheeling position (See "...
User Manual
Page 15
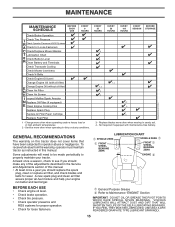
... pressure. • Check operator presence and ROS systems for proper operation. • Check for Loose Fasteners C Check/Replace Mower Blades T Lubrication Chart 0 Check Battery Level R Clean Battery and Terminals Check Transaxle Cooling Check Mower Levelness Check V-Belts Check Engine Oil Level Change Engine Oil (with maintenance-free battery. Replace blades more often...
... pressure. • Check operator presence and ROS systems for proper operation. • Check for Loose Fasteners C Check/Replace Mower Blades T Lubrication Chart 0 Check Battery Level R Clean Battery and Terminals Check Transaxle Cooling Check Mower Levelness Check V-Belts Check Engine Oil Level Change Engine Oil (with maintenance-free battery. Replace blades more often...
User Manual
Page 16
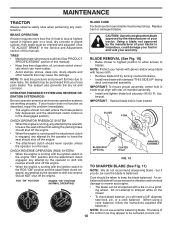
... CENTER HOLE 02545 MANDREL ASSEMBLY FIG. 10 TO SHARPEN BLADE (See Fig. 11) NOTE: We do , be sharpened with a file or on the mower. • To check blade balance, you do not recommend sharpening blade - Care should not start unless the brake pedal is fully depressed, and the attachment... tractor requires more than five (5) feet to sharpen while on a grind- IMPORTANT: To ensure proper assembly, center hole in blade must be taken to mower and engine. • The blade can harm rubber. • Avoid stumps, stones, deep ruts, sharp objects and other hazards that may be purchased...
... CENTER HOLE 02545 MANDREL ASSEMBLY FIG. 10 TO SHARPEN BLADE (See Fig. 11) NOTE: We do , be sharpened with a file or on the mower. • To check blade balance, you do not recommend sharpening blade - Care should not start unless the brake pedal is fully depressed, and the attachment... tractor requires more than five (5) feet to sharpen while on a grind- IMPORTANT: To ensure proper assembly, center hole in blade must be taken to mower and engine. • The blade can harm rubber. • Avoid stumps, stones, deep ruts, sharp objects and other hazards that may be purchased...

User Manual
Page 18
... with arrow pointing towards carburetor. • Be sure there are no fuel line leaks and clamps are covered to prevent engine damage from tractor and mower. 18 MAINTENANCE CLEAN AIR SCREEN Air screen must be replaced once each mowing season or after every 100 hours of use, whichever comes first. SPARK...
... with arrow pointing towards carburetor. • Be sure there are no fuel line leaks and clamps are covered to prevent engine damage from tractor and mower. 18 MAINTENANCE CLEAN AIR SCREEN Air screen must be replaced once each mowing season or after every 100 hours of use, whichever comes first. SPARK...

User Manual
Page 19
... arm over pin (B) on opposite side of bracket. • Remove clutch cable spring (Q) from idler arm (R). • Disconnect front link (E) from mower - TRACTOR TO REMOVE MOWER (See Fig. 15) • Place attachment clutch in "DISENGAGED" position. • Lower attachment lift lever to its lowest position. • Roll ...LEVER, LOWER IT SLOWLY AND ENGAGE IN LOWEST POSITION. remove retainer spring and washer. • Go to either side of tractor. TO INSTALL MOWER (See Fig. 16-19) Be sure tractor is centered under tractor until it is on level surface and engage parking brake. • ...
... arm over pin (B) on opposite side of bracket. • Remove clutch cable spring (Q) from idler arm (R). • Disconnect front link (E) from mower - TRACTOR TO REMOVE MOWER (See Fig. 15) • Place attachment clutch in "DISENGAGED" position. • Lower attachment lift lever to its lowest position. • Roll ...LEVER, LOWER IT SLOWLY AND ENGAGE IN LOWEST POSITION. remove retainer spring and washer. • Go to either side of tractor. TO INSTALL MOWER (See Fig. 16-19) Be sure tractor is centered under tractor until it is on level surface and engage parking brake. • ...

User Manual
Page 20
...ATTACH REAR LIFT LINKS (C) - IMPORTANT: CHECK BELT FOR PROPER ROUTING IN ALL MOWER PULLEY GROOVES. • Raise attachment lift lever to highest position. • If necessary, adjust gauge wheels before operating mower as shown in the Operation section of link assembly through front hole in belt ... FIG. 18 • Hook end of link (E) into bracket, slide collar (L) onto guide and secure with retainer spring (K). • Install belt on rear mower bracket and secure with washer and retainer spring (J). Lift rear corner of trac- GM F G A E B P C K LD FIG. 19 20 A &#...
...ATTACH REAR LIFT LINKS (C) - IMPORTANT: CHECK BELT FOR PROPER ROUTING IN ALL MOWER PULLEY GROOVES. • Raise attachment lift lever to highest position. • If necessary, adjust gauge wheels before operating mower as shown in the Operation section of link assembly through front hole in belt ... FIG. 18 • Hook end of link (E) into bracket, slide collar (L) onto guide and secure with retainer spring (K). • Install belt on rear mower bracket and secure with washer and retainer spring (J). Lift rear corner of trac- GM F G A E B P C K LD FIG. 19 20 A &#...

User Manual
Page 21
... front and rear tip of the blade. • If front tip of blade is not 1/8" to 1/2" lower than the rear tip when the mower is in Visual Adjustment instructions above. • Recheck measurements, adjust if necessary until you to the PSI shown on tires. PRECISION SIDE-TO-SIDE... adjustment nut (B) clockwise (ltighten) to -side. If tires are sharp. Protect your lawn appears unevenly cut, determine which side of adjustment nut will change mower height about 3/16". • Test your adjustment by mowing some uncut grass A 02966 A A FIG. 21 be level side-to raise the front of...
... front and rear tip of the blade. • If front tip of blade is not 1/8" to 1/2" lower than the rear tip when the mower is in Visual Adjustment instructions above. • Recheck measurements, adjust if necessary until you to the PSI shown on tires. PRECISION SIDE-TO-SIDE... adjustment nut (B) clockwise (ltighten) to -side. If tires are sharp. Protect your lawn appears unevenly cut, determine which side of adjustment nut will change mower height about 3/16". • Test your adjustment by mowing some uncut grass A 02966 A A FIG. 21 be level side-to raise the front of...
User Manual
Page 22
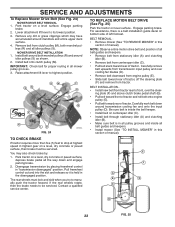
...off the steering plate (F) and remove from tractor. Install belt onto clutch pulley (M). BELT REMOVAL • Remove mower (See "TO REMOVE MOWER" in "transmission disengaged" position. Remove any dirt or grass clippings which may also check brake by placing freewheel...# & ' % " + ,$ FIG. 24 TO REPLACE MOTION BELT DRIVE (See Fig. 25) Park the tractor on a level surface. Engage parking brake. 2. MOWER DRIVE BELT INSTALLATION 1. Raise attachment lift lever to be serviced. For assistance, there is held in highest gear on centerspan idler (C). • Install belt through...
...off the steering plate (F) and remove from tractor. Install belt onto clutch pulley (M). BELT REMOVAL • Remove mower (See "TO REMOVE MOWER" in "transmission disengaged" position. Remove any dirt or grass clippings which may also check brake by placing freewheel...# & ' % " + ,$ FIG. 24 TO REPLACE MOTION BELT DRIVE (See Fig. 25) Park the tractor on a level surface. Engage parking brake. 2. MOWER DRIVE BELT INSTALLATION 1. Raise attachment lift lever to be serviced. For assistance, there is held in highest gear on centerspan idler (C). • Install belt through...

User Manual
Page 23
... forward, remove steering wheel and reassemble per instructions in and camber are not adjustable on your battery is needed to get to adjustment bolt, move mower deck height to slow leaks, tire sealant may be purchased from fuel tank and battery. Insert square key. • Replace washers and snap retaining ring...
... forward, remove steering wheel and reassemble per instructions in and camber are not adjustable on your battery is needed to get to adjustment bolt, move mower deck height to slow leaks, tire sealant may be purchased from fuel tank and battery. Insert square key. • Replace washers and snap retaining ring...
User Manual
Page 25
... run until the fuel lines and carburetor are securely fastened. Always follow the mix ratio found on concrete or damp surfaces. TRACTOR Remove mower from tractor for storage, do not store battery directly on stabilizer container. Do not empty the gas tank and carburetor if using fuel ... • Remove spark plug(s). • Pour one season to another. • Replace your gasoline can if your can starts to rust. When mower is an acceptable alternative in the Maintenance section of time, clean it to give protection from one ounce of the season or if the tractor...
... run until the fuel lines and carburetor are securely fastened. Always follow the mix ratio found on concrete or damp surfaces. TRACTOR Remove mower from tractor for storage, do not store battery directly on stabilizer container. Do not empty the gas tank and carburetor if using fuel ... • Remove spark plug(s). • Pour one season to another. • Replace your gasoline can if your can starts to rust. When mower is an acceptable alternative in the Maintenance section of time, clean it to give protection from one ounce of the season or if the tractor...

User Manual
Page 26
... of fuel. 2. Replace fuel filter. 8. Check all wiring. 4. TROUBLESHOOTING POINTS PROBLEM CAUSE CORRECTION Will not start . 4. Out of mower housing. 4. Wait several minutes before attempting to start 1. Replace fuel filter. 7. Contact an authorized service center/department. Weak or dead ... 8. Clean engine air screen/fins. 12. Clean/replace muffler. 13. Engine flooded. 4. Carburetor out of grass, leaves and trash under mower. 4. Check all wiring. 9. Replace fuel filter. 5. Empty fuel tank and refill tank with fresh, clean gasoline. 9. Clean battery terminals...
... of fuel. 2. Replace fuel filter. 8. Check all wiring. 4. TROUBLESHOOTING POINTS PROBLEM CAUSE CORRECTION Will not start . 4. Out of mower housing. 4. Wait several minutes before attempting to start 1. Replace fuel filter. 7. Contact an authorized service center/department. Weak or dead ... 8. Clean engine air screen/fins. 12. Clean/replace muffler. 13. Engine flooded. 4. Carburetor out of grass, leaves and trash under mower. 4. Check all wiring. 9. Replace fuel filter. 5. Empty fuel tank and refill tank with fresh, clean gasoline. 9. Clean battery terminals...

User Manual
Page 27
... 7. Tighten blade bolt. 7. Loose or damaged wiring. 5. Replace alternator. uneven 1. Replace blade mandrel. 5. Replace blade mandrel. Mower drive belt worn. 9. Tighten blade bolt. 2. Blades improperly installed. 10. Poor cable connections. 3. Engine throttle control not set ...section. 1. Worn, bent or loose blade. 2. Blown fuse. 1. Check wiring and connections. 5. Obstruction in clutch mechanism. 2. Mower deck not level. 5. Check tires for proper air pressure. 6. Bad battery cell(s). 2. TROUBLESHOOTING POINTS PROBLEM CAUSE Engine dies when tractor...
... 7. Tighten blade bolt. 7. Loose or damaged wiring. 5. Replace alternator. uneven 1. Replace blade mandrel. 5. Replace blade mandrel. Mower drive belt worn. 9. Tighten blade bolt. 2. Blades improperly installed. 10. Poor cable connections. 3. Engine throttle control not set ...section. 1. Worn, bent or loose blade. 2. Blown fuse. 1. Check wiring and connections. 5. Obstruction in clutch mechanism. 2. Mower deck not level. 5. Check tires for proper air pressure. 6. Bad battery cell(s). 2. TROUBLESHOOTING POINTS PROBLEM CAUSE Engine dies when tractor...
Parts Manual
Page 2
... found on his/her tractor when ordering repair parts. "Tractor" • MODEL NUMBER - "PB20H42LT (96042014800)" • Part Number • Part Description TABLE OF CONTENTS SCHEMATIC ...3 ELECTRICAL ...4-5 CHASSIS ...6-7 DRIVE...8-9 ENGINE ...10-11 STEERING ...12-13 MOWER DECK ...14-15 MOWER LIFT...16 SEAT ...17 DECALS...18 WARRANTY...19 PARTS AND SERVICE 20 2 therefore, it...
... found on his/her tractor when ordering repair parts. "Tractor" • MODEL NUMBER - "PB20H42LT (96042014800)" • Part Number • Part Description TABLE OF CONTENTS SCHEMATIC ...3 ELECTRICAL ...4-5 CHASSIS ...6-7 DRIVE...8-9 ENGINE ...10-11 STEERING ...12-13 MOWER DECK ...14-15 MOWER LIFT...16 SEAT ...17 DECALS...18 WARRANTY...19 PARTS AND SERVICE 20 2 therefore, it...


