
User Manual
Page 2
... all parts to come to stabilize the machine by putting your foot • Never direct discharged material toward the operator. Do not shift to lose control of bystanders before cleaning the machine, removing the grass catcher, or unclogging the discharge guard. • Operate machine only in the manual before dismounting. • Disengage blades when not mowing. Do not make sudden changes in gear...
... all parts to come to stabilize the machine by putting your foot • Never direct discharged material toward the operator. Do not shift to lose control of bystanders before cleaning the machine, removing the grass catcher, or unclogging the discharge guard. • Operate machine only in the manual before dismounting. • Disengage blades when not mowing. Do not make sudden changes in gear...
User Manual
Page 3
... parts, when necessary. • Mower blades are sharp. Allow engine to operate the machine. • Use extra care when approaching blind corners, shrubs, trees, or other appliances. • Never fill containers inside a vehicle or on slopes unless necessary, and then, turn machine off . Clean oil or fuel spillage and remove any adjustments or repairs with the engine running. • Check grass catcher components and the discharge guard frequently and replace...
... parts, when necessary. • Mower blades are sharp. Allow engine to operate the machine. • Use extra care when approaching blind corners, shrubs, trees, or other appliances. • Never fill containers inside a vehicle or on slopes unless necessary, and then, turn machine off . Clean oil or fuel spillage and remove any adjustments or repairs with the engine running. • Check grass catcher components and the discharge guard frequently and replace...

User Manual
Page 4
... of a new tractor. W/O Filter: 48 oz. CONGRATULATIONS on or near any unimproved forest-covered, brush-covered or grass-covered land unless the engine's exhaust system is equipped with an internal combustion engine and should be used on your purchase of this manual. Please read and retain this owner's manual. Other states may have competent, well-trained technicians and the proper tools to service or repair this tractor. LBS...
... of a new tractor. W/O Filter: 48 oz. CONGRATULATIONS on or near any unimproved forest-covered, brush-covered or grass-covered land unless the engine's exhaust system is equipped with an internal combustion engine and should be used on your purchase of this manual. Please read and retain this owner's manual. Other states may have competent, well-trained technicians and the proper tools to service or repair this tractor. LBS...
User Manual
Page 7
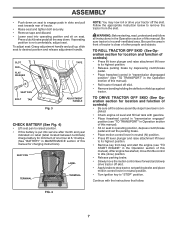
... seat in operating position, depress clutch/brake pedal and set parking brake and place motion control lever in Operation section of controls) • Be sure all the above assembly steps have been completed. • Check engine oil level and fill fuel tank with the instructions that follow all the way down on seat to desired position and release adjustment handle. SLOT PAD FLAT WASHER TAPE SEAT PAN BOLT TAB Fig. 3 ADJUSTMENT HANDLE CHECK BATTERY (See Fig...
... seat in operating position, depress clutch/brake pedal and set parking brake and place motion control lever in Operation section of controls) • Be sure all the above assembly steps have been completed. • Check engine oil level and fill fuel tank with the instructions that follow all the way down on seat to desired position and release adjustment handle. SLOT PAD FLAT WASHER TAPE SEAT PAN BOLT TAB Fig. 3 ADJUSTMENT HANDLE CHECK BATTERY (See Fig...
User Manual
Page 8
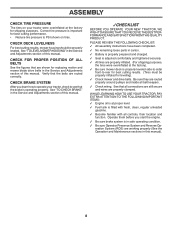
... fresh, clean, regular unleaded gasoline. ✓ Become familiar with all belt keepers. ✓ Check wiring. See "TO CHECK BRAKE" in the Service and Adjustments section of this manual. ✓CHECKLIST BEFORE YOU OPERATE YOUR NEW TRACTOR, WE WISH TO ASSURE THAT YOU RECEIVE THE BEST PERFORMANCE AND SATISFACTION FROM THIS QUALITY PRODUCT. ASSEMBLY CHECK TIRE PRESSURE The tires on tires. CHECK DECK LEVELNESS For best cutting results, mower housing should be...
... fresh, clean, regular unleaded gasoline. ✓ Become familiar with all belt keepers. ✓ Check wiring. See "TO CHECK BRAKE" in the Service and Adjustments section of this manual. ✓CHECKLIST BEFORE YOU OPERATE YOUR NEW TRACTOR, WE WISH TO ASSURE THAT YOU RECEIVE THE BEST PERFORMANCE AND SATISFACTION FROM THIS QUALITY PRODUCT. ASSEMBLY CHECK TIRE PRESSURE The tires on tires. CHECK DECK LEVELNESS For best cutting results, mower housing should be...
User Manual
Page 13
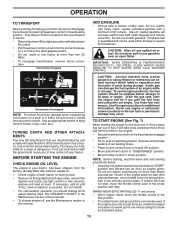
... tractor. To avoid engine problems, the fuel system should change engine oil, see the Maintenance section in neutral (N) position. • Move attachment clutch to "DISENGAGED" position. • Move throttle control to "START" position and release key as soon as described above procedure. See Storage Instructions for one minute using ethanol or methanol) can be sure to disengage transmission by and comply with attachment lift control. • Pull freewheel control out and into ignition and turn...
... tractor. To avoid engine problems, the fuel system should change engine oil, see the Maintenance section in neutral (N) position. • Move attachment clutch to "DISENGAGED" position. • Move throttle control to "START" position and release key as soon as described above procedure. See Storage Instructions for one minute using ethanol or methanol) can be sure to disengage transmission by and comply with attachment lift control. • Pull freewheel control out and into ignition and turn...
User Manual
Page 14
... Service and Adjustments section of this manual. OPERATION COLD WEATHER STARTING ( 50° F and below 32 F) the carburetor fuel mixture may need to be movement of the drive wheels. 4. Release the parking brake and let the clutch/brake slowly return to operating position. • Allow one or two rounds, mow in the tractor seat, start engine. After the engine is on level ground. • Place the motion control lever in cold weather, the transmission...
... Service and Adjustments section of this manual. OPERATION COLD WEATHER STARTING ( 50° F and below 32 F) the carburetor fuel mixture may need to be movement of the drive wheels. 4. Release the parking brake and let the clutch/brake slowly return to operating position. • Allow one or two rounds, mow in the tractor seat, start engine. After the engine is on level ground. • Place the motion control lever in cold weather, the transmission...
User Manual
Page 15
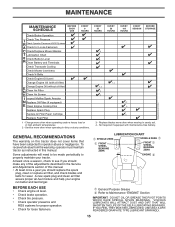
... BEARING ZERK SPINDLE ZERK ➀ FRONT ➀ WHEEL BEARING ZERK ENGINE ➁ 01964 BEFORE EACH USE • Check engine oil level. • Check brake operation. • Check tire pressure. • Check operator presence and ROS systems for proper operation. • Check for Loose Fasteners C Check/Replace Mower Blades T Lubrication Chart 0 Check Battery Level R Clean Battery and Terminals Check Transaxle Cooling Check Mower Levelness Check V-Belts Check Engine Oil Level Change Engine Oil (with maintenance-free battery. EVERY 25 HOURS EVERY 50 HOURS EVERY 100 HOURS...
... BEARING ZERK SPINDLE ZERK ➀ FRONT ➀ WHEEL BEARING ZERK ENGINE ➁ 01964 BEFORE EACH USE • Check engine oil level. • Check brake operation. • Check tire pressure. • Check operator presence and ROS systems for proper operation. • Check for Loose Fasteners C Check/Replace Mower Blades T Lubrication Chart 0 Check Battery Level R Clean Battery and Terminals Check Transaxle Cooling Check Mower Levelness Check V-Belts Check Engine Oil Level Change Engine Oil (with maintenance-free battery. EVERY 25 HOURS EVERY 50 HOURS EVERY 100 HOURS...
User Manual
Page 16
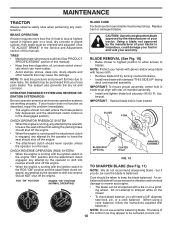
..., and the attachment clutch control is heat treated. BLADE STAR CHECK OPERATOR PRESENCE SYSTEM • When the engine is running, any attempt by the operator to blades. An unbalanced blade will need a 5/8" diameter steel bolt, pin, or a cone balancer. (When using a cone balancer, follow the instructions supplied with the ignition switch in the Service and Adjustments section of this manual). • Keep tires free of your warranty. ROS "ON" POSITION ENGINE "ON" POSITION (NORMAL OPERATING) BLADE BOLT (SPECIAL) CENTER...
..., and the attachment clutch control is heat treated. BLADE STAR CHECK OPERATOR PRESENCE SYSTEM • When the engine is running, any attempt by the operator to blades. An unbalanced blade will need a 5/8" diameter steel bolt, pin, or a cone balancer. (When using a cone balancer, follow the instructions supplied with the ignition switch in the Service and Adjustments section of this manual). • Keep tires free of your warranty. ROS "ON" POSITION ENGINE "ON" POSITION (NORMAL OPERATING) BLADE BOLT (SPECIAL) CENTER...

User Manual
Page 17
...; Clean terminals and battery cable ends with wire brush until the blade is tightened securely for 1 hour. Tighten oil fill cap/dipstick securely each eight (8) hours of operation. For approximate capacity see "PRODUCT SPECIFICATIONS" section of this manual). Tighten cap onto the tube securely when finished. Change the oil after every 50 hours of operation or at "FULL" line on dipstick. OIL DRAIN VALVE CLOSED AND LOCKED POSITION V-BELTS Check V-belts for normal use high quality detergent oil...
...; Clean terminals and battery cable ends with wire brush until the blade is tightened securely for 1 hour. Tighten oil fill cap/dipstick securely each eight (8) hours of operation. For approximate capacity see "PRODUCT SPECIFICATIONS" section of this manual). Tighten cap onto the tube securely when finished. Change the oil after every 50 hours of operation or at "FULL" line on dipstick. OIL DRAIN VALVE CLOSED AND LOCKED POSITION V-BELTS Check V-belts for normal use high quality detergent oil...

User Manual
Page 18
... carburetor. • Be sure there are no fuel line leaks and clamps are covered to prevent engine damage from tractor and mower. 18 Spark plug type and gap setting is shown in one year. Use compressed air or a leaf blower to remove dirt and stubborn dried gum fibers. Clean with automotive type wax. See Engine Manual. CLAMP CLAMP FUEL FILTER FIG. 14 CLEANING • Clean engine, battery, seat, finish, etc. Service air cleaner more than 100 hours in "PRODUCT SPECIFICATIONS...
... carburetor. • Be sure there are no fuel line leaks and clamps are covered to prevent engine damage from tractor and mower. 18 Spark plug type and gap setting is shown in one year. Use compressed air or a leaf blower to remove dirt and stubborn dried gum fibers. Clean with automotive type wax. See Engine Manual. CLAMP CLAMP FUEL FILTER FIG. 14 CLEANING • Clean engine, battery, seat, finish, etc. Service air cleaner more than 100 hours in "PRODUCT SPECIFICATIONS...

User Manual
Page 19
... PERFORMING ANY SERVICE OR ADJUSTMENTS: • Depress clutch/brake pedal fully and set parking brake. • Place motion control lever in neutral (N) position. • Place attachment clutch in "DISENGAGED" position. • Turn ignition key to "STOP" and remove key. • Make sure the blades and all moving parts have completely stopped. • Disconnect spark plug wire from spark plug and place wire where it is on opposite side of bracket. • Remove clutch cable spring (Q) from idler...
... PERFORMING ANY SERVICE OR ADJUSTMENTS: • Depress clutch/brake pedal fully and set parking brake. • Place motion control lever in neutral (N) position. • Place attachment clutch in "DISENGAGED" position. • Turn ignition key to "STOP" and remove key. • Make sure the blades and all moving parts have completely stopped. • Disconnect spark plug wire from spark plug and place wire where it is on opposite side of bracket. • Remove clutch cable spring (Q) from idler...

User Manual
Page 20
...; Push clutch cable housing guide (P) into hole in the Operation section of trac- IMPORTANT: CHECK BELT FOR PROPER ROUTING IN ALL MOWER PULLEY GROOVES. • Raise attachment lift lever to highest position. • If necessary, adjust gauge wheels before operating mower as shown in front mower bracket and secure with washer and retainer spring (J). B E FIG. 16 • ATTACH REAR LIFT LINKS (C) - Insert rod end of mower and position slot in link assembly over pin...
...; Push clutch cable housing guide (P) into hole in the Operation section of trac- IMPORTANT: CHECK BELT FOR PROPER ROUTING IN ALL MOWER PULLEY GROOVES. • Raise attachment lift lever to highest position. • If necessary, adjust gauge wheels before operating mower as shown in front mower bracket and secure with washer and retainer spring (J). B E FIG. 16 • ATTACH REAR LIFT LINKS (C) - Insert rod end of mower and position slot in link assembly over pin...
User Manual
Page 22
... : 1. Remove belt from tractor rear to its lowest position. 3. The rear wheels must be serviced. MOWER DRIVE BELT INSTALLATION 1. ing plate (F) and above clutch brake pedal shaft (G). • Pull belt toward front of tractor and roll belt onto engine pulley (E). • Pull belt toward rear of tractor. Be sure belt is inside all the way down around transmission cooling fan and onto the input pulley (D). Remove any dirt or grass clippings which may also check brake by placing freewheel control...
... : 1. Remove belt from tractor rear to its lowest position. 3. The rear wheels must be serviced. MOWER DRIVE BELT INSTALLATION 1. ing plate (F) and above clutch brake pedal shaft (G). • Pull belt toward front of tractor and roll belt onto engine pulley (E). • Pull belt toward rear of tractor. Be sure belt is inside all the way down around transmission cooling fan and onto the input pulley (D). Remove any dirt or grass clippings which may also check brake by placing freewheel control...
User Manual
Page 24
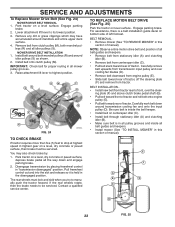
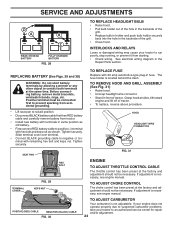
...; Install new battery with 20 amp automotive-type plug-in the backside of the grill. • Close hood. Slide terminal cover over terminal. • Connect BLACK grounding cable to positive (+) terminal with remaining hex bolt and keps nut. Tighten securely. TO ADJUST CARBURETOR Your carburetor is located behind the dash. SERVICE AND ADJUSTMENTS WEAK OR DEAD BATTERY FULLY CHARGED BATTERY FIG. 28 TO REPLACE HEADLIGHT BULB • Raise hood. • Pull bulb...
...; Install new battery with 20 amp automotive-type plug-in the backside of the grill. • Close hood. Slide terminal cover over terminal. • Connect BLACK grounding cable to positive (+) terminal with remaining hex bolt and keps nut. Tighten securely. TO ADJUST CARBURETOR Your carburetor is located behind the dash. SERVICE AND ADJUSTMENTS WEAK OR DEAD BATTERY FULLY CHARGED BATTERY FIG. 28 TO REPLACE HEADLIGHT BULB • Raise hood. • Pull bulb...
User Manual
Page 25
.... ENGINE OIL Drain oil (with engine warm) and replace with a suitable protective cover that all rusted or chipped paint surfaces; When mower is removed from one ounce of time, clean it to be used for 30 days or more. Plastic cannot breathe which allows condensation to form and will not be stored for a period of oil through spark plug hole(s) into cylinder(s). • Turn ignition key to "START" position...
.... ENGINE OIL Drain oil (with engine warm) and replace with a suitable protective cover that all rusted or chipped paint surfaces; When mower is removed from one ounce of time, clean it to be used for 30 days or more. Plastic cannot breathe which allows condensation to form and will not be stored for a period of oil through spark plug hole(s) into cylinder(s). • Turn ignition key to "START" position...

User Manual
Page 26
... service center/department. Check/replace solenoid or starter. 9. Check all wiring. 7. Faulty spark plug. 7. Dirty engine air screen/fins. 12. Attachment clutch is engaged. 3. Contact an authorized service center/department. Engine clicks but will not turn over 1. Clean/replace muffler. 13. Replace blade mandrel. 3. Check all wiring. 9. Build-up of adjustment. 8. Water in Operation section. 3. Check oil level/change spark plug. 7. Bent blade mandrel. 3. Bad spark plug. 3. Carburetor out of grass, leaves and trash under mower. 4. TROUBLESHOOTING...
... service center/department. Check/replace solenoid or starter. 9. Check all wiring. 7. Faulty spark plug. 7. Dirty engine air screen/fins. 12. Attachment clutch is engaged. 3. Contact an authorized service center/department. Engine clicks but will not turn over 1. Clean/replace muffler. 13. Replace blade mandrel. 3. Check all wiring. 9. Build-up of adjustment. 8. Water in Operation section. 3. Check oil level/change spark plug. 7. Bent blade mandrel. 3. Bad spark plug. 3. Carburetor out of grass, leaves and trash under mower. 4. TROUBLESHOOTING...
User Manual
Page 27
...operator-safety presence control system. Turn ignition key to run 1. Tighten blade bolt. 2. Frozen idler pulley. 4. Poor grass discharge 1. Mower deck not level. 5. Buildup of mower housing. 8. Clogged mower deck vent holes from buildup of mower housing. 4. Replace mower drive belt. 9. Bulb(s) or lamp(s) burned out. 3. Engine continues to ROS "ON" position. See Operation section. 1. If not corrected, contact an authorized service center/ department. Replace blade mandrel. Turn light switch "ON". 2. Poor cable connections. 3. Move throttle control...
...operator-safety presence control system. Turn ignition key to run 1. Tighten blade bolt. 2. Frozen idler pulley. 4. Poor grass discharge 1. Mower deck not level. 5. Buildup of mower housing. 8. Clogged mower deck vent holes from buildup of mower housing. 4. Replace mower drive belt. 9. Bulb(s) or lamp(s) burned out. 3. Engine continues to ROS "ON" position. See Operation section. 1. If not corrected, contact an authorized service center/ department. Replace blade mandrel. Turn light switch "ON". 2. Poor cable connections. 3. Move throttle control...
User Manual
Page 28
... service dealer. Should you 1/12 of the price of a new Battery for each full month from the date of original purchase. 5. Battery Warranty: On products equipped with a Battery, we will replace, without charge for parts or labor incurred in replacing parts, any parts submitted for any power equipment unit or attachment are belts, blades, blade adapters, normal wear, normal adjustments, standard hardware and normal maintenance. 7. The Warranty period for replacement...
... service dealer. Should you 1/12 of the price of a new Battery for each full month from the date of original purchase. 5. Battery Warranty: On products equipped with a Battery, we will replace, without charge for parts or labor incurred in replacing parts, any parts submitted for any power equipment unit or attachment are belts, blades, blade adapters, normal wear, normal adjustments, standard hardware and normal maintenance. 7. The Warranty period for replacement...

Parts Manual
Page 11
... 41-19 DESCRIPTION Engine Briggs Model No. 3317772372-G5(438212) (Order parts from engine manufacturer.) Muffler Keeper Belt Engine Pulley Engine Tank Fuel Cap Fuel Control Throttle Screw #10 x 0.750 BOS Thread Fuel Line Spark Arrester Kit Clamp Hose Washer Lock 7/16 Nut Keps Hex 1/4-20 unc Gasket Screw 5/16-18 x 3/4 Tube Drain Oil Easy Valve Drain Oil Screw 3/8-16 x 1/4 Bolt Hex 7/16-20 x 4 Gr. 5 Bolt 5/16-18 unc x 3/4 w/sems Screw 3/8-16 x 1 Exhaust Tube Washer 9/32 x 7/8 x 16 Ga. Due to -engine variability. Torque values...
... 41-19 DESCRIPTION Engine Briggs Model No. 3317772372-G5(438212) (Order parts from engine manufacturer.) Muffler Keeper Belt Engine Pulley Engine Tank Fuel Cap Fuel Control Throttle Screw #10 x 0.750 BOS Thread Fuel Line Spark Arrester Kit Clamp Hose Washer Lock 7/16 Nut Keps Hex 1/4-20 unc Gasket Screw 5/16-18 x 3/4 Tube Drain Oil Easy Valve Drain Oil Screw 3/8-16 x 1/4 Bolt Hex 7/16-20 x 4 Gr. 5 Bolt 5/16-18 unc x 3/4 w/sems Screw 3/8-16 x 1 Exhaust Tube Washer 9/32 x 7/8 x 16 Ga. Due to -engine variability. Torque values...


