
User Manual
Page 2
...• Disengage blades when not mowing. Operate only at all instructions on a slope, is dangerous. Tires can touch hot exhaust / engine parts and burn. WARNING • Do not operate machine without the entire grass catcher, discharge guard, or other debris which can lose traction with...off engine and wait for holes, ruts, bumps, rocks, or other attachments; Do not allow responsible adults, who are involved in the manual before cleaning the machine, removing the grass catcher, or unclogging the discharge guard. • Operate machine only in daylight or good arti...
...• Disengage blades when not mowing. Operate only at all instructions on a slope, is dangerous. Tires can touch hot exhaust / engine parts and burn. WARNING • Do not operate machine without the entire grass catcher, discharge guard, or other debris which can lose traction with...off engine and wait for holes, ruts, bumps, rocks, or other attachments; Do not allow responsible adults, who are involved in the manual before cleaning the machine, removing the grass catcher, or unclogging the discharge guard. • Operate machine only in daylight or good arti...
User Manual
Page 6
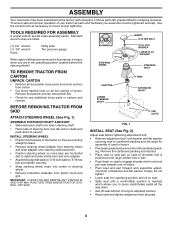
...pressure gauge When right or left unassembled for any additional loose parts or cartons and remove. ASSEMBLY Your new tractor has been assembled at the factory with exception of those parts left hand is mentioned in this manual, it means when you assemble must be tightened securely. ...TO REMOVE TRACTOR FROM CARTON UNPACK CARTON • Remove all accessible loose parts and parts cartons from the cardboard packing. IMPORTANT: CHECK ...
...pressure gauge When right or left unassembled for any additional loose parts or cartons and remove. ASSEMBLY Your new tractor has been assembled at the factory with exception of those parts left hand is mentioned in this manual, it means when you assemble must be tightened securely. ...TO REMOVE TRACTOR FROM CARTON UNPACK CARTON • Remove all accessible loose parts and parts cartons from the cardboard packing. IMPORTANT: CHECK ...

User Manual
Page 8
...keepers. ✓ Check wiring. PLEASE REVIEW THE FOLLOWING CHECKLIST: ✓ All assembly instructions have been completed. ✓ No remaining loose parts in safe operating condition. ✓ Be sure Operator Presence System and Reverse Operation System (ROS) are routed properly around pulleys and inside... leveled. Be sure they are working properly (See the Operation and Maintenance sections in the Service and Adjustments section of this manual. ✓CHECKLIST BEFORE YOU OPERATE YOUR NEW TRACTOR, WE WISH TO ASSURE THAT YOU RECEIVE THE BEST PERFORMANCE AND SATISFACTION FROM...
...keepers. ✓ Check wiring. PLEASE REVIEW THE FOLLOWING CHECKLIST: ✓ All assembly instructions have been completed. ✓ No remaining loose parts in safe operating condition. ✓ Be sure Operator Presence System and Reverse Operation System (ROS) are routed properly around pulleys and inside... leveled. Be sure they are working properly (See the Operation and Maintenance sections in the Service and Adjustments section of this manual. ✓CHECKLIST BEFORE YOU OPERATE YOUR NEW TRACTOR, WE WISH TO ASSURE THAT YOU RECEIVE THE BEST PERFORMANCE AND SATISFACTION FROM...
User Manual
Page 16
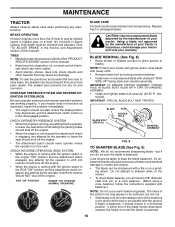
... on a grind- NOTE: To seal tire punctures and prevent flat highest speed in all tires (See"PRODUCT SPECIFICATIONS" section of this manual). BLADE REMOVAL (See Fig. 8) • Raise mower to highest position to allow access to shift into reverse should remain in the disengaged...instructions supplied with the ignition switch in the Service and Adjustments section of this manual). • Keep tires free of gasoline, oil, or insect control chemicals which can be purchased from your local parts dealer. Tire sealant also prevents tire dry rot and corrosion. IMPORTANT: TO ...
... on a grind- NOTE: To seal tire punctures and prevent flat highest speed in all tires (See"PRODUCT SPECIFICATIONS" section of this manual). BLADE REMOVAL (See Fig. 8) • Raise mower to highest position to allow access to shift into reverse should remain in the disengaged...instructions supplied with the ignition switch in the Service and Adjustments section of this manual). • Keep tires free of gasoline, oil, or insect control chemicals which can be purchased from your local parts dealer. Tire sealant also prevents tire dry rot and corrosion. IMPORTANT: TO ...
User Manual
Page 22
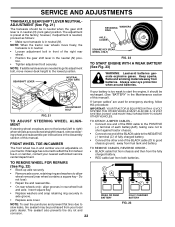
... is too weak to slow leaks, tire sealant may be recharged. (See "BATTERY" in or camber, contact your tractor. If your local parts dealer. FIG. 21 ADJUSTMENT BOLT If "jumper cables" are positioned straight forward, remove steering wheel and reassemble per instructions in neutral (N). TO ADJUST...allow wheel removal (rear wheel contains a square key - If damage has occurred to right) when wheels are used for emergency starting, follow this manual). TO ATTACH JUMPER CABLES • Connect one end of the RED cable to the POSITIVE (+) terminal of each battery(A-B), taking care not to ...
... is too weak to slow leaks, tire sealant may be recharged. (See "BATTERY" in or camber, contact your tractor. If your local parts dealer. FIG. 21 ADJUSTMENT BOLT If "jumper cables" are positioned straight forward, remove steering wheel and reassemble per instructions in neutral (N). TO ADJUST...allow wheel removal (rear wheel contains a square key - If damage has occurred to right) when wheels are used for emergency starting, follow this manual). TO ATTACH JUMPER CABLES • Connect one end of the RED cable to the POSITIVE (+) terminal of each battery(A-B), taking care not to ...

User Manual
Page 23
...CABLE The throttle control has been preset at the same time. If adjustment is not adjustable. TO ADJUST CARBURETOR Your carburetor is necessary, see engine manual. TO REMOVE HOOD AND GRILL ASSEMBLY (See Fig. 26) • Raise hood. • Unsnap headlight wire connector. • Stand in ..., take your tractor to run poorly, stop running, or prevent it from tractor. • Install new battery with terminals in the Repair Parts section. 23 SERVICE AND ADJUSTMENTS REPLACING BATTERY (See Figs. 24 and 25) WARNING: Do not short battery terminals by allowing a wrench or...
...CABLE The throttle control has been preset at the same time. If adjustment is not adjustable. TO ADJUST CARBURETOR Your carburetor is necessary, see engine manual. TO REMOVE HOOD AND GRILL ASSEMBLY (See Fig. 26) • Raise hood. • Unsnap headlight wire connector. • Stand in ..., take your tractor to run poorly, stop running, or prevent it from tractor. • Install new battery with terminals in the Repair Parts section. 23 SERVICE AND ADJUSTMENTS REPLACING BATTERY (See Figs. 24 and 25) WARNING: Do not short battery terminals by allowing a wrench or...
User Manual
Page 24
placement instructions in the Service and Adjustments section of this manual). • Lubricate as shown in the Maintenance section of time, clean it thoroughly, remove all dirt, grease, leaves, etc. Inspect moving parts for storage. • After a period of the season or if the tractor will cause...8226; If possible, store your tractor indoors and cover it run until the fuel lines and carburetor are securely fastened. nance section of this manual. • Be sure that does not retain moisture. OTHER • Do not store gasoline from tractor for winter storage. WARNING: Never...
placement instructions in the Service and Adjustments section of this manual). • Lubricate as shown in the Maintenance section of time, clean it thoroughly, remove all dirt, grease, leaves, etc. Inspect moving parts for storage. • After a period of the season or if the tractor will cause...8226; If possible, store your tractor indoors and cover it run until the fuel lines and carburetor are securely fastened. nance section of this manual. • Be sure that does not retain moisture. OTHER • Do not store gasoline from tractor for winter storage. WARNING: Never...
User Manual
Page 30
... engineered and carefully manufactured to our website: www.poulan.com/support.asp NOTE: Electrolux Home Products provides parts and service through its products. The philosophy of Electrolux Home Products is to your unit. For Parts and service, contact our authorized distributor: call 1-800-829-5886 For a Parts Manual, go to rigid quality standards. Description of...
... engineered and carefully manufactured to our website: www.poulan.com/support.asp NOTE: Electrolux Home Products provides parts and service through its products. The philosophy of Electrolux Home Products is to your unit. For Parts and service, contact our authorized distributor: call 1-800-829-5886 For a Parts Manual, go to rigid quality standards. Description of...

Parts List
Page 2
...Decal, Clutch Brake Decal, Replacement Decal, Engine HP Decal Warning Decal, SDPNL Decal, Fender Danger English Decal Ins Str Wh Decal Fender KEY PART NO. Decal, Handle Lft Height Adj. DESCRIPTION 1 59192 Cap, Tire valve 2 65139 Stem, Valve 4,10 3 124157X Tire, Front 4 ... DESCRIPTION Decal, Hood RH Decal, Hood LH Decal, Caution, Battery Decal, Oper Sdl P/L Gear Dr Eng Decal, V-Belt Sch. Manual, Operator's E&F Manual, Parts E&F WHEELS & TIRES 1 2 5,8 7 6 KEY PART NO. NO. Tube) wheel_1 NOTE: All component dimensions given in U.S. MODEL NUMBER PB1638LT (96012004401).
...Decal, Clutch Brake Decal, Replacement Decal, Engine HP Decal Warning Decal, SDPNL Decal, Fender Danger English Decal Ins Str Wh Decal Fender KEY PART NO. Decal, Handle Lft Height Adj. DESCRIPTION 1 59192 Cap, Tire valve 2 65139 Stem, Valve 4,10 3 124157X Tire, Front 4 ... DESCRIPTION Decal, Hood RH Decal, Hood LH Decal, Caution, Battery Decal, Oper Sdl P/L Gear Dr Eng Decal, V-Belt Sch. Manual, Operator's E&F Manual, Parts E&F WHEELS & TIRES 1 2 5,8 7 6 KEY PART NO. NO. Tube) wheel_1 NOTE: All component dimensions given in U.S. MODEL NUMBER PB1638LT (96012004401).


