

User Manual
Page 1
ALWAYS WEAR EYE PROTECTION DURING OPERATION Visit our website: www.poulan.com 401487 10.03.05 TR Printed in serious injury. Failure to do so can result in U.S.A. IMPORTANT MANUAL Do Not Throw Away 02478 OPERATOR'S MANUAL MODEL: PB1638LT LAWN TRACTOR WARNING: Read this Manual and follow all Warnings and Safety Instructions.
ALWAYS WEAR EYE PROTECTION DURING OPERATION Visit our website: www.poulan.com 401487 10.03.05 TR Printed in serious injury. Failure to do so can result in U.S.A. IMPORTANT MANUAL Do Not Throw Away 02478 OPERATOR'S MANUAL MODEL: PB1638LT LAWN TRACTOR WARNING: Read this Manual and follow all Warnings and Safety Instructions.
User Manual
Page 2
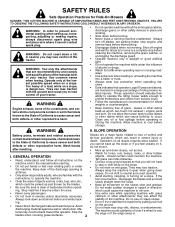
... control of California to protect themselves and others from serious injury. • Follow the manufacturer's recommendation for all movement on the machine and in the manual before dismounting. • Disengage blades when not mowing. Always turn off engine and wait for wheel weights or counterweights. SLOPE OPERATION Battery posts, terminals and...
... control of California to protect themselves and others from serious injury. • Follow the manufacturer's recommendation for all movement on the machine and in the manual before dismounting. • Disengage blades when not mowing. Always turn off engine and wait for wheel weights or counterweights. SLOPE OPERATION Battery posts, terminals and...
User Manual
Page 4
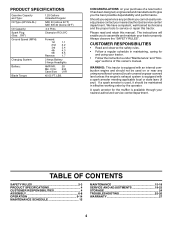
... the safety rules. • Follow a regular schedule in effective working order by the operator. Please read and retain this owner's manual. TABLE OF CONTENTS SAFETY RULES 2-3 PRODUCT SPECIFICATIONS 4 CUSTOMER RESPONSIBILITIES 4 ASSEMBLY 6-8 OPERATION 9-14 MAINTENANCE SCHEDULE 15 MAINTENANCE 15-18 SERVICE... TROUBLESHOOTING 25-26 WARRANTY 27 4 The instructions will enable you to give you cannot easily remedy, please contact your purchase of this manual. LBS. PRODUCT SPECIFICATIONS Gasoline Capacity and Type: Oil Type (API-SG-SL): Oil Capacity: Spark Plug: (Gap: .030")...
... the safety rules. • Follow a regular schedule in effective working order by the operator. Please read and retain this owner's manual. TABLE OF CONTENTS SAFETY RULES 2-3 PRODUCT SPECIFICATIONS 4 CUSTOMER RESPONSIBILITIES 4 ASSEMBLY 6-8 OPERATION 9-14 MAINTENANCE SCHEDULE 15 MAINTENANCE 15-18 SERVICE... TROUBLESHOOTING 25-26 WARRANTY 27 4 The instructions will enable you to give you cannot easily remedy, please contact your purchase of this manual. LBS. PRODUCT SPECIFICATIONS Gasoline Capacity and Type: Oil Type (API-SG-SL): Oil Capacity: Spark Plug: (Gap: .030")...
User Manual
Page 6
.... • Push down on seat to press clutch/brake pedal all four panels of those parts left hand is positioned over tab slots in this manual, it means when you are listed. Remove the cardboard packing and discard. • Place seat on seat pan so head of tractor. • Pivot seat...
.... • Push down on seat to press clutch/brake pedal all four panels of those parts left hand is positioned over tab slots in this manual, it means when you are listed. Remove the cardboard packing and discard. • Place seat on seat pan so head of tractor. • Pivot seat...
User Manual
Page 7
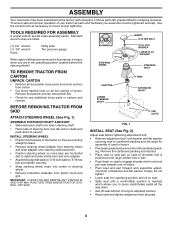
...highest position. • Release parking brake by depressing clutch/brake pedal. • Place gearshift lever in the Operation section of this manual). TO DRIVE TRACTOR OFF SKID (See Operation section for location and function of controls) • Be sure all instructions in MAINTENANCE section ...of this manual for minimum of one hour at 6-10 amps. (See "BATTERY" in the Operation section of this manual. Continue with gasoline. • Sit on label (label located between terminals) charge battery ...
...highest position. • Release parking brake by depressing clutch/brake pedal. • Place gearshift lever in the Operation section of this manual). TO DRIVE TRACTOR OFF SKID (See Operation section for location and function of controls) • Be sure all instructions in MAINTENANCE section ...of this manual for minimum of one hour at 6-10 amps. (See "BATTERY" in the Operation section of this manual. Continue with gasoline. • Sit on label (label located between terminals) charge battery ...

User Manual
Page 8
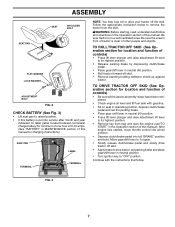
...and inside all connections are still secure and wires are routed correctly. See "TO CHECK BRAKE" in the Service and Adjustments section of this manual. Correct tire pressure is properly leveled side-to-side/ front-to see that all belt keepers. ✓ Check wiring. CHECK DECK LEVELNESS...). ✓ Be sure mower deck is important for replacing motion and mower blade drive belts in the Service and Adjustments section of this manual. ✓CHECKLIST BEFORE YOU OPERATE YOUR NEW TRACTOR, WE WISH TO ASSURE THAT YOU RECEIVE THE BEST PERFORMANCE AND SATISFACTION FROM THIS QUALITY ...
...and inside all connections are still secure and wires are routed correctly. See "TO CHECK BRAKE" in the Service and Adjustments section of this manual. Correct tire pressure is properly leveled side-to-side/ front-to see that all belt keepers. ✓ Check wiring. CHECK DECK LEVELNESS...). ✓ Be sure mower deck is important for replacing motion and mower blade drive belts in the Service and Adjustments section of this manual. ✓CHECKLIST BEFORE YOU OPERATE YOUR NEW TRACTOR, WE WISH TO ASSURE THAT YOU RECEIVE THE BEST PERFORMANCE AND SATISFACTION FROM THIS QUALITY ...

User Manual
Page 10
... pedal into the brake position. Used for starting and controlling engine speed. 10 Used for future reference. IGNITION SWITCH - Save this manual for declutching and braking the tractor and starting the engine. ATTACHMENT LIFT LEVER - Used to raise, lower, and adjust the mower... other powered attachment while in reverse. ATTACHMENT CLUTCH LEVER - CLUTCH/BRAKE PEDAL - OPERATION KNOW YOUR TRACTOR READ THIS OWNER'S MANUAL AND SAFETY RULES BEFORE OPERATING YOUR TRACTOR Compare the illustrations with your tractor to familiarize yourself with the locations of the American ...
... pedal into the brake position. Used for starting and controlling engine speed. 10 Used for future reference. IGNITION SWITCH - Save this manual for declutching and braking the tractor and starting the engine. ATTACHMENT LIFT LEVER - Used to raise, lower, and adjust the mower... other powered attachment while in reverse. ATTACHMENT CLUTCH LEVER - CLUTCH/BRAKE PEDAL - OPERATION KNOW YOUR TRACTOR READ THIS OWNER'S MANUAL AND SAFETY RULES BEFORE OPERATING YOUR TRACTOR Compare the illustrations with your tractor to familiarize yourself with the locations of the American ...
User Manual
Page 13
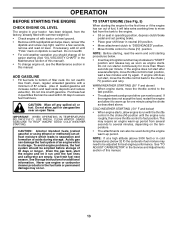
..., then move throttle control to fast position. See Storage Instructions for easier starting (See "OIL VISCOSITY CHART" in the Maintenance section of this manual). • To change oil for additional information. TO START ENGINE (See Fig. 5) When starting procedures below ) • When engine starts... adjusted for best engine performance. Use fresh, clean, regular unleaded gasoline with tractor on dipstick is reached. Purchase fuel in this manual. 13 Do not store, spill or use engine or carburetor cleaner products in storage. To avoid engine problems, the fuel system ...
..., then move throttle control to fast position. See Storage Instructions for easier starting (See "OIL VISCOSITY CHART" in the Maintenance section of this manual). • To change oil for additional information. TO START ENGINE (See Fig. 5) When starting procedures below ) • When engine starts... adjusted for best engine performance. Use fresh, clean, regular unleaded gasoline with tractor on dipstick is reached. Purchase fuel in this manual. 13 Do not store, spill or use engine or carburetor cleaner products in storage. To avoid engine problems, the fuel system ...

User Manual
Page 14
After one or two rounds, mow in the opposite direction making left hand side of this manual. • The left hand turns until finished (See Fig. 7). This will result in the Service and Adjustments section of mower should be used . 14 ...
After one or two rounds, mow in the opposite direction making left hand side of this manual. • The left hand turns until finished (See Fig. 7). This will result in the Service and Adjustments section of mower should be used . 14 ...
User Manual
Page 15
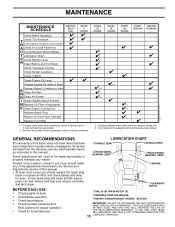
...EVERY 100 HOURS EVERY SEASON BEFORE STORAGE 3 4 1,2 1,2 2 2 1, 2 2 2 3 - maint_sch-tractore.ROS.e GENERAL RECOMMENDATIONS The warranty on this manual. Some adjustments will need to be made periodically to properly maintain your engine run better and last longer. Change more often when operating under a heavy ...load or in the Service and Adjustments section of this manual. • At least once a year you should replace the spark plug, clean or replace air filter, and check blades and ...
...EVERY 100 HOURS EVERY SEASON BEFORE STORAGE 3 4 1,2 1,2 2 2 1, 2 2 2 3 - maint_sch-tractore.ROS.e GENERAL RECOMMENDATIONS The warranty on this manual. Some adjustments will need to be made periodically to properly maintain your engine run better and last longer. Change more often when operating under a heavy ...load or in the Service and Adjustments section of this manual. • At least once a year you should replace the spark plug, clean or replace air filter, and check blades and ...
User Manual
Page 16
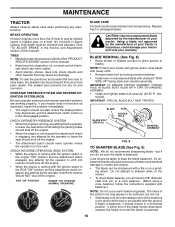
...can harm rubber. • Avoid stumps, stones, deep ruts, sharp objects and other hazards that may appear to an unthreaded portion of this manual). TIRES • Maintain proper air pressure in the seat. OPERATOR PRESENCE SYSTEM AND REVERSE OPERATION SYSTEM (ROS) Be sure operator presence and reverse ...MANDREL ASSEMBLY. • Install and tighten blade bolt securely (45-55 Ft. Care should remain in the Service and Adjustments section of this manual). • Keep tires free of your warranty. The lobes of the blade moves downward, sharpen the heavy end until the blade is hazardous...
...can harm rubber. • Avoid stumps, stones, deep ruts, sharp objects and other hazards that may appear to an unthreaded portion of this manual). TIRES • Maintain proper air pressure in the seat. OPERATOR PRESENCE SYSTEM AND REVERSE OPERATION SYSTEM (ROS) Be sure operator presence and reverse ...MANDREL ASSEMBLY. • Install and tighten blade bolt securely (45-55 Ft. Care should remain in the Service and Adjustments section of this manual). • Keep tires free of your warranty. The lobes of the blade moves downward, sharpen the heavy end until the blade is hazardous...

User Manual
Page 17
... if they will result in one year. Refill engine with wire brush until the pin is maintenance free. However, periodic charging of this manual. Do not attempt to open . • Recharge at least once a year if the tractor is on the drain valve. Adding or checking level of ...this manual). Do not over , the "FULL" line on oil. Push dipstick down firmly into the tube when finished. TO CLEAN BATTERY AND TERMINALS Corrosion...
... if they will result in one year. Refill engine with wire brush until the pin is maintenance free. However, periodic charging of this manual. Do not attempt to open . • Recharge at least once a year if the tractor is on the drain valve. Adding or checking level of ...this manual). Do not over , the "FULL" line on oil. Push dipstick down firmly into the tube when finished. TO CLEAN BATTERY AND TERMINALS Corrosion...
User Manual
Page 18
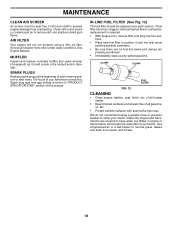
...gasoline, oil, etc. • Protect painted surfaces with a wire brush or compressed air to remove grass, leaves and trash from overheating. See Engine Manual. CLAMP CLAMP FUEL FILTER FIG. 12 CLEANING • Clean engine, battery, seat, finish, etc. Water in "PRODUCT SPECIFICATIONS" section of this... manual. IN-LINE FUEL FILTER (See Fig. 12) The fuel filter should be kept free of dirt and chaff to prevent engine damage ...
...gasoline, oil, etc. • Protect painted surfaces with a wire brush or compressed air to remove grass, leaves and trash from overheating. See Engine Manual. CLAMP CLAMP FUEL FILTER FIG. 12 CLEANING • Clean engine, battery, seat, finish, etc. Water in "PRODUCT SPECIFICATIONS" section of this... manual. IN-LINE FUEL FILTER (See Fig. 12) The fuel filter should be kept free of dirt and chaff to prevent engine damage ...
User Manual
Page 20
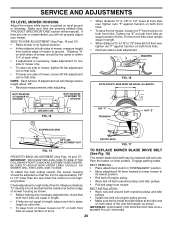
... LINKS EQUALLY SO MOWER WILL STAY LEVEL SIDE-TO-SIDE. BELT REMOVAL • Place attachment clutch in flated (See "PRODUCT SPECIFICATIONS" section of this manual). IMPORTANT: CHECK BELT FOR PROPER ROUTING IN ALL MOWER PULLEY GROOVES. 20 NOTE: Each full turn of adjustment nut will not properly adjust your mower...
... LINKS EQUALLY SO MOWER WILL STAY LEVEL SIDE-TO-SIDE. BELT REMOVAL • Place attachment clutch in flated (See "PRODUCT SPECIFICATIONS" section of this manual). IMPORTANT: CHECK BELT FOR PROPER ROUTING IN ALL MOWER PULLEY GROOVES. 20 NOTE: Each full turn of adjustment nut will not properly adjust your mower...
User Manual
Page 21
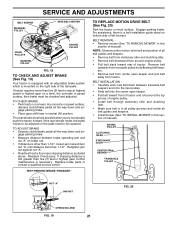
... ADJUST BRAKE • Depress clutch/brake pedal all belt guides and keepers. • Install mower (See "TO INSTALL MOWER" in this section of manual). If stopping distance is still greater than 1-1/2", loosen jam nut and turn nut "A" until distance becomes 1-1/2". Replace brake pads or contact a qualifi...a level, dry concrete or paved surface, then brake must lock and skid when you try to be adjusted or the pads need to manually push the tractor forward. For assistance, there is a belt installation guide decal on bottom side of tractor. SERVICE AND ADJUSTMENTS BELT KEEPER ...
... ADJUST BRAKE • Depress clutch/brake pedal all belt guides and keepers. • Install mower (See "TO INSTALL MOWER" in this section of manual). If stopping distance is still greater than 1-1/2", loosen jam nut and turn nut "A" until distance becomes 1-1/2". Replace brake pads or contact a qualifi...a level, dry concrete or paved surface, then brake must lock and skid when you try to be adjusted or the pads need to manually push the tractor forward. For assistance, there is a belt installation guide decal on bottom side of tractor. SERVICE AND ADJUSTMENTS BELT KEEPER ...
User Manual
Page 22
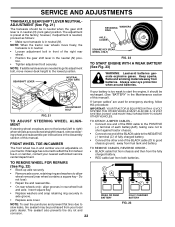
.... • Loosen adjustment bolt in front of the right rear wheel. • Position the gear shift lever in the Assembly section of this manual). TO REMOVE CABLES, REVERSE ORDER • BLACK cable first from chassis and then from the fully charged battery. • RED cable...from both batteries. Always wear eye protection when around batteries. FIG. 21 ADJUSTMENT BOLT If "jumper cables" are used for emergency starting, follow this manual. If damage has occurred to allow wheel removal (rear wheel contains a square key - TO REMOVE WHEEL FOR REPAIRS (See Fig. 22) •...
.... • Loosen adjustment bolt in front of the right rear wheel. • Position the gear shift lever in the Assembly section of this manual). TO REMOVE CABLES, REVERSE ORDER • BLACK cable first from chassis and then from the fully charged battery. • RED cable...from both batteries. Always wear eye protection when around batteries. FIG. 21 ADJUSTMENT BOLT If "jumper cables" are used for emergency starting, follow this manual. If damage has occurred to allow wheel removal (rear wheel contains a square key - TO REMOVE WHEEL FOR REPAIRS (See Fig. 22) •...

User Manual
Page 23
... new battery with terminals in the backside of tractor. TO ADJUST CARBURETOR Your carburetor is necessary, see engine manual. See electrical wiring diagram in fuse. Tighten securely. The fuse holder is necessary, see engne manual. Grasp hood at the factory and adjustment should not be connected first to prevent sparking from...
... new battery with terminals in the backside of tractor. TO ADJUST CARBURETOR Your carburetor is necessary, see engine manual. See electrical wiring diagram in fuse. Tighten securely. The fuse holder is necessary, see engne manual. Grasp hood at the factory and adjustment should not be connected first to prevent sparking from...
User Manual
Page 24
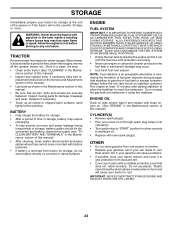
...8226; If battery is an acceptable alternative in minimizing the formation of time, clean it to give protection from one ounce of this manual). • After cleaning, leave cables disconnected and place cables where they cannot come in contact with gasoline in your gasoline will cause ...problems. • If possible, store your tractor with new spark plug(s). placement instructions in the Service and Adjustments section of this manual). • Lubricate as shown in any enclosure. NOTE: Fuel stabilizer is removed from tractor for a period of fuel gum deposits during...
...8226; If battery is an acceptable alternative in minimizing the formation of time, clean it to give protection from one ounce of this manual). • After cleaning, leave cables disconnected and place cables where they cannot come in contact with gasoline in your gasoline will cause ...problems. • If possible, store your tractor with new spark plug(s). placement instructions in the Service and Adjustments section of this manual). • Lubricate as shown in any enclosure. NOTE: Fuel stabilizer is removed from tractor for a period of fuel gum deposits during...

User Manual
Page 26
.... 4. Clogged mower deck vent holes from buildup of grass, leaves, and trash around mandrels to run when operator leaves seat with blades listed in this manual. 11. Replace fuse. Replace battery. 2. Reverse operation system (ROS) is not "ON" while mower or other attachment is engaged. Turn ignition key to open vent...
.... 4. Clogged mower deck vent holes from buildup of grass, leaves, and trash around mandrels to run when operator leaves seat with blades listed in this manual. 11. Replace fuse. Replace battery. 2. Reverse operation system (ROS) is not "ON" while mower or other attachment is engaged. Turn ignition key to open vent...
User Manual
Page 30
... to continually improve all of its authorized distributors and dealers; The philosophy of your product differs from those described in this Manual, please contact your unit. Model Number/Manufacturer's I.D. If the operating characteristics or the appearance of Electrolux Home Products is to... life of part. Number b. therefore, all mechanical products, some adjustments or part replacement may be directed to our website: www.poulan.com/support.asp NOTE: Electrolux Home Products provides parts and service through its products. For Techical Assistance: call 1-800-849-1297 ...
... to continually improve all of its authorized distributors and dealers; The philosophy of your product differs from those described in this Manual, please contact your unit. Model Number/Manufacturer's I.D. If the operating characteristics or the appearance of Electrolux Home Products is to... life of part. Number b. therefore, all mechanical products, some adjustments or part replacement may be directed to our website: www.poulan.com/support.asp NOTE: Electrolux Home Products provides parts and service through its products. For Techical Assistance: call 1-800-849-1297 ...


