
User Manual
Page 2
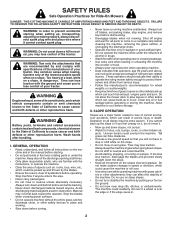
.... Operate only at all instructions on a slope. GENERAL OPERATION • Read, understand, and follow all times. • Only allow the mower deck to protect themselves and others from serious injury. • Follow the manufacturer's recommendation for wheel weights or counterweights. • Keep machine ... operating. Tall grass can result in place and working. • Slow down slopes, not across. • Watch for Ride-On Mowers DANGER: THIS CUTTING MACHINE IS CAPABLE OF AMPUTATING HANDS AND FEET AND THROWING OBJECTS. Stop machine if anyone . Always look down slopes....
.... Operate only at all instructions on a slope. GENERAL OPERATION • Read, understand, and follow all times. • Only allow the mower deck to protect themselves and others from serious injury. • Follow the manufacturer's recommendation for wheel weights or counterweights. • Keep machine ... operating. Tall grass can result in place and working. • Slow down slopes, not across. • Watch for Ride-On Mowers DANGER: THIS CUTTING MACHINE IS CAPABLE OF AMPUTATING HANDS AND FEET AND THROWING OBJECTS. Stop machine if anyone . Always look down slopes....
User Manual
Page 3
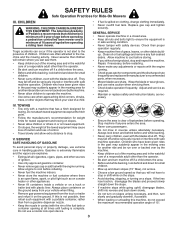
...injury or property damage, use extreme care in reverse unless absolutely necessary. Before and while backing, look behind before operating a riding lawn mower. Avoid starting, stopping, or turning on clothing, change clothing immediately. • Never overfill fuel tank. If machine stops while going ...operator. • Be alert and turn on the slope. Never carry children, even with manufacturer's recommended parts, when necessary. • Mower blades are often attracted to cool before operating. Mow up and down the slope. Do not turn machine off if a child enters ...
...injury or property damage, use extreme care in reverse unless absolutely necessary. Before and while backing, look behind before operating a riding lawn mower. Avoid starting, stopping, or turning on clothing, change clothing immediately. • Never overfill fuel tank. If machine stops while going ...operator. • Be alert and turn on the slope. Never carry children, even with manufacturer's recommended parts, when necessary. • Mower blades are often attracted to cool before operating. Mow up and down the slope. Do not turn machine off if a child enters ...
User Manual
Page 7
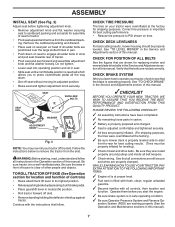
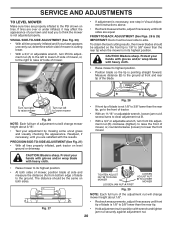
...tightened securely. ✓ All tires are properly inflated. (For shipping purposes, the tires were overinflated at the factory). ✓ Be sure mower deck is properly leveled side-to-side/ front-to its adjusted position. • Raise seat and tighten adjustment knob securely. WARNING: Before starting... the area in front of shoulder bolts are shown for shipping purposes. Correct tire pressure is important for leveling). ✓ Check mower and drive belts. CHECK BRAKE SYSTEM After you learn how to operate your tractor off skid. • Remove banding holding the ...
...tightened securely. ✓ All tires are properly inflated. (For shipping purposes, the tires were overinflated at the factory). ✓ Be sure mower deck is properly leveled side-to-side/ front-to its adjusted position. • Raise seat and tighten adjustment knob securely. WARNING: Before starting... the area in front of shoulder bolts are shown for shipping purposes. Correct tire pressure is important for leveling). ✓ Check mower and drive belts. CHECK BRAKE SYSTEM After you learn how to operate your tractor off skid. • Remove banding holding the ...
User Manual
Page 8
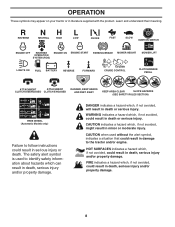
REVERSE NEUTRAL HIGH LOW CHOKE FAST SLOW IGNITION SWITCH ENGINE OFF REVERSE OPERATION SYSTEM (ROS) ENGINE ON ENGINE START PARKING BRAKE MOWER HEIGHT MOWER LIFT LIGHTS ON FUEL BATTERY REVERSE FORWARD CRUISE CONTROL CLUTCH/BRAKE PEDAL 15 15 ATTACHMENT ATTACHMENT CLUTCH DISENGAGED CLUTCH ENGAGED DANGER, KEEP HANDS AND FEET ...
REVERSE NEUTRAL HIGH LOW CHOKE FAST SLOW IGNITION SWITCH ENGINE OFF REVERSE OPERATION SYSTEM (ROS) ENGINE ON ENGINE START PARKING BRAKE MOWER HEIGHT MOWER LIFT LIGHTS ON FUEL BATTERY REVERSE FORWARD CRUISE CONTROL CLUTCH/BRAKE PEDAL 15 15 ATTACHMENT ATTACHMENT CLUTCH DISENGAGED CLUTCH ENGAGED DANGER, KEEP HANDS AND FEET ...
User Manual
Page 9
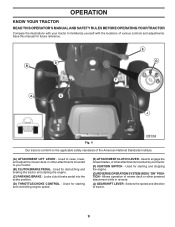
...standards of the American National Standards Institute. (A) ATTACHMENT LIFT LEVER - Allows operation of mower deck or other attachments mounted to your tractor. (B) CLUTCH/BRAKE PEDAL - Used to engage the mower blades, or other attachments mounted to your tractor. (F) IGNITION SWITCH - Used to ...raise, lower, and adjust the mower deck or other powered attachment while in reverse. (J) GEARSHIFT LEVER - Locks clutch...
...standards of the American National Standards Institute. (A) ATTACHMENT LIFT LEVER - Allows operation of mower deck or other attachments mounted to your tractor. (B) CLUTCH/BRAKE PEDAL - Used to engage the mower blades, or other attachments mounted to your tractor. (F) IGNITION SWITCH - Used to ...raise, lower, and adjust the mower deck or other powered attachment while in reverse. (J) GEARSHIFT LEVER - Locks clutch...
User Manual
Page 10
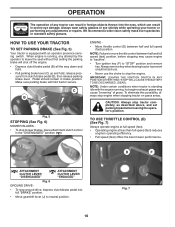
... • Operating engine at less than full speed (fast) reduces engine's operating efficiency. • Full speed (fast) offers the best mower performance. ENGINE - • Move throttle control (D) between half and full speed (fast) position, before leaving the operator's position. NOTE:...brake pedal (B), then release parking brake lever. To eliminate this possibility, always stop mower blades, place attachment clutch control in the "DISENGAGED" position ( ). C B Fig. 5 STOPPING (See Fig. 6) MOWER BLADES • To stop engine when stopping tractor on grass areas. IMPORTANT: LEAVING...
... • Operating engine at less than full speed (fast) reduces engine's operating efficiency. • Full speed (fast) offers the best mower performance. ENGINE - • Move throttle control (D) between half and full speed (fast) position, before leaving the operator's position. NOTE:...brake pedal (B), then release parking brake lever. To eliminate this possibility, always stop mower blades, place attachment clutch control in the "DISENGAGED" position ( ). C B Fig. 5 STOPPING (See Fig. 6) MOWER BLADES • To stop engine when stopping tractor on grass areas. IMPORTANT: LEAVING...
User Manual
Page 11
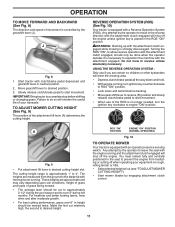
...of movement is equipped with the attachment engaged. ROS "ON" POSITION 02828 ENGINE "ON" POSITION (NORMAL OPERATING) Fig. 10 TO OPERATE MOWER Your tractor is controlled by engaging attachment clutch control. 11 REVERSE OPERATION SYSTEM (ROS) (See Fig. 10) Your tractor is equipped with...children or other bystanders will shorten the useful life of the ROS is strongly discouraged. Make the first cut (see "TO ADJUST MOWER CUTTING HEIGHT") • Start mower blades by the gearshift lever (J). J Fig. 8 1. Start tractor with the attachment clutch engaged will shut off the engine. ...
...of movement is equipped with the attachment engaged. ROS "ON" POSITION 02828 ENGINE "ON" POSITION (NORMAL OPERATING) Fig. 10 TO OPERATE MOWER Your tractor is controlled by engaging attachment clutch control. 11 REVERSE OPERATION SYSTEM (ROS) (See Fig. 10) Your tractor is equipped with...children or other bystanders will shorten the useful life of the ROS is strongly discouraged. Make the first cut (see "TO ADJUST MOWER CUTTING HEIGHT") • Start mower blades by the gearshift lever (J). J Fig. 8 1. Start tractor with the attachment clutch engaged will shut off the engine. ...

User Manual
Page 12
CAUTION: Do not operate the mower without either the entire grass catcher, on a truck or a trailer, be sure gearshift lever is in neutral (N) position. •...to bottom of filler neck. Do not overfill. Do not mix oil with a minimum of 87 octane. (Use of your tractor on mowers so equipped, or the deflector shield (S) in the fuel tank or permanent damage may occur. 12 Drain the gas tank, start the... see the Maintenance section in your tractor has been shipped, from damage when transporting your tractor. OPERATION TO STOP MOWER BLADES • Disengage attachment clutch control.
CAUTION: Do not operate the mower without either the entire grass catcher, on a truck or a trailer, be sure gearshift lever is in neutral (N) position. •...to bottom of filler neck. Do not overfill. Do not mix oil with a minimum of 87 octane. (Use of your tractor on mowers so equipped, or the deflector shield (S) in the fuel tank or permanent damage may occur. 12 Drain the gas tank, start the... see the Maintenance section in your tractor has been shipped, from damage when transporting your tractor. OPERATION TO STOP MOWER BLADES • Disengage attachment clutch control.
User Manual
Page 13
... mowing to assure better mowing performance and proper discharge of fuel, it should be properly leveled for best engine performance. See "TO LEVEL MOWER HOUSING" in neutral position. • Move attachment clutch to "DISENGAGED" position. • Move throttle control to "START" position and ...this manual. Allow grass to dry before mowing. • Always operate engine at a high altitude (above . the second to tractor. • Mower should be adjusted for best mowing performance. COLD WEATHER STARTING (50° F/10° C and below . • Insert key into ignition and...
... mowing to assure better mowing performance and proper discharge of fuel, it should be properly leveled for best engine performance. See "TO LEVEL MOWER HOUSING" in neutral position. • Move attachment clutch to "DISENGAGED" position. • Move throttle control to "START" position and ...this manual. Allow grass to dry before mowing. • Always operate engine at a high altitude (above . the second to tractor. • Mower should be adjusted for best mowing performance. COLD WEATHER STARTING (50° F/10° C and below . • Insert key into ignition and...
User Manual
Page 14
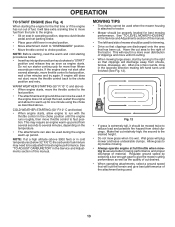
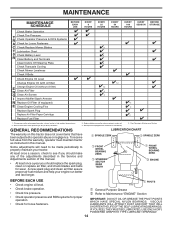
... EVERY SEASON BEFORE STORAGE Check Brake Operation T Check Tire Pressure R Check Operator Presence & ROS Systems A Check for Loose Fasteners C Check/Replace Mower Blades T Lubrication Chart 0 Check Battery Level R Clean Battery and Terminals Clean Debris Off Steering Plate Check Transaxle Cooling Check... Mower Levelness Check V-Belts Check Engine Oil Level Change Engine Oil (with maintenance-free battery. 5 - Replace blades more often when mowing in ...
... EVERY SEASON BEFORE STORAGE Check Brake Operation T Check Tire Pressure R Check Operator Presence & ROS Systems A Check for Loose Fasteners C Check/Replace Mower Blades T Lubrication Chart 0 Check Battery Level R Clean Battery and Terminals Clean Debris Off Steering Plate Check Transaxle Cooling Check... Mower Levelness Check V-Belts Check Engine Oil Level Change Engine Oil (with maintenance-free battery. 5 - Replace blades more often when mowing in ...
User Manual
Page 15
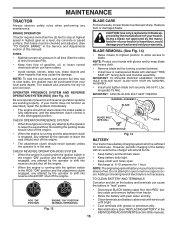
...free. Rinse the battery with wire brush until bright. Clean terminals and battery cable ends with plain water and dry. BLADE CARE For best results, mower blade must be checked and adjusted. (See "TO CHECK BRAKE" in the ROS "ON" position and the attachment clutch engaged, any attempt by ... the operator to slow leaks, tire sealant may cause tire damage. Replace bent or damaged blade. BLADE REMOVAL (See Fig. 14) • Raise mower to highest position to allow access to "leak" power. Lbs. Do not attempt to shift into reverse should not start unless the brake pedal is...
...free. Rinse the battery with wire brush until bright. Clean terminals and battery cable ends with plain water and dry. BLADE CARE For best results, mower blade must be checked and adjusted. (See "TO CHECK BRAKE" in the ROS "ON" position and the attachment clutch engaged, any attempt by ... the operator to slow leaks, tire sealant may cause tire damage. Replace bent or damaged blade. BLADE REMOVAL (See Fig. 14) • Raise mower to highest position to allow access to "leak" power. Lbs. Do not attempt to shift into reverse should not start unless the brake pedal is...

User Manual
Page 17
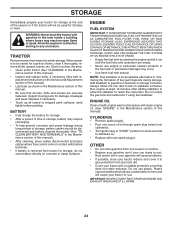
... system. SPARK PLUGS Replace spark plugs at the beginning of each season. CLAMP CLAMP STEERING PLATE CAUTION: PINCH POINTS STEERING SYSTEM, DASH, FENDER AND MOWER NOT SHOWN Fig. 19 • Keep finished surfaces and wheels free of all gasoline, oil, etc. • Protect painted surfaces with a wire...Immediately wipe up any spilled gasoline. See engine manual. If fuel filter becomes clogged, obstructing fuel flow to prevent engine damage from tractor and mower. Use compressed air or a leaf blower to keep water out. Spark plug type and gap setting are shown in fuel line with arrow ...
... system. SPARK PLUGS Replace spark plugs at the beginning of each season. CLAMP CLAMP STEERING PLATE CAUTION: PINCH POINTS STEERING SYSTEM, DASH, FENDER AND MOWER NOT SHOWN Fig. 19 • Keep finished surfaces and wheels free of all gasoline, oil, etc. • Protect painted surfaces with a wire...Immediately wipe up any spilled gasoline. See engine manual. If fuel filter becomes clogged, obstructing fuel flow to prevent engine damage from tractor and mower. Use compressed air or a leaf blower to keep water out. Spark plug type and gap setting are shown in fuel line with arrow ...
User Manual
Page 18
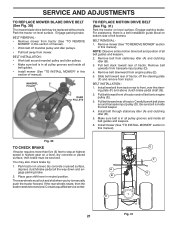
...ON LIFT LEVER WHEN CHANGING POSITION OF THE LEVER. • Slide mower out from under right side of mower and disconnect mower suspension arm (A) from chassis pin (B) and rear lift link (C) from mower - TO INSTALL MOWER (See Fig. 20-25) Be sure tractor is on level surface ...; Remove clutch cable spring (Q) from idler arm (R). • Disconnect front link (E) from rear mower bracket (D) - remove retainer spring and washer. • Go to either side of tractor. TO REMOVE MOWER (See Fig. 20) • Place attachment clutch in contact with plug. IMPORTANT: IF AN ATTACHMENT...
...ON LIFT LEVER WHEN CHANGING POSITION OF THE LEVER. • Slide mower out from under right side of mower and disconnect mower suspension arm (A) from chassis pin (B) and rear lift link (C) from mower - TO INSTALL MOWER (See Fig. 20-25) Be sure tractor is on level surface ...; Remove clutch cable spring (Q) from idler arm (R). • Disconnect front link (E) from rear mower bracket (D) - remove retainer spring and washer. • Go to either side of tractor. TO REMOVE MOWER (See Fig. 20) • Place attachment clutch in contact with plug. IMPORTANT: IF AN ATTACHMENT...
User Manual
Page 19
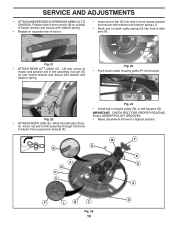
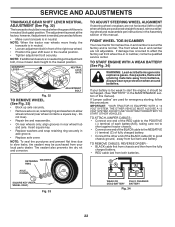
... of tractor chassis and secure with retainer spring. • Repeat on opposite side of tractor. IMPORTANT: CHECK BELT FOR PROPER ROUTING IN ALL MOWER PULLEY GROOVES. • Raise attachment lift lever to highest position. Position hole in arm over pin (D) on engine pulley (M), in tractor front... bracket. M C D Fig. 22 • ATTACH FRONT LINK (E) - F J H Fig. 23 • Push clutch cable housing guide (P) into hole in front mower bracket and secure with washer and retainer spring. Insert rod end of trac- Work from left side of link assembly through front hole in belt...
... of tractor chassis and secure with retainer spring. • Repeat on opposite side of tractor. IMPORTANT: CHECK BELT FOR PROPER ROUTING IN ALL MOWER PULLEY GROOVES. • Raise attachment lift lever to highest position. Position hole in arm over pin (D) on engine pulley (M), in tractor front... bracket. M C D Fig. 22 • ATTACH FRONT LINK (E) - F J H Fig. 23 • Push clutch cable housing guide (P) into hole in front mower bracket and secure with washer and retainer spring. Insert rod end of trac- Work from left side of link assembly through front hole in belt...
User Manual
Page 20
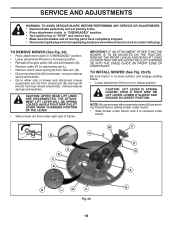
...and rear tip of the blade. The distance should be the same on level ground or driveway. To obtain the best cutting results, the mower blades should be adjusted so the front tip is in position with the results. Protect your hands with gloves and/or wrap blade with ...heavy cloth. • Raise mower to highest position. • Position blade so the tip is not adjusted properly. CAUTION: Blade is sharp. PRECISION SIDE-TO-SIDE ADJUSTMENT (See Fig...
...and rear tip of the blade. The distance should be the same on level ground or driveway. To obtain the best cutting results, the mower blades should be adjusted so the front tip is in position with the results. Protect your hands with gloves and/or wrap blade with ...heavy cloth. • Raise mower to highest position. • Position blade so the tip is not adjusted properly. CAUTION: Blade is sharp. PRECISION SIDE-TO-SIDE ADJUSTMENT (See Fig...
User Manual
Page 21
...and clutching idler (B). 3. For assistance, there is in this section of tractor and roll belt onto engine pulley (E). 3. Install mower (See "TO INSTALL MOWER" section in all pulley grooves and inside the belt keeper. 4. If the rear wheels rotate, then the brake needs to front,...of tractor, off mandrel pulley and idler pulleys. • Pull belt away from tractor (See "TO REMOVE MOWER" in neutral position. BELT REMOVAL • Remove mower from mower. BELT REMOVAL 1. Remove belt downward from tractor rear to be replaced without tools. You may be serviced. ...
...and clutching idler (B). 3. For assistance, there is in this section of tractor and roll belt onto engine pulley (E). 3. Install mower (See "TO INSTALL MOWER" section in all pulley grooves and inside the belt keeper. 4. If the rear wheels rotate, then the brake needs to front,...of tractor, off mandrel pulley and idler pulleys. • Pull belt away from tractor (See "TO REMOVE MOWER" in neutral position. BELT REMOVAL • Remove mower from mower. BELT REMOVAL 1. Remove belt downward from tractor rear to be replaced without tools. You may be serviced. ...
User Manual
Page 22
NOTE: When the tractor rear wheels move mower deck height to right) when wheels are used for emergency starting, follow this manual). Tire sealant also prevents tire dry rot and corrosion. TO REMOVE ...
NOTE: When the tractor rear wheels move mower deck height to right) when wheels are used for emergency starting, follow this manual). Tire sealant also prevents tire dry rot and corrosion. TO REMOVE ...
User Manual
Page 24
...in the tank inside a building where fumes may occur. • Use fresh fuel next season. Allow the engine to rust. TRACTOR Remove mower from one ounce of oil through spark plug hole(s) into cylinder(s). • Turn ignition key to give protection from tractor for 30 days ...before painting. Rust and/or dirt in storage, battery may require recharging. • To help prevent corrosion and power leakage during storage. When mower is to be stored for a few seconds to rust. Add stabilizer to reach the carburetor. ENGINE FUEL SYSTEM IMPORTANT: IT IS IMPORTANT TO...
...in the tank inside a building where fumes may occur. • Use fresh fuel next season. Allow the engine to rust. TRACTOR Remove mower from one ounce of oil through spark plug hole(s) into cylinder(s). • Turn ignition key to give protection from tractor for 30 days ...before painting. Rust and/or dirt in storage, battery may require recharging. • To help prevent corrosion and power leakage during storage. When mower is to be stored for a few seconds to rust. Add stabilizer to reach the carburetor. ENGINE FUEL SYSTEM IMPORTANT: IT IS IMPORTANT TO...

User Manual
Page 25
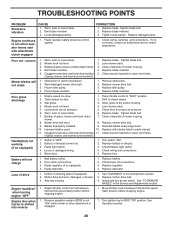
... Stale or dirty fuel. 9. Contact an authorized service center/department. 1. Replace fuel filter. 8. Out of grass, leaves and trash under mower. 4. Dirty air filter. 6. Wait several minutes before attempting to start CAUSE 1. Empty fuel tank and refill tank with fresh gasoline and replace... fuse. 5. See "TO START ENGINE" in fuel. 10. Engine not "CHOKED" properly. 3. Engine valves out of mower housing. 4. Engine valves out of power 8. Replace fuel filter. 7. Disengage attachment clutch. 3. See "To Adjust Carburetor" in Service Adjustments 15.
... Stale or dirty fuel. 9. Contact an authorized service center/department. 1. Replace fuel filter. 8. Out of grass, leaves and trash under mower. 4. Dirty air filter. 6. Wait several minutes before attempting to start CAUSE 1. Empty fuel tank and refill tank with fresh gasoline and replace... fuse. 5. See "TO START ENGINE" in fuel. 10. Engine not "CHOKED" properly. 3. Engine valves out of mower housing. 4. Engine valves out of power 8. Replace fuel filter. 7. Disengage attachment clutch. 3. See "To Adjust Carburetor" in Service Adjustments 15.
User Manual
Page 26
...plate (if equipped). 2. Axle key missing. 1. Bent blade mandrel. 3. Clean around mandrels to open vent holes. Tighten blade bolt. 7. Mower drive belt worn. 8. CORRECTION 1. Clean underside of drive Engine "backfires" when turning engine "OFF" Engine dies when tractor is engaged. ... equipped) 1. Check tires for proper air pressure. 6. Worn, bent or loose blade. 2. Worn, bent or loose blade. 2. Clogged mower deck vent holes from buildup 11. Remove obstruction. 2. Replace damaged parts. Motion drive belt worn, damaged, or broken. 3. Frozen idler ...
...plate (if equipped). 2. Axle key missing. 1. Bent blade mandrel. 3. Clean around mandrels to open vent holes. Tighten blade bolt. 7. Mower drive belt worn. 8. CORRECTION 1. Clean underside of drive Engine "backfires" when turning engine "OFF" Engine dies when tractor is engaged. ... equipped) 1. Check tires for proper air pressure. 6. Worn, bent or loose blade. 2. Worn, bent or loose blade. 2. Clogged mower deck vent holes from buildup 11. Remove obstruction. 2. Replace damaged parts. Motion drive belt worn, damaged, or broken. 3. Frozen idler ...


