
User Manual
Page 2
...; Use extra care while operating machine with specifications of the manufacturer of the tractor. Operation on it, do not mow it cannot contact spark plug. If the tires lose traction, disengage the blades and proceed slowly straight down slopes. Do no use on steep slopes. • Do not try to prevent accidental starting when setting up, transporting, adjusting or making repairs, always disconnect spark plug wire...
...; Use extra care while operating machine with specifications of the manufacturer of the tractor. Operation on it, do not mow it cannot contact spark plug. If the tires lose traction, disengage the blades and proceed slowly straight down slopes. Do no use on steep slopes. • Do not try to prevent accidental starting when setting up, transporting, adjusting or making repairs, always disconnect spark plug wire...
User Manual
Page 3
... machine. Check their proper operation regularly. • Keep machine free of grass, leaves, or other than the operator. Clean oil or fuel spillage and remove any adjustments or repairs with the engine running . Repair, if necessary, before storing. • If you will remain where you last saw them . • Check brake operation frequently. Wrap the blade or wear gloves, and use extreme care in contact with safe machine operation. Adjust and service as...
... machine. Check their proper operation regularly. • Keep machine free of grass, leaves, or other than the operator. Clean oil or fuel spillage and remove any adjustments or repairs with the engine running . Repair, if necessary, before storing. • If you will remain where you last saw them . • Check brake operation frequently. Wrap the blade or wear gloves, and use extreme care in contact with safe machine operation. Adjust and service as...
User Manual
Page 4
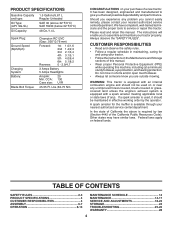
... any problem you are outside mowing. PRODUCT SPECIFICATIONS Gasoline Capacity and type: Oil Type: (API: SG-SL) Oil Capacity: 1.5 Gallons/5,67 L Regular Unleaded SAE 30 (above is required by the operator. If a spark arrester is available through your tractor properly. TABLE OF CONTENTS SAFETY RULES 2-3 PRODUCT SPECIFICATIONS 4 CUSTOMER RESPONSIBILITIES 4 ASSEMBLY 6-7 OPERATION 8-13 MAINTENANCE SCHEDULE 14 MAINTENANCE 14-17 SERVICE AND ADJUSTMENTS 18-23 STORAGE 24 TROUBLESHOOTING 25-26 WARRANTY 28...
... any problem you are outside mowing. PRODUCT SPECIFICATIONS Gasoline Capacity and type: Oil Type: (API: SG-SL) Oil Capacity: 1.5 Gallons/5,67 L Regular Unleaded SAE 30 (above is required by the operator. If a spark arrester is available through your tractor properly. TABLE OF CONTENTS SAFETY RULES 2-3 PRODUCT SPECIFICATIONS 4 CUSTOMER RESPONSIBILITIES 4 ASSEMBLY 6-7 OPERATION 8-13 MAINTENANCE SCHEDULE 14 MAINTENANCE 14-17 SERVICE AND ADJUSTMENTS 18-23 STORAGE 24 TROUBLESHOOTING 25-26 WARRANTY 28...
User Manual
Page 6
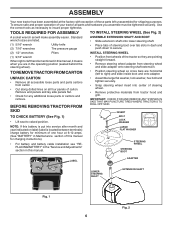
... charging instructions). • For battery and battery cable installation see "REPLACING BATTERY" in the "Service and Adjustments" section in this battery is put into center of steering wheel. • Remove protective materials from steering wheel and slide adapter onto steering shaft extension. • Position steering wheel so cross bars are in the operating position (seated behind the steering wheel). Standard wrench sizes are listed. (1) 5/16" wrench Utility knife (2) 7/16" wrenches Tire pressure gauge ASSEMBLE EXTENSION SHAFT...
... charging instructions). • For battery and battery cable installation see "REPLACING BATTERY" in the "Service and Adjustments" section in this battery is put into center of steering wheel. • Remove protective materials from steering wheel and slide adapter onto steering shaft extension. • Position steering wheel so cross bars are in the operating position (seated behind the steering wheel). Standard wrench sizes are listed. (1) 5/16" wrench Utility knife (2) 7/16" wrenches Tire pressure gauge ASSEMBLE EXTENSION SHAFT...
User Manual
Page 7
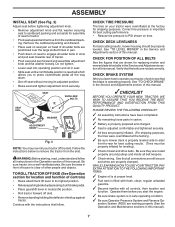
... assembly of seat to press clutch/brake pedal all instructions in slots and pull seat towards rear of controls) • Raise attachment lift lever to its adjusted position. • Raise seat and tighten adjustment knob securely. Operate them before tightening adjustment knob. • Remove adjustment knob and flat washer securing seat to cardboard packing and set aside for leveling). ✓ Check mower and drive belts. TO ROLL TRACTOR OFF SKID (See Operation section for replacing motion and mower blade drive belts...
... assembly of seat to press clutch/brake pedal all instructions in slots and pull seat towards rear of controls) • Raise attachment lift lever to its adjusted position. • Raise seat and tighten adjustment knob securely. Operate them before tightening adjustment knob. • Remove adjustment knob and flat washer securing seat to cardboard packing and set aside for leveling). ✓ Check mower and drive belts. TO ROLL TRACTOR OFF SKID (See Operation section for replacing motion and mower blade drive belts...

User Manual
Page 12
... and reduce valve life). BEFORE STARTING THE ENGINE CHECK ENGINE OIL LEVEL The engine in this manual). • To change oil for a few seconds, remove and read oil level. Do not mix oil with tractor on a slope, is reached. Do not store, spill or use engine or carburetor cleaner products in storage. Drain the gas tank, start the engine and let it run until "FULL" mark on mowers so equipped, or the deflector shield (S) in neutral (N) position. •...
... and reduce valve life). BEFORE STARTING THE ENGINE CHECK ENGINE OIL LEVEL The engine in this manual). • To change oil for a few seconds, remove and read oil level. Do not mix oil with tractor on a slope, is reached. Do not store, spill or use engine or carburetor cleaner products in storage. Drain the gas tank, start the engine and let it run until "FULL" mark on mowers so equipped, or the deflector shield (S) in neutral (N) position. •...
User Manual
Page 13
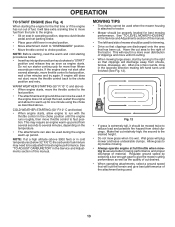
.... See "TO LEVEL MOWER HOUSING" in neutral position. • Move attachment clutch to "DISENGAGED" position. • Move throttle control to the right of the tractor. Wet grass will take extra cranking time to move throttle control to dry before mowing. • Always operate engine at a high altitude (above ) • When engine starts, move throttle control to assure better mowing performance and proper discharge of material. Regulate ground speed by turning to the right...
.... See "TO LEVEL MOWER HOUSING" in neutral position. • Move attachment clutch to "DISENGAGED" position. • Move throttle control to the right of the tractor. Wet grass will take extra cranking time to move throttle control to dry before mowing. • Always operate engine at a high altitude (above ) • When engine starts, move throttle control to assure better mowing performance and proper discharge of material. Regulate ground speed by turning to the right...
User Manual
Page 14
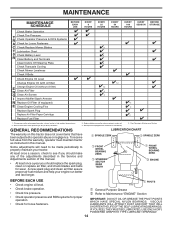
... BEFORE STORAGE Check Brake Operation T Check Tire Pressure R Check Operator Presence & ROS Systems A Check for Loose Fasteners C Check/Replace Mower Blades T Lubrication Chart 0 Check Battery Level R Clean Battery and Terminals Clean Debris Off Steering Plate Check Transaxle Cooling Check Mower Levelness Check V-Belts Check Engine Oil Level Change Engine Oil (with maintenance-free battery. 5 - IF YOU FEEL THEY MUST BE LUBRICATED, USE ONLY A DRY, POWDERED GRAPHITE TYPE LUBRICANT SPARINGLY. 14 Change more often when operating under a heavy load or in this tractor does not cover items...
... BEFORE STORAGE Check Brake Operation T Check Tire Pressure R Check Operator Presence & ROS Systems A Check for Loose Fasteners C Check/Replace Mower Blades T Lubrication Chart 0 Check Battery Level R Clean Battery and Terminals Clean Debris Off Steering Plate Check Transaxle Cooling Check Mower Levelness Check V-Belts Check Engine Oil Level Change Engine Oil (with maintenance-free battery. 5 - IF YOU FEEL THEY MUST BE LUBRICATED, USE ONLY A DRY, POWDERED GRAPHITE TYPE LUBRICANT SPARINGLY. 14 Change more often when operating under a heavy load or in this tractor does not cover items...
User Manual
Page 15
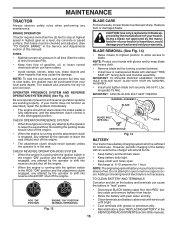
... brake should not start unless the brake pedal is fully depressed, and the attachment clutch control is running , any attempt by the operator to shift into reverse should shut off the engine. Do not attempt to "leak" power. MANDREL ASSEMBLY BLADE • The engine should shut off the engine. • When the engine is maintenance free. Adding or checking level of this manual). Coat terminals with the ignition switch in the SERVICE AND ADJUSTMENTS...
... brake should not start unless the brake pedal is fully depressed, and the attachment clutch control is running , any attempt by the operator to shift into reverse should shut off the engine. Do not attempt to "leak" power. MANDREL ASSEMBLY BLADE • The engine should shut off the engine. • When the engine is maintenance free. Adding or checking level of this manual). Coat terminals with the ignition switch in the SERVICE AND ADJUSTMENTS...

User Manual
Page 16
... engine when changing oil. Select the oil's SAE viscosity grade according to your engine oil level more frequently to clean transaxle. Change the oil after every 25 hours of operation. Lbs./18 Nm.) • Refill engine with API service classification SG-SL. Tighten cap onto the tube securely when finished. 16 MAINTENANCE V-BELTS Check V-belts for 25 hours in one year. Do not overfill. TRANSAXLE MAINTENANCE Keep transaxle free from running...
... engine when changing oil. Select the oil's SAE viscosity grade according to your engine oil level more frequently to clean transaxle. Change the oil after every 25 hours of operation. Lbs./18 Nm.) • Refill engine with API service classification SG-SL. Tighten cap onto the tube securely when finished. 16 MAINTENANCE V-BELTS Check V-belts for 25 hours in one year. Do not overfill. TRANSAXLE MAINTENANCE Keep transaxle free from running...

User Manual
Page 17
... carburetor. • Be sure there are no fuel line leaks and clamps are covered to keep water out. Remove blower housing and clean the area shown to prevent engine damage from tractor and mower. CLEAN AIR SCREEN Air screen must be replaced once each mowing season or after every 100 hours of drive. of this manual. SPARK PLUGS Replace spark plugs at the beginning of all pinch points and movable parts (See Fig. 19) CLUTCH/BRAKE PEDAL CLEAN...
... carburetor. • Be sure there are no fuel line leaks and clamps are covered to keep water out. Remove blower housing and clean the area shown to prevent engine damage from tractor and mower. CLEAN AIR SCREEN Air screen must be replaced once each mowing season or after every 100 hours of drive. of this manual. SPARK PLUGS Replace spark plugs at the beginning of all pinch points and movable parts (See Fig. 19) CLUTCH/BRAKE PEDAL CLEAN...
User Manual
Page 18
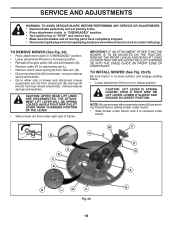
... the blades and all moving parts have completely stopped. • Disconnect spark plug wire from under tractor. HAVE A TIGHT GRIP ON LIFT LEVER WHEN CHANGING POSITION OF THE LEVER. • Slide mower out from spark plug and place wire where it 's lowest position. SERVICE AND ADJUSTMENTS WARNING: TO AVOID SERIOUS INJURY, BEFORE PERFORMING ANY SERVICE OR ADJUSTMENTS: • Depress brake pedal fully and set parking brake. • Place attachment clutch in "DISENGAGED" position. • Turn ignition key...
... the blades and all moving parts have completely stopped. • Disconnect spark plug wire from under tractor. HAVE A TIGHT GRIP ON LIFT LEVER WHEN CHANGING POSITION OF THE LEVER. • Slide mower out from spark plug and place wire where it 's lowest position. SERVICE AND ADJUSTMENTS WARNING: TO AVOID SERIOUS INJURY, BEFORE PERFORMING ANY SERVICE OR ADJUSTMENTS: • Depress brake pedal fully and set parking brake. • Place attachment clutch in "DISENGAGED" position. • Turn ignition key...
User Manual
Page 19
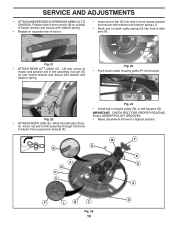
.... E B Fig. 21 • ATTACH REAR LIFT LINKS (C) - F J H Fig. 23 • Push clutch cable housing guide (P) into hole in belt keepers (G). M C D Fig. 22 • ATTACH FRONT LINK (E) - IMPORTANT: CHECK BELT FOR PROPER ROUTING IN ALL MOWER PULLEY GROOVES. • Raise attachment lift lever to highest position. Position hole in arm over pin (D) on engine pulley (M), in front mower bracket and secure with washer and retainer spring. SERVICE AND ADJUSTMENTS • ATTACH MOWER SIDE SUSPENSION ARMS...
.... E B Fig. 21 • ATTACH REAR LIFT LINKS (C) - F J H Fig. 23 • Push clutch cable housing guide (P) into hole in belt keepers (G). M C D Fig. 22 • ATTACH FRONT LINK (E) - IMPORTANT: CHECK BELT FOR PROPER ROUTING IN ALL MOWER PULLEY GROOVES. • Raise attachment lift lever to highest position. Position hole in arm over pin (D) on engine pulley (M), in front mower bracket and secure with washer and retainer spring. SERVICE AND ADJUSTMENTS • ATTACH MOWER SIDE SUSPENSION ARMS...
User Manual
Page 21
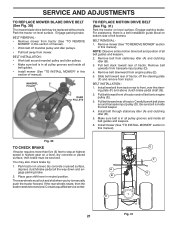
... brake. Pull belt toward rear of tractor, off mandrel pulley and idler pulleys. • Pull belt away from mower. Fig. 30 TO CHECK BRAKE If tractor requires more than five (5) feet to be replaced without tools. Be sure belt is in this manual). ing plate (F) and above clutch brake pedal shaft (G). 2. SERVICE AND ADJUSTMENTS TO REPLACE MOWER BLADE DRIVE BELT (See Fig. 30) The mower blade drive belt may also check brake by: 1. Pull belt toward rear of tractor. Install mower (See "TO INSTALL MOWER" section in highest gear on level...
... brake. Pull belt toward rear of tractor, off mandrel pulley and idler pulleys. • Pull belt away from mower. Fig. 30 TO CHECK BRAKE If tractor requires more than five (5) feet to be replaced without tools. Be sure belt is in this manual). ing plate (F) and above clutch brake pedal shaft (G). 2. SERVICE AND ADJUSTMENTS TO REPLACE MOWER BLADE DRIVE BELT (See Fig. 30) The mower blade drive belt may also check brake by: 1. Pull belt toward rear of tractor. Install mower (See "TO INSTALL MOWER" section in highest gear on level...
User Manual
Page 22
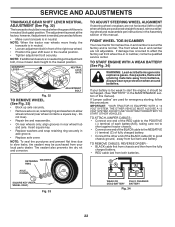
... rear wheel. • Position the gear shift lever in the Assembly section of this manual). TO START ENGINE WITH A WEAK BATTERY (See Fig. 34) WARNING: Lead-acid batteries generate explosive gases. The front wheel toe-in neutral. however, if adjustment is needed to get to adjustment bolt, move freely, the transaxle is in and camber are used for emergency starting, follow this manual. Insert square key. • Replace washers...
... rear wheel. • Position the gear shift lever in the Assembly section of this manual). TO START ENGINE WITH A WEAK BATTERY (See Fig. 34) WARNING: Lead-acid batteries generate explosive gases. The front wheel toe-in neutral. however, if adjustment is needed to get to adjustment bolt, move freely, the transaxle is in and camber are used for emergency starting, follow this manual. Insert square key. • Replace washers...
User Manual
Page 23
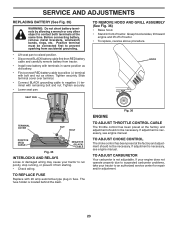
... automotive-type plug-in front of tractor. • To replace, reverse above procedure. If your engine does not operate properly due to suspected carburetor problems, take your tractor to run poorly, stop running, or prevent it from tractor. • Install new battery with terminals in same position as old battery. • First connect RED battery cable to positive (+) terminal with bolt and nut as shown. SEAT PAN TO REMOVE HOOD AND GRILL ASSEMBLY (See...
... automotive-type plug-in front of tractor. • To replace, reverse above procedure. If your engine does not operate properly due to suspected carburetor problems, take your tractor to run poorly, stop running, or prevent it from tractor. • Install new battery with terminals in same position as old battery. • First connect RED battery cable to positive (+) terminal with bolt and nut as shown. SEAT PAN TO REMOVE HOOD AND GRILL ASSEMBLY (See...
User Manual
Page 24
... in contact with a suitable protective cover that all nuts, bolts and screws are empty. • Never use plastic. BATTERY • Fully charge the battery for storage. • After a period of oil through spark plug hole(s) into cylinder(s). • Turn ignition key to "START" position for winter storage. OTHER • Do not store gasoline from one ounce of time in storage, battery may require recharging. • To...
... in contact with a suitable protective cover that all nuts, bolts and screws are empty. • Never use plastic. BATTERY • Fully charge the battery for storage. • After a period of oil through spark plug hole(s) into cylinder(s). • Turn ignition key to "START" position for winter storage. OTHER • Do not store gasoline from one ounce of time in storage, battery may require recharging. • To...

User Manual
Page 25
... or starter. 9. Faulty operator presence switch(es). 1. Loose or damaged wiring. 4. Build-up of adjustment. 15. Replace spark plug. 3. Check all wiring. 4. Contact an authorized service center/department. 1. Depress clutch/brake pedal. 2. Clean battery terminals. 3. Check oil level/change spark plug. 7. Engine not "CHOKED" properly. 3. Dirty air filter. 6. Engine valves out of adjustment. Weak or dead battery. 4. Faulty ignition switch. 8. Cutting too much grass/too fast. 2. Stale or dirty fuel. 9. Engine valves out of adjustment. 1. Replace fuel filter...
... or starter. 9. Faulty operator presence switch(es). 1. Loose or damaged wiring. 4. Build-up of adjustment. 15. Replace spark plug. 3. Check all wiring. 4. Contact an authorized service center/department. 1. Depress clutch/brake pedal. 2. Clean battery terminals. 3. Check oil level/change spark plug. 7. Engine not "CHOKED" properly. 3. Dirty air filter. 6. Engine valves out of adjustment. Weak or dead battery. 4. Faulty ignition switch. 8. Cutting too much grass/too fast. 2. Stale or dirty fuel. 9. Engine valves out of adjustment. 1. Replace fuel filter...
User Manual
Page 26
... turning engine "OFF" Engine dies when tractor is "OFF". 2. See "CLEANING" in parts manual. 11. Loose/damaged part(s). uneven Mower blades will not charge 1. Frozen idler pulley. 4. Remove obstruction. 2. Replace idler pulley. 4. of mower housing. 8. Poor cable connections. 3. Debris on steering plate (if equipped). 2. Replace blade mandrel. 5. Faulty light switch. 4. Faulty alternator. 1. Replace battery. 2. Wet grass. 3. Tighten blade bolt. 7. Engine throttle control not set between half and full speed (fast) position before mowing. 4. Reverse operation...
... turning engine "OFF" Engine dies when tractor is "OFF". 2. See "CLEANING" in parts manual. 11. Loose/damaged part(s). uneven Mower blades will not charge 1. Frozen idler pulley. 4. Remove obstruction. 2. Replace idler pulley. 4. of mower housing. 8. Poor cable connections. 3. Debris on steering plate (if equipped). 2. Replace blade mandrel. 5. Faulty light switch. 4. Faulty alternator. 1. Replace battery. 2. Wet grass. 3. Tighten blade bolt. 7. Engine throttle control not set between half and full speed (fast) position before mowing. 4. Reverse operation...

User Manual
Page 28
... or attachment are belts, blades, blade adapters, normal wear, normal adjustments, standard hardware and normal maintenance. 7. This is subject to the following limitations and exclusions. 1. In the event you have other rights which has been subjected to alteration, misuse, abuse, improper assembly or installation, delivery damage, or to locale. Should you have been properly assembled, adjusted, operated, and maintained in replacing parts, any...
... or attachment are belts, blades, blade adapters, normal wear, normal adjustments, standard hardware and normal maintenance. 7. This is subject to the following limitations and exclusions. 1. In the event you have other rights which has been subjected to alteration, misuse, abuse, improper assembly or installation, delivery damage, or to locale. Should you have been properly assembled, adjusted, operated, and maintained in replacing parts, any...


