User Manual
Page 4
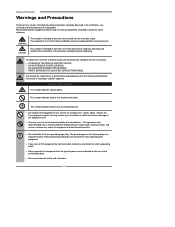
... This symbol is an important feature. To reduce the risk of fire or electric shock, do not expose this equipment from the type of power source indicated on the 3-prong plug is intended to alert the user to rain or moisture. ▪ TO REDUCE THE RISK OF ELECTRIC SHOCK, ▪...
... This symbol is an important feature. To reduce the risk of fire or electric shock, do not expose this equipment from the type of power source indicated on the 3-prong plug is intended to alert the user to rain or moisture. ▪ TO REDUCE THE RISK OF ELECTRIC SHOCK, ▪...
User Manual
Page 5
...Opening and removing the covers may expose you to rain or moisture, does not operate normally, or has been dropped. ▪ Always remove the power cord from the outlet before cleaning the equipment. ▪ Never use attachments/accessories specified by the manufacturer. 3 too close to drapes/curtains/walls,...Inserting any of time. ▪ Refer all servicing to liquid, rain, or moisture. ENGLISH Warnings and Precautions ▪ Use and handle the power cord with a soft dry cloth. ▪ Only use liquid or aerosol cleaners on the equipment. Seek for long periods of the above is...
...Opening and removing the covers may expose you to rain or moisture, does not operate normally, or has been dropped. ▪ Always remove the power cord from the outlet before cleaning the equipment. ▪ Never use attachments/accessories specified by the manufacturer. 3 too close to drapes/curtains/walls,...Inserting any of time. ▪ Refer all servicing to liquid, rain, or moisture. ENGLISH Warnings and Precautions ▪ Use and handle the power cord with a soft dry cloth. ▪ Only use liquid or aerosol cleaners on the equipment. Seek for long periods of the above is...
User Manual
Page 6
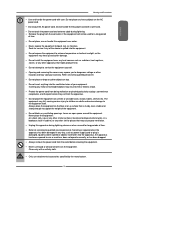
...wire Ground clamps Electric service equipment Antenna discharge unit (NEC section 810-20) Grounding conductors (NEC section 810-20) Ground clamps Power service grounding (NEC Art250 part H) NEC : National Electrical code EXAMPLE OF OUTDOOR ANTENNA GROUNDING 4 Section 810 of National Electrical ...in wire to an antenna discharge unit, size of grounding conductors, location of antenna discharge unit, connection to prevent contact with power lines. Warnings and Precautions Outdoor Antenna Safety Instructions If an outdoor antenna is connected, follow the precautions below: ▪ An ...
...wire Ground clamps Electric service equipment Antenna discharge unit (NEC section 810-20) Grounding conductors (NEC section 810-20) Ground clamps Power service grounding (NEC Art250 part H) NEC : National Electrical code EXAMPLE OF OUTDOOR ANTENNA GROUNDING 4 Section 810 of National Electrical ...in wire to an antenna discharge unit, size of grounding conductors, location of antenna discharge unit, connection to prevent contact with power lines. Warnings and Precautions Outdoor Antenna Safety Instructions If an outdoor antenna is connected, follow the precautions below: ▪ An ...
User Manual
Page 9
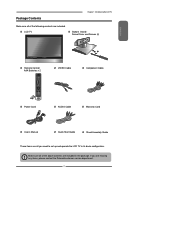
... CH PAGE MUTE ASPECT LAST GUIDE LIVE TV PIP MENU OK INFO CC EXIT DVR 1 2 3 ABC DEF 4 5 6 GHI JKL MNO 7 8 9 PQRS TUV WXYZ INPUT . 0 ENTER Power Cord VIDEO Cable Component Cable AUDIO Cable Warranty Card User's Manual Quick Start Guide Stand Assembly Guide These items are all you are missing any...
... CH PAGE MUTE ASPECT LAST GUIDE LIVE TV PIP MENU OK INFO CC EXIT DVR 1 2 3 ABC DEF 4 5 6 GHI JKL MNO 7 8 9 PQRS TUV WXYZ INPUT . 0 ENTER Power Cord VIDEO Cable Component Cable AUDIO Cable Warranty Card User's Manual Quick Start Guide Stand Assembly Guide These items are all you are missing any...
User Manual
Page 12
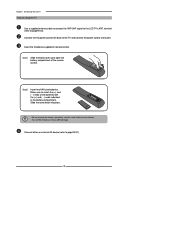
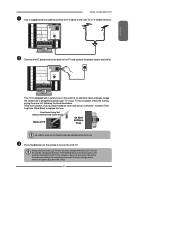
... it may suffer damage. Insert the 2 batteries supplied in the battery compartment. Make sure to open the battery compartment of the TV and connect the power cord to the LCD TV's ANT. Slide the cover back into place. terminal (refer to page23-31). 10 Connect other an external AV device (refer... setup the TV Use a supplied antenna cable to connect the VHF/UHF signal to wall outlet. Step2 Insert two AAA size batteries. Connect the AC power cord at the back of the remote control.
... it may suffer damage. Insert the 2 batteries supplied in the battery compartment. Make sure to open the battery compartment of the TV and connect the power cord to the LCD TV's ANT. Slide the cover back into place. terminal (refer to page23-31). 10 Connect other an external AV device (refer... setup the TV Use a supplied antenna cable to connect the VHF/UHF signal to wall outlet. Step2 Insert two AAA size batteries. Connect the AC power cord at the back of the remote control.
User Manual
Page 15
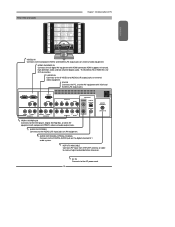
... video equipment. HDTV/TV AIR/CABLE VHF/UHF IN HDTV/TV AIR/CABLE Connects RF input from VHF/UHF antenna or cable to the AC power cord. 13 Rear View and Jacks Chapter 1 Introducing the LCD TV ENGLISH VIDEO2 IN Connects to the composite VIDEO and AUDIO(L/R) output jacks on the...
... video equipment. HDTV/TV AIR/CABLE VHF/UHF IN HDTV/TV AIR/CABLE Connects RF input from VHF/UHF antenna or cable to the AC power cord. 13 Rear View and Jacks Chapter 1 Introducing the LCD TV ENGLISH VIDEO2 IN Connects to the composite VIDEO and AUDIO(L/R) output jacks on the...
User Manual
Page 20
... When connecting any external equipment, do not connect any external equipment to be connected. The following is a brief explanation of the type of any AC power cords to wall outlets until all other connections are more important than those for good color TV reception are completed. F-type connector 75-ohm coaxial...
... When connecting any external equipment, do not connect any external equipment to be connected. The following is a brief explanation of the type of any AC power cords to wall outlets until all other connections are more important than those for good color TV reception are completed. F-type connector 75-ohm coaxial...
User Manual
Page 23
... not disconnect the device from the main voltage. Firm Plastic Prying Tool (Using a metal tool may cause shock) Back of the TV and connect the power cord to wall outlet. Press the button on the front panel is blown, visit your local hardware store and ask for a 4A 250V - 5x20mm Time... the event of time. HDTV/TV AIR/CABLE VHF/UHF IN ENGLISH Connect the AC power cord at the back of TV 4A 250V 5x20mm Fuse BE SURE TO UNPLUG AC POWER CORD BEFORE REMOVING THE FUSE. The POWER button on the remote to replace the fuse. To completely disconnect the main voltage...
... not disconnect the device from the main voltage. Firm Plastic Prying Tool (Using a metal tool may cause shock) Back of the TV and connect the power cord to wall outlet. Press the button on the front panel is blown, visit your local hardware store and ask for a 4A 250V - 5x20mm Time... the event of time. HDTV/TV AIR/CABLE VHF/UHF IN ENGLISH Connect the AC power cord at the back of TV 4A 250V 5x20mm Fuse BE SURE TO UNPLUG AC POWER CORD BEFORE REMOVING THE FUSE. The POWER button on the remote to replace the fuse. To completely disconnect the main voltage...
User Manual
Page 25
..., before turning on the LCD TV. Press the button on the remote to turn on the power switch of TV Chapter 2 Installing the LCD TV HDMI1 IN HDMI2 IN AUDIO L R VGA IN AUDIO L R VIDEO L R AUDIO VIDEO2 IN S-VIDEO L AUDIO R S-VIDEO IN YPbPr1 ...
..., before turning on the LCD TV. Press the button on the remote to turn on the power switch of TV Chapter 2 Installing the LCD TV HDMI1 IN HDMI2 IN AUDIO L R VGA IN AUDIO L R VIDEO L R AUDIO VIDEO2 IN S-VIDEO L AUDIO R S-VIDEO IN YPbPr1 ...
User Manual
Page 26
... equipment. Press the button on the remote to turn on the remote to select VIDEO2/VIDEO1( METHOD A), or VIDEO3 (METHOD B). Not all AC power sources, before turning on the power switch of TV HDMI1 IN HDMI2 IN AUDIO L R VGA IN AUDIO L R VIDEO L R AUDIO VIDEO2 IN S-VIDEO L AUDIO R S-VIDEO IN YPbPr1 IN Y Pb...
... equipment. Press the button on the remote to turn on the remote to select VIDEO2/VIDEO1( METHOD A), or VIDEO3 (METHOD B). Not all AC power sources, before turning on the power switch of TV HDMI1 IN HDMI2 IN AUDIO L R VGA IN AUDIO L R VIDEO L R AUDIO VIDEO2 IN S-VIDEO L AUDIO R S-VIDEO IN YPbPr1 IN Y Pb...

User Manual
Page 28
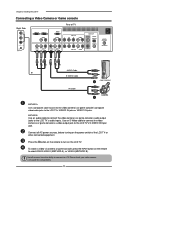
For best picture quality, if your equipment has component video output, use a component cable instead of the LCD TV or other connected equipment. To watch a DVD, press the INPUT button on the LCD TV. Press the button on the remote to turn on the remote to select VIDEO2( METHOD A), or VIDEO3 ( METHOD B), or VIDEO4/VIDEO5 (METHOD C). Chapter 2 Installing the LCD TV Connect all AC power sources, before turning on the power switch of a composite video or S-video cable. 26
For best picture quality, if your equipment has component video output, use a component cable instead of the LCD TV or other connected equipment. To watch a DVD, press the INPUT button on the LCD TV. Press the button on the remote to turn on the remote to select VIDEO2( METHOD A), or VIDEO3 ( METHOD B), or VIDEO4/VIDEO5 (METHOD C). Chapter 2 Installing the LCD TV Connect all AC power sources, before turning on the power switch of a composite video or S-video cable. 26
User Manual
Page 29
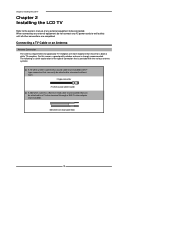
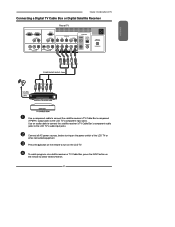
Connect all AC power sources, before turning on the remote to the LCD TV's audio input jacks. ENGLISH Chapter 2 Installing the LCD TV Connecting a Digital TV Cable Box or ... Rear of the LCD TV or other connected equipment. To watch programs via satellite receiver or TV Cable Box, press the INPUT button on the power switch of TV HDMI1 IN HDMI2 IN AUDIO L R VGA IN AUDIO L R L R VIDEO AUDIO VIDEO2 IN S-VIDEO L AUDIO R S-VIDEO IN YPbPr1 IN Y Pb Pr AUDIO AUDIO...
Connect all AC power sources, before turning on the remote to the LCD TV's audio input jacks. ENGLISH Chapter 2 Installing the LCD TV Connecting a Digital TV Cable Box or ... Rear of the LCD TV or other connected equipment. To watch programs via satellite receiver or TV Cable Box, press the INPUT button on the power switch of TV HDMI1 IN HDMI2 IN AUDIO L R VGA IN AUDIO L R L R VIDEO AUDIO VIDEO2 IN S-VIDEO L AUDIO R S-VIDEO IN YPbPr1 IN Y Pb Pr AUDIO AUDIO...
User Manual
Page 30
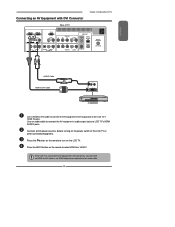
..., before turning on the LCD TV. Press the button on the remote to turn on the power switch of TV HDMI1 IN HDMI2 IN AUDIO L R VGA IN AUDIO L R VIDEO L R AUDIO VIDEO2 IN S-VIDEO L AUDIO R S-VIDEO IN YPbPr1 IN Y Pb Pr AUDIO AUDIO ...
..., before turning on the LCD TV. Press the button on the remote to turn on the power switch of TV HDMI1 IN HDMI2 IN AUDIO L R VGA IN AUDIO L R VIDEO L R AUDIO VIDEO2 IN S-VIDEO L AUDIO R S-VIDEO IN YPbPr1 IN Y Pb Pr AUDIO AUDIO ...
User Manual
Page 31
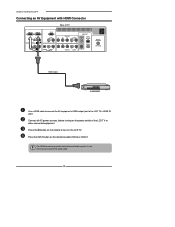
... audio cable to connect the AV equipment's audio output jacks to select VIDEO6 or VIDEO7. Press the button on the remote to turn on the power switch of TV Chapter 2 Installing the LCD TV HDMI1 IN HDMI2 IN AUDIO L R VGA IN AUDIO L R VIDEO L R AUDIO VIDEO2 IN S-VIDEO L AUDIO R S-VIDEO IN YPbPr1...
... audio cable to connect the AV equipment's audio output jacks to select VIDEO6 or VIDEO7. Press the button on the remote to turn on the power switch of TV Chapter 2 Installing the LCD TV HDMI1 IN HDMI2 IN AUDIO L R VGA IN AUDIO L R VIDEO L R AUDIO VIDEO2 IN S-VIDEO L AUDIO R S-VIDEO IN YPbPr1...
User Manual
Page 32
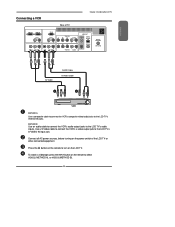
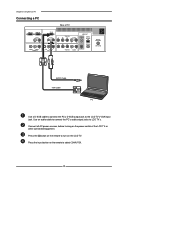
... cable to connect the PC's audio output jacks to select COMPUTER. 30 Press the Input button on the LCD TV. Connect all AC power sources, before turning on the power switch of TV HDMI1 IN HDMI2 IN AUDIO L R VGA IN AUDIO L R VIDEO L R AUDIO VIDEO2 IN S-VIDEO L AUDIO R S-VIDEO IN YPbPr1 IN Y Pb...
... cable to connect the PC's audio output jacks to select COMPUTER. 30 Press the Input button on the LCD TV. Connect all AC power sources, before turning on the power switch of TV HDMI1 IN HDMI2 IN AUDIO L R VGA IN AUDIO L R VIDEO L R AUDIO VIDEO2 IN S-VIDEO L AUDIO R S-VIDEO IN YPbPr1 IN Y Pb...
User Manual
Page 33
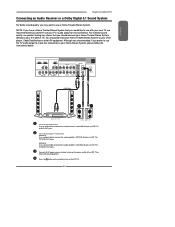
... Receiver or a Dolby Digital 5.1 Sound System For better sound quality, you may want to LCD TV's AUDIO OUT jacks. I.E. Connect all AC power sources, before turning on the power switch of the LCD TV or other AV equipment. METHOD B: Use a coaxial cable to connect the audio amplifier's COAXIAL IN jacks...
... Receiver or a Dolby Digital 5.1 Sound System For better sound quality, you may want to LCD TV's AUDIO OUT jacks. I.E. Connect all AC power sources, before turning on the power switch of the LCD TV or other AV equipment. METHOD B: Use a coaxial cable to connect the audio amplifier's COAXIAL IN jacks...


