
User Manual
Page 2
.... For service, support and warranty information, visit www.polaroid.com. This TV incorporates High-Definition Multimedia Interface (HDMITM) technology. "Dolby" and the double-D symbol are responsible for your country listed in subsequent editions. All rights reserved. Changes are periodically made to properly dispose of as unsorted waste and must be corrected in the instruction manual. As...
.... For service, support and warranty information, visit www.polaroid.com. This TV incorporates High-Definition Multimedia Interface (HDMITM) technology. "Dolby" and the double-D symbol are responsible for your country listed in subsequent editions. All rights reserved. Changes are periodically made to properly dispose of as unsorted waste and must be corrected in the instruction manual. As...
User Manual
Page 4
... the installation, use, servicing and maintenance of the serial/model plate. ▪ Never overload wall outlets and extensions. 2 This equipment and recommended cart or stand should be done. CAUTION This symbol is an important feature. The equipment may fall, causing serious injury to children or adults and serious damage to overturn. ▪ Do not disable the 3-wire grounding type plug...
... the installation, use, servicing and maintenance of the serial/model plate. ▪ Never overload wall outlets and extensions. 2 This equipment and recommended cart or stand should be done. CAUTION This symbol is an important feature. The equipment may fall, causing serious injury to children or adults and serious damage to overturn. ▪ Do not disable the 3-wire grounding type plug...
User Manual
Page 6
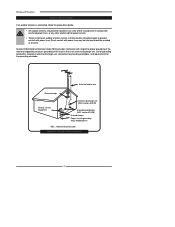
...-20) Ground clamps Power service grounding (NEC Art250 part H) NEC : National Electrical code EXAMPLE OF OUTDOOR ANTENNA GROUNDING 4 Direct contact with power lines may be fatal and should be avoided at all costs. Warnings and Precautions Outdoor Antenna Safety Instructions If an outdoor antenna is connected, follow the precautions below: ▪ An outdoor antenna should not be located in any area where...
...-20) Ground clamps Power service grounding (NEC Art250 part H) NEC : National Electrical code EXAMPLE OF OUTDOOR ANTENNA GROUNDING 4 Direct contact with power lines may be fatal and should be avoided at all costs. Warnings and Precautions Outdoor Antenna Safety Instructions If an outdoor antenna is connected, follow the precautions below: ▪ An outdoor antenna should not be located in any area where...
User Manual
Page 7
... Antenna 18 Connecting a VCR ...23 Connecting a Video Camera or Game Console 24 Connecting a DVD Player 26 Connecting a Digital TV Cable Box or Digital Satellite Receiver 27 Connecting an AV Equipment with HDMI Connector 28 Connecting an AV Equipment with DVI Connector 29 Connecting a PC...30 Connecting an Audio Receiver or a Dolby Digital 5.1 Sound System 31 Chapter 3 USING THE FEATURES Using The Built-in DVD...32 Using The USB Storage and SD Card Reader 34 Wide Screen Viewing...37 Using the Program Guide...38 Operating...
... Antenna 18 Connecting a VCR ...23 Connecting a Video Camera or Game Console 24 Connecting a DVD Player 26 Connecting a Digital TV Cable Box or Digital Satellite Receiver 27 Connecting an AV Equipment with HDMI Connector 28 Connecting an AV Equipment with DVI Connector 29 Connecting a PC...30 Connecting an Audio Receiver or a Dolby Digital 5.1 Sound System 31 Chapter 3 USING THE FEATURES Using The Built-in DVD...32 Using The USB Storage and SD Card Reader 34 Wide Screen Viewing...37 Using the Program Guide...38 Operating...
User Manual
Page 8
... and confusion of multiple cables used to connect current A/V systems. HDTV Component Video Inputs ▪ Offers the best video quality for external equipment connection ▪ 2 sets of composite A/V input terminals ▪ 1 set of S-VIDEO terminals ▪ 2 sets of component Video input terminals ▪ 1 VGA/ Audio input terminals ▪ 2 HDMI/Audio input terminals ▪ 1 set -top-box (1080i, 720p) connections. 3D Digital Noise Reduction ▪ This function can digitally reduce image noise to provide better picture quality. Film-Mode Detection (3:2 Reverse Pull...
... and confusion of multiple cables used to connect current A/V systems. HDTV Component Video Inputs ▪ Offers the best video quality for external equipment connection ▪ 2 sets of composite A/V input terminals ▪ 1 set of S-VIDEO terminals ▪ 2 sets of component Video input terminals ▪ 1 VGA/ Audio input terminals ▪ 2 HDMI/Audio input terminals ▪ 1 set -top-box (1080i, 720p) connections. 3D Digital Noise Reduction ▪ This function can digitally reduce image noise to provide better picture quality. Film-Mode Detection (3:2 Reverse Pull...
User Manual
Page 9
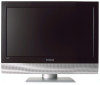
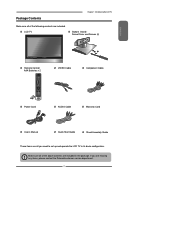
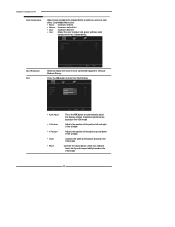
Make sure all you are included. LCD TV Bottom Stand / Screw Driver and Screws (4) ENGLISH Remote Control/ AAA Batteries x 2 SET UP TV CAB/ SAT DVD AUX SLEEP DVD MENU VOL CH PAGE MUTE ASPECT LAST GUIDE LIVE TV PIP MENU OK INFO CC EXIT DVR 1 2 3 ABC DEF 4 5 6 GHI JKL MNO 7 8 9 PQRS TUV WXYZ INPUT . 0 ENTER Power Cord VIDEO Cable Component Cable AUDIO Cable Warranty Card User's Manual Quick Start Guide Stand Assembly Guide These items are included in its basic configuration...
Make sure all you are included. LCD TV Bottom Stand / Screw Driver and Screws (4) ENGLISH Remote Control/ AAA Batteries x 2 SET UP TV CAB/ SAT DVD AUX SLEEP DVD MENU VOL CH PAGE MUTE ASPECT LAST GUIDE LIVE TV PIP MENU OK INFO CC EXIT DVR 1 2 3 ABC DEF 4 5 6 GHI JKL MNO 7 8 9 PQRS TUV WXYZ INPUT . 0 ENTER Power Cord VIDEO Cable Component Cable AUDIO Cable Warranty Card User's Manual Quick Start Guide Stand Assembly Guide These items are included in its basic configuration...
User Manual
Page 15
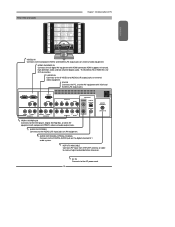
... television. S-VIDEO IN Connects to the DVD player, Digital Set-Top-Box, or other AV equipment with HDMI connector.HDMI supports enhanced, high-definition video and two-channel digital audio. HDMI1 IN/HDMI2 IN Connects the all digital AV equipment with VGA and AUDIO(L/R) output jacks. The AUDIO(L/R) of HDMI IN is for DVI connection. HDTV/TV AIR/CABLE VHF/UHF IN HDTV/TV AIR/CABLE Connects RF input from VHF/UHF antenna or cable to the AC power cord...
... television. S-VIDEO IN Connects to the DVD player, Digital Set-Top-Box, or other AV equipment with HDMI connector.HDMI supports enhanced, high-definition video and two-channel digital audio. HDMI1 IN/HDMI2 IN Connects the all digital AV equipment with VGA and AUDIO(L/R) output jacks. The AUDIO(L/R) of HDMI IN is for DVI connection. HDTV/TV AIR/CABLE VHF/UHF IN HDTV/TV AIR/CABLE Connects RF input from VHF/UHF antenna or cable to the AC power cord...
User Manual
Page 16
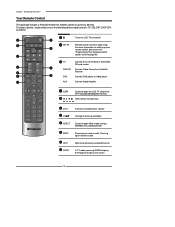
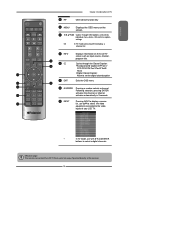
... a Polaroid remote that enables control of the following device mode controls: TV, CBL/SAT, DVD/VCR, or AUDIO. 2 SET UP 1 3 TV CAB/ SAT DVD AUX SLEEP 4 DVD MENU 5 6 VOL CH PAGE 7 8 9 MUTE ASPECT LAST 10 LIVE TV GUIDE PIP MENU 11 1 Turns the LCD TV on and off 2 SET UP Remote control universal code setup. For more information on the screen 14 To select a device, simply select one of up to previously selected channel 11 GUIDE...
... a Polaroid remote that enables control of the following device mode controls: TV, CBL/SAT, DVD/VCR, or AUDIO. 2 SET UP 1 3 TV CAB/ SAT DVD AUX SLEEP 4 DVD MENU 5 6 VOL CH PAGE 7 8 9 MUTE ASPECT LAST 10 LIVE TV GUIDE PIP MENU 11 1 Turns the LCD TV on and off 2 SET UP Remote control universal code setup. For more information on the screen 14 To select a device, simply select one of up to previously selected channel 11 GUIDE...
User Manual
Page 17
... TV mode, use with 0-9 and ENTER buttons to 5m away, if pointed directly at the receiver. 15 Effective range: The remote can control the LCD TV from up to select a digital channels. ENGLISH Chapter 2 Installing the LCD TV SET UP TV CAB/ SAT DVD AUX SLEEP DVD MENU 12 PIP Other device function key 13 MENU Displays the OSD menu on the LCD TV screen such as input source, channel, MUTE ASPECT LAST 12 program title. GUIDE...
... TV mode, use with 0-9 and ENTER buttons to 5m away, if pointed directly at the receiver. 15 Effective range: The remote can control the LCD TV from up to select a digital channels. ENGLISH Chapter 2 Installing the LCD TV SET UP TV CAB/ SAT DVD AUX SLEEP DVD MENU 12 PIP Other device function key 13 MENU Displays the OSD menu on the LCD TV screen such as input source, channel, MUTE ASPECT LAST 12 program title. GUIDE...

User Manual
Page 22
... using the converter channel keys. 20 Since the signals of these premium pay channels. If this TV for normal viewing of scrambled channels. (Set your cable TV company is shown in the diagram below. RF switch (not included) A OUT IN B 2 set for the use of all unscrambled channels by the cable TV company. This converter/descrambler is required to the set, connect the 75ohm cable into the set signal...
... using the converter channel keys. 20 Since the signals of these premium pay channels. If this TV for normal viewing of scrambled channels. (Set your cable TV company is shown in the diagram below. RF switch (not included) A OUT IN B 2 set for the use of all unscrambled channels by the cable TV company. This converter/descrambler is required to the set, connect the 75ohm cable into the set signal...
User Manual
Page 24
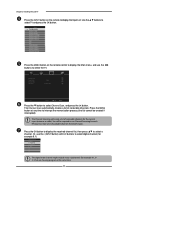
... a list of receivable channels. Channel Scan Tuner Mode Channel Skip Time Zone Cable Eastern Time TV Select Exit Press the ▼ button to select a channel. Or, use the ◄► buttons to select the TV. Main TV(CABLE/AIR) VIDEO1 (SIDE) VIDEO2 (REAR) VIDEO3 (S-VIDEO) VIDEO4 (YPbPr1) VIDEO5 (YPbPr2) DVD USB CARD READER VIDEO6 (HDMI1) VIDEO7 (HDMI2) COMPUTER(VGA) Press the MENU button on the remote to display the Input List. Chapter 2 Installing the LCD TV Press the INPUT button...
... a list of receivable channels. Channel Scan Tuner Mode Channel Skip Time Zone Cable Eastern Time TV Select Exit Press the ▼ button to select a channel. Or, use the ◄► buttons to select the TV. Main TV(CABLE/AIR) VIDEO1 (SIDE) VIDEO2 (REAR) VIDEO3 (S-VIDEO) VIDEO4 (YPbPr1) VIDEO5 (YPbPr2) DVD USB CARD READER VIDEO6 (HDMI1) VIDEO7 (HDMI2) COMPUTER(VGA) Press the MENU button on the remote to display the Input List. Chapter 2 Installing the LCD TV Press the INPUT button...
User Manual
Page 25
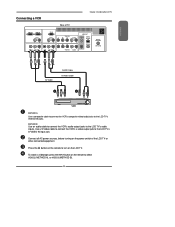
... remote to turn on the LCD TV. Press the button on the power switch of TV Chapter 2 Installing the LCD TV HDMI1 IN HDMI2 IN AUDIO L R VGA IN AUDIO L R VIDEO L R AUDIO VIDEO2 IN S-VIDEO L AUDIO R S-VIDEO IN YPbPr1 IN Y Pb Pr AUDIO AUDIO OUT STEREO DIGITAL OPTICAL L R Y Pb Pr L COAXIAL L R R YPbPr2 IN AUDIO HDTV/TV AIR/CABLE VHF/UHF IN AV Cable AUDIO Cable S-VIDEO Cable A B METHOD A: Use a composite cable to connect the VCR's composite video/audio jacks to the LCD TV's S-VIDEO IN input...
... remote to turn on the LCD TV. Press the button on the power switch of TV Chapter 2 Installing the LCD TV HDMI1 IN HDMI2 IN AUDIO L R VGA IN AUDIO L R VIDEO L R AUDIO VIDEO2 IN S-VIDEO L AUDIO R S-VIDEO IN YPbPr1 IN Y Pb Pr AUDIO AUDIO OUT STEREO DIGITAL OPTICAL L R Y Pb Pr L COAXIAL L R R YPbPr2 IN AUDIO HDTV/TV AIR/CABLE VHF/UHF IN AV Cable AUDIO Cable S-VIDEO Cable A B METHOD A: Use a composite cable to connect the VCR's composite video/audio jacks to the LCD TV's S-VIDEO IN input...
User Manual
Page 26
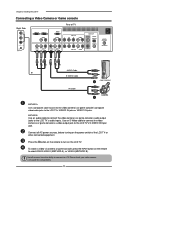
... game console, press the INPUT button on the LCD TV. Use an S-Video cable to connect the video camera's or game console's s-video output jack to the LCD TV's VIDEO2 IN jacks or VIDEO1 IN jacks. Press the button on the remote to turn on the remote to select VIDEO2/VIDEO1( METHOD A), or VIDEO3 (METHOD B). Please check your video camera user guide for compatibility. 24 Not all AC power sources, before turning on the power switch...
... game console, press the INPUT button on the LCD TV. Use an S-Video cable to connect the video camera's or game console's s-video output jack to the LCD TV's VIDEO2 IN jacks or VIDEO1 IN jacks. Press the button on the remote to turn on the remote to select VIDEO2/VIDEO1( METHOD A), or VIDEO3 (METHOD B). Please check your video camera user guide for compatibility. 24 Not all AC power sources, before turning on the power switch...
User Manual
Page 31
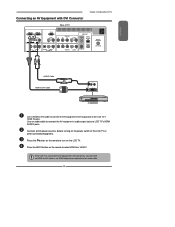
..., you will need an HDMI-to LCD TV's HDMI AUDIO jacks. Use an audio cable to connect the AV equipment's audio output jacks to -DVI cable or an HDMI adapter(not suplied) and an audio cable. 29 ENGLISH Connecting an AV Equipment with DVI Connector Rear of the LCD TV or other connected equipment. Press the INPUT button on the LCD TV. Connect all AC power sources, before turning on the power switch of TV Chapter 2 Installing the LCD TV HDMI1...
..., you will need an HDMI-to LCD TV's HDMI AUDIO jacks. Use an audio cable to connect the AV equipment's audio output jacks to -DVI cable or an HDMI adapter(not suplied) and an audio cable. 29 ENGLISH Connecting an AV Equipment with DVI Connector Rear of the LCD TV or other connected equipment. Press the INPUT button on the LCD TV. Connect all AC power sources, before turning on the power switch of TV Chapter 2 Installing the LCD TV HDMI1...
User Manual
Page 32
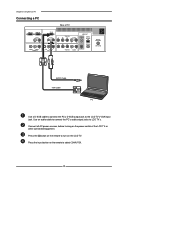
Use an audio cable to connect the PC's audio output jacks to turn on the remote to LCD TV's. Press the button on the LCD TV. Press the Input button on the power switch of TV HDMI1 IN HDMI2 IN AUDIO L R VGA IN AUDIO L R VIDEO L R AUDIO VIDEO2 IN S-VIDEO L AUDIO R S-VIDEO IN YPbPr1 IN Y Pb Pr AUDIO AUDIO OUT STEREO DIGITAL OPTICAL L R Y Pb Pr L COAXIAL L R R YPbPr2 IN AUDIO HDTV/TV AIR/CABLE VHF/UHF IN AUDIO Cable VGA Cable PC Use a D-SUB cable to connect the...
Use an audio cable to connect the PC's audio output jacks to turn on the remote to LCD TV's. Press the button on the LCD TV. Press the Input button on the power switch of TV HDMI1 IN HDMI2 IN AUDIO L R VGA IN AUDIO L R VIDEO L R AUDIO VIDEO2 IN S-VIDEO L AUDIO R S-VIDEO IN YPbPr1 IN Y Pb Pr AUDIO AUDIO OUT STEREO DIGITAL OPTICAL L R Y Pb Pr L COAXIAL L R R YPbPr2 IN AUDIO HDTV/TV AIR/CABLE VHF/UHF IN AUDIO Cable VGA Cable PC Use a D-SUB cable to connect the...
User Manual
Page 40
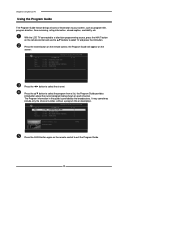
With the LCD TV connected to a television programming source, press the INPUT button on the remote control to select TV and press the OK button. It may sometimes include only the channel number, without a program title or...GUIDE button on the remote control, the Program Guide will appear on each channel. Chapter 3 Using the LCD TV Using the Program Guide The Program Guide feature brings all sorts of information to select the channel. Press the ▲▼ button to select the program from a list, the Program Guide provides introduction about the current program being shown on the screen...
With the LCD TV connected to a television programming source, press the INPUT button on the remote control to select TV and press the OK button. It may sometimes include only the channel number, without a program title or...GUIDE button on the remote control, the Program Guide will appear on each channel. Chapter 3 Using the LCD TV Using the Program Guide The Program Guide feature brings all sorts of information to select the channel. Press the ▲▼ button to select the program from a list, the Program Guide provides introduction about the current program being shown on the screen...
User Manual
Page 42
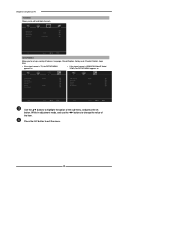
... LCD TV TV MENU: Allows you to set up a variety of features: Language, Closed Caption, factory reset, Parental Control, sleep timer. ▪ If the signal source is TV, the SETUP MENU appears as: ▪ If the signal source is HDMI/VGA/Video/S-Video/ YPbPr, the SETUP MENU appears as: OSD Language Time Setup Closed Caption Parental Gamma Reset Default English Middle OSD Language Time Setup Parental Gamma Reset Default English Middle Setup Select Exit Setup Select Exit Use the ▲▼ buttons to exit the menu. 40 Channel Scan Tuner Mode Channel Skip Time Zone Cable...
... LCD TV TV MENU: Allows you to set up a variety of features: Language, Closed Caption, factory reset, Parental Control, sleep timer. ▪ If the signal source is TV, the SETUP MENU appears as: ▪ If the signal source is HDMI/VGA/Video/S-Video/ YPbPr, the SETUP MENU appears as: OSD Language Time Setup Closed Caption Parental Gamma Reset Default English Middle OSD Language Time Setup Parental Gamma Reset Default English Middle Setup Select Exit Setup Select Exit Use the ▲▼ buttons to exit the menu. 40 Channel Scan Tuner Mode Channel Skip Time Zone Cable...
User Manual
Page 44
... performance based on the VGA mode 42 Position ▪ Clock ▪ Phase Select Exit Press the OK button to automatically adjust the display settings to enter the VGA Setting: Auto Adjust H.Position 72 V. Position ▪ V. Color Temperature User R Gain 120 G Gain 120 B Gain 120 Noise Reduction VGA Color Temperature Select Exit Select to adjust red, green and blue color component levels independently. Chapter 3 Using the LCD TV Color temperature Adjusts color components independently...
... performance based on the VGA mode 42 Position ▪ Clock ▪ Phase Select Exit Press the OK button to automatically adjust the display settings to enter the VGA Setting: Auto Adjust H.Position 72 V. Position ▪ V. Color Temperature User R Gain 120 G Gain 120 B Gain 120 Noise Reduction VGA Color Temperature Select Exit Select to adjust red, green and blue color component levels independently. Chapter 3 Using the LCD TV Color temperature Adjusts color components independently...
User Manual
Page 47
... are receiving TV channels with a CATV (cable TV) Allows addition/removal of receivable channels. Channel Scan Tuner Mode Channel Skip Time Zone Cable Eastern Time TV Select Exit The TV menu includes the following options: Channel Scan Tuner Mode Channel Skip Press the OK button, the Channel Scanning automatically creates a list of channels on the channel list. Press the MENU button on . Use the ▲▼buttons to turn the LCD TV on the remote control to display the Main menu, and use the ◄► buttons changes the setting, and...
... are receiving TV channels with a CATV (cable TV) Allows addition/removal of receivable channels. Channel Scan Tuner Mode Channel Skip Time Zone Cable Eastern Time TV Select Exit The TV menu includes the following options: Channel Scan Tuner Mode Channel Skip Press the OK button, the Channel Scanning automatically creates a list of channels on the channel list. Press the MENU button on . Use the ▲▼buttons to turn the LCD TV on the remote control to display the Main menu, and use the ◄► buttons changes the setting, and...
User Manual
Page 60
... a device. Unlocking All Volume Control (Restoring Global Unlock) Press and hold SET UP until the red LED blinks twice; The LED blinks four times. Enter 9-9-3 and then press VOL-. LED blinks when you press a key. Try entry sequence again. Remote does not control devices or commands are not working properly. Make sure the device operates with new AAA size battery. No volume on this remote after entering the channel number. 58 then...
... a device. Unlocking All Volume Control (Restoring Global Unlock) Press and hold SET UP until the red LED blinks twice; The LED blinks four times. Enter 9-9-3 and then press VOL-. LED blinks when you press a key. Try entry sequence again. Remote does not control devices or commands are not working properly. Make sure the device operates with new AAA size battery. No volume on this remote after entering the channel number. 58 then...


