User Manual
Page 3
... interference to radio or television reception, which is different from what the receiver is connected to. 4. This equipment generates, uses and can be determined by turning the equipment off and on, the user is no guarantee that interference will not occur in a particular installation. Reorient/Relocate the receiving antenna. 2. Consult the...
... interference to radio or television reception, which is different from what the receiver is connected to. 4. This equipment generates, uses and can be determined by turning the equipment off and on, the user is no guarantee that interference will not occur in a particular installation. Reorient/Relocate the receiving antenna. 2. Consult the...
User Manual
Page 13
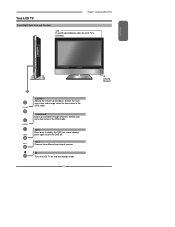
CHANNEL▲▼ Scans up and down through channels. Turns the LCD TV on screen display), press again to turn the OSD off. Your LCD TV Chapter 1 Introducing the LCD TV Front/Right Side View and Controls LED The LED light indicates when the LCD TV is activated. Selects the mainmenu item and change values for items when in the OSD mode. INPUT Chooses from different input signal sources. ENGLISH VOLUME+Adjusts the volume up and down . Selects submenu item when in the OSD mode. MENU Press once to display the OSD (on and into standby mode. 11 IR Infrared Receiver
CHANNEL▲▼ Scans up and down through channels. Turns the LCD TV on screen display), press again to turn the OSD off. Your LCD TV Chapter 1 Introducing the LCD TV Front/Right Side View and Controls LED The LED light indicates when the LCD TV is activated. Selects the mainmenu item and change values for items when in the OSD mode. INPUT Chooses from different input signal sources. ENGLISH VOLUME+Adjusts the volume up and down . Selects submenu item when in the OSD mode. MENU Press once to display the OSD (on and into standby mode. 11 IR Infrared Receiver
User Manual
Page 16
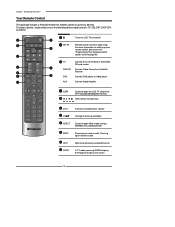
... GUIDE In TV mode, pressing GUIDE displays the Program Guide on the screen 14 Chapter 1 Introducing the LCD TV Your Remote Control This package includes a Polaroid remote that enables control of the following device mode controls: TV, CBL/SAT, DVD/VCR, or AUDIO. 2 SET UP 1 3 TV CAB/ SAT DVD... AUX SLEEP 4 DVD MENU 5 6 VOL CH PAGE 7 8 9 MUTE ASPECT LAST 10 LIVE TV GUIDE PIP MENU 11 1 Turns the LCD TV on setting up your remote control, please see the "Programming Your Remote Control" section (refer to page 56) 3 TV CAB/SAT DVD...
... GUIDE In TV mode, pressing GUIDE displays the Program Guide on the screen 14 Chapter 1 Introducing the LCD TV Your Remote Control This package includes a Polaroid remote that enables control of the following device mode controls: TV, CBL/SAT, DVD/VCR, or AUDIO. 2 SET UP 1 3 TV CAB/ SAT DVD... AUX SLEEP 4 DVD MENU 5 6 VOL CH PAGE 7 8 9 MUTE ASPECT LAST 10 LIVE TV GUIDE PIP MENU 11 1 Turns the LCD TV on setting up your remote control, please see the "Programming Your Remote Control" section (refer to page 56) 3 TV CAB/SAT DVD...
User Manual
Page 23
... voltage, please remove the power plug from the main voltage. Chapter 2 Installing the LCD TV Use a supplied antenna cable to connect the TV signal to turn on the LCD TV. HDTV/TV AIR/CABLE VHF/UHF IN This TV is only used for a 4A 250V - 5x20mm Time Lag Fuse (Slow Blow...
... voltage, please remove the power plug from the main voltage. Chapter 2 Installing the LCD TV Use a supplied antenna cable to connect the TV signal to turn on the LCD TV. HDTV/TV AIR/CABLE VHF/UHF IN This TV is only used for a 4A 250V - 5x20mm Time Lag Fuse (Slow Blow...
User Manual
Page 25
Press the button on the remote to the LCD TV's VIDEO2 IN jacks. Connect all AC power sources, before turning on the power switch of TV Chapter 2 Installing the LCD TV HDMI1 IN HDMI2 IN AUDIO L R VGA IN AUDIO L R VIDEO L R AUDIO VIDEO2 IN S-VIDEO L AUDIO R S-.../TV AIR/CABLE VHF/UHF IN AV Cable AUDIO Cable S-VIDEO Cable A B METHOD A: Use a composite cable to connect the VCR's composite video/audio jacks to turn on the remote to the LCD TV's S-VIDEO IN input jack. ENGLISH Connecting a VCR Rear of the LCD TV or other connected equipment. To watch...
Press the button on the remote to the LCD TV's VIDEO2 IN jacks. Connect all AC power sources, before turning on the power switch of TV Chapter 2 Installing the LCD TV HDMI1 IN HDMI2 IN AUDIO L R VGA IN AUDIO L R VIDEO L R AUDIO VIDEO2 IN S-VIDEO L AUDIO R S-.../TV AIR/CABLE VHF/UHF IN AV Cable AUDIO Cable S-VIDEO Cable A B METHOD A: Use a composite cable to connect the VCR's composite video/audio jacks to turn on the remote to the LCD TV's S-VIDEO IN input jack. ENGLISH Connecting a VCR Rear of the LCD TV or other connected equipment. To watch...
User Manual
Page 26
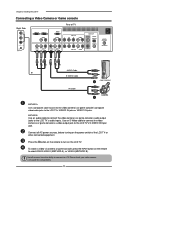
... the button on the remote to the LCD TV's VIDEO2 IN jacks or VIDEO1 IN jacks. Connect all cameras have the ability to connect to turn on the power switch of TV HDMI1 IN HDMI2 IN AUDIO L R VGA IN AUDIO L R VIDEO L R AUDIO VIDEO2 IN S-VIDEO L AUDIO R S-VIDEO IN YPbPr1 IN Y Pb... connect the video camera's or game console's composite video/audio jacks to select VIDEO2/VIDEO1( METHOD A), or VIDEO3 (METHOD B). Not all AC power sources, before turning on the LCD TV.
... the button on the remote to the LCD TV's VIDEO2 IN jacks or VIDEO1 IN jacks. Connect all cameras have the ability to connect to turn on the power switch of TV HDMI1 IN HDMI2 IN AUDIO L R VGA IN AUDIO L R VIDEO L R AUDIO VIDEO2 IN S-VIDEO L AUDIO R S-VIDEO IN YPbPr1 IN Y Pb... connect the video camera's or game console's composite video/audio jacks to select VIDEO2/VIDEO1( METHOD A), or VIDEO3 (METHOD B). Not all AC power sources, before turning on the LCD TV.
User Manual
Page 28
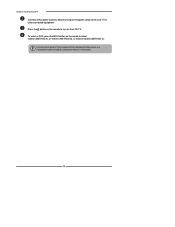
Chapter 2 Installing the LCD TV Connect all AC power sources, before turning on the power switch of a composite video or S-video cable. 26 Press the button on the LCD TV. For best picture quality, if your equipment has component video output, use a component cable instead of the LCD TV or other connected equipment. To watch a DVD, press the INPUT button on the remote to turn on the remote to select VIDEO2( METHOD A), or VIDEO3 ( METHOD B), or VIDEO4/VIDEO5 (METHOD C).
Chapter 2 Installing the LCD TV Connect all AC power sources, before turning on the power switch of a composite video or S-video cable. 26 Press the button on the LCD TV. For best picture quality, if your equipment has component video output, use a component cable instead of the LCD TV or other connected equipment. To watch a DVD, press the INPUT button on the remote to turn on the remote to select VIDEO2( METHOD A), or VIDEO3 ( METHOD B), or VIDEO4/VIDEO5 (METHOD C).
User Manual
Page 29
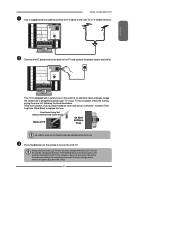
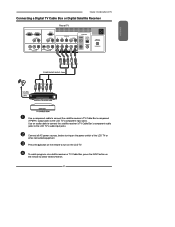
... the LCD TV or other connected equipment. To watch programs via satellite receiver or TV Cable Box, press the INPUT button on the remote to turn on the power switch of TV HDMI1 IN HDMI2 IN AUDIO L R VGA IN AUDIO L R L R VIDEO AUDIO VIDEO2 IN S-VIDEO L AUDIO R S-VIDEO IN YPbPr1 IN ... the satellite receiver's/TV Cable Box's component (YPbPr1) output jacks to the LCD TV's audio input jacks. Connect all AC power sources, before turning on the LCD TV. Use an audio cable to connect the satellite receiver's/TV Cable Box's component audio jacks to the LCD TV's component input...
... the LCD TV or other connected equipment. To watch programs via satellite receiver or TV Cable Box, press the INPUT button on the remote to turn on the power switch of TV HDMI1 IN HDMI2 IN AUDIO L R VGA IN AUDIO L R L R VIDEO AUDIO VIDEO2 IN S-VIDEO L AUDIO R S-VIDEO IN YPbPr1 IN ... the satellite receiver's/TV Cable Box's component (YPbPr1) output jacks to the LCD TV's audio input jacks. Connect all AC power sources, before turning on the LCD TV. Use an audio cable to connect the satellite receiver's/TV Cable Box's component audio jacks to the LCD TV's component input...
User Manual
Page 30
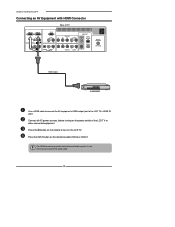
Press the INPUT button on the remote to connect the audio cable. 28 Connect all AC power sources, before turning on the power switch of TV HDMI1 IN HDMI2 IN AUDIO L R VGA IN AUDIO L R VIDEO L R AUDIO VIDEO2 IN S-VIDEO L AUDIO R S-VIDEO IN YPbPr1 IN Y Pb ... IN AUDIO HDTV/TV AIR/CABLE VHF/UHF IN HDMI Cable AV EQUIPMENT Use a HDMI cable to connect the AV equipment's HDMI output jack to turn on the LCD TV. The HDMI connector provides both video and audio signals, it's not necessary to select VIDEO6 or VIDEO7. Press the button on...
Press the INPUT button on the remote to connect the audio cable. 28 Connect all AC power sources, before turning on the power switch of TV HDMI1 IN HDMI2 IN AUDIO L R VGA IN AUDIO L R VIDEO L R AUDIO VIDEO2 IN S-VIDEO L AUDIO R S-VIDEO IN YPbPr1 IN Y Pb ... IN AUDIO HDTV/TV AIR/CABLE VHF/UHF IN HDMI Cable AV EQUIPMENT Use a HDMI cable to connect the AV equipment's HDMI output jack to turn on the LCD TV. The HDMI connector provides both video and audio signals, it's not necessary to select VIDEO6 or VIDEO7. Press the button on...
User Manual
Page 31
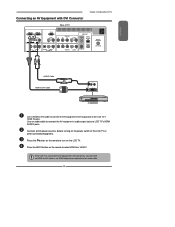
...LCD TV is connected to AV equipment's DVI connector, you will need an HDMI-to select VIDEO6 or VIDEO7. Connect all AC power sources, before turning on the LCD TV. Use an audio cable to connect the AV equipment's audio output jacks to the LCD TV's HDMI IN jacks. ENGLISH Connecting... an AV Equipment with DVI Connector Rear of the LCD TV or other connected equipment. Press the button on the remote to turn on the power switch of TV Chapter 2 Installing the LCD TV HDMI1 IN HDMI2 IN AUDIO L R VGA IN AUDIO L R VIDEO L R AUDIO VIDEO2 IN S-VIDEO L ...
...LCD TV is connected to AV equipment's DVI connector, you will need an HDMI-to select VIDEO6 or VIDEO7. Connect all AC power sources, before turning on the LCD TV. Use an audio cable to connect the AV equipment's audio output jacks to the LCD TV's HDMI IN jacks. ENGLISH Connecting... an AV Equipment with DVI Connector Rear of the LCD TV or other connected equipment. Press the button on the remote to turn on the power switch of TV Chapter 2 Installing the LCD TV HDMI1 IN HDMI2 IN AUDIO L R VGA IN AUDIO L R VIDEO L R AUDIO VIDEO2 IN S-VIDEO L ...
User Manual
Page 32
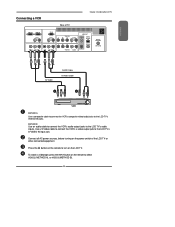
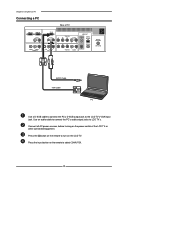
Press the Input button on the remote to turn on the LCD TV. Press the button on the power switch of TV HDMI1 IN HDMI2 IN AUDIO L R VGA IN AUDIO L R VIDEO L R AUDIO VIDEO2 IN S-... IN AUDIO Cable VGA Cable PC Use a D-SUB cable to connect the PC's D-SUB output jack to LCD TV's. Connect all AC power sources, before turning on the remote to select COMPUTER. 30 Chapter 3 Using the LCD TV Connecting a PC Rear of the LCD TV or other connected equipment. Use an...
Press the Input button on the remote to turn on the LCD TV. Press the button on the power switch of TV HDMI1 IN HDMI2 IN AUDIO L R VGA IN AUDIO L R VIDEO L R AUDIO VIDEO2 IN S-... IN AUDIO Cable VGA Cable PC Use a D-SUB cable to connect the PC's D-SUB output jack to LCD TV's. Connect all AC power sources, before turning on the remote to select COMPUTER. 30 Chapter 3 Using the LCD TV Connecting a PC Rear of the LCD TV or other connected equipment. Use an...
User Manual
Page 33
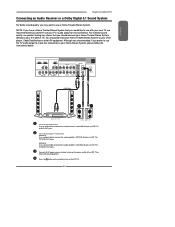
...B: Use a coaxial cable to connect the audio amplifier's COAXIAL IN jacks to LCD TV's AUDIO OUT jacks. Connect all AC power sources, before turning on the power switch of the LCD TV or other AV equipment. I.E. HDMI1 IN HDMI2 IN AUDIO L R VGA IN AUDIO L R VIDEO L R AUDIO VIDEO2...has shown that you should connect your Home Theater/Stereo System to your A/V device. You should connect your Home Theater/Stereo System directly to turn on the remote to your Home Stereo System, please follow the instructions below. Although not recommended, if you do NOT use your TV's audio...
...B: Use a coaxial cable to connect the audio amplifier's COAXIAL IN jacks to LCD TV's AUDIO OUT jacks. Connect all AC power sources, before turning on the power switch of the LCD TV or other AV equipment. I.E. HDMI1 IN HDMI2 IN AUDIO L R VGA IN AUDIO L R VIDEO L R AUDIO VIDEO2...has shown that you should connect your Home Theater/Stereo System to your A/V device. You should connect your Home Theater/Stereo System directly to turn on the remote to your Home Stereo System, please follow the instructions below. Although not recommended, if you do NOT use your TV's audio...
User Manual
Page 34
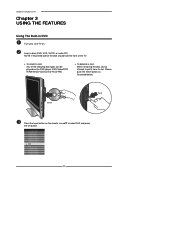
Please push the EJECT button as illustrated below. Chapter 3 Using the LCD TV Chapter 3 USING THE FEATURES Using The Built-in DVD Turn your LCD TV on the remote, use ▲▼ to pull it from its slot. NOTE: The printed side of the disk should face the ...
Please push the EJECT button as illustrated below. Chapter 3 Using the LCD TV Chapter 3 USING THE FEATURES Using The Built-in DVD Turn your LCD TV on the remote, use ▲▼ to pull it from its slot. NOTE: The printed side of the disk should face the ...
User Manual
Page 36
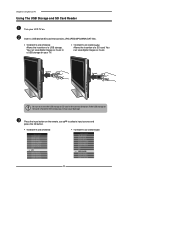
... the USB storage or SD card is forced in the correct direction. Chapter 3 Using the LCD TV Using The USB Storage and SD Card Reader Turn your TV.
... the USB storage or SD card is forced in the correct direction. Chapter 3 Using the LCD TV Using The USB Storage and SD Card Reader Turn your TV.
User Manual
Page 41
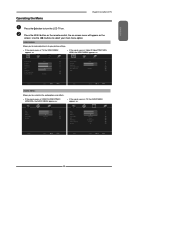
... AUDIO MENU: Allows you to make adjustments to your main menu option. ENGLISH Operating the Menu Chapter 3 Using the LCD TV Press the button to turn the LCD TV on the screen.
... AUDIO MENU: Allows you to make adjustments to your main menu option. ENGLISH Operating the Menu Chapter 3 Using the LCD TV Press the button to turn the LCD TV on the screen.

User Manual
Page 43
... setting to see crisp edges in the picture; Use the ▲▼buttons to highlight an individual VIDEO option, use the ◄► buttons to turn the LCD TV on.
... setting to see crisp edges in the picture; Use the ▲▼buttons to highlight an individual VIDEO option, use the ◄► buttons to turn the LCD TV on.
User Manual
Page 45
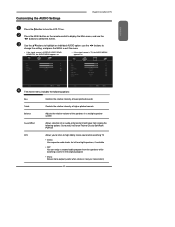
... of an audio-enhancement technique from among the following options: Surround/Live/Dance/Techno/Classic/Soft/Rock/ POP/Off MTS Allows you to listen to turn the LCD TV on. Press the MENU button on the remote control to display the Main menu, and use the ◄► buttons to change...
... of an audio-enhancement technique from among the following options: Surround/Live/Dance/Techno/Classic/Soft/Rock/ POP/Off MTS Allows you to listen to turn the LCD TV on. Press the MENU button on the remote control to display the Main menu, and use the ◄► buttons to change...
User Manual
Page 46
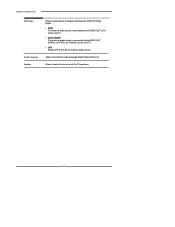
Chapter 3 Using the LCD TV SPDIF Type Audio Language Speaker Allows to selection of the digital sound format: PCM/OFF/Dolby Digital ▪ PCM: The external audio system is connected to the AUDIO OUT (L/R) of the LCD TV ▪ Dolby Digital: The external audio system is connected to the AUDIO OUT DIGITAL (OPTICAL or COAXIAL) ot the LCD TV ▪ OFF: Select OFF to turn on or off the external audio system Allows to turn off the TV speakers. 44 Allows to select to select the audio language:English/Spanish/French.
Chapter 3 Using the LCD TV SPDIF Type Audio Language Speaker Allows to selection of the digital sound format: PCM/OFF/Dolby Digital ▪ PCM: The external audio system is connected to the AUDIO OUT (L/R) of the LCD TV ▪ Dolby Digital: The external audio system is connected to the AUDIO OUT DIGITAL (OPTICAL or COAXIAL) ot the LCD TV ▪ OFF: Select OFF to turn on or off the external audio system Allows to turn off the TV speakers. 44 Allows to select to select the audio language:English/Spanish/French.
User Manual
Page 47
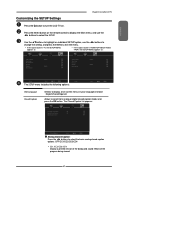
... Channel Skip menu: 2 ABC 3 DISC 4 5 6 7 8 9 10 Analog Analog Analog Analog Analog Analog Analog Analog Analog Channel Skip 45 Select Exit Press the OK button to turn the LCD TV on the channel list.
... Channel Skip menu: 2 ABC 3 DISC 4 5 6 7 8 9 10 Analog Analog Analog Analog Analog Analog Analog Analog Analog Channel Skip 45 Select Exit Press the OK button to turn the LCD TV on the channel list.
User Manual
Page 49
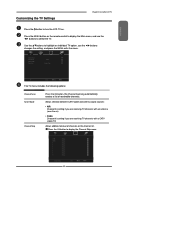
.../CC1/CC2/CC3/CC4 ▪ CC1 /CC2 /CC3 /CC4: Display a printed version of the dialog and sound effects of choice: English/French/Spanish Allows to turn the LCD TV on -screen menus in your language of the program being viewed 47
.../CC1/CC2/CC3/CC4 ▪ CC1 /CC2 /CC3 /CC4: Display a printed version of the dialog and sound effects of choice: English/French/Spanish Allows to turn the LCD TV on -screen menus in your language of the program being viewed 47


