User Manual
Page 2
... your country listed in subsequent editions. HDMI, the HDMI logo and High-Definition Multimedia Interface are trademarks of this product, please go to this document. Changes, technical inaccuracies, and typographic errors will be ...service number for ensuring that this label on the product means it should not be disposed of as unsorted waste and must be corrected in the instruction manual. All rights reserved. "Polaroid" and "Polaroid and Pixel" are periodically made to www.polaroid.com and click on the environment and human health. For service, support and warranty...
... your country listed in subsequent editions. HDMI, the HDMI logo and High-Definition Multimedia Interface are trademarks of this product, please go to this document. Changes, technical inaccuracies, and typographic errors will be ...service number for ensuring that this label on the product means it should not be disposed of as unsorted waste and must be corrected in the instruction manual. All rights reserved. "Polaroid" and "Polaroid and Pixel" are periodically made to www.polaroid.com and click on the environment and human health. For service, support and warranty...
User Manual
Page 6
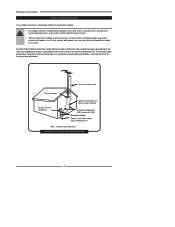
... light or power circuits. ▪ When installing an outdoor antenna system, extreme caution should be taken to prevent contact with power lines. Direct contact with respect to proper grounding of the mast and supporting structure, grounding of the lead-in wire to grounding electrodes, and requirements for the grounding electrode. Section 810 of antenna discharge unit, connection...
... light or power circuits. ▪ When installing an outdoor antenna system, extreme caution should be taken to prevent contact with power lines. Direct contact with respect to proper grounding of the mast and supporting structure, grounding of the lead-in wire to grounding electrodes, and requirements for the grounding electrode. Section 810 of antenna discharge unit, connection...
User Manual
Page 7
... 18 Connecting a VCR ...23 Connecting a Video Camera or Game Console 24 Connecting a DVD Player 26 Connecting a Digital TV Cable Box or Digital Satellite Receiver 27 Connecting an AV Equipment with HDMI Connector 28 Connecting an AV Equipment with DVI Connector 29 Connecting a PC...30 Connecting an Audio Receiver or a Dolby Digital 5.1 Sound System 31 Chapter 3 USING THE FEATURES Using The Built-in DVD 32 Using The USB Storage and SD Card Reader 34 Wide Screen Viewing 37 Using the Program Guide 38 Operating the Menu...
... 18 Connecting a VCR ...23 Connecting a Video Camera or Game Console 24 Connecting a DVD Player 26 Connecting a Digital TV Cable Box or Digital Satellite Receiver 27 Connecting an AV Equipment with HDMI Connector 28 Connecting an AV Equipment with DVI Connector 29 Connecting a PC...30 Connecting an Audio Receiver or a Dolby Digital 5.1 Sound System 31 Chapter 3 USING THE FEATURES Using The Built-in DVD 32 Using The USB Storage and SD Card Reader 34 Wide Screen Viewing 37 Using the Program Guide 38 Operating the Menu...
User Manual
Page 8
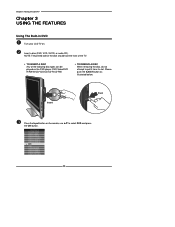
... Slot-type DVD Player ▪ Supports DVD/SVCD/VCD/CD compatibility. Film-Mode Detection (3:2 Reverse Pull Down) ▪ This function can automatically detect content derived from film and adjust the interlacer's frame matching to digital content stored on a SD card. This system eliminates the cost, complexity and confusion of multiple cables used to connect current A/V systems. HDTV Component Video Inputs ▪ Offers the best video quality...
... Slot-type DVD Player ▪ Supports DVD/SVCD/VCD/CD compatibility. Film-Mode Detection (3:2 Reverse Pull Down) ▪ This function can automatically detect content derived from film and adjust the interlacer's frame matching to digital content stored on a SD card. This system eliminates the cost, complexity and confusion of multiple cables used to connect current A/V systems. HDTV Component Video Inputs ▪ Offers the best video quality...
User Manual
Page 14
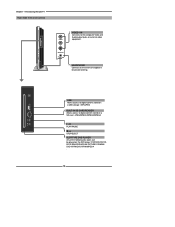
... Audio output jacks on the DVD player: DVD/VCD/CD/CDR/CD-RW/JPEG/KODAK PICTURE CD/WMA/ DVD+R/RW/DVD-R/RW/MPEG-4 . 12 Chapter 1 Introducing the LCD TV Right Side View and Controls VIDEO L R VIDEO1 IN VIDEO1 IN Connects to digital content stored on a SD card : JPEG/MPEG1/MPEG2/MPEG4 / PLAY/PAUSE / STOP/EJECT SLOT-TYPE DVD PLAYER Any of the following disc types can be played on external video equipment. HEADPHONE Connects...
... Audio output jacks on the DVD player: DVD/VCD/CD/CDR/CD-RW/JPEG/KODAK PICTURE CD/WMA/ DVD+R/RW/DVD-R/RW/MPEG-4 . 12 Chapter 1 Introducing the LCD TV Right Side View and Controls VIDEO L R VIDEO1 IN VIDEO1 IN Connects to digital content stored on a SD card : JPEG/MPEG1/MPEG2/MPEG4 / PLAY/PAUSE / STOP/EJECT SLOT-TYPE DVD PLAYER Any of the following disc types can be played on external video equipment. HEADPHONE Connects...

User Manual
Page 15
Rear View and Jacks Chapter 1 Introducing the LCD TV ENGLISH VIDEO2 IN Connects to the composite VIDEO and AUDIO(L/R) output jacks on AV equipment. The AUDIO(L/R) of HDMI IN is for DVI connection. HDTV/TV AIR/CABLE Connects RF input from VHF/UHF antenna or cable to the AC power cord. 13 HDMI1 IN/HDMI2 IN Connects the all digital AV equipment with component(YPbPr) video and audio output jacks. AC IN Connects to...
Rear View and Jacks Chapter 1 Introducing the LCD TV ENGLISH VIDEO2 IN Connects to the composite VIDEO and AUDIO(L/R) output jacks on AV equipment. The AUDIO(L/R) of HDMI IN is for DVI connection. HDTV/TV AIR/CABLE Connects RF input from VHF/UHF antenna or cable to the AC power cord. 13 HDMI1 IN/HDMI2 IN Connects the all digital AV equipment with component(YPbPr) video and audio output jacks. AC IN Connects to...
User Manual
Page 16
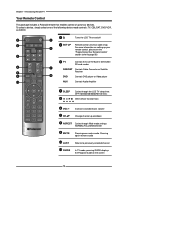
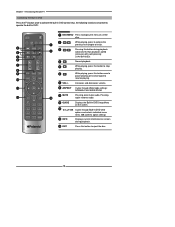
... Your Remote Control This package includes a Polaroid remote that enables control of the following device mode controls: TV, CBL/SAT, DVD/VCR, or AUDIO. 2 SET UP 1 3 TV CAB/ SAT DVD AUX SLEEP 4 DVD MENU 5 6 VOL CH PAGE 7 8 9 MUTE ASPECT LAST 10 LIVE TV GUIDE PIP MENU 11 1 Turns the LCD TV on and off 2 SET UP Remote control universal code setup. For more information on the screen 14 CAB/SAT Controls Cable Converter or Satellite Receiver DVD Controls DVD player or Video player AUX Controls Audio Ampli...
... Your Remote Control This package includes a Polaroid remote that enables control of the following device mode controls: TV, CBL/SAT, DVD/VCR, or AUDIO. 2 SET UP 1 3 TV CAB/ SAT DVD AUX SLEEP 4 DVD MENU 5 6 VOL CH PAGE 7 8 9 MUTE ASPECT LAST 10 LIVE TV GUIDE PIP MENU 11 1 Turns the LCD TV on and off 2 SET UP Remote control universal code setup. For more information on the screen 14 CAB/SAT Controls Cable Converter or Satellite Receiver DVD Controls DVD player or Video player AUX Controls Audio Ampli...
User Manual
Page 17
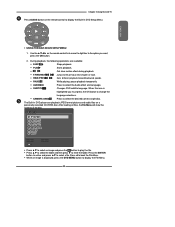
... select the video equipment connected to the video inputs of your LCD TV: Input Source TV(CABLE/AIR) VIDEO1 (SIDE) VIDEO2 (REAR) VIDEO3 (S-VIDEO) VIDEO4 (YPbPr1) VIDEO5 (YPbPr2) DVD USB CARD READER VIDEO6 (HDMI1) VIDEO7 (HDMI2) COMPUTER(VGA) In TV mode, use with 0-9 and ENTER buttons to 5m away, if pointed directly at the receiver. 15 ENGLISH SET UP TV CAB/ SAT DVD AUX SLEEP DVD MENU VOL CH PAGE MUTE GUIDE ASPECT...
... select the video equipment connected to the video inputs of your LCD TV: Input Source TV(CABLE/AIR) VIDEO1 (SIDE) VIDEO2 (REAR) VIDEO3 (S-VIDEO) VIDEO4 (YPbPr1) VIDEO5 (YPbPr2) DVD USB CARD READER VIDEO6 (HDMI1) VIDEO7 (HDMI2) COMPUTER(VGA) In TV mode, use with 0-9 and ENTER buttons to 5m away, if pointed directly at the receiver. 15 ENGLISH SET UP TV CAB/ SAT DVD AUX SLEEP DVD MENU VOL CH PAGE MUTE GUIDE ASPECT...
User Manual
Page 18
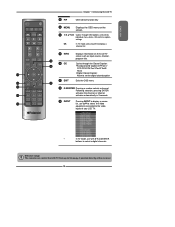
... again restores audio. 10 GUIDE Displays the Built-in DVD Setup Menu on screen during playback advances/reviews playback; speed increases with each pressing: 2x/4x/8x/16x/32x 4 Normal playback. 5 While playing, press this button to stop playing. 6 While playing, press this button to eject the disc. 16 Pressing this button during playback. 13 EXIT Press this button once to pause playing, press once again to resume playing. 7 VOL+- Increases and decreases volume. 8 ASPECT Cycles...
... again restores audio. 10 GUIDE Displays the Built-in DVD Setup Menu on screen during playback advances/reviews playback; speed increases with each pressing: 2x/4x/8x/16x/32x 4 Normal playback. 5 While playing, press this button to stop playing. 6 While playing, press this button to eject the disc. 16 Pressing this button during playback. 13 EXIT Press this button once to pause playing, press once again to resume playing. 7 VOL+- Increases and decreases volume. 8 ASPECT Cycles...
User Manual
Page 27
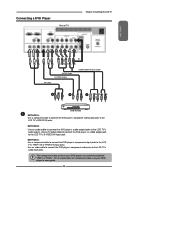
...'s audio inputs. The component video jacks on your DVD player's user guide. 25 Use an S-Video cable to connect the DVD player's s-video output jack to the LCD TV's YPbPr1 IN or YPbPr2 IN input jacks. For an explanation of TV Chapter 2 Installing the LCD TV ENGLISH Pb Pr AUDIO Cable S-VIDEO Cable AV Cable or COMPONENT/AUDIO Cable A B C Pb Pr DVD PLAYER METHOD A: Use a composite cable to connect the DVD player's composite video/audio jacks to the LCD TV's VIDEO2 IN jacks. Connecting a DVD Player Rear of component video, see your DVD player...
...'s audio inputs. The component video jacks on your DVD player's user guide. 25 Use an S-Video cable to connect the DVD player's s-video output jack to the LCD TV's YPbPr1 IN or YPbPr2 IN input jacks. For an explanation of TV Chapter 2 Installing the LCD TV ENGLISH Pb Pr AUDIO Cable S-VIDEO Cable AV Cable or COMPONENT/AUDIO Cable A B C Pb Pr DVD PLAYER METHOD A: Use a composite cable to connect the DVD player's composite video/audio jacks to the LCD TV's VIDEO2 IN jacks. Connecting a DVD Player Rear of component video, see your DVD player...
User Manual
Page 29
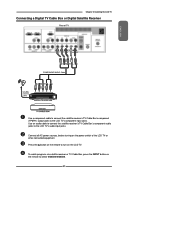
... Cable Box or Digital Satellite Receiver Rear of the LCD TV or other connected equipment. Use an audio cable to connect the satellite receiver's/TV Cable Box's component audio jacks to turn on the remote to the LCD TV's audio input jacks. Press the button on the LCD TV. Connect all AC power sources, before turning on the remote to the LCD TV's component input jacks. To watch programs via satellite receiver or TV Cable Box, press the INPUT button on the power switch...
... Cable Box or Digital Satellite Receiver Rear of the LCD TV or other connected equipment. Use an audio cable to connect the satellite receiver's/TV Cable Box's component audio jacks to turn on the remote to the LCD TV's audio input jacks. Press the button on the LCD TV. Connect all AC power sources, before turning on the remote to the LCD TV's component input jacks. To watch programs via satellite receiver or TV Cable Box, press the INPUT button on the power switch...
User Manual
Page 31
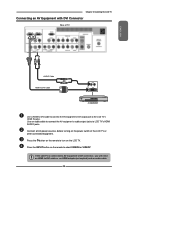
... Rear of the LCD TV or other connected equipment. Connect all AC power sources, before turning on the power switch of TV ENGLISH AUDIO Cable HDMI-to-DVI Cable AUDIO L R DVI IN AV EQUIPMENT Use a HDMI-to-DVI cable to connect the AV equipment's DVI output jack to select VIDEO6 or VIDEO7. Use an audio cable to connect the AV equipment's audio output jacks to -DVI cable or an HDMI adapter(not suplied) and an audio cable. 29 Press the INPUT button...
... Rear of the LCD TV or other connected equipment. Connect all AC power sources, before turning on the power switch of TV ENGLISH AUDIO Cable HDMI-to-DVI Cable AUDIO L R DVI IN AV EQUIPMENT Use a HDMI-to-DVI cable to connect the AV equipment's DVI output jack to select VIDEO6 or VIDEO7. Use an audio cable to connect the AV equipment's audio output jacks to -DVI cable or an HDMI adapter(not suplied) and an audio cable. 29 Press the INPUT button...
User Manual
Page 33
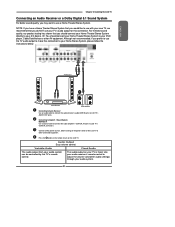
... System directly to your A/V device. Audio Output Easy volume control. Connect all AC power sources, before turning on the LCD TV. NOTE: If you have a Home Theater/Stereo System that you would like to use your TV's audio output for this connection to your Home Stereo System, please follow the instructions below. Use your audio receiver's remote control to adjust the volume (and other audio settings) through your DVD player, Cable/Satellite box or other connected equipment. For the best sound...
... System directly to your A/V device. Audio Output Easy volume control. Connect all AC power sources, before turning on the LCD TV. NOTE: If you have a Home Theater/Stereo System that you would like to use your TV's audio output for this connection to your Home Stereo System, please follow the instructions below. Use your audio receiver's remote control to adjust the volume (and other audio settings) through your DVD player, Cable/Satellite box or other connected equipment. For the best sound...
User Manual
Page 34
... Press the Input button on the DVD player: DVD-Video/DVD R/RW/SVCD/VCD/CD/CD-R/CD-RW. Input Source TV(CABLE/AIR) VIDEO1 (SIDE) VIDEO2 (REAR) VIDEO3 (S-VIDEO) VIDEO4 (YPbPr1) VIDEO5 (YPbPr2) DVD USB CARD READER VIDEO6 (HDMI1) VIDEO7 (HDMI2) COMPUTER(VGA) 32 NOTE: The printed side of the disk should face the front of the following disc types can be played on the remote, use ▲▼...
... Press the Input button on the DVD player: DVD-Video/DVD R/RW/SVCD/VCD/CD/CD-R/CD-RW. Input Source TV(CABLE/AIR) VIDEO1 (SIDE) VIDEO2 (REAR) VIDEO3 (S-VIDEO) VIDEO4 (YPbPr1) VIDEO5 (YPbPr2) DVD USB CARD READER VIDEO6 (HDMI1) VIDEO7 (HDMI2) COMPUTER(VGA) 32 NOTE: The printed side of the disk should face the front of the following disc types can be played on the remote, use ▲▼...
User Manual
Page 35
... playback, the following operations are available: EJECT Stops playback. The Built-in DVD Setup Menu: ENGLISH USING THE BUILT-IN DVD SETUP MENU 1. Use the on the remote control to to move the light bar to select the Audio effect and Language. REW./PREV. PLAY Starts playback. PAUSE While playing, pause playback temporarily AUDIO Press to the option you must press the OK button to change the language selections. CAMERA ANGLE Press to display the Built-in DVD player can playback JPEG format pictures and audio...
... playback, the following operations are available: EJECT Stops playback. The Built-in DVD Setup Menu: ENGLISH USING THE BUILT-IN DVD SETUP MENU 1. Use the on the remote control to to move the light bar to select the Audio effect and Language. REW./PREV. PLAY Starts playback. PAUSE While playing, pause playback temporarily AUDIO Press to the option you must press the OK button to change the language selections. CAMERA ANGLE Press to display the Built-in DVD player can playback JPEG format pictures and audio...
User Manual
Page 43
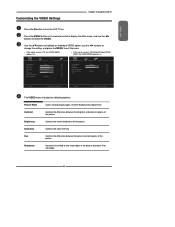
... VIDEO Settings Chapter 3 Using the LCD TV Press the button to see crisp edges in the picture; Press the MENU button on the remote control to display the Main menu, and use the ◄► buttons to change the setting, and press the MENU to exit the menu ▪ If the signal source is TV, the VIDEO MENU appears as: ▪ If the signal source is VGA/Video/S-Video/YPbPr/ HDMI, the VIDEO MENU appears as: Picture Mode User Picture Mode User...
... VIDEO Settings Chapter 3 Using the LCD TV Press the button to see crisp edges in the picture; Press the MENU button on the remote control to display the Main menu, and use the ◄► buttons to change the setting, and press the MENU to exit the menu ▪ If the signal source is TV, the VIDEO MENU appears as: ▪ If the signal source is VGA/Video/S-Video/YPbPr/ HDMI, the VIDEO MENU appears as: Picture Mode User Picture Mode User...

User Manual
Page 50
... each DTV channel Caption Style: Press OK button to customize the settings for digital closed caption option. The factory password is 0000 The Parental list appears: Program Block Allows to setup the TV and MPAA Rating Lock options (refer to change password. Use the ▼ button to select the Parental, and press the OK to select the digital closed caption option: Caption Style Font Size Font Color Font Opacity Background Color Background Opacity...
... each DTV channel Caption Style: Press OK button to customize the settings for digital closed caption option. The factory password is 0000 The Parental list appears: Program Block Allows to setup the TV and MPAA Rating Lock options (refer to change password. Use the ▼ button to select the Parental, and press the OK to select the digital closed caption option: Caption Style Font Size Font Color Font Opacity Background Color Background Opacity...

User Manual
Page 52
...display the Program Block menu. Movie Ratings Canadian English Ratings Canadian French Ratings Block MPAA Unrated NO Block TV Unrated NO Program Block Select Exit 50 Password **** Program Block Channel Block Input Block Change Password Parental Select Exit Parental Select Exit Use the ▼ button to select the Program Block, and press the OK to select the SETUP. U.S.TV Ratings U.S. OSD Language Closed Caption Parental Gamma Reset Default English Middle Setup Select Exit Use the Parental function, must enter a four-digit password. The factory password...
...display the Program Block menu. Movie Ratings Canadian English Ratings Canadian French Ratings Block MPAA Unrated NO Block TV Unrated NO Program Block Select Exit 50 Password **** Program Block Channel Block Input Block Change Password Parental Select Exit Parental Select Exit Use the ▼ button to select the Program Block, and press the OK to select the SETUP. U.S.TV Ratings U.S. OSD Language Closed Caption Parental Gamma Reset Default English Middle Setup Select Exit Use the Parental function, must enter a four-digit password. The factory password...
User Manual
Page 58
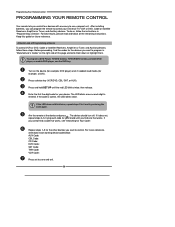
... Tuner, and Auxiliary devices, follow these steps. The device should turn off. If you cannot find a code that works. Programming Your Remote Control PROGRAMMING YOUR REMOTE CONTROL Your remote lets you control four devices with one that works, see "Searching for the other devices you want to program in "Programming a Device". After installing batteries, you can program the remote to control your brand until the red LED blinks twice; To program a DVD Player, TV/DVD Combo, TV/VCR/DVD Combo, portable DVD player, or mobile DVD player, use...
... Tuner, and Auxiliary devices, follow these steps. The device should turn off. If you cannot find a code that works. Programming Your Remote Control PROGRAMMING YOUR REMOTE CONTROL Your remote lets you control four devices with one that works, see "Searching for the other devices you want to program in "Programming a Device". After installing batteries, you can program the remote to control your brand until the red LED blinks twice; To program a DVD Player, TV/DVD Combo, TV/VCR/DVD Combo, portable DVD player, or mobile DVD player, use...
User Manual
Page 60
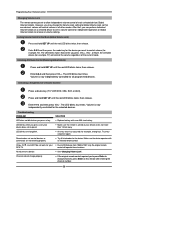
... release. Troubleshooting PROBLEM SOLUTION LED does not blink when you press VOL+, VOL-, or Mute, the selected device (for the device you press a key, but device does not respond. CH▲, CH▼, and LAST do not change the Volume Lock setting to change channels, press Enter on this remote after entering the channel number. 58 Enter 9-9-3 and then press VOL+. Replace battery with an infrared remote control. Try...
... release. Troubleshooting PROBLEM SOLUTION LED does not blink when you press VOL+, VOL-, or Mute, the selected device (for the device you press a key, but device does not respond. CH▲, CH▼, and LAST do not change the Volume Lock setting to change channels, press Enter on this remote after entering the channel number. 58 Enter 9-9-3 and then press VOL+. Replace battery with an infrared remote control. Try...


